Polkupyörän käyttöopas Bruksanvisning för cykel Bicycle ... - Helkama
Polkupyörän käyttöopas Bruksanvisning för cykel Bicycle ... - Helkama
Polkupyörän käyttöopas Bruksanvisning för cykel Bicycle ... - Helkama

Erfolgreiche ePaper selbst erstellen
Machen Sie aus Ihren PDF Publikationen ein blätterbares Flipbook mit unserer einzigartigen Google optimierten e-Paper Software.
Cantilever and caliper brakes<br />
A good braking effect and safety can be attained by making sure the brakes are in the<br />
right position in relation to the rim and that the gap is sufficiently small. Cantilever<br />
and caliper brakes have many adjustment possibilities which enable the brake pads to<br />
be adjusted in precisely the right place in relation to the rims. The gap which increases<br />
with wear between the brake pad and the rim can be adjusted by turning the adjuster<br />
screw on the handbrake levers.<br />
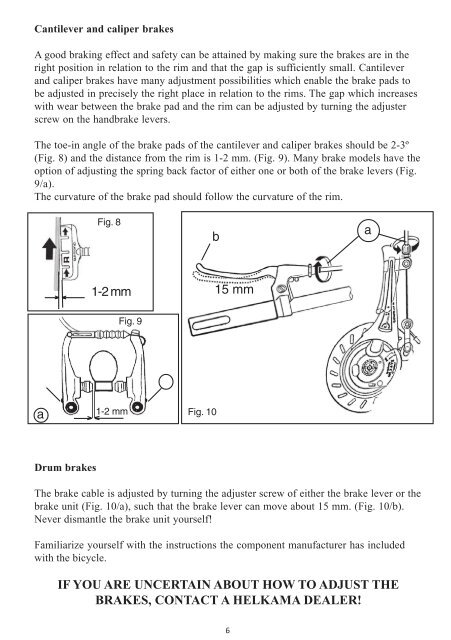
The toe-in angle of the brake pads of the cantilever and caliper brakes should be 2-3º<br />
(Fig. 8) and the distance from the rim is 1-2 mm. (Fig. 9). Many brake models have the<br />
option of adjusting the spring back factor of either one or both of the brake levers (Fig.<br />
9/a).<br />
The curvature of the brake pad should follow the curvature of the rim.<br />
Fig. 8<br />
b<br />
a<br />
1-2 mm<br />
15 mm<br />
Fig. 9<br />
a<br />
1-2 mm<br />
Fig. 10<br />
Drum brakes<br />
The brake cable is adjusted by turning the adjuster screw of either the brake lever or the<br />
brake unit (Fig. 10/a), such that the brake lever can move about 15 mm. (Fig. 10/b).<br />
Never dismantle the brake unit yourself!<br />
Familiarize yourself with the instructions the component manufacturer has included<br />
with the bicycle.<br />
IF YOU ARE UNCERTAIN ABOUT HOW TO ADJUST THE<br />
BRAKES, CONTACT A HELKAMA DEALER!<br />
6