MODEL N0: USER MANUAL - Zenec
MODEL N0: USER MANUAL - Zenec
MODEL N0: USER MANUAL - Zenec

Erfolgreiche ePaper selbst erstellen
Machen Sie aus Ihren PDF Publikationen ein blätterbares Flipbook mit unserer einzigartigen Google optimierten e-Paper Software.
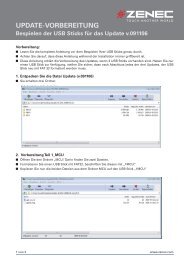
INSTALLATION AND UNINSTALLATION<br />
NOTES OF INSTALLATION<br />
1. Before installation, please make sure proper connections are conducted and the unit<br />
operates normally. lmproper connection may result in damage to the unit.<br />
2. Use only accessories designed and manufactured for this unit and other unauthorized<br />
accessories may result in damage to the unit.<br />
3. Before installation, please fasten all power cables.<br />
4. DO NOT install the unit in the place where close to hot area to prevent damage to<br />
electrical components such as the laser head.<br />
5. lnstall the unit horizontally. lnstalling the unit more than 30 degree inclined may result in<br />
worse performance.<br />
6. To prevent electric spark, connect the positive pole first and then the negative pole.<br />
7. DO NOT block the cooling fan exit to ensure sufficient heat dissipation of this unit, or it<br />
may result in damage to this unit.<br />
UNIT INSTALLATION<br />
Method A<br />
1. lnsert mounting bracket into dash board, choose appropriate mounting tab according<br />
to the gap width, bending the mounting tab outwards with a screw driver to fix the<br />
mounting bracket in place.<br />
2. Use 2 pieces of M5 x 5 cone shaped screw to fix two assemble bars on both sides of<br />
the unit (see picture 1).<br />
(Picture 1)<br />
3. Screw in 1 piece of M5 x 24 to the hole of the unit back and put on a rubber sheath over<br />
the screw (see picture 2).<br />
42