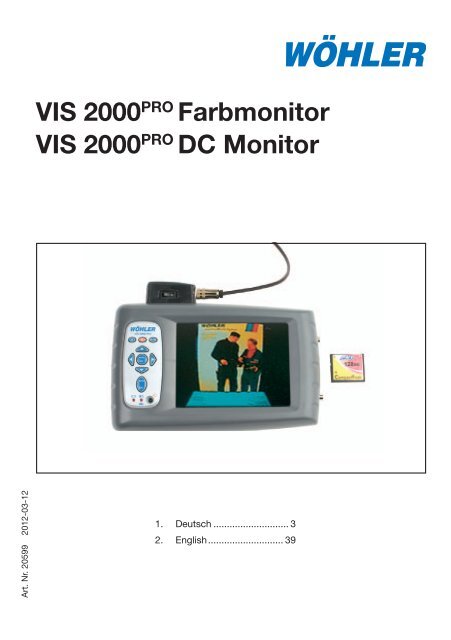
VIS 2000PRO Farbmonitor VIS 2000PRO DC Monitor - Wohler USA
VIS 2000PRO Farbmonitor VIS 2000PRO DC Monitor - Wohler USA
VIS 2000PRO Farbmonitor VIS 2000PRO DC Monitor - Wohler USA

Sie wollen auch ein ePaper? Erhöhen Sie die Reichweite Ihrer Titel.
YUMPU macht aus Druck-PDFs automatisch weboptimierte ePaper, die Google liebt.
<strong>VIS</strong> 2000 PRO <strong>Farbmonitor</strong><br />
<strong>VIS</strong> 2000 PRO <strong>DC</strong> <strong>Monitor</strong><br />
Art. Nr. 20599 2012-03-12<br />
1. Deutsch............................. 3<br />
2. English............................. 39
<strong>Farbmonitor</strong> <strong>VIS</strong> 2000 PRO<br />
Inhalt<br />
1. Spezifikation..................... 4<br />
2. Bedienung........................ 5<br />
3. Datenübertragung.......... 24<br />
4 Externe Geräte............... 26<br />
5. Wartung und Pflege........ 27<br />
7. Systemkomponenten..... 27<br />
8. Zubehör/ Ersatzteile<br />
zum <strong>Farbmonitor</strong> <strong>VIS</strong> 2000.......33<br />
9. EG-Konformitätserklärung........34<br />
10. Garantie und Service...............35<br />
11. Kurzanleitung............................36<br />
Technik nach Maß
1. Spezifikation<br />
1. Spezifikation<br />
<strong>Farbmonitor</strong> <strong>VIS</strong> 2000 PRO<br />
Das Videoinspektionssystem <strong>VIS</strong> 2000 PRO ermöglicht die optische Kontrolle und<br />
Dokumentation in Rohren und Schächten, z.B. Abgasanlagen, Lüftungsanlagen,<br />
Abwasserrohren etc. Das breite Spektrum der untereinander kompatiblen Systemkomponenten<br />
bietet die Auswahl einer individuellen und sehr gut auf die<br />
jeweilige Aufgabe abgestimmten Kamerazusammenstellung.<br />
Der hier beschriebene <strong>Farbmonitor</strong> <strong>VIS</strong> 2000 PRO ermöglicht es erstmalig, einzelne<br />
Bilder wie auch Video-Sequenzen digital über den integrierten Kartenslot auf eine<br />
CompactFlash-Speicherkarte (CF-Speicherkarte) aufzunehmen. Die gespeicherten<br />
Bilder (.jpg) und Videosequenzen (.mov) können direkt vom <strong>Monitor</strong> über die<br />
CF-Speicherkarte auf einen PC übertragen und in eine Dokumentation eingebunden<br />
werden. Peripherie-Geräte wie Camcorder, Videorecorder oder Notebook<br />
brauchen nicht mehr vor Ort mitgenommen werden.<br />
Für eine zusätzliche Dokumentation verfügt der <strong>Farbmonitor</strong> über einen Standard-Videoausgang<br />
(FBAS), über den die Aufnahmen problemlos zu entsprechenden<br />
Aufzeichnungsgeräten wie Videorecordern, Bildspeichern oder über<br />
einen Bildwandler (Best. Nr. 6233 J) zum PC übertragen werden können.<br />
Auf dem leuchtstarken Farb-TFT-Display können auch kleine Defekte in Rohren,<br />
Schächten etc. sicher erkannt werden. Eine Menüeinblendung erlaubt die Darstellung<br />
von Datum und Uhrzeit und die Anzeige der digitalen Meterzählung<br />
sowie eines Titels auf dem Display.<br />
Zum Schutz des Geräts wird der <strong>Farbmonitor</strong> in einer robusten Ledertasche ausgeliefert.<br />
Diese Schutztasche ist mit einem integrierten Schutz gegen seitlichen<br />
Lichteinfall ausgestattet und verfügt über einen Schultergurt, der ein bequemes<br />
Tragen vor dem Körper erlaubt. Bei sehr starkem Fremdlichteinfall, z.B. bei der<br />
Bedienung auf Dächern, kann die Ledertasche durch einen optional erhältlichen<br />
zusätzlichen Blendschutz ergänzt werden.<br />
Die Steuerung der Kameraköpfe erfolgt einfach und bequem über das Tastenfeld<br />
links vom Display.<br />
4 Hotline: 0 29 53 / 73 211 Fax: 0 29 53 / 73 250
2. Bedienung<br />
1.2 Technische Daten<br />
<strong>Farbmonitor</strong> <strong>VIS</strong> 2000 PRO 5<br />
Auflösung: 768 x 512 Pixel (PAL)<br />
640 x 480 Pixel (NTSC)<br />
Maße Gehäuse: 27x20x6 cm<br />
Maße TFT-Display: 6,5“<br />
CF-Speicherkarte: maximal 2 GB<br />
Video-Out:<br />
FBAS-Signal<br />
Gewicht:<br />
1.300 g<br />
Stromversorgung: 7,2 V, NiMH<br />
Standzeit:<br />
typ. 1 Stunde<br />
Arbeitstemperatur: 0 bis 40 °C<br />
Standard-Stativ-Anschluss<br />
DEUTSCH<br />
2. Bedienung<br />
2.1 Bedienelemente<br />
1<br />
7<br />
2<br />
3<br />
4<br />
5<br />
Abbildung 1: Bedienelemente<br />
10<br />
9<br />
8<br />
6<br />
1 Ein/Aus-Schalter<br />
2 Tastenfeld<br />
3 Videoeingang<br />
4 Videoausgang<br />
5 CF-Speicherkarte<br />
6 Kartenausgabe<br />
7 Anschluss für das Kamerakabel<br />
8 Stativanschluss für Kabelaufwicklung(Rückseite)<br />
9 Ladebuchse für das Netzteil<br />
10 Anschluss für externe Tastatur<br />
e-mail: mgkg@woehler.de http://mgkg.woehler.de
2. Bedienung<br />
2.2 Handhabung des Geräts<br />
<strong>Farbmonitor</strong> <strong>VIS</strong> 2000 PRO<br />
2.2.1 Inbetriebnahme<br />
Am <strong>Monitor</strong> befindet sich oberhalb des Displays eine 8-polige Kupplungs-Buchse,<br />
über die der <strong>Monitor</strong> mit dem Kabelstecker der Kabelaufwicklung oder der<br />
Kamerahaspel verbunden wird.<br />
Stecken Sie den Kabelstecker der Kabelaufwicklung oder der Haspel in die<br />
Kupplungs-Buchse des <strong>Monitor</strong>s, und drehen Sie anschließend das Gewindestück<br />
des Steckers zum Verschließen im Uhrzeigersinn.<br />
Die Kameraköpfe (Miniatur-Kameraköpfe sowie Kamerakopf <strong>VIS</strong> 2000 und <strong>VIS</strong><br />
98) verfügen ebenfalls über eine 8-polige Kupplungs-Buchse, über die der jeweilige<br />
Kamerakopf mit der Kabelaufwicklung oder mit der Haspel, die beide mit<br />
einem 8-poligen Kabelstecker ausgestattet sind, verbunden wird.<br />
Stecken Sie die Kupplungs-Buchse des Kamerakopfes auf den Kabelstecker<br />
von Kabelaufwicklung oder Haspel und drehen Sie anschließend das Gewindestück<br />
des Kabelsteckers an Kabelaufwicklung oder Haspel zum Verschließen im<br />
Uhrzeigersinn.<br />
Sie können nun den Kamerakopf, wie unten beschrieben, über den <strong>Monitor</strong> steuern.<br />
Die robuste Lederschutztasche des <strong>Monitor</strong>s dient als Transportschutz und<br />
schützt vorrangig das empfindliche TFT-Display des <strong>Farbmonitor</strong>s vor etwaigen<br />
Schäden. Vor der Inspektion klappen Sie bitte den Lederschutz auf der Frontseite<br />
des <strong>Monitor</strong>s nach oben, so dass die zwei über dem Display liegenden<br />
Lederklappen sichtbar werden. Stellen Sie diese seitlich auf und befestigen Sie<br />
sie mittels der dafür vorgesehenen Klettverschlüsse an der Unterseite des Frontlederschutzes.<br />
Auf diese Weise erhalten Sie einen Blendschutz, der das Display<br />
vor einfallendem Sonnenlicht schützt und eine optimale Bildqualität ermöglicht.<br />
An der Unterseite der Tasche lassen sich ebenfalls mit einem Klettverschuss und<br />
mit Druckknöpfen die Köcher für die Kameraköpfe anbringen, die alternativ auch<br />
am Schultergurt befestigt werden können.<br />
Mit einem 4-Punkt-Tragegurt ist der <strong>Monitor</strong> in der Schutztasche bequem vor<br />
dem Körper zu tragen, so dass die Hände während der Inspektion für andere<br />
Arbeiten frei bleiben.<br />
Falls während der Inspektion die Kabelaufwicklung mit dem dafür vorgesehenen<br />
Gurt vor dem Körper getragen werden soll, so ist der 4-Punkt-Tragegurt der <strong>Monitor</strong>tasche<br />
abzunehmen.<br />
6 Hotline: 0 29 53 / 73 211 Fax: 0 29 53 / 73 250
2.. Bedienung<br />
2.2.2 Ein-/Ausschalten<br />
<strong>Farbmonitor</strong> <strong>VIS</strong> 2000 PRO 7<br />
Der <strong>Monitor</strong> wird am Schalter auf der Oberseite eingeschaltet (siehe Abbildung<br />
1, Bedienelemente). Nach einer kurzen Verzögerung, während der sich das Gerät<br />
initialisiert, wird folgendes Menü auf dem Display eingeblendet<br />
WOEHLER<br />
(REV 1. 00F)<br />
AUTO VIDEO IN<br />
KEIN SIGNAL<br />
NTSC S VIDEO<br />
NTSC COMPOSITE<br />
PAL S VIDEO<br />
PAL COMPOSITE<br />
DEUTSCH<br />
und nach einem kurzen Moment automatisch das Kamerabild angezeigt.<br />
2.2.3 Bewegen des Kamerakopfes <strong>VIS</strong> 2000 / <strong>VIS</strong> 98<br />
Nun können Sie mit der Inspektion beginnen.<br />
Dabei wird der Kamerakopf mittels der Tastenfeld-Bedienstruktur (siehe Abbildung<br />
2) wie folgt gesteuert:<br />
Aufwärtsschwenken des Kamerakopfes<br />
Abwärtsschwenken des Kamerakopfes<br />
Drehen des Kamerakopfes nach Links<br />
Drehen des Kamerakopfes nach Rechts<br />
Soll eine Stelle im Rohr näher betrachtet werden, so können Sie dies, indem Sie<br />
den Kamerakopf über das Bedienfeld des <strong>Monitor</strong>s drehen und schwenken. Der<br />
Kamerakopf lässt sich durch Druck auf die Auf-/Ab-Pfeiltasten im Zentrum des<br />
Bedienfeldes auf und abschwenken und mit Hilfe der Links-/Rechts-Pfeiltasten<br />
drehen (Abbildung 2, Punkt 5: Pfeiltasten).<br />
e-mail: mgkg@woehler.de http://mgkg.woehler.de
2. Bedienung<br />
2.3 Tastenfeld-Bedienstruktur<br />
<strong>Farbmonitor</strong> <strong>VIS</strong> 2000 PRO<br />
Die Bedienung des <strong>Farbmonitor</strong>s <strong>VIS</strong> 2000 PRO erfolgt über das integrierte Tastenfeld<br />
auf der linken Seite der Frontseite des <strong>Monitor</strong>s und stellt sich als ausgesprochen<br />
einfach und anwenderfreundlich dar.<br />
4<br />
5d<br />
3<br />
2<br />
5a<br />
5c<br />
5b<br />
6<br />
1<br />
1 Indexbild<br />
2 Speichern (Bild oder Video-Clip)<br />
3 Standbild<br />
4 Bildeinstellungen (z.B. Helligkeit, Kontrast)<br />
und Taste zum Bestätigen einer Auswahl<br />
Pfeiltasten zur Steuerung des Kamerakopfes:<br />
5a Aufwärtsschwenken der Kameraoptik<br />
5b .Abwärtsschwenken der Kameraoptik<br />
5c Schwenken der Kameraoptik nach<br />
rechts<br />
5d .Schwenken der Kameraoptik nach links<br />
7<br />
Abbildung 2<br />
8<br />
6 Display Menü oder Menü verlassen<br />
(ESC)<br />
7 Ladezustandsanzeige<br />
8 Fernbedienung (nicht aktiv)<br />
8 Hotline: 0 29 53 / 73 211 Fax: 0 29 53 / 73 250
2. Bedienung<br />
2.4 Mode-Menü<br />
<strong>Farbmonitor</strong> <strong>VIS</strong> 2000 PRO 9<br />
Das Mode-Menü gibt Ihnen die Möglichkeit, Videoeinstellungen vorzunehmen.<br />
• Drücken Sie die MODE-Taste, um das Menü aufzurufen.<br />
EINSTELLUNGEN<br />
SPOT < 0 ><br />
KONTRAST < 5 ><br />
HELLIGKEIT < 5 ><br />
FARBE < 5 ><br />
DEUTSCH<br />
Navigation im Mode-Menü:<br />
Ansteuern des gewünschten Menüpunktes: ← und →<br />
Verändern des jeweiligen Wertes:<br />
↓ und ↑<br />
Speichern der getroffenen Auswahl: OK<br />
Verlassen des Menüpunktes ohne zu speichern: ESC<br />
SPOT<br />
KONTRAST<br />
HELLIGKEIT<br />
FARBE<br />
Ein- bzw. Ausschalten der Kamerazusatzbeleuchtung<br />
Einschalten: <br />
Ausschalten: <br />
Einstellung des Kontrastes<br />
Wert (wenig Kontrast) bis (hoher Kontrast)<br />
Einstellung der <strong>Monitor</strong>helligkeit<br />
Wert (dunkel) bis (maximal)<br />
Einstellung der Farbintensität<br />
Wert (minimal) bis (maximal)<br />
e-mail: mgkg@woehler.de http://mgkg.woehler.de
2. Bedienung<br />
2.5 Dokumentation Bild- und Videospeicher<br />
<strong>Farbmonitor</strong> <strong>VIS</strong> 2000 PRO<br />
2.5.1 CF-Speicherkarte<br />
Der <strong>Monitor</strong> <strong>VIS</strong> 2000 PRO wird mit einer vorformatierten, leeren CF-Speicherkarte<br />
geliefert.<br />
Um andere CF-Speicherkarten (maximale Größe: 2 GB) oder IBM-Mikrodrives<br />
verwenden zu können, müssen diese erst formatiert werden. Gehen Sie dazu<br />
folgendermaßen vor:<br />
• Speicherkarte in Lesegerät stecken und Lesegerät an den Computer anschließen.<br />
• Die Speicherkarte wird im Explorer des Computers als Wechselmedium<br />
angezeigt: Rechter Mausklick auf die Speicherkarte > Formatieren<br />
• Stellen Sie in dem sich öffnenden Fenster Dateisystem „FAT“ ein und klicken<br />
Sie anschließend auf „Starten“.<br />
Aufnahmekapazität einer 2 GB Speicherkarte (128 MB Speicherkarte):<br />
Bilder: max. 7700 jpg-Bilder<br />
Videos: 40 Minuten (Vollbild) bei Einstellung „kurz“<br />
80 Minuten (Vollbild) bzw. 5:12 Minuten (Halbbild) bei Einstellung „lang“<br />
(siehe Punkt 2.6.3: Festlegung der Aufnahmezeit)<br />
Bedienung des Kartenslots<br />
Um die CF-Speicherkarte einzusetzen, stecken Sie sie (wie eine Diskette) in Pfeilrichtung<br />
und mit der in Abb. 1 sichtbaren Seite nach oben in den Kartenslot.<br />
Wenn Sie die CF-Speicherkarte wieder entfernen wollen, drücken Sie auf die Kartenausgabetaste<br />
unterhalb des Slots (Abbildung 1, Punkt 6) und ziehen Sie die<br />
Karte aus dem Slot heraus.<br />
2.5.2 Aufnahme von Bildern und Videos<br />
Der <strong>VIS</strong> 2000 PRO -<strong>Monitor</strong> kann sowohl PAL- als auch NTSC-modulierte Signale<br />
verstehen, wobei es egal ist, ob der S-Video- oder der Composite-Eingang benutzt<br />
wird.<br />
Das Gerät wird automatisch erkennen, welches Signal an welchem Eingang ankommt.<br />
Der verwendete Anschluss wird dann auf dem Bildschirm angezeigt.<br />
Daraufhin wechselt der Schirm zur Videodarstellung und Sie können Bilder oder<br />
Videos erstellen.<br />
2.5.2.1 Aufnahme eines Bildes<br />
Um ein Bild im jpeg-Format aufzunehmen, stellen Sie zunächst sicher, dass<br />
10 Hotline: 0 29 53 / 73 211 Fax: 0 29 53 / 73 250
2. Bedienung<br />
<strong>Farbmonitor</strong> <strong>VIS</strong> 2000 PRO<br />
Sie kein Menü aufgerufen haben (drücken Sie zum Verlassen eines Menüs die<br />
„ESC“-Taste).<br />
Gehen Sie nun wie folgt vor:<br />
• Drücken Sie die „Standbild“-Taste, um ein Bild auf dem Display einzufrieren<br />
(siehe Abbildung 2, Punkt 3).<br />
Wenn ein Bild eingefroren wurde, wird im Display „STANDBILD“ angezeigt.<br />
• Um das eingefrorene Bild zu speichern, drücken Sie die rote „Speichern“-Taste<br />
(siehe Abbildung 2, Punkt 2). Anschließend wechselt das System automatisch<br />
wieder zur Videonanzeige.<br />
• Soll das Bild nicht gespeichert werden, so drücken Sie die „Standbild“-Taste<br />
erneut, um zur Videoanzeige zurückzukehren.<br />
Hinweis:<br />
Falls die Darstellung des Standbildes aufgrund von Bewegungsunschärfen<br />
flackert, kann eine volle PAL- oder NTSC-Auflösung auf dem <strong>Farbmonitor</strong> <strong>VIS</strong><br />
2000 PRO wie folgt erreicht werden:<br />
• Drücken Sie OK, während das Bild eingefroren ist.<br />
Die Bildschirmdarstellung wechselt vom Vollbild- zum Halbbild-Mode. Durch<br />
erneutes Drücken des OK-Buttons wird wieder in den Vollbild-Mode zurückgekehrt.<br />
Beim Vollbildmode wird aus zwei aufeinanderfolgenden Halbbildern ein Bild erzeugt,<br />
während im Halbbildmode alle Zeilen eines Halbbildes verdoppelt (interpoliert)<br />
werden. Ein Vollbildmode bietet eine höhere „echte“ Auflösung, während<br />
der Halbbildmode besser für die Darstellung von schnellen Bewegungen ist.<br />
Die ersten 6 Zeichen des Dateinamens sind der Stammdateiname und stellen<br />
standardmäßig das Datum in folgenden Format dar: TTMMJJ<br />
Alternativ kann ein beliebiger anderer Stammdateiname im Menupunkt „Standarddateiname“<br />
im Hauptmenü vorgegeben werden (vgl. Seite 17).<br />
Die letzten zwei Buchstaben des Dateinamens werden automatisch mit einer<br />
laufenden Nummer der Sequenz 0-9; A-Z versehen. Dadurch wird sichergestellt,<br />
dass jedes Bild einen eigenen Dateinamen erhält.<br />
Die ersten Nummern lauten z. B.: 00, 01, 02, 03, ..., 09, 0A, 0B, ...., 0Z, 10, 11, .<br />
2.5.2.2 Aufnahme eines Videos<br />
Um ein Video im mov-Format aufzunehmen, stellen Sie zunächst sicher, dass<br />
Sie kein Menü aufgerufen haben (drücken Sie zum Verlassen eines Menüs die<br />
„ESC“-Taste).<br />
Gehen Sie nun wie folgt vor: • Drücken Sie die „Speichern“-Taste, um ein<br />
Video aufzunehmen (siehe Abbildung 2, Punkt 2). Auf dem Display erscheint<br />
das „AUFNAHME-Menü, das die maximale Aufnahmezeit des Clips in Minuten<br />
und Sekunden, abhängig vom frei verfügbaren Speicherplatz auf der CF-<br />
DEUTSCH<br />
e-mail: mgkg@woehler.de http://mgkg.woehler.de<br />
11
2. Bedienung<br />
<strong>Farbmonitor</strong> <strong>VIS</strong> 2000 PRO<br />
Speicherkarte, anzeigt.<br />
• Um den Aufnahmevorgang abzubrechen, drücken Sie einmal ↓, so dass<br />
„Abbruch“ markiert ist. Drücken Sie nun OK, um Abbruch auszuwählen, oder<br />
drücken Sie MENU/ ESC, um das Aufnahmemenü zu verlassen.<br />
• Um die Aufnahme zu starten, drücken Sie OK oder →.<br />
• Um die Aufnahme zu beenden und das Video zu speichern, drücken Sie noch<br />
einmal auf die „Speichern“-Taste.<br />
2.5.3 Wiedergabe der Aufnahmen<br />
Die Bildvorschau (Bildergalerie) bietet einen Überblick über alle aufgenommenen<br />
Bilder und Videos und ermöglicht mittels eines integrierten Befehlsmenüs ein<br />
einfaches und komfortables Dateimanagement.<br />
• Um die Bildvorschau anzuzeigen, drücken Sie Index. Im Bildschirm wird kurz<br />
folgende Meldung angezeigt:<br />
BILDERGALERIE<br />
VORSCHAU LADEN<br />
Danach werden im aktiven Ordner die zuletzt aufgenommenen 12 Bilder in einer<br />
Miniaturvorschau angezeigt.<br />
Ein blinkender Dateiname zeigt die zuletzt gespeicherte Datei an.<br />
Videosequenzen werden jeweils mit dem Startbild angezeigt. Anhand des<br />
Wiedergabesymbols in der linken unteren Ecke des jeweiligen Miniaturbildes<br />
können Videosequenzen eindeutig erkannt und von Bildern unterschieden werden.<br />
2.5.3.1 Bildwiedergabe<br />
Um in der Bildergalerie ein Bild auszuwählen, gehen Sie wie folgt vor:<br />
• Mit ↓ oder ↑ wählen Sie innerhalb der Bildvorschau ein einzelnes Bild an. Wenn<br />
Sie ein Bild hervorheben, wird der volle Dateiname angezeigt.<br />
Halten Sie die Taste↓ oder ↑ länger gedrückt, so scrollen Sie innhalb der Bildvorschau<br />
von Bild zu Bild auf - bzw. abwärts.<br />
Anzeigen der vorhergehenden Seite:<br />
• Bewegen Sie den Zeiger auf das oberste Miniaturbild der linken Seite und drücken<br />
Sie ↑.<br />
Die vorhergehenden 12 Miniaturbilder werden angezeigt. Falls die vorhergehende<br />
Seite weniger als 12 Bilder enthält, ist die linke obere Ecke der Vorschau<br />
leer.<br />
Anzeigen der nachfolgenden Seite:<br />
12 Hotline: 0 29 53 / 73 211 Fax: 0 29 53 / 73 250
2. Bedienung<br />
<strong>Farbmonitor</strong> <strong>VIS</strong> 2000 PRO<br />
• Bewegen Sie den Zeiger auf das unterste rechte Miniaturbild und drücken Sie<br />
↓.<br />
Die nächsten 12 Bilder werden angezeigt.<br />
Falls es keine neueren Bilder gibt, werden ausgehend von der rechten unteren<br />
Ecke keine Miniaturbilder angezeigt.<br />
Anzeigen eines Bildes im Großformat:<br />
Alle in der Bildergalerie dargestellten Miniaturbilder können auf dem Display in<br />
Großformat dargestellt werden. Gehen Sie dazu wie folgt vor:<br />
• Kennzeichnen Sie das Miniaturbild der entsprechenden Datei in der Vorschau.<br />
• Drücken Sie OK und das gewählte Bild wird in der vollen Bildschirmgröße<br />
dargestellt.<br />
Während ein Bild im Großformat angezeigt wird, können folgende Tasten benutzt<br />
werden:<br />
Taste<br />
Funktion<br />
↓<br />
Sprung zum nächsten Bild<br />
↑<br />
Zurück zum vorherigen Bild<br />
• Zurück zur Galerie gelangen Sie durch Drücken des Index-Buttons. Direkt in<br />
den Inspektionsmodus wechseln Sie mittels ESC.<br />
2.5.3.2 Video-Wiedergabe<br />
Die Wiedergabe von Videosequenzen erfolgt analog der soeben beschriebenen<br />
Vorgehensweise zur Wiedergabe von Bildern.<br />
Um in der Bildergalerie ein Video auszuwählen, gehen Sie wie folgt vor:<br />
• Mit ↓ oder ↑ wählen Sie innerhalb der Bildvorschau das gewünschte Video an.<br />
• Drücken Sie OK und das gewählte Video wird in der vollen Bildschirmgröße<br />
abgespielt.<br />
Während das Video abgespielt wird, sind folgende Tasten funktionell belegt:<br />
Taste<br />
Funktion<br />
„Standbild“ / Pause Pause / Wiedergabe<br />
←<br />
Rückwärts abspielen<br />
→<br />
Vorwärts abspielen<br />
• Ist ein Video abgespielt, so können Sie mit den Tasten ↑ und ↓ innerhalb der<br />
Großformatanzeige direkt zum vorangegangenen oder nächsten Video oder Bild<br />
wechseln.<br />
• Zurück zur Galerie gelangen Sie durch Drücken des Index-Buttons. Direkt in<br />
den Inspektionsmodus wechseln Sie mittels ESC.<br />
DEUTSCH<br />
e-mail: mgkg@woehler.de http://mgkg.woehler.de<br />
13
2. Bedienung<br />
2.5.4 Bildergalerie<br />
<strong>Farbmonitor</strong> <strong>VIS</strong> 2000 PRO<br />
Die Bildergalerie dient als Bildervorschau und bietet einen Überblick über alle<br />
aufgenommenen Bilder und Videos. Das integrierte Befehlsmenüs („Vorschau“-<br />
Menü) ermöglicht die einfache Verwaltung aller gespeicherten Bilder und Videosequenzen.<br />
So ist es möglich, Bilder und Videos anzusehen, individuell zu benennen<br />
und umzubenennen, zu löschen, zu kopieren und in individuellen Ordnern<br />
abzulegen. Eine logische Dateistruktur zur Ablage Ihrer Bilder und Videos kann<br />
problemlos angelegt und jederzeit benutzt werden, wodurch ein leichtes „Wiederfinden“<br />
und Bearbeiten Ihrer Aufnahmen realisiert wird.<br />
Vorschau-Menü<br />
Bildervorschau<br />
Abbildung 3: Bildergalerie<br />
• Drücken Sie Index, um die Bildergalerie aufzurufen.<br />
Der Bildschirmaufbau setzt sich aus dem Vorschau-Menü (erste Spalte) und der<br />
Bildervorschau (2.-4. Spalte) zusammen.<br />
Nach Aufruf der Bildergalerie ist das zuletzt gespeicherte Bild/Video aktiviert, was<br />
durch ein Blinken des Dateinamens sichtbar wird.<br />
Das Vorschau-Menü bietet folgende Bearbeitungspunkte:<br />
Option<br />
Beschreibung<br />
MARKIEREN<br />
Erlaubt es, mehrere Dateien gleichzeitig auszuwählen<br />
LÖSCHEN<br />
Löscht die ausgewählte(n) Datei(en)<br />
VERSCHIEBEN Verschiebt die ausgewählte(n) Datei(en) in ein anderes Verzeichnis<br />
KOPIEREN<br />
Kopiert die ausgewählte(n) Datei(en) in ein anderes Verzeichnis<br />
UMBENENNEN Ändert den Dateinamen<br />
ORDNER W.<br />
Verzeichnisse wechseln<br />
ORDNER NEU Erstellt ein neues Verzeichnis<br />
14 Hotline: 0 29 53 / 73 211 Fax: 0 29 53 / 73 250
2. Bedienung<br />
Tastensteuerung:<br />
<strong>Farbmonitor</strong> <strong>VIS</strong> 2000 PRO<br />
DEUTSCH<br />
Vorschau-Menü<br />
Navigation im Menü:<br />
↓ und ↑: Anwählen der<br />
Menüpunkte<br />
OK oder →: Auswahl bestätigen<br />
Bildervorschau<br />
Navigation:<br />
↓ und ↑: Anwählen der<br />
Bilder/Videos<br />
Abbildung 3a: Tastensteuerung<br />
2.5.4.1 Optionen im Vorschau-Menü<br />
• Wechseln Sie durch Drücken der MENU-Taste von der Bildvorschau ins Vorschau-Menü.<br />
Die erste Option im Menü ist hervorgehoben.<br />
• Wählen Sie Menüpunkte an, indem Sie ↓ und ↑ so lange drücken, bis Sie beim<br />
gewünschten Punkt angekommen sind. Bestätigen Sie die Wahl mit OK oder<br />
→.<br />
MARKIEREN:<br />
Diese Menüoption erlaubt das Kennzeichnen von Dateien in der Bildergalerie, um<br />
diese Dateinen ggfs. zu löschen, zu kopieren etc.<br />
• Kennzeichnen Sie den Befehl MARKIEREN im Menü und drücken Sie OK oder<br />
→, um ihn auszuführen.<br />
Das Blinken der Option MARKIEREN zeigt an, dass der Auswahl-Mode aktiv ist.<br />
• Benutzen Sie die ↑ und ↓ Tasten, um das erste auszuwählende Bild hervorzuheben,<br />
und drücken Sie OK, um es zu markieren. Auf dem Miniaturbild<br />
erscheint ein Kennzeichen, das anzeigt, dass die entsprechende Datei markiert<br />
wurde.<br />
e-mail: mgkg@woehler.de http://mgkg.woehler.de<br />
15
2. Bedienung<br />
<strong>Farbmonitor</strong> <strong>VIS</strong> 2000 PRO<br />
• Soll die Markierung des Bildes/Videos rückgängig gemacht werden, so wählen<br />
Sie dieses Bild/Video an und drücken Sie OK und diese Dateie wird in ihren<br />
ursprünglichen Zustand zurück gesetzt.<br />
• Markieren Sie andere Dateien auf die gleiche Weise.<br />
Wenn Sie alle gewünschten Dateien ausgewählt haben:<br />
• Drücken Sie MENU, um zurück ins Vorschau-Menü zu gelangen.<br />
• Wählen Sie die gewünschte Funktion aus (löschen, verschieben oder kopieren)<br />
und drücken Sie OK, um sie auszuwählen.<br />
LOESCHEN<br />
Option zum Entfernen einer oder mehrerer Dateien.<br />
• Klicken Sie LOESCHEN im Vorschau-Menü an, und drücken Sie OK oder →,<br />
um diesen Befehl auszuwählen.<br />
Es erscheint ein Fenster LOSCHEN am Display<br />
• Drücken Sie ↓, um OK hervorzuheben, und drücken Sie OK, um den Befehl<br />
auszuführen.<br />
ODER<br />
• Drücken Sie OK, um ABBRUCH zu bestätigen und den Löschvorgang abzubrochen.<br />
VERSCHIEBEN / KOPIEREN<br />
Diese Menüoptionen ermöglichen das einfache Verschieben und Kopieren von<br />
Dateien.<br />
• Heben Sie VERSCHIEBEN oder KOPIEREN im Galeriemenü hervor, und drücken<br />
Sie OK, um es auszuwählen.<br />
Es erscheint das Fenster VERSCHIEBEN bzw. KOPIEREN, in dem das weitere<br />
Vorgehen bestätigt werden muss.<br />
• Drücken Sie ↓, um den gewünschten Ordner hervorzuheben, und drücken Sie<br />
OK, um ihn auszuwählen<br />
ODER<br />
• wählen Sie alternativ OK, wenn ABBRUCH markiert ist, um die Aktion abzubrechen<br />
(die nachstehend beschriebene Vorgehensweise entfällt!).<br />
Das Fenster ORDNERAUSWAHL wird angezeigt, das eine Liste aller Ordner auf<br />
der Compactflash Speicherkarte beinhaltet.<br />
• Wählen Sie den gewünschten Ordner, und drücken Sie OK.<br />
Die Dateien werden in den entsprechenden Ordner kopiert oder verschoben.<br />
16 Hotline: 0 29 53 / 73 211 Fax: 0 29 53 / 73 250
2. Bedienung<br />
<strong>Farbmonitor</strong> <strong>VIS</strong> 2000 PRO<br />
UMBENNENNEN<br />
Menüoption zum Umbenennen von Dateien.<br />
• Um eine Datei umzubenennen, wählen Sie UMBENENNEN aus dem Vorschau-<br />
Menü, und drücken Sie OK.<br />
Es erscheint das Fenster UMBENENNEN.<br />
• Drücken Sie ↓, um EINGABE hervorzuheben, und drücken Sie OK, um EINGA-<br />
BE auszuwählen<br />
ODER<br />
• wählen Sie OK, wenn ABBRUCH markiert ist, um die Aktion abzubrechen (die<br />
nachstehend beschriebene Vorgehensweise entfällt!).<br />
Es erscheint das Dateinamendialog-Fenster:<br />
DEUTSCH<br />
DATEINAME EDITOR<br />
GESPEICHERT ALS<br />
02060405<br />
• Geben Sie die ersten 6 Buchstaben des Dateinamen wie folgt ein:<br />
• Drücken Sie ↑ oder ↓, um zwischen den Buchstaben A-Z und den Zahlen 0-9<br />
zu wechseln.<br />
• Drücken Sie →, um zwischen den 6 Zeichen zu wechseln.<br />
• Nach der Eingabe des 6. Zeichens drücken Sie OK, um zum Vorschaumenü<br />
zurückzukehren.<br />
Die letzten zwei Zeichen können nicht verändert werden.<br />
ORDNER W.<br />
Diese Menüoption erlaubt Ihnen das Wechseln des aktuellen Ordners zum Speichern<br />
Ihrer Dateien.<br />
• Um den aktuellen Ordner zu ändern, wählen Sie ORDNER W. im Vorschaumenü<br />
aus und drücken Sie OK.<br />
Das Fenster ORDNERAUSWAHL wird auf dem Display eingeblendet und zeigt<br />
eine Liste aller verfügbaren Ordner, die auf der CF-Speicherkarte vorhanden sind.<br />
• Wählen Sie den gewünschten Ordner aus und drücken Sie OK.<br />
Die Miniaturbilder der zuletzt gespeicherten Bilder im aktuellen Ordner werden an<br />
e-mail: mgkg@woehler.de http://mgkg.woehler.de<br />
17
2. Bedienung<br />
<strong>Farbmonitor</strong> <strong>VIS</strong> 2000 PRO<br />
ORDNER NEU<br />
Menüoption zum Anlegen eines neuen Ordners.<br />
• Heben Sie ORDNER NEU im Galeriemenü hervor und drücken Sie OK.<br />
Das Fenster NEU. ORDNER wird am Bildschirm eingeblendet.<br />
• Drücken Sie OK, um AUTOMAT. auszuwählen und einen Ordner mit dem Standardnamen<br />
”FOLDER” gefolgt von einem Suffix, das aus zwei Zeichen besteht,<br />
zu erstellen.<br />
2.6 Hauptmenü - Gerätekonfiguration<br />
Das Hauptmenü dient zur Einstellung diverser Gerätekonfigurationen.<br />
Dieses Kapitel beschreibt die Einstellungen, die im Hauptmenü vorgenommen<br />
werden können, um den <strong>Farbmonitor</strong> <strong>VIS</strong> 2000 PRO an ihre Bedürfnisse anzupassen.<br />
• Drücken Sie MENU, um das Hauptmenü am Bildschirm aufzurufen. Das Hauptmenü<br />
stellt sich wie folgt dar:<br />
HAUPTMENU<br />
VIDEO STANDARD ><br />
BILDAUFLOESUNG ><br />
AUFNAHMEZEIT ><br />
STANDARD DATEINAME ><br />
DISPLAY AUSRICHTUNG ><br />
SPRACHE ><br />
SETUP ><br />
KARTE FORMATIEREN ><br />
ORDNER WECHSELN ><br />
ORDNER ANLEGEN ><br />
ORDNER UMBENENNEN ><br />
KOPFZEILE ><br />
FUSSZEILE ><br />
18 Hotline: 0 29 53 / 73 211 Fax: 0 29 53 / 73 250
2. Bedienung<br />
Navigation im Hauptmenü:<br />
Ansteuern des gewünschten Menüpunktes: ↓ und ↑<br />
Aufruf des gewünschten Menüpunktes: OK oder →<br />
Speichern der getroffenen Auswahl: OK<br />
Verlassen des Menüpunktes ohne zu speichern: ←<br />
Verlassen des Hauptmenüs: ESC<br />
2.6.1 Video-Einstellungen<br />
<strong>Farbmonitor</strong> <strong>VIS</strong> 2000 PRO<br />
Menüpunkt: VIIDEO STANDARD<br />
Die Einstellungen VIDEO STANDARD, Bildauflösung und Aufnahmezeit im<br />
Hauptmenü erlauben es, die Video- und Speicherspezifikationen festzulegen.<br />
• Um den Video-Standard der Wiedergabe festzulegen, wählen Sie „AUTO“ für<br />
die automatische Wiedergabe des gleichen Formats, das am Videoeingang verwendet<br />
wird, „NTSC“, um die Standardwiedergabe auf NTSC zu setzen, oder<br />
„PAL“, um das Standardwiedergabeformat auf PAL zu setzen.<br />
Diese Einstellungen werden beibehalten, wenn das Gerät ausgeschaltet wird.<br />
Die empfohlene Einstellung ist „AUTO“. Mit dieser Einstellung setzt das Gerät<br />
den Videostandard automatisch analog zum Format der letzten Videoeinspeisung<br />
und behält diesen Standard auch dann bei, wenn es ausgeschaltet wird oder<br />
wenn kein Videosignal mehr anliegt. In dieser Einstellung können nur Videostandards<br />
analog zum zuletzt verwendeten Video-Standard dargestellt werden.<br />
Falls Sie Bilder wiedergeben möchten, ohne dass eine Videoquelle angeschlossen<br />
ist, muss in der Option Videostandard „NTSC“ oder „PAL“, entsprechend<br />
dem vorliegenden Bildmaterial, als Standard ausgewählt werden.<br />
2.6.2 Bildauflösung - Festlegung des Standbildmodes<br />
Menüpunkt: BILDAUFLOESUNG<br />
Werksseitig ist ein Vollbild eingestellt, wobei aus zwei aufeinanderfolgenden<br />
Halbbildern ein Vollbild komplett generiert wird. Die Auflösung des aufgenommenen<br />
Bildes ist gleich der nominalen PAL/NTSC Auflösung.<br />
Der Vollbildmodus wird empfohlen, wenn besonders detailreiche, langsam bewegte<br />
Objekte aufgenommen werden.<br />
Wird die Funktion „Halbbild“ aktiviert, werden alle Bilder im Halbbildmodus<br />
gespeichert. Bilder dieser Funktion besitzen die halbe Auflösung des entsprechenden<br />
Videostandards (PAL oder NTSC). Durch Verdoppelung jeder Zeile des<br />
aufgenommenen Halbbildes wird das aufgenomme Bild wieder auf die nominale<br />
Auflösung des entsprechenden Videostandards (PAL oder NTSC) „aufgeblasen“.<br />
Der Halbbild-Modus wird empfohlen, wenn schnell bewegte Objekte aufgenommen<br />
werden.<br />
DEUTSCH<br />
e-mail: mgkg@woehler.de http://mgkg.woehler.de<br />
19
2. Bedienung<br />
2.6.3 Festlegung der Aufnahmezeit<br />
<strong>Farbmonitor</strong> <strong>VIS</strong> 2000 PRO<br />
Menüpunkt: AUFNAHMEZEIT<br />
Diese Einstellung erlaubt die Festlegung der Länge der Video-Clips.<br />
„Lang“ ermöglicht die maximal Cliplänge, jedoch können die Filmsequenzen<br />
unter Quicktime nur in halber Auflösung wiedergegeben werden.<br />
„Kurz“ begrenzt die verfügbare Aufnahmezeit auf die Hälfte von „Lang“. Video-<br />
Clips werden unter Quicktime in voller Auflösung wiedergegeben.<br />
2.6.4 Ändern des Standard-Dateinamens<br />
Menüpunkt: STANDARD DATEINAME<br />
Dieser Punkt ermöglicht die Eingabe der sechs Buchstaben des Dateinamenpräfixes.<br />
Ist STANDARD ausgewählt, wird jeder Datei ein sechsstelliger Namenspräfix<br />
vorangestellt, der das aktuelle Datum darstellt.(TTMMJJ)<br />
Bei der Auswahl von BELIEBIG wird ein Dateinameneditor angezeigt, in dem die<br />
ersten sechs Buchstaben festgelegt werden können (vgl. S. 14, „Verschieben<br />
und kopieren von Dateien).<br />
2.6.5 Display-Ausrichtung<br />
Menüpunkt: BILDAUFLOESUNG<br />
Diese Einstellung dreht die Bildschirmausgabe um 180 Grad, so dass das <strong>VIS</strong><br />
2000 PRO die Funktionsknöpfe auf der rechten Seite hat. Die Funktionen der<br />
Knöpfe . und - sind ebenfalls vertauscht, entsprechend der Menüdarstellung.<br />
2.6.6 Spracheinstellungen<br />
Menüpunkt: SPRACHE<br />
Diese Einstellung erlaubt die Auswahl der Sprache der Bildschirmmenüs. Zwischen<br />
der englischen, deutschen, französischen, spanischen und italienischen<br />
Sprache kann nach Wunsch gewählt werden.<br />
Alle Einstellungen bleiben nach dem Ausschalten erhalten.<br />
2.6.7 Setupeinstellungen<br />
Menüpunkt: SETUP<br />
Erlaubt die Einstellung des Datums, der Zeit sowie diverser Wiedergabeeinstellungen.<br />
Datums- und Zeiteinstellungen<br />
• Drücken Sie ↓ oder ↑, um Datum oder Zeit hervorzuheben, und drücken Sie<br />
OK.<br />
20 Hotline: 0 29 53 / 73 211 Fax: 0 29 53 / 73 250
2. Bedienung<br />
<strong>Farbmonitor</strong> <strong>VIS</strong> 2000 PRO<br />
SETUP MENU<br />
DATUM TTMMJJ<br />
ZEIT HHMMSS<br />
TASTATURKLICK <br />
STANDRD KONTRAST <br />
STANDARD HELLIGKEIT <br />
STANDARD FARBE <br />
DEUTSCH<br />
Das erste Zeichen des Datums wird durch einen blinkenden Cursor hervorgehoben.<br />
• Benutzen Sie ↓ oder ↑, um die dargestellte Zahl zu ändern.<br />
• Drücken Sie →, um zur nächsten Ziffer zu gelangen.<br />
• Wenn Sie alle Werte von Datum und Zeit geändert haben, drücken Sie OK, um<br />
den Editor-Modus zu verlassen.<br />
Tastaturtöne ein- und ausschalten<br />
• Drücken Sie ↓ und ↑, bis TASTATURKLICK hervorgehoben ist, und drücken Sie<br />
→.<br />
• Drücken Sie ↓ oder ↑, um zwischen keinem Tastaturton (0) oder aktivierter<br />
akustischer Tastendruckbestätigung (1) auszuwählen und OK, um die Eingabe<br />
zu bestätigen und den Editor-Modus zu verlassen.<br />
Ändern der Videoparameter<br />
Die Videoeinstellungen KONTRAST, HELLIGKEIT und FARBE erlauben es, Defizite<br />
der Videoquelle auszugleichen und das Videobild dem persönlichem Geschmack<br />
anzupassen.<br />
• Drücken Sie ↓ und ↑, bis der zu verändernde Parameter ausgewählt ist, und<br />
drücken Sie →, um ihn zu ändern.<br />
Der aktuelle Wert wird durch einen blinkenden Cursor angezeigt.<br />
• Drücken Sie ↓ oder ↑, um die Einstellung zu ändern.<br />
Jeder der Werte kann zwischen 0 und 9 frei gewählt werden, wobei die Werkseinstellung<br />
5 ist.<br />
• Drücken Sie OK, um den Editor-Modus zu verlassen.<br />
Bitte beachten Sie, dass beim nächsten Einschalten des Gerätes die Videoeinstellungen<br />
auf die Werkseinstellung zurückgesetzt werden.<br />
e-mail: mgkg@woehler.de http://mgkg.woehler.de<br />
21
2. Bedienung<br />
2.6.8 Verwaltung des Dateisystems<br />
<strong>Farbmonitor</strong> <strong>VIS</strong> 2000 PRO<br />
Menüpunkte:<br />
KARTE FORMATIEREN<br />
ORDNER WECHSELN<br />
ORDNER ANLEGEN<br />
ORDNER UMBENENNEN<br />
Die o.g. Optionen im Hauptmenü erlauben es, die CF-Speicherkarte zu formatieren<br />
und die Ordner auf der Karte zu bearbeiten.<br />
Formatieren einer CF-Speicherkarte:<br />
• Wählen Sie KARTE FORMATIEREN im Hauptmenü und bestätigen Sie mit OK<br />
im Untermenü.<br />
Achtung: Dadurch werden alle bereits gespeicherten Daten auf der Karte gelöscht.<br />
Nach dem Formatieren wird die CF-Speicherkarte einen Ordner mit dem Namen<br />
FOLDERAA enthalten.<br />
Wechseln des aktuellen Ordners:<br />
• Klicken Sie ORDNER WECHSELN im Hauptmenü an.<br />
Das Ordnerauswahl-Untermenü zeigt eine Liste aller verfügbaren Ordner auf der<br />
CompactFlash Speicherkarte.<br />
• Benutzen Sie ↓ und ↑, um zu dem gewünschten Ordner zu gelangen und drücken<br />
Sie OK, um diesen Ordner als neuen Standardornder zum Speichern Ihrer<br />
Bilder und Videos festzulegen.<br />
Anlegen eines neuen Ordners<br />
• Wählen Sie ORDNER ANLEGEN im Hauptmenü und fahren Sie analog dem<br />
Punkt “Anlegen eines neuen Ordners “ von Seite 15 fort.<br />
Umbenennen eines Ordners<br />
• Wählen Sie ORDNER UMBENENNEN im Hauptmenü und fahren Sie analog zu<br />
“Umbenennen einer Datei“ von Seite 15 fort.<br />
2.6.9 Bildschirm-Einblendung (On-Screen-Display)<br />
Ein- und Ausschalten der Kopf- und Fußzeile<br />
Menüpunkte: KOPFZEILE<br />
FUSSZEILE<br />
Wenn Sie die Kopf- oder Fußzeile aus- oder später wieder einschalten möchten,<br />
wählen Sie im Hauptmenü KOPFZEILE bzw. FUSSZEILE aus, benutzen ↑ oder ↓,<br />
22 Hotline: 0 29 53 / 73 211 Fax: 0 29 53 / 73 250
2. Bedienung<br />
<strong>Farbmonitor</strong> <strong>VIS</strong> 2000 PRO<br />
um zu der gewünschten Option (AN oder AUS) zu gelangen und bestätigen mit<br />
OK oder →.<br />
Kopfzeile<br />
In der Kopfzeile wird der Dateiname angezeigt, den die nächste Bild- oder Videodatei<br />
bekommen wird, die Sie erstellen werden.<br />
Zur besseren Orientierung in der Bildergalerie und später eventuell auf dem PC<br />
kann es sinnvoll sein, die Kopfzeile eingeblendet zu lassen.<br />
DEUTSCH<br />
Fußzeile<br />
In der Fußzeile wird am linken Bildschirmrand das Datum und die Uhrzeit eingeblendet.<br />
Außerdem wird, wenn Sie eine Kabelaufwicklung bzw. Kamerahaspel verwenden,<br />
die die digitale Meterzählung unterstützt, die Entfernung zwischen Kamerakopf<br />
und Kabelaufwicklung bzw. Haspel in der Mitte der Fußzeile eingeblendet. Da<br />
auch diese Einblendung auf dem aufgenommenen Bild oder Video zu sehen ist,<br />
ist diese Option zur Dokumentation und zur Markierung einer etwaigen Schadensstelle<br />
sehr nützlich.<br />
02060405<br />
Dateiname<br />
Datum und Uhrzeit<br />
Metereinblendung<br />
02. 06. 2004 11:27 1. 55m<br />
Abbildung 4: Displayanzeige<br />
e-mail: mgkg@woehler.de http://mgkg.woehler.de<br />
23
2. Bedienung<br />
<strong>Farbmonitor</strong> <strong>VIS</strong> 2000 PRO<br />
2.7 Aufladen der Akkus/Netzbetrieb<br />
Der <strong>Monitor</strong> verfügt über einen internen Akku, der über ein mitgeliefertes Netzteil<br />
aufgeladen wird. Stecken Sie dazu den einpoligen Stecker des Netzteils in die<br />
Ladebuchse unten auf der rechten Seite des <strong>Monitor</strong>s (Abbildung 1, Punkt 9:<br />
Ladebuchse). Sobald Sie den Netzstecker in die Steckdose stecken, beginnt der<br />
Ladevorgang und beide LED’s der Ladezuschandsanzeige (siehe Seite 6) blinken.<br />
Sobald der Akku komplett geladen ist, wird der Ladevorgang abgeschaltet und<br />
beide LED’s leuchten permanent.<br />
Sollten bereits bei Beginn des Ladevorgangs die LEDs permanent leuchten, so<br />
kann das zwei Gründe haben: 1. Der Akku ist noch warm durch den Entladevorgang<br />
oder 2. der Akku ist tiefentladen (wurde länger nicht mehr geladen). In beiden<br />
Fällen bitte den Ladevorgang mehrmals wiederholen, bis die LED‘s blinken.<br />
Um den Akku zu schonen, kann der <strong>Monitor</strong> bei angeschlossenem Netzteil auch<br />
jederzeit im Netzbetrieb genutzt werden.<br />
3. Datenübertragung<br />
3.1 Anschluss des Kartenlesegerätes<br />
Die CF-Speicherkarte kann während des laufenden Betriebes entfernt oder eingelegt<br />
werden.<br />
Nach dem Einlegen einer CF-Speicherkarte wird der Bildschirm einige Sekunden<br />
blinken, während der <strong>Monitor</strong> <strong>VIS</strong> 2000 PRO die Daten auf der Karte liest. Danach<br />
kann man normal weiterverfahren.<br />
Ein mit Windows 2000/ME oder späteren Versionen ausgestatteter PC erkennt<br />
den Kartenleser und installiert den erforderlichen Treiber automatisch. In diesem<br />
Fall sind keine Maßnahmen erforderlich.<br />
Wenn das Kartenlesegerät korrekt funktioniert, wird Windows automatisch einen<br />
neuen Laufwerksbuchstaben einführen, z.B. E oder F.<br />
Diese Laufwerk kann genau wie ein Diskettenlaufwerk benutzt werden.<br />
3.2 Kopieren von Bildern zum PC<br />
Um Bilder von der CF-Speicherkarte auf den PC zu übertragen, klicken Sie einfach<br />
auf ein Bild, halten die Maustaste weiter gedrückt und ziehen das Symbol in<br />
einen Ordner auf Ihrem Computer.<br />
Die Bilder werde im JPEG Standard gespeichert und können mit jedem Standardgrafik-<br />
programm bearbeitet und gedruckt werden.<br />
24 Hotline: 0 29 53 / 73 211 Fax: 0 29 53 / 73 250
3. Datenübertragung<br />
3.3 Kopieren von Bildern auf die CF-Speicherkarte<br />
<strong>Farbmonitor</strong> <strong>VIS</strong> 2000 PRO<br />
Bilder, die vom <strong>Farbmonitor</strong> <strong>VIS</strong> 2000 PRO erstellt und am PC bearbeitet wurden,<br />
können zur weiteren Betrachtung am <strong>Farbmonitor</strong> <strong>VIS</strong> 2000 PRO wieder zurück auf<br />
die CF-Speicherkarte übertragen werden.<br />
Sie können auch am PC erstellte JPEG-Dateien zur Darstellung auf dem <strong>Monitor</strong><br />
<strong>VIS</strong> 2000 PRO auf die Karte kopieren. In diesem Fall muss das JPEG-Bild die richtige<br />
Größe und das richtige Bildseitenverhältnis zur PAL-oder NTSC-Darstellung<br />
haben (PAL: 768 x 512 Pixel, NTSC: 640 x 480 Pixel). Zusätzlich muss das Bild<br />
den Mindestanforderunden der JPEG-Spezifikation genügen und im 4:2:2-Format<br />
gespeichert sein, damit die Farben richtig dargestellt werden können.<br />
DEUTSCH<br />
e-mail: mgkg@woehler.de http://mgkg.woehler.de<br />
25
4. Externe Geräte<br />
4 Externe Geräte<br />
<strong>Farbmonitor</strong> <strong>VIS</strong> 2000 PRO<br />
4.1 Video-Out<br />
Mit dem <strong>Monitor</strong> <strong>VIS</strong> 2000 PRO können Bilder und Videos nicht nur aufgezeichnet,<br />
sondern auch auf externe Geräte, wie zum Beispiel PC oder Videorecorder<br />
übertragen werden.<br />
Die Bildübertragung erfolgt über den Standard-Videoausgang (vgl. Abbildung 1,<br />
Punkt 3).<br />
Zur Bildübertragung zum PC benötigen Sie den Digitalen Bildumwandler Grab-<br />
Bee III (Best.-Nr. 6233). Schließen Sie den Stecker des mitgelieferten Video-<br />
Kabels an die Video-Buchse rechtsseitig des <strong>Monitor</strong>s (vgl. Abbildung 1, Punkt 3)<br />
und den Stecker am anderen Ende des Kabels an den Videokanal (gelbe Buchse)<br />
des Digitalen Bildumwandlers an. Verbinden Sie nun den USB-Stecker des Grab-<br />
Bee III mit der USB-Schnittstelle des PC. Die Speicherung der Aufnahme erfolgt<br />
dann über die dem Bildumwandler beiliegenden, auf den PC zu installierenden<br />
Software.<br />
4.2 Video-In<br />
Aufnahmen anderer Videoquellen wie z.B. Videorecorder, Endoskop-Kamera etc.<br />
können über den Steckerverbinder (FBAS-Übertragung) eingespielt werden.<br />
Somit können analoge Videodaten digitalisiert und auf der CompactFlash Karte<br />
gespeichert werden.<br />
Die Bildübertragung erfolgt über den Verbindungsanschluss „Typ Mini DIN“ (vgl.<br />
Abbildung 1, Punkt 4). Die Signale werden direkt auf den <strong>Monitor</strong> <strong>VIS</strong> 2000 PRO<br />
übertragen und können als Video aufgezeichnet werden (vgl. Punkt 2.6.3 Aufnahme<br />
eines Videos).<br />
26 Hotline: 0 29 53 / 73 211 Fax: 0 29 53 / 73 250
5. Wartung und Pflege<br />
5. Wartung und Pflege<br />
<strong>Farbmonitor</strong> <strong>VIS</strong> 2000 PRO<br />
Reinigen sie den <strong>Monitor</strong> nur mit einem sauberen weichen Tuch und keinesfalls<br />
mit Wasser und Reinigungsmitteln.<br />
Achtung: Das Gerät darf nur von einem von Wöhler zugelassenen Fachbetrieb<br />
geöffnet werden. Vorsicht, Hochspannung !<br />
6. Fehlermeldungen<br />
DEUTSCH<br />
Problem:<br />
Maßnahme:<br />
Kamera fehlt<br />
Kein Bild<br />
Störungen im Bild<br />
Überprüfen Sie den Anschluss der<br />
Kamera an den <strong>Monitor</strong>.<br />
Laden Sie den Akku der <strong>Monitor</strong>einheit<br />
auf.<br />
Laden Sie den Akku der <strong>Monitor</strong>einheit<br />
auf.<br />
7. Systemkomponenten<br />
Zur Anpassung an die jeweilige Inspektionsaufgabe bietet das Videoinspektionssystem<br />
<strong>VIS</strong> 2000 PRO eine Vielzahl verschiedener, untereinander kompatibler Bausteine<br />
im Bezug auf die Auswahl von:<br />
• <strong>Monitor</strong>- und Steuereinheit<br />
• Kamerakopf<br />
• Verbindungskabel / -stange<br />
• Zubehör<br />
Durch Kombination der Module kann für die jeweilige Aufgabe die optimale Ausstattung<br />
zusammengestellt werden. Auch spätere Ergänzungen des Systems im<br />
Hinblick auf neue Aufgaben sind jederzeit möglich<br />
Abbildung 5 zeigt die verschiedenen Komponenten im Überblick. Auf den nachfolgenden<br />
Seiten werden diese inkl. des zusätzlich erhältlichen Zubehörs kurz<br />
beschrieben.<br />
e-mail: mgkg@woehler.de http://mgkg.woehler.de<br />
27
7. Systemkomponenten<br />
<strong>Farbmonitor</strong> <strong>VIS</strong> 2000 PRO<br />
Abbildung 5: Systemkomponenten<br />
28 Hotline: 0 29 53 / 73 211 Fax: 0 29 53 / 73 250
7. Systemkomponenten<br />
7.1 Kamerakopf <strong>VIS</strong> 2000 Farbe (Best.-Nr. 7806 J )<br />
Kamerakopf <strong>VIS</strong> 98 s/w (Best.-Nr. 7801)<br />
7.2 Miniatur-Kamerakopf Farbe (Best.-Nr. 7817 J)<br />
Miniatur-Kamerakopf s/w (Best.-Nr. 7871 J )<br />
e-mail: mgkg@woehler.de http://mgkg.woehler.de<br />
<strong>Farbmonitor</strong> <strong>VIS</strong> 2000 PRO<br />
Die Kameraköpfe <strong>VIS</strong> 2000 Farbe und <strong>VIS</strong><br />
98 s/w sind spritzwassergeschützt durch<br />
ein vollständig gekapseltes Alugehäuse.<br />
Das Objektiv ist jeweils unter der Glaskuppel<br />
um 180° schwenkbar und um 360°<br />
drehbar. Durch zuschaltbare helle Lichtkörper<br />
kann der Fernbereich ausgeleuchtet<br />
werden. Der Kamerakopf ist mit einem<br />
Weitwinkelobjektiv<br />
(f = 2,0 mm) ausgestattet.<br />
Anwendung: Die Kameraköpfe sind hervorragend<br />
geeignet zur Dokumentation von<br />
Schäden und zur Kontrolle in Abgas- und<br />
Lüftungsanlagen sowie zur vorbereitenden<br />
Inspektion bei Sanierungsarbeiten an<br />
Abgasanlagen ab einem Durchmesser von<br />
ca. 70 mm.<br />
Der Miniatur-Kamerakopf ist ein bis zu 3<br />
bar wasserdichter Kamerakopf im robusten<br />
Edelstahlgehäuse, der über ein Weitwinkelobjektiv<br />
(f = 2,5 mm) verfügt.<br />
Aufgrund seines kleinen Durchmessers<br />
von nur 26 mm, der kurzen Baulänge und<br />
der robusten flexiblen Stangenanbindung<br />
lässt sich der Miniatur-Kamerakopf<br />
auch in engen Leitungen durch mehrere<br />
Bögen hindurch problemlos einsetzen.<br />
Anwendung: Der Miniatur-Kamerakopf<br />
ist hervorragend geeignet zur optischen<br />
Inspektion und Kontrolle von Kanälen,<br />
Rohren, Abgasleitungen, Lüftungsleitungen<br />
und Ringspalten mit Durchmessern von ca.<br />
40 mm bis 100 mm. Speziell der Miniatur-<br />
Kamerakopf s/w ist durch seine außerordentliche<br />
Lichtempfindlichkeit auch für die<br />
Kontrolle von Schornsteinen bis 20 x 20<br />
cm und Abgasleitungen bis 30 cm Durchmesser<br />
geeignet.<br />
29<br />
DEUTSCH
7. Systemkomponenten<br />
7.3 Endoskop Kamerakopf Farbe (Best.-Nr. 8697 J )<br />
<strong>Farbmonitor</strong> <strong>VIS</strong> 2000 PRO<br />
Der Endoskop Kamerakopf Farbe wird vor<br />
allem zur Dokumentation endoskopischer<br />
Aufnahmen für die gutachterliche Tätigkeit<br />
eingesetzt. Außerdem ermöglicht er<br />
die Visualisierung des Endoskopbildes für<br />
mehrere Betrachter.<br />
7.4 Zubehör Videoinspektion<br />
7.4.1 Kamerarollenführung(Best.-Nr. 7826 J)<br />
Die Kamerarollenführung für Kamerakopf<br />
<strong>VIS</strong> 2000 und <strong>VIS</strong> 98, zum Schieben in<br />
waagerechten und senkrechten Verbindungsstücken,<br />
Schornsteinen, Lüftungsund<br />
Rohrleitungen<br />
• außenliegende Rolle<br />
• einfachste Montage am Kamerakopf<br />
• Kuppelschutz aus Edelstahl, pulverbeschichtet<br />
• Stabilisierungshülse besonders empfehlenswert<br />
in größeren Rohren<br />
7.4.2 Stabilisierungshülse mit Zentriersternhalter (Best.-Nr. 3590 J)<br />
zur Stabilisierung der Kameraköpfe <strong>VIS</strong><br />
2000 und <strong>VIS</strong> 98 auf den Kamerastangen<br />
beim Durchstoßen großer Leitungen, wird<br />
einfach in den Kamerakopf oder in die<br />
Rollenführung eingeschraubt, zur Führung<br />
beim Herabstoßen z.B. im Schornstein<br />
kann ein Leinstern aufgesteckt werden<br />
(nicht im Lieferumfang enthalten)<br />
30 Hotline: 0 29 53 / 73 211 Fax: 0 29 53 / 73 250
7. Systemkomponenten<br />
7.4.3 Teleskop-Rollbock (Best.-Nr. 5706 L)<br />
<strong>Farbmonitor</strong> <strong>VIS</strong> 2000 PRO<br />
Mit dem Teleskop-Rollbock lässt sich der<br />
Kamerakopf am Kabel kontrolliert herablassen.<br />
Da er aus Edelstahl hergestellt ist,<br />
ist er besonders leicht und stabil. Er ist von<br />
22 auf 40 cm ausziehbar<br />
7.4.4 LED Zusatzbeleuchtung (Best.-Nr. 9377 P und 9177 P)<br />
DEUTSCH<br />
Die LED Zusatzbeleuchtung mit rot-gelben<br />
und mit weißen LEDs zur Arbeit mit dem<br />
Kamerakopf <strong>VIS</strong> 2000 und <strong>VIS</strong> 98 ermöglicht<br />
die Ausleuchtung des Fernbereiches<br />
während der Inspektion. Die Zusatzbeleuchtung<br />
lässt sich einfach auf den<br />
Kamerakopf aufschieben.<br />
7.4.5 Kabelaufwicklung <strong>VIS</strong> 2000 und SK 95 (Best.-Nr. 7816 J)<br />
Kabelaufwicklung <strong>VIS</strong> 2000 PRO (Best.-Nr. 3816 J)<br />
Die praktische Kabelaufwicklung mit patentiertem,<br />
robustem Drehübertrager lässt<br />
sich während der Inspektion mit einem<br />
Schultergurt gut vor dem Körper tragen.<br />
Für den Transport kann sie samt <strong>Monitor</strong><br />
kompakt zusammengeklappt werden.<br />
7.4.6 Kamerahaspel (Best.-Nr. 7822 J )<br />
Die Kamerahaspel wird mit Kamerastangen<br />
von 6 oder 7 mm l und einer Länge bis<br />
zu 30 m angeboten. Die Stange erlaubt die<br />
komfortable Inspektion vertikal wie auch<br />
horizontal verlaufender Rohrsysteme.<br />
e-mail: mgkg@woehler.de http://mgkg.woehler.de<br />
31
7. Systemkomponenten<br />
7.4.7 Kamerahalterung (Best.-Nr. 3720 J)<br />
<strong>Farbmonitor</strong> <strong>VIS</strong> 2000 PRO<br />
Die Kamerahalterung ist mit einem Verbindungskabel<br />
und einem Gewinde M10<br />
ausgestattet und kann so bequem auf alle<br />
GFK-Stangen montiert werden. Sie ist<br />
sowohl bei der vertikalen als auch bei der<br />
horizontalen Inspektion einsetzbar. Der<br />
Kamerakopf wird im Schutzkorb mit Blickrichtung<br />
nach unten positioniert, so dass<br />
einfallendes Tageslicht bei der Inspektion<br />
von Schornsteinen nicht blendet.<br />
7.4.8 Kamerafederführung (Best.-Nr. 8633 J)<br />
Die Kamerafederführung erleichtert die<br />
Führung des Kamerakopfes am Kabel in<br />
vertikalen Kanälen, indem sie das Verdrehen<br />
und Pendeln des Kopfes verhindert.<br />
Die Feder ist auf die jeweilige Schornsteingröße<br />
einstellbar.<br />
7.4.8 Spezialkabel (Best.-Nr. 9181 L)<br />
0,8 m zur Verbindung der einzelnen GFK-Kamerastange mit dem <strong>Monitor</strong>.<br />
7.4.9 Kamerastangen<br />
GFK-Kamerastange schwarz, flexibel, 6 mm Ø, 5 m lang (Best.-Nr. 7821 J)<br />
GFK-Kamerastange schwarz, flexibel, 6 mm Ø, 20 m lang (Best.-Nr. 7818 J)<br />
GFK-Kamerastange schwarz, flexibel, 6 mm Ø, 30 m lang (Best.-Nr. 7819 J)<br />
GFK-Kamerastange rot, stabil, 7 mm Ø, 5 m lang (Best.-Nr. 7305 J)<br />
GFK-Kamerastange rot, stabil, 7 mm Ø, 20 m lang (Best.-Nr. 7829 J)<br />
GFK-Kamerastange rot, stabil, 7 mm Ø, 30 m lang (Best.-Nr. 7306 J)<br />
32 Hotline: 0 29 53 / 73 211 Fax: 0 29 53 / 73 250
8. Zubehör<br />
8. Zubehör/ Ersatzteile zum <strong>Farbmonitor</strong> <strong>VIS</strong> 2000<br />
<strong>Farbmonitor</strong> <strong>VIS</strong> 2000 PRO<br />
8.1 Netzteil <strong>VIS</strong> 2000 PRO (Best.-Nr. 6837 J)<br />
für Netz- und Ladebetrieb<br />
8.2 Lederschutztasche für <strong>Monitor</strong> <strong>VIS</strong> 2000 PRO (Best.-Nr. 6838 J)<br />
DEUTSCH<br />
mit Blendschutz und Schultergurt. Zum<br />
sicheren Transport und als komfortable<br />
Halterung des <strong>Monitor</strong>s während der<br />
Inspektion.<br />
8.3 Adapterkabel (Best.-Nr. 8637 O)<br />
für 12 Volt PKW-Bordnetz<br />
8.4 Tragegurt (Best.-Nr. 8136 I)<br />
Ermöglicht es, die Kabelaufwicklung bequem<br />
vor dem Körper zu tragen, so dass<br />
beide Hände für die Arbeiten frei bleiben.<br />
e-mail: mgkg@woehler.de http://mgkg.woehler.de<br />
33
9. Konformitätserklärung<br />
<strong>Farbmonitor</strong> <strong>VIS</strong> 2000 PRO<br />
9. EG-Konformitätserklärung<br />
Für das folgend bezeichnete Produkt<br />
Videoinspektionsgerät <strong>VIS</strong> 2000 PRO<br />
wird hiermit bestätigt, dass es den wesentlichen Schutzanforderungen entspricht,<br />
die in den Richtlinien des Rates zur Angleichung der Rechtsvorschriften<br />
der Mitgliedstaaten über die elektomagnetische Verträglichkeit (89/336/EWG und<br />
93/97/EWG) festgelegt sind.<br />
Zur Beurteilung des Produkts hinsichtlich der elektromagnetischen Verträglichkeit<br />
wurden folgende Normen herangezogen:<br />
EN 55024<br />
Störfestigkeit<br />
EN 55022<br />
Störaussendung<br />
EN 61000-3-2 Netzoberschwingungen<br />
EN 61000-3-3 Spannungsschwankungen, Flicker<br />
Dieser Erklärung wird verantwortlich für den Hersteller/Importeur<br />
Wöhler Messgeräte Kehrgeräte GmbH<br />
Adresse:<br />
33181 Bad Wünnenberg<br />
abgegeben durch:<br />
Dipl.-Phys. Johannes Lötfering, Geschäftsführer<br />
Bad Wünnenberg, 28.10.2004<br />
34 Hotline: 0 29 53 / 73 211 Fax: 0 29 53 / 73 250
10. Garantie und Service<br />
10. Garantie und Service<br />
<strong>Farbmonitor</strong> <strong>VIS</strong> 2000 PRO<br />
Jeder <strong>Farbmonitor</strong> <strong>VIS</strong> 2000 PRO wird im Werk in allen Funktionen geprüft und<br />
verlässt unser Werk erst nach einer ausführlichen Qualitätskontrolle.<br />
Bei sachgemäßem Gebrauch beträgt die Garantiezeit auf den <strong>Monitor</strong> 12 Monate.<br />
Ausgenommen sind Verschleißteile (z.B. Akkus/Batterien) und Verbrauchsmaterialien.<br />
Die Kosten für den Transport und die Verpackung des Geräts im Reparaturfall<br />
werden von dieser Garantie nicht abgtedeckt. Diese Garantie erlischt,<br />
wenn Reparaturen und Abänderungen von dritter, nicht autorisierter Stelle an<br />
dem Gerät vorgenommen wurden.<br />
Der SERVICE wird bei uns sehr groß geschrieben. Deshalb sind wir auch selbstverständlich<br />
nach der Garantiezeit für Sie da.<br />
• Es erfolgt eine sofortige Reparatur, wenn Sie mit Ihrem Gerät zu uns nach<br />
Bad Wünnenberg kommen.<br />
• Sie schicken das Gerät zu uns, wir reparieren es innerhalb weniger Tage,<br />
und schicken es Ihnen mit unserem Paketdienst zurück.<br />
• Sie erhalten gegen einen geringen Pauschalbetrag ein Leihgerät gestellt.<br />
• Sofortige Hilfe erhalten Sie durch unsere Techniker am Telefon.<br />
DEUTSCH<br />
e-mail: mgkg@woehler.de http://mgkg.woehler.de<br />
35
11. Kurzanleitung<br />
<strong>Farbmonitor</strong> <strong>VIS</strong> 2000 PRO<br />
Gerät einschalten<br />
Hauptmenü<br />
Einstellen Bildschirmdarstellung, Sprache, Standardwerten etc.<br />
Bildergalerie<br />
zeigt alle gespeicherten<br />
Bilder<br />
des aktuellen<br />
Ordners an<br />
Mode-Fenster<br />
Einstellen der<br />
Videoparameter<br />
Standbild<br />
Bilder speichern<br />
Aufnahme<br />
Videos aufnehmen<br />
AUTO<br />
NTSC<br />
PAL<br />
VOLLBILD<br />
HALBBILD<br />
VIDEO STANDARD<br />
Videoformat einstellen<br />
Kamerasteuerung<br />
Drehen und<br />
Schwenken des<br />
Kamerakopfes<br />
BILDAUFLOESUNG<br />
Bildauflösung festlegen<br />
Bilder/Videos<br />
auswählen<br />
SPOT<br />
Zusatzbeleuchtung<br />
ein-/ausschalten<br />
Wechsel zwischen<br />
Voll- und<br />
Halbbild-Mode<br />
Aufnahme starten<br />
LANG<br />
AUFNAHMEZEIT<br />
KURZ<br />
Länge/Auflösung der Videos wählen<br />
Großansicht<br />
Aufnahme stoppen<br />
AUTOMAT. (Datum; TTMMJJ)<br />
BELIEBIG* (Name frei wählbar)<br />
KONTRAST<br />
Kontrast<br />
verändern<br />
STANDARD DATEINAME<br />
Dateinamenformat festlegen<br />
MARKIERN<br />
mehrere Dateien<br />
gleichzeitig auswählen<br />
ENGLISCH<br />
DEUTSCH<br />
FRANZ.<br />
SPANISCH<br />
ITAL.<br />
DATUM<br />
ZEIT<br />
TASTATURKLICK (Tastenton)<br />
STANDARD KONTRAST<br />
STANDARD HELLIGKEIT<br />
STANDARD FARBE<br />
36 Hotline: 0 29 53 / 73 211 Fax: 0 29 53 / 73 250<br />
Bild aufnehmen<br />
DISPLAY AUSRICHTUNG<br />
Display drehen<br />
HELLIGKEIT<br />
Helligkeit<br />
anpassen<br />
SPRACHE<br />
Sprache auswählen<br />
LÖSCHEN<br />
ausgewählte<br />
Datei(en) löschen<br />
FARBE<br />
Farbsättigung<br />
einstellen<br />
SETUP<br />
Grundeinstellung<br />
VERSCHIEBEN<br />
Datei in einen<br />
anderen Ordner<br />
verschieben<br />
Navigation im Menü<br />
KARTE FORMATIEREN<br />
alle Inhalte der<br />
Speicherkarte löschen<br />
anwählen der Menüpunkte/Dateien<br />
Auswahl<br />
KOPIEREN<br />
Kopie der Datei<br />
in einem anderen<br />
Ordner erstellen<br />
zurück zum Menü/<br />
Wechsel zwischen Menü und Bildauswahl<br />
zurück zum Kamerabild<br />
ORDNER WECHSELN<br />
aktiven Ordner wechseln<br />
AUTOMAT. (Name: FOLDER)<br />
BELIEBIG* (Name frei wählbar)<br />
ORDNER ANLEGEN<br />
neuen Ordner erstellen<br />
UMBENENNEN*<br />
ausgewählte Datei<br />
umbenennen<br />
KOPFZEILE<br />
Dateiname ein-/ausblenden<br />
ORDNER W.<br />
aktiven Ordner<br />
wechseln<br />
FUSSZEILE<br />
Datum/Meterzählung ein-/aus-<br />
AUTOMAT. (Name: FOLDER)<br />
BELIEBIG* (Name frei wählbar)<br />
Navigation zur Eingabe von Zeichen/Ändern von Parametern<br />
anwählen des Zeichens/Parameters<br />
verändern des Zeichens/Wertes<br />
speichern und verlassen<br />
verlassen ohne zu speichern
<strong>VIS</strong> 2000 PRO <strong>DC</strong> <strong>Monitor</strong><br />
Contents<br />
1. Introduction..................................2<br />
2. Components and Controls...........3<br />
3. Technical Specifications...............4<br />
4. Getting Started.............................6<br />
5. Using the Key Menus...................7<br />
6. Capturing Images.........................8<br />
7. Reviewing Images and Videos...10<br />
8. Using the Gallery Menu..............11<br />
9. Configuring the PRO <strong>Monitor</strong>.....14<br />
10. Transferring Images to a PC.......19<br />
11. Troubleshooting..........................20<br />
12. System Components..................22<br />
13. Accessories/SpareParts of the Colour<br />
<strong>Monitor</strong> <strong>VIS</strong> 2000 PRO ............27<br />
14. Declaration of conformity...........28<br />
15. Guarantee and Service...............29<br />
The Measure of Technology
1. Introduction<br />
1. Introduction<br />
Colour <strong>Monitor</strong> <strong>VIS</strong> 2000 PRO<br />
1.1 About the Wöhler PRO <strong>DC</strong> monitor<br />
The PRO <strong>DC</strong> monitor (PRO) is a unique product that provides a convenient way<br />
of capturing still images or video clips to a removable CompactFlash card. It is<br />
compatible with both NTSC and PAL, composite or S-video signals, and a builtin<br />
LCD display allows you to preview the video before saving it to the memory<br />
card. Video clips are captured at 12 frames per second at full NTSC or PAL<br />
resolution, and stored in Motion-JPEG (MJPEG) compressed format, allowing<br />
approximately 40 minutes of video to be stored on a 2 GB CompactFlash card.<br />
Still images are stored in a compressed JPEG format, and about 7700 images<br />
can be stored on a 2 GB CompactFlash card. The storage capacity is limited only<br />
by the size of the CompactFlash card used (2GB). Captured images and video<br />
clips are automatically named with the date and a sequence label. Alternatively<br />
you can supply a name using the PRO monitor keypad. Images can be organized<br />
into named folders, and a range of cataloguing functions help in archiving and retrieving<br />
images, including the ability to rename images, delete images, and move<br />
or copy images between folders.<br />
The PRO monitor includes a convenient thumbnail gallery feature, which allows<br />
you to search through the library of captured images 12 at a time, and then<br />
select one for full size viewing. Alternatively the images can be uploaded to a PC<br />
using the supplied card reader, where they can be displayed or processed by any<br />
suitable image editing software.<br />
The PRO monitor is simple to operate, using intuitive onscreen displays, and<br />
the keypad can be used even when wearing gloves or protective clothing. For<br />
convenience the PRO monitor display image can also be flipped so the monitor<br />
can accommodate either right or left-handed use. A range of user options allows<br />
you to specify how the image files are named, the display orientation, and video<br />
parameters.<br />
The PRO monitor is ideal for any application in which sequences of still images<br />
or video clips need to be captured and stored on site. The PRO monitor is an<br />
ideal replacement for a VCR or computer based video capture system where<br />
still images or video clips need to be captured from a video source. Its rugged<br />
construction and the absence of moving parts make it extremely durable and it is<br />
ideal for use in the field.<br />
Typical applications include:<br />
- Chimney, Duct, Vent or pipe inspection and documentation<br />
- Routine maintenance and quality control<br />
40 Hotline: 0 29 53 / 73 211 Fax: 0 29 53 / 73 250
2. Components and Controls<br />
Colour <strong>Monitor</strong> <strong>VIS</strong> 2000 PRO<br />
- Inspection and fault-finding<br />
- Digital capture from other video/TV sources<br />
The PRO monitor comes standard with a high quality, leather case and strap for<br />
protection and ease of transport and has a flip out sun visor for outdoor viewing.<br />
The PRO monitor also comes with a power supply unit (PSU) for recharging the<br />
internal batteries or for direct 120V AC operation. For digital capture the PRO<br />
comes with a CompactFlash card and a USB 2.0 High Speed CF reader with<br />
software. CF cards up to 2 GB can be used in the PRO monitor.<br />
The PRO monitor can also operate as a secondary monitor for viewing or to<br />
capture images from other analog video sources (ie VCR, TV etc.). Simply plug<br />
in the external analog video source to the Video-In RCA socket (no. 3, fig 1). See<br />
Section 6 for details. Note: The Video-In socket is not active while the camera is<br />
attached and live.<br />
2. Components and Controls<br />
2.1 PRO <strong>DC</strong> <strong>Monitor</strong> Components and Controls<br />
English<br />
1<br />
7<br />
2<br />
3<br />
4<br />
5<br />
9<br />
8<br />
10<br />
6<br />
Figure 2.1: Components and Controls<br />
1 ON/OFF Switch<br />
2 <strong>Monitor</strong> and camera control pad<br />
3 Video-In<br />
4 Video-Out<br />
5 CompactFlash (CF) card<br />
6 CF Card slot/release<br />
7 Video cable connection<br />
8 Camera mount plate (back)<br />
9 Power supply socket<br />
10 Future external device socket<br />
e-mail: mgkg@woehler.de http://mgkg.woehler.de<br />
41
2. Components and Controls<br />
Colour <strong>Monitor</strong> <strong>VIS</strong> 2000 PRO<br />
2.2 Front Panel Controls<br />
The diagram below shows the function of each of the PRO monitor front panel<br />
controls and connections:<br />
2<br />
3<br />
4<br />
5c<br />
5d<br />
7<br />
Figure 2.2: Front Panel controls<br />
1<br />
5a<br />
5b<br />
6a<br />
6b<br />
8<br />
Pro <strong>Monitor</strong> controls:<br />
1 Picture index<br />
2 Record picture or video<br />
3 Pause/freeze screen<br />
4 Mode menu<br />
(bright/contrast/color/spot)<br />
5a,b,c,d<br />
5a UP Pan<br />
5b Right Tilt<br />
5c Down Pan<br />
5d Left Tilt<br />
6 Menu/ESC<br />
6a Press top for Menu<br />
6b Press bottom for ESC<br />
7 Charge indicators<br />
8 IR Remote control<br />
(not currently available)<br />
3. Technical Specifications<br />
Display<br />
Type:<br />
Resolution:<br />
6.5“ TFT LCD<br />
640 x 480 pixels<br />
Brightness: 300cd/m 2<br />
Color depth: 262,144 colors (18-bits)<br />
Video System: Auto selecting NTSC/PAL<br />
Resolution: NTSC – 640 x 480<br />
PAL – 768 x 512<br />
42 Hotline: 0 29 53 / 73 211 Fax: 0 29 53 / 73 250
3. Technical Specifications<br />
Colour <strong>Monitor</strong> <strong>VIS</strong> 2000 PRO<br />
Inputs:<br />
Auto selecting Composite (CVBS)/<br />
S-Video (Y/C)<br />
Connectors: Camera - 8 pin<br />
Composite – Phono<br />
S-Video – 4-pin mini-DIN<br />
Media:<br />
Flash memory: CompactFlash TM Type I & II cards<br />
Capacity (max.): CompactFlash TM 2GB<br />
File system:<br />
Capacity: Root directory – 256 folders<br />
Folders – Unlimited files<br />
Format:<br />
FAT-16 Long filename convention<br />
File formats:<br />
Still image: JPEG, high quality<br />
Video clip: Motion-JPEG (.MOV), 12 fps<br />
Power:<br />
Internal Battery: NiMH 6-cell<br />
Voltage:<br />
7.2V (nominal)<br />
Capacity: 4Ahr (typical operation 1 – 1.5 hrs approx.)<br />
Charger:<br />
Internal smart fast charger<br />
Charging indicators<br />
Mounting:<br />
threaded insert (standard camera mount)<br />
Approved<br />
CompactFlash cards: Type I: Dane-elec. Please contact Wöhler<strong>USA</strong> for details<br />
of currently approved CompactFlash card manufacturers.<br />
Operating temperature: 32 to 104 °F (0 to 40 °C)<br />
Weight: 79 oz. (1300 g)<br />
Dimensions: 10.5 x 8 x 2.5 in. (27 x 20x 6 cm)<br />
English<br />
e-mail: mgkg@woehler.de http://mgkg.woehler.de<br />
43
4. Getting Started<br />
Colour <strong>Monitor</strong> <strong>VIS</strong> 2000 PRO<br />
4. Getting Started<br />
This chapter provides a general overview of the PRO monitor to get you started<br />
as quickly as possible. More detailed instructions on the various menu features<br />
will be discussed in following chapters.<br />
NOTE: Please read all instructions fully before using the monitor. Incorrect<br />
operation of the monitor or the system can cause poor performance or damage<br />
to the monitor or other components.<br />
4.1 Battery charger<br />
IMPORTANT: Before using the PRO monitor for the first time the internal batteries<br />
should be fully charged by plugging the supplied charger into any 120V AC socket.<br />
A full charge requires approximately 4 hours. The PRO monitor can be operated<br />
while the battery is being recharged. The PRO monitor will operate 1 to 1.5<br />
hours on a fully charged battery depending on activity and camera. The battery<br />
will trickle charge while plugged in and operating. See Section 11.4 for details.<br />
WARNING: DO NOT substitute another charger for the one provided. Using a<br />
different charger could damage the monitor and/or cause a fire hazard.<br />
4.2 Inserting/Removing the CompactFlash Card<br />
The CompactFlash card can be removed or plugged in even while the PRO monitor<br />
is switched on. After plugging in a CompactFlash card the screen will blink for<br />
a few seconds while the PRO reads the data on the card. When finished blinking,<br />
you can proceed as normal. To remove a card press the eject button beside the<br />
slot. Care should be taken to properly align the card during insertion. Otherwise<br />
the card could be damaged and data lost.<br />
4.3 Camera Connection<br />
Connect the video cable (male) to the video socket (female) located on the top of<br />
the monitor (No. 7, fig. 1). You can use either NTSC or PAL Wöhler camera heads<br />
as the monitor automatically detects and adjusts for either format.<br />
4.4 Switching on<br />
Switch the PRO monitor ON by using the switch located on the face of the cable<br />
connector on top of the unit (No. 1, fig. 1). After a brief delay, during which the<br />
unit performs an internal check, the Video Auto-Selector screen will be displayed:<br />
44 Hotline: 0 29 53 / 73 211 Fax: 0 29 53 / 73 250
5. Using the Key Menus<br />
Colour <strong>Monitor</strong> <strong>VIS</strong> 2000 PRO<br />
Woehler<br />
A U T O VIDEO IN<br />
N O V I D E O S I G N A L<br />
N T SC S – V I D E O<br />
N T SC C O M P O S I T E<br />
P A L S – V I D E O<br />
P A L C O M P O S I T E<br />
The PRO monitor will then display the live video signal on the display.<br />
5. Using the Key Menus<br />
The PRO monitor is operated using the nine keys on the touch panel to the left of<br />
the display in conjunction with a series of on-screen menus. The Main Menu and<br />
the Mode Menu are accessed directly from the key pad. The Main Menu has a<br />
variety of setup and file management features and settings accessed via submenus.<br />
See Section 9 ( Configuring The PRO <strong>Monitor</strong>) for details. The Mode Menu<br />
accesses display adjustment features screen and has the camera’s Hi Beam ON/<br />
OFF control.<br />
5.1 To display the Main Menu<br />
English<br />
° Press menu/esc.<br />
The Main Menu is displayed as an overlay on the current video image:<br />
M A I N M E N U<br />
– – – – – – – – –<br />
V I D E O S T A N D A R D ><br />
I M A G E F R E E Z E ><br />
R E C O R D T I M E ><br />
B A S E F I L E N A M E ><br />
D I S P L A Y O R I E N T A T I O N ><br />
L A N G U A G E ><br />
S E T U P ><br />
F O R M A T ><br />
F O L D E R ><br />
+ F O L D E R ><br />
R E N A M E F O L D E R ><br />
T O P L I N E ><br />
B O T T O M L I N E ><br />
e-mail: mgkg@woehler.de http://mgkg.woehler.de<br />
45
6. Capturing Images<br />
Colour <strong>Monitor</strong> <strong>VIS</strong> 2000 PRO<br />
To move between menu options<br />
° Press v or w<br />
To select an option<br />
° Press n.<br />
To exit from the current menu<br />
° Press menu/esc.<br />
NOTE: Pressing menu/esc at any stage generally exits from the current function<br />
and takes you back to the previous function.<br />
5.2 To display the Mode Menu<br />
The Mode Menu allows you to adjust the brightness, contrast and color of the<br />
screen display. This is frequently done during the course of any inspection as the<br />
quality of the displayed picture changes due to distance, surface conditions and<br />
light levels the camera experiences. You also turn ON or OFF the camera’s Hi Beams<br />
in this menu. You toggle up or down the numerical options by using buttons<br />
5a v and 5d b (Fig 2).<br />
° Press Mode/OK<br />
The Main Menu is displayed as an overlay on the current video image:<br />
MODE M E N U<br />
– – – – – – – – – –<br />
SPOT ( 0 – 1 )<br />
C O N T R A S T ( 0 – 9 ) < 5 ><br />
B R I G H T N E S S ( 0 – 9 ) < 5 ><br />
C O L O R ( 0 – 9 ) < 5 ><br />
< 0 > “0“ = Off, “1“ = On<br />
The default setting for the display is “5” and for the Hi Beam Spot is “0”. The<br />
monitor automatically resets these settings when turned off. NOTE: The Mode<br />
Menu cannot be accessed when there is no video-in signal present.<br />
6. Capturing Images<br />
6.1 Image capacity<br />
The PRO monitor is provided with a preformatted blank CompactFlash card. To<br />
use other CompactFlash cards with the PRO monitor they should first be formatted<br />
as described in Section 9.41 (To format a CompactFlash card).<br />
46 Hotline: 0 29 53 / 73 211 Fax: 0 29 53 / 73 250
6. Capturing Images<br />
Colour <strong>Monitor</strong> <strong>VIS</strong> 2000 PRO<br />
6.2 Freezing an image<br />
To freeze the video image:<br />
° Press II (No. 3 Fig. 2.1)<br />
When the video image is frozen the display shows:<br />
S T I L L<br />
° Press II again to unfreeze the video image.<br />
6.3 To save the image<br />
While the image is frozen:<br />
° Press • (the red record button) (No. 2 Fig 2.1)<br />
The FILENAME EDITOR is briefly displayed to show the filename assigned to the<br />
image, and the space remaining:<br />
English<br />
F I L E N A M E E D I T O R<br />
S t o r e a s :<br />
— 0 1 2 8 0 3 0 V —<br />
F i l e s p a c e l e f t : 0 1 2 6<br />
If the image is in double-field mode a D is displayed in the top right-hand corner<br />
of the FILENAME EDITOR. The first six characters of the filename will be the current<br />
date in US format; for example 012803. Alternatively you can supply a sixcharacter<br />
prefix using the BASE FILENAME option on the Main Menu. To specify<br />
the base filename see Section 9.31. The last two characters of the filename are<br />
automatically incremented through the sequence of characters 0-9 and A-Z to<br />
ensure that every file is saved with a unique name. For example, the first few<br />
filenames will end in 00, 01, 02 … 09, 0A, 0B … 0Z, 10, 11 … etc.<br />
6.4 Capturing a video clip<br />
To capture a video clip:<br />
° Press • the red record button. (No. 2 Fig 2.1)<br />
The display shows the maximum length of video clip you can capture, depending<br />
on the amount of space remaining on the CompactFlash card:<br />
R E C O R D I N G<br />
O K<br />
(will be highlighted on screen)<br />
C A N C E L<br />
R E C O R D : M M S S<br />
T I M E : 0 2 3 4<br />
e-mail: mgkg@woehler.de http://mgkg.woehler.de<br />
47
7. Reviewing Images and Videos<br />
Colour <strong>Monitor</strong> <strong>VIS</strong> 2000 PRO<br />
° Press OK and start recording. Alternatively, to cancel video capture press w to<br />
highlight CANCEL and press MODE/OK to select it, or press menu/esc.<br />
While video is being captured the display shows:<br />
R E C O R D I N G<br />
° Press • to stop recording.<br />
7. Reviewing Images and Videos<br />
The image gallery allows you to review the still images and video clips you have<br />
captured, and provides commands to help you to organize the images.<br />
7.1 To display the image gallery<br />
° Press index.<br />
The display briefly shows:<br />
I M A G E G A L L E R Y<br />
G A L L E R Y L O A D I N G :<br />
It will then show thumbnail previews of the 12 most recent images you have<br />
captured in the current folder. A flashing filename indicator highlights the most<br />
recently captured image. For video clips the thumbnail shows the first frame, and<br />
a play icon n is displayed in the lower left corner.<br />
7.2 To highlight a thumbnail<br />
° Move the filename indicator with v or w.<br />
° Hold down either key to move quickly between the images. You can step<br />
through the 12 thumbnails in the gallery, and as you highlight each thumbnail<br />
the filename indicator changes to show the full filename of that image or video<br />
clip.<br />
7.3 To display the previous page of thumbnails<br />
° Move the filename indicator to the first thumbnail in the top left corner of the<br />
image gallery, and press v. The next page of 12 thumbnails will be displayed. If<br />
there are no more images in the current folder the filename indicator will wrap to<br />
the last image in the lower right corner of the image gallery.<br />
7.4 To display the next page of thumbnails<br />
° Move the filename indicator to the last thumbnail in the lower right corner of<br />
48 Hotline: 0 29 53 / 73 211 Fax: 0 29 53 / 73 250
7. Reviewing Images and Videos<br />
Colour <strong>Monitor</strong> <strong>VIS</strong> 2000 PRO<br />
the image gallery, and press b . The next page of 12 thumbnails will be displayed.<br />
If you are already displaying the most recent files in the current folder the<br />
filename indicator will wrap to the first image in the top left corner of the image<br />
gallery.<br />
7.5 To display an image at full size, or replay a video clip<br />
° Highlight the thumbnail of the file you want to display.<br />
° Press Mode / OK<br />
The image or video clip will be displayed at full size. To return to the image gallery<br />
press index. While a full size image is being displayed you can use the following<br />
keys:<br />
w Step to the next image<br />
v Step to the previous image<br />
° Press MENU<br />
Displays the Retrieval menu to allow you to delete or rename the image, see<br />
Section 8.23<br />
English<br />
R E T R I E V A L M E N U<br />
– – – – – – – – – – – – – –<br />
D E L E T E > S e l e c t<br />
— — — — — —<br />
C A N C E L (press OK to cancel)<br />
O K (press b then OK to delete)<br />
R E N A M E > S e l e c t<br />
— — — — — —<br />
C A N C E L (press OK to cancel)<br />
C H A N G E ( press OK to select)<br />
While a video clip is playing or paused you can use the following keys to control<br />
playback:<br />
II Pause/continue playing<br />
w Play backwards<br />
v Play forwards<br />
7.6 To exit from the image gallery<br />
° Press ESC.<br />
8. Using the Gallery Menu<br />
You can manipulate the images displayed in the gallery using the options on the<br />
Gallery menu. The following tables summarize the options:<br />
e-mail: mgkg@woehler.de http://mgkg.woehler.de<br />
49
8. Using the Gallery Menu<br />
Colour <strong>Monitor</strong> <strong>VIS</strong> 2000 PRO<br />
Option Description:<br />
MARK Allows you to mark several thumbnails and then apply a function to<br />
all the marked files.<br />
DELETE Deletes the selected file or marked files.<br />
MOVE Moves the selected file or marked files to another folder.<br />
COPY Copies the selected file or marked files to another folder.<br />
RENAME Renames the selected file.<br />
FOLDER Changes the current folder.<br />
+FOLDER Creates a new empty folder.<br />
8.1 To display the Gallery menu<br />
The Gallery menu automatically displays on the left side of the display when you<br />
enter the image gallery. To activate the Gallery menu:<br />
° Press MENU<br />
G A L L E R Y<br />
— — — — — —---<br />
M A R K ><br />
D E L E T E ><br />
M O V E ><br />
C O P Y ><br />
R E N A M E ><br />
F O L D E R ><br />
+ F O L D E R ><br />
The first option on the Gallery menu will be highlighted.<br />
8.2 To mark files in the gallery<br />
° Highlight MARK on the Gallery menu and press OK to select it. The MARK option<br />
will flash to indicate that you are in marking mode.<br />
° Use the v or b keys to highlight the first thumbnail you want to mark, and<br />
press OK to mark it. The filename indicator will change to show that the file is<br />
marked. If necessary you can unmark a marked file by pressing OK again.<br />
° Mark other files in the gallery the same way. When you have marked the files to<br />
work with:<br />
° Press MENU to return to the Gallery menu.<br />
° Highlight the option you want to apply to the marked files: DELETE, MOVE, or<br />
COPY, and press OK to select it.<br />
50 Hotline: 0 29 53 / 73 211 Fax: 0 29 53 / 73 250
8. Using the Gallery Menu<br />
Colour <strong>Monitor</strong> <strong>VIS</strong> 2000 PRO<br />
° Proceed as described in the appropriate section below to perform the operation<br />
on the marked files.<br />
8.2.1 To delete one or more files<br />
° Highlight DELETE on the Gallery menu and press OK to select it. A DELETE<br />
menu will be displayed to allow you to confirm that you want to delete the selected<br />
file or marked files.<br />
° Press b to highlight OK and press OK to select it. Alternatively to cancel the<br />
operation press OK to select cancel.<br />
8.2.2 To move or copy one or more files<br />
° Highlight MOVE or COPY in the Gallery menu and press OK to select it. A menu<br />
will allow you to confirm that you want to proceed.<br />
° Press b to highlight FOLDER and press OK to select it. Alternatively to cancel<br />
the operation press OK when CANCEL highlighted. A SELECT FOLDER menu<br />
will be displayed, showing a list of the names of each folder on the Compact-<br />
Flash card.<br />
° Highlight the folder you want to use and press OK to select it. The files will be<br />
moved or copied to the folder you specified.<br />
English<br />
8.2.3 To rename a file<br />
° Highlight RENAME in the Gallery menu and press OK to select it. A RENAME<br />
menu will allow you to confirm that you want to proceed.<br />
° Press b to highlight CHANGE and press OK to select it. Alternatively to cancel<br />
the operation press OK when CANCEL highlighted.<br />
The CHANGE FILENAME EDITOR will be displayed:<br />
C H A N G E F I L E N A M E E D I T O R<br />
S t o r e a s :<br />
— 0 1 2 8 0 3 0 V —<br />
Edit the first six characters of the filename as follows:<br />
° Press v or w to step between the characters A-Z and 0-9.<br />
° Press OK to step between the six character positions.<br />
° Press OK after editing the sixth character to return to the Gallery menu. You cannot change<br />
the two-character suffix.<br />
e-mail: mgkg@woehler.de http://mgkg.woehler.de<br />
51
9. Configuring the PRO-<strong>Monitor</strong><br />
8.2.4 To change the current folder<br />
Colour <strong>Monitor</strong> <strong>VIS</strong> 2000 PRO<br />
° Highlight FOLDER in the Gallery menu and press OK to select it. A SELECT<br />
FOLDER menu will show a list of the names of the folders on the CompactFlash<br />
card.<br />
° Highlight the folder you want to use and press OK to select it. The image gallery<br />
will be updated to show the 12 most recent files in the folder you specified.<br />
8.2.5 To create a new folder<br />
° Highlight +FOLDER in the Gallery menu and press OK to select it. The +FOL-<br />
DER menu will be displayed.<br />
° Press OK to select DEFAULT and create a folder with the default name FOLDER<br />
followed by a two-character suffix which is automatically incremented through<br />
the sequence AA, AB…AZ, BA… etc. Alternatively, press b to highlight USER<br />
and press OK to select it to provide a custom folder name, in exactly the same<br />
way as renaming a file; see Section 8.23 (To rename a file) above.<br />
9. Configuring the PRO <strong>Monitor</strong><br />
This chapter describes the option settings available from the Main Menu to allow<br />
you to configure the PRO monitor to suit the requirements of your application.<br />
9.1 Using the Main Menu<br />
To display the Main Menu<br />
° Press MENU<br />
M A I N M E N U<br />
– – – – – – – – –<br />
V I D E O S T A N D A R D ><br />
I M A G E F R E E Z E ><br />
R E C O R D T I M E ><br />
B A S E F I L E N A M E ><br />
D I S P L A Y O R I E N T A T I O N ><br />
L A N G U A G E ><br />
S E T U P ><br />
F O R M A T ><br />
F O L D E R ><br />
+ F O L D E R ><br />
R E N A M E F O L D E R ><br />
T O P L I N E ><br />
B O T T O M L I N E ><br />
P O W E R S A V E ><br />
52 Hotline: 0 29 53 / 73 211 Fax: 0 29 53 / 73 250
9. Configuring the PRO-<strong>Monitor</strong><br />
Colour <strong>Monitor</strong> <strong>VIS</strong> 2000 PRO<br />
To scroll up and down the main menu selections use the v and b keys. To<br />
enter a selection and to view the submenu:<br />
° Press n.<br />
9.2 Video settings<br />
The VIDEO STANDARD, IMAGE FREEZE, and RECORD TIME options on the<br />
Main Menu allow you to configure the video operation of the PRO monitor.<br />
9.2.1 To specify the video standard for replaying images<br />
This setting is retained when the PRO monitor is switched off. Normally AUTO is<br />
the recommended setting. With this option the PRO monitor automatically sets<br />
the standard based on the current video source, and retains the settings even<br />
when the video source is disconnected. However, you can only replay images<br />
saved with the current video standard. If you want to replay images on the PRO<br />
monitor of either standard, without a video input connected, set the VIDEO<br />
STANDARD option to NTSC or PAL as appropriate.<br />
English<br />
M A I N M E N U<br />
– – – – – – –<br />
V I D E O S T A N D A R D > S e l e c t<br />
– – – – –<br />
AU T O<br />
N T S C<br />
P A L<br />
° Choose AUTO for auto-detection of the video standard from the current video<br />
input, NTSC to set the standard to NTSC, or PAL to set the standard to PAL.<br />
9.2.2 To specify the image freeze mode<br />
By default the IMAGE FREEZE option is set to FRAME, which captures both<br />
frames of the video image. You can override this on an individual image basis.<br />
The FIELD option sets double-field mode for all images by default. This is useful<br />
if most images you capture are of moving objects.<br />
M A I N M E N U<br />
– – – – – – – –<br />
I M A G E F R E E Z E ><br />
S e l e c t<br />
— — — — — —<br />
F R A M E<br />
F I E L D<br />
e-mail: mgkg@woehler.de http://mgkg.woehler.de<br />
53
9. Configuring the PRO-<strong>Monitor</strong><br />
Colour <strong>Monitor</strong> <strong>VIS</strong> 2000 PRO<br />
9.2.3 To specify the record time<br />
This option allows you to select the maximum length of video clips. LONG allows<br />
maximum recording time but clips will only replay correctly in half-size image<br />
mode under QuickTime. SHORT limits the recording time to half that of LONG<br />
clips, but clips will replay correctly in any QuickTime mode. The corresponding<br />
recording times are displayed when you press •.<br />
M A I N M E N U<br />
– – – – – – – – –<br />
R E C O R D T I M E > S e l e c t<br />
— — — — — —<br />
L O N G<br />
S H O R T<br />
9.3 Other Menu Options<br />
9.3.1 To specify the base filename<br />
This option allows you to specify a six-character filename prefix instead of the default date<br />
prefix. Selecting DEFAULT saves each file with a six-character prefix, consisting of the<br />
current date in US format, MMDDYY.<br />
M A I N M E N U<br />
– – – – – – – – –<br />
B A S E F I L E N A M E > S e l e c t<br />
— — — — — —<br />
D E F A U L T<br />
U S E R<br />
Selecting USER displays the following dialog box to allow you to enter a six-character<br />
prefix using the v, b, and enter keys<br />
B A S E F I L E N A M E E D I T O R<br />
S t o r e a s :<br />
— A A A A A —<br />
9.3.2 To rotate the display<br />
Note: In software version 1.10 and later this function has been disabled!<br />
This option inverts the display so the PRO monitor can be operated with the<br />
keypad on the right.<br />
The operation of the v or w keys is also reversed, for consistency with the<br />
menus.<br />
54 Hotline: 0 29 53 / 73 211 Fax: 0 29 53 / 73 250
9. Configuring the PRO-<strong>Monitor</strong><br />
Colour <strong>Monitor</strong> <strong>VIS</strong> 2000 PRO<br />
M A I N M E N U<br />
– – – – – – – – –<br />
D I S P L A Y O R I E N T A T I O N > S e l e c t<br />
— — — — — —<br />
N O R M A L<br />
R O T A T E D<br />
9.3.3 To select the language<br />
This option allows you to select the on-screen menu language. This setting is<br />
retained when the PRO monitor is switched off.<br />
M A I N M E N U<br />
– – – – – – – –<br />
L A N G U A G E ><br />
S e l e c t<br />
— — — — — —<br />
E N G L I S H<br />
D E U T S C H<br />
F R E N C H<br />
S P A N I S H<br />
I T A L I A N<br />
English<br />
9.3.4 System setup<br />
The Setup Menu allows you to set the date and time, and adjust the video display<br />
setting:<br />
S E T U P M E N U<br />
– – – – – – – – – –<br />
D a t e – 0 1 2 9 0 3 – M M D D Y Y<br />
T i m e – 1 4 1 6 2 0 – H H M M S S<br />
B E E P (0 – 1) Keypress BEEP (0=No Beep, 1=Beep)<br />
C O N T R A S T (0 – 9)<br />
B R I G H T N E S S (0 – 9)<br />
C O L O R (0 – 9)<br />
To set the date and time<br />
° Press n to highlight the current date. The first digit of the date is highlighted<br />
with a flashing cursor.<br />
° Use v and w to change the current digit, use n to move to the next. When<br />
you have edited each digit of the date and time:<br />
° Press OK to exit from editing mode.<br />
To adjust the other settings in the SETUP menu, use the v and w to scroll up<br />
or down.<br />
e-mail: mgkg@woehler.de http://mgkg.woehler.de<br />
55
9. Configuring the PRO-<strong>Monitor</strong><br />
through each selection.<br />
9.4 File System Utilities<br />
Colour <strong>Monitor</strong> <strong>VIS</strong> 2000 PRO<br />
The next group of options on the Main Menu allow you to format a Compact-<br />
Flash card, and work with the folders on a card.<br />
M A I N M E N U<br />
– – – – – – – –<br />
F O R M A T ><br />
F O L D E R ><br />
+ F O L D E R ><br />
R E N A M E F O L D E R ><br />
9.4.1 To format a CompactFlash card<br />
° Select FORMAT on the Main Menu, and select OK on the submenu. Warning:<br />
This will erase any images already on the CompactFlash card. After formatting<br />
a card there will be one folder named FOLDERAA.<br />
9.4.2 To Select the Current Folder<br />
° Select FOLDER on the Main Menu.<br />
The SELECT FOLDER menu shows a list of the names of the folders on the CompactFlash<br />
card.<br />
° Use the v or b keys to highlight the folder you want to use and press enter<br />
to select it.<br />
9.4.3 To Create a New Folder<br />
° Select +FOLDER on the Main Menu, then proceed as described in Section 8.25<br />
(To create a new folder).<br />
9.4.4 To Rename a Folder<br />
° Select RENAME FOLDER on the Main Menu, then proceed as for renaming a<br />
file; see Section 8.23 (To rename a file).<br />
9.5 Top Line and Bottom Line on Display<br />
The final group of options on the Main Menu allow you to select between showing<br />
or not showing on the top left and bottom left of the screen select information.<br />
56 Hotline: 0 29 53 / 73 211 Fax: 0 29 53 / 73 250
10. Transferring Images to a PC<br />
Colour <strong>Monitor</strong> <strong>VIS</strong> 2000 PRO<br />
M A I N M E N U<br />
– – – – – – – – –<br />
T O P L I N E ><br />
Displays next file number that will be assigned on<br />
saving<br />
B O T T O M L I N E><br />
Displays the date and time set in the system as well as<br />
the<br />
distance measurement if that option is available and<br />
activated.<br />
Toggle to the line you wish from the menu.<br />
° Press OK to enter and toggle between ON, OFF using the v or w keys.<br />
° Use OK to select. The choice will immediately show on the screen and the submenu<br />
will disappear.<br />
9.6 Power Save<br />
The Power Save options on the Main Menu allows you to select between five<br />
different auto-off time.<br />
English<br />
M A I N M E N U<br />
– – – – – – – –<br />
P O W E R S A V E > S e l e c t<br />
— — — — — —<br />
O F F<br />
30 S E C<br />
1 M I N<br />
5 M I N<br />
10 M I N<br />
10. Transferring Images to a PC<br />
This chapter describes how to install the card reader, software supplied with the<br />
PRO monitor, and use it to copy images between a CompactFlash card and PC,<br />
or format new CompactFlash cards.<br />
10.1 Installing the Card Reader and Software<br />
The PRO <strong>Monitor</strong> set comes with a high speed, USB 2.0 CompactFlash l/ll<br />
reader. PCs running Windows 2000ME or later should recognize the card reader<br />
automatically and install the appropriate driver when you plug it into the port, in<br />
which case you do not need to perform any installation. If the card reader is working<br />
correctly, Windows will allocate a drive letter, such as D: or E: to the reader.<br />
You can then use it just like another disk drive. Please read the instructions on<br />
the back of the Card reader for minimum system requirements and appropriate<br />
installation instructions for your system.<br />
e-mail: mgkg@woehler.de http://mgkg.woehler.de<br />
57
11. Troubleshooting<br />
Colour <strong>Monitor</strong> <strong>VIS</strong> 2000 PRO<br />
10.2 Copying images to the PC<br />
To copy images from a CompactFlash card to the PC simply drag them from the<br />
drive allocated to the CompactFlash card and copy them to a suitable disk on<br />
your PC. The images are stored in standard JPEG/MOV format and can be edited<br />
or printed from any suitable application, such as Paint Shop Pro.<br />
10.3 Copying images to the CompactFlash card<br />
Images created by the PRO monitor and edited on the PC can be copied back to<br />
the CompactFlash card for subsequent display on the PRO monitor. You can also<br />
create JPEG images on the PC and copy them to the PRO monitor for display. In<br />
this case the JPEG image must be the correct size and aspect ratio for the PAL<br />
or NTSC display. In addition it must comply with the JPEG baseline image specification,<br />
and be encoded in 4:2:2 format for correct color rendition.<br />
11. Troubleshooting<br />
This chapter provides answers to typical questions and problems that may arise<br />
when using the PRO monitor.<br />
11.1 Why can’t I display images from the gallery?<br />
Images can only be displayed if they were captured using the same video standard<br />
as the current setting of the PRO monitor. Either switch off the PRO monitor,<br />
connect an appropriate video source, and switch it on again so the autodetection<br />
selects the new video standard, or set the VIDEO STANDARD option<br />
to NTSC or PAL; see Section 9.21 (To specify the video standard for replaying<br />
images).<br />
11.2 Why are the images not displayed chronologically after copying them<br />
from a PC?<br />
If image files are copied back onto a CompactFlash card from a PC, the order<br />
of the files will be determined by the PC directory listing order, which is not the<br />
same as the order in which they were captured. Unfortunately there is no way to<br />
modify this.<br />
11.3 The frozen image appears to jitter?<br />
If the frozen S T I L L image appears to jitter, due to movement between the two<br />
fields of the full frame image, the PRO monitor allows you to double-up a single<br />
field to remove the jitter:<br />
° Press OK while the image is frozen. S T I L L. One of the two sequential fields is<br />
then doubled up to create a flicker-free image at half the resolution. The display<br />
shows Double-Field Mode to show that only one field will be saved. You can<br />
58 Hotline: 0 29 53 / 73 211 Fax: 0 29 53 / 73 250
11. Troubleshooting<br />
Colour <strong>Monitor</strong> <strong>VIS</strong> 2000 PRO<br />
configure the PRO monitor to save all images in double-field mode; see Section<br />
9.22.<br />
11.4 Battery charging<br />
The <strong>Monitor</strong> disposes of an internal rechargeable battery, which is charged<br />
by the power supply that is delivered with the monitor. For this purpose, plug<br />
the single-ended plug connector of the power supply into the charging jack<br />
at the bottom of the right side of the monitor (figure 1, point 9: power supply<br />
socket). As soon as you have put the mains plug into the socket, loading will<br />
begin and both cahrge indicators (see fig. 2.2) will blink. Once the rechargeable<br />
battery is completely loaded, loading process will stop and both LEDs will<br />
glow permanently. If the rechargeable battery is still warm after the discharging<br />
process, first both LEDs will glow when the monitor is connected to the power<br />
supply. In this case the loading process will begin automatically after some<br />
minutes and the LEDs will blink.<br />
English<br />
In order to conserve the rechargeable battery, the monitor can always be used in<br />
mains operation as well when the power supply is connected.<br />
11.5 The charging LED shows ¤ • pulse flash / Steady ON ?<br />
This indicates an over-temperature condition. The battery pack has a temperature<br />
sensor, which detects an over-temperature condition. With a prolonged period<br />
of charging (particularly with the unit switched on) the internal temperature will<br />
rise sufficiently to trigger the battery pack’s thermistor sensor and shut down the<br />
charging process. This will cause no harm to the battery pack or the PRO monitor.<br />
To reset, disconnect the PSU and allow the system to cool down for a period<br />
of time. When the PSU is reconnected, charging should resume as normal. This<br />
condition will normally only happen when the battery pack is already near the<br />
end of its charging cycle, so little further charging will be required.<br />
e-mail: mgkg@woehler.de http://mgkg.woehler.de<br />
59
12. System Components<br />
12. System Components<br />
Colour <strong>Monitor</strong> <strong>VIS</strong> 2000 PRO<br />
Figure 12.1: System - components<br />
60 Hotline: 0 29 53 / 73 211 Fax: 0 29 53 / 73 250
12. System Components<br />
Colour <strong>Monitor</strong> <strong>VIS</strong> 2000 PRO<br />
12.1 Camera head <strong>VIS</strong> 2000 Colour (Order no. 7806 J )<br />
Camera head <strong>VIS</strong> 98 b/w (Order no. 7801)<br />
12.2 Miniature camera head (Order no. 7817 J)<br />
Miniature camera head b/w (Order no. 7871 J )<br />
The camera heads <strong>VIS</strong> 2000 colour and<br />
<strong>VIS</strong> 98 b/w are watertight enclosed in<br />
illuminating housing. They enable a simple<br />
and exact inspection by the 180 o tilt and<br />
360 o pan of the camera head. High beam<br />
LEDs for extra light make it possible to see<br />
even at far distances. The camera head<br />
disposes of a wide angle objective (f=2.0<br />
mm) for large point of view and large depth<br />
sharpness.<br />
Applications: Inspection and documentation<br />
of damage in ventilation and exhaust<br />
systems from aprox. 70 mm on.<br />
English<br />
The mini camera head is watertight up to<br />
3 bar and has a durable stainless housing<br />
with a wide angle objective (f=2.0 mm).<br />
Because of the small diameter of only 26<br />
mm, the short lenght and the flexible viper<br />
it can be used in small lines and pipes with<br />
various bows without problems.<br />
Applications: Inspection and direct documentation<br />
of flue lines and ventilations as<br />
well as water pipes with a diameter from<br />
40 mm to 100 mm.<br />
Especially the mini camera head black<br />
and white is extremely sensitive to light<br />
and therefore convenient for the control of<br />
chimneys up to 20 x 20 Ø and flue lines up<br />
to 30 cm Ø.<br />
e-mail: mgkg@woehler.de http://mgkg.woehler.de<br />
61
12. System Components<br />
Colour <strong>Monitor</strong> <strong>VIS</strong> 2000 PRO<br />
12.3 Endoscope camera head colour (Order no. 8697 J )<br />
The Endoscope Camera Head color is<br />
used especially for the documentation of<br />
endoscopic snapshots for expertises. It<br />
also makes it possible that various persons<br />
can regard the endoscopic picture.<br />
12.4 Assessories Video inspection<br />
12.4.1 Camera roller guide (Order no. 7826 J)<br />
Camera roller guide for the Camera head<br />
<strong>VIS</strong> 2000 and <strong>VIS</strong> 98, for pushing the camera<br />
head in horizontally exhaust systems<br />
and ventilation systems and chimneys.<br />
• outer roll<br />
• simple installation at the camera head<br />
• special steal protection , powder coated<br />
• stabilization sleeve, especially recommended<br />
in large pipes<br />
12.4.2 Stabilization sleeve with star holder (Order no. 3590 J)<br />
For the stabilization of the camera heads<br />
<strong>VIS</strong> 2000 and <strong>VIS</strong> 98 on the camera viper<br />
when pushing through large pipes; simply<br />
is screwed into the roller guide. When<br />
pushing downwards, for example in the<br />
chimney, a star can be plugged on for better<br />
guiding (not included in delivery).<br />
62 Hotline: 0 29 53 / 73 211 Fax: 0 29 53 / 73 250
12. System Components<br />
Colour <strong>Monitor</strong> <strong>VIS</strong> 2000 PRO<br />
12.4.3 Telescope Dolly (Order no. 5706 L)<br />
For letting down the camera head at the<br />
cable. Especially light and stable because<br />
of special steel. Extendable from 22 to 40<br />
cm.<br />
12.4.4 LED supplementary light (Order no. 9377 P und 9177 P)<br />
The LED supplementary light with redyellow<br />
and white LEDs, for camera head<br />
<strong>VIS</strong> 2000 and <strong>VIS</strong> 98 makes it possible<br />
to iluminate the distant zone during the<br />
inspection.<br />
English<br />
12.4.5 Cable reel <strong>VIS</strong> 2000 and SK 95 (Order no. 7816 J)<br />
Cable reel <strong>VIS</strong> 2000 PRO (Order no. 3816 J)<br />
The usefull cable reel with patented stable<br />
metric marking can be carried in front<br />
of the body during the measuring with a<br />
shoulder strap. For the transport the stand<br />
legs and the monitor can be collapsed.<br />
12.4.6 Camera viper (Order no. 7822 J )<br />
The camera viper is offered with a camera<br />
rod with a diameter of 6 or 7mm diameter<br />
and a length of 30 m. With the viper<br />
a comfortable inspection of horizontally<br />
and vertically running exhaust systems is<br />
possible.<br />
e-mail: mgkg@woehler.de http://mgkg.woehler.de<br />
63
12. System components<br />
12.4.7 Viper Camera Holder (Order no. 3720 J)<br />
Colour <strong>Monitor</strong> <strong>VIS</strong> 2000 PRO<br />
The viper camera holder disposes of a<br />
connection cable and a M 10 thread and<br />
therefore can easily be installed to all<br />
camera rods. The camera is in a protective<br />
cage and faces downwards, so that incidental<br />
daylight does not cause problems.<br />
Attached to rods, both horizontal and<br />
vertical pipes can be examined.<br />
12.4.8 Camera Spring Guide (Order no. 8633 J)<br />
For centering of the camera head in vertical<br />
vents. A stainless steel spring prevents<br />
a rotating and oscillating of the camera<br />
head. The spring is adjustable on the<br />
tubing size.<br />
12.4.8 Special Cable (Order no. 9181 L)<br />
0.8 m, for the connection of the Camera rod to the monitor.<br />
12.4.9 Camera rod<br />
Camera rod black, flexible, 6 mm Ø, 5 m long (Order no. 7821 J)<br />
Camera rod black, flexible, 6 mm Ø, 20 m long (Order no. 7818 J)<br />
Camera rod black, flexible, 6 mm Ø, 30 m long (Order no. 7819 J)<br />
Camera rod red, stable, 7 mm Ø, 5 m long (Order no. 7305 J)<br />
Camera rod red, stable, 7 mm Ø, 20 m long (Order no. 7829 J)<br />
Camera rod red, stable, 7 mm Ø, 30 m long (Order no. 7306 J)<br />
64 Hotline: 0 29 53 / 73 211 Fax: 0 29 53 / 73 250
13. Accessories<br />
Colour <strong>Monitor</strong> <strong>VIS</strong> 2000 PRO<br />
13. Accessories/SpareParts of the Colour <strong>Monitor</strong> <strong>VIS</strong> 2000<br />
13.1 Power Supply <strong>VIS</strong> 2000 PRO (Order no. 6837 J)<br />
for mains operation and charging<br />
13.2 Leather protection bag for monitor <strong>VIS</strong> 2000 PRO (Order no. 6838 J)<br />
With protection anti-dazzle and shoulderstrap.<br />
For the secure transport and a<br />
comfortable position of the monitor during<br />
the inspection.<br />
English<br />
13.3 Adaptercable (Order no. 8637 O)<br />
for the 12 volt car-system<br />
13.4 Shoulder strap (Order no. 8136 I)<br />
Makes it possible to carry the Cable reel<br />
comfortably in front of the body, so that<br />
both hands will be free for working.<br />
e-mail: mgkg@woehler.de http://mgkg.woehler.de<br />
65
14. Declaration of conformity<br />
Colour <strong>Monitor</strong> <strong>VIS</strong> 2000 PRO<br />
14. Declaration of conformity<br />
Manufacturer: WÖHLER Messgeräte Kehrgeräte GmbH<br />
Schützenstr. 41, 33181 Bad Wünnenberg<br />
declares that the following product:<br />
Product name: Wöhler <strong>VIS</strong> 2000 PRO <strong>Monitor</strong><br />
complies with key safety requirements set down in the guidelines of the Council<br />
for the Harmonisation of the Legal Requirements of the Member States in relation<br />
to electromagnetic compatibility (89/336/EWG and 93/97/EWG).<br />
The following standards are used to assess the product in terms of electromagnetic<br />
compatibility:<br />
EN 50082-1 : 11.97 Resistence to interference<br />
EN 50081-1 : 03.93 Emissions<br />
FCC 15.109 : Emissions<br />
EN 55024<br />
EN 55022<br />
EN 61000-3-2<br />
EN 61000-3-3<br />
Resistance to jamming<br />
Emitted interference<br />
Harmonic oscilation<br />
Voltage fluctuation, flicker<br />
This declaration is issued on behalf of the aforementioned manufacturer by:<br />
Johannes Lötfering, Managing Director Bad Wünnenberg, 28.10.2004<br />
66 Hotline: 0 29 53 / 73 211 Fax: 0 29 53 / 73 250
15. Guarantee and Service<br />
Colour <strong>Monitor</strong> <strong>VIS</strong> 2000 PRO<br />
15. Guarantee and Service<br />
15.1 Guarantee<br />
Every Wöhler <strong>VIS</strong>2000 PRO <strong>Monitor</strong> has been subjected to a thorough functional<br />
check and only leaves our factory after detailed quality control. The final inspection<br />
is recorded in detail in a test report and is kept by us on our premises. If<br />
the device is used correctly, the guarantee period is 12 months from the date of<br />
purchase. This guarantee does not cover wear and tear parts.<br />
The guarantee does not include the costs for transport and packing material in<br />
case of repair. It will expire, if third persons, who are not authorized, repaire or<br />
change the device.<br />
We see SERVICE as a very important element in our business. That is why we are<br />
still available to you even after the guarantee period has expired.<br />
• An immediate repair will be carried out if you bring your meter to us in<br />
Bad Wünnenberg.<br />
• If you send us the meter, it will be returned to you by our delivery service<br />
after repair in just a few days.<br />
• We can lend you a device for a small standard fee.<br />
• You can obtain immediate help from our engineers by telephone.<br />
English<br />
e-mail: mgkg@woehler.de http://mgkg.woehler.de<br />
67
Points of sale and service<br />
Points of sale and service<br />
Points of sale and service<br />
Germany<br />
Wöhler Messgeräte Kehrgeräte<br />
GmbH<br />
Schützenstr. 41<br />
33181 Bad Wünnenberg<br />
Tel.: +49 2953 73-100<br />
Fax: +49 2953 73-96100<br />
mgkg@woehler.de<br />
http://mgkg.woehler.de<br />
Wöhler West<br />
Castroper Str. 105<br />
44791 Bochum<br />
Tel.: +49 234 516993-0<br />
Fax: +49 234 516993-99<br />
west@woehler.de<br />
Wöhler Süd<br />
Gneisenaustr.12<br />
80992 München<br />
Tel.: +49 89 1589223-0<br />
Fax: +49 89 1589223-99<br />
sued@woehler.de<br />
Colour <strong>Monitor</strong> <strong>VIS</strong> 2000 PRO<br />
International<br />
<strong>USA</strong><br />
<strong>Wohler</strong> <strong>USA</strong> Inc.<br />
20 Locust Street, Suite 205<br />
Danvers, MA 01923<br />
Tel.: +1 978 750 9876<br />
Fax.: +1 978 750 9799<br />
www.wohlerusa.com<br />
Italy<br />
Wöhler Italia srl<br />
Corso Libertà 9<br />
39100 Bolzano<br />
Tel.: +390471402422<br />
Fax: +39 0471<br />
http://mgkg.woehler.it<br />
Czech Republic<br />
Wöhler Bohemia s.r.o.<br />
Za Naspern 1993<br />
393 01 Pelhrimov<br />
Tel.: +420 5653 49019<br />
Fax: +420 5653 23078<br />
info@woehler.cz<br />
France<br />
Wöhler France SARL<br />
16 Chemin de Fondeyre<br />
31200 Toulouse<br />
Tel. : 05 61 52 40 39<br />
Fax : 05 62 27 11 31<br />
info@woehler.fr<br />
http://mgkg.woehler.fr<br />
Your contact:<br />
68 Hotline: 0 29 53 / 73 211 Fax: 0 29 53 / 73 250