522220 UWS-Scheinwerfer_50W_Art.Nr.4240020
522220 UWS-Scheinwerfer_50W_Art.Nr.4240020
522220 UWS-Scheinwerfer_50W_Art.Nr.4240020

Erfolgreiche ePaper selbst erstellen
Machen Sie aus Ihren PDF Publikationen ein blätterbares Flipbook mit unserer einzigartigen Google optimierten e-Paper Software.
Einbau- und Bedienungsanleitung<br />
User manual<br />
Instruction<br />
Halogenunterwasserscheinwerfer<br />
Halogen - underwater floodlight<br />
Projecteur de piscine Halogène<br />
O 67<br />
O 46<br />
82<br />
O 110<br />
74<br />
80<br />
<strong>Art</strong> Nr. / Code / Réf:<br />
Rotguß / gunmetal<br />
Bronze / bronze /<br />
/laiton bronze<br />
4240020 4240021<br />
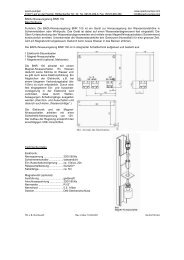
QR-CB 51 <strong>50W</strong>-12V/AC - 38°<br />
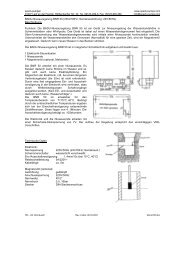
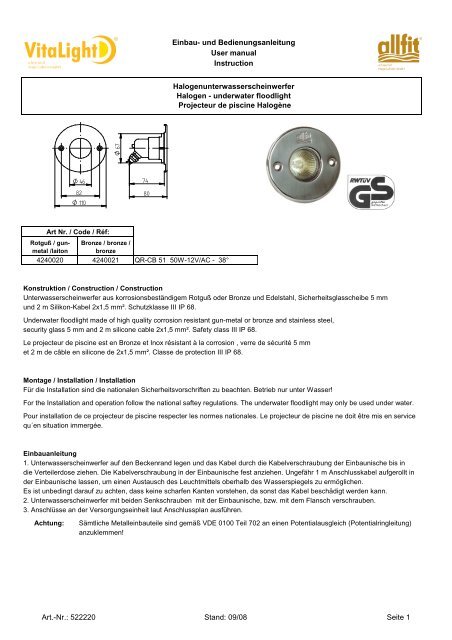
Konstruktion / Construction / Construction<br />
Unterwasserscheinwerfer aus korrosionsbeständigem Rotguß oder Bronze und Edelstahl, Sicherheitsglasscheibe 5 mm<br />
und 2 m Silikon-Kabel 2x1,5 mm². Schutzklasse III IP 68.<br />
Underwater floodlight made of high quality corrosion resistant gun-metal or bronze and stainless steel,<br />
security glass 5 mm and 2 m silicone cable 2x1,5 mm². Safety class III IP 68.<br />
Le projecteur de piscine est en Bronze et Inox résistant à la corrosion , verre de sécurité 5 mm<br />
et 2 m de câble en silicone de 2x1,5 mm². Classe de protection III IP 68.<br />
Montage / Installation / Installation<br />
Für die Installation sind die nationalen Sicherheitsvorschriften zu beachten. Betrieb nur unter Wasser!<br />
For the Installation and operation follow the national saftey regulations. The underwater floodlight may only be used under water.<br />
Pour installation de ce projecteur de piscine respecter les normes nationales. Le projecteur de piscine ne doit être mis en service<br />
qu´en situation immergée.<br />
Einbauanleitung<br />
1. Unterwasserscheinwerfer auf den Beckenrand legen und das Kabel durch die Kabelverschraubung der Einbaunische bis in<br />
die Verteilerdose ziehen. Die Kabelverschraubung in der Einbaunische fest anziehen. Ungefähr 1 m Anschlusskabel aufgerollt in<br />
der Einbaunische lassen, um einen Austausch des Leuchtmittels oberhalb des Wasserspiegels zu ermöglichen.<br />
Es ist unbedingt darauf zu achten, dass keine scharfen Kanten vorstehen, da sonst das Kabel beschädigt werden kann.<br />
2. Unterwasserscheinwerfer mit beiden Senkschrauben mit der Einbaunische, bzw. mit dem Flansch verschrauben.<br />
3. Anschlüsse an der Versorgungseinheit laut Anschlussplan ausführen.<br />
Achtung:<br />
Sämtliche Metalleinbauteile sind gemäß VDE 0100 Teil 702 an einen Potentialausgleich (Potentialringleitung)<br />
anzuklemmen!<br />
<strong>Art</strong>.-Nr.: <strong>522220</strong> Stand: 09/08 Seite 1
Installation instruction<br />
1. Put the underwater floodlight on the pool border. Pull the cable through the cable gland of the bulit-in-niche into the junction<br />
box. Then fix the cable gland in the built-in niche carefully. Leave about 1 m of the connection cable rolled inside the built-in niche<br />
to enable an exchange of the lamps above the water level.<br />
Pay attention that no sharp edges protrude because otherwise the silicone cable can get damaged.<br />
2. Screw up the underwater floodlight inset by using the two flat head screws at the assembly bay or at the flange.<br />
3. The connections to the supply unit have to be conducted as specified in the connection diagram.<br />
Attention:<br />
All metal mounting parts have to be crossbonded and earthed (closed potential circuit) in an approved manner!<br />
Montage dans le Bassin<br />
Poser le projecteur de piscine sur le bord du bassin. Introduire le câble dans le presse-étoupe du boîtier mural jusqu'à<br />
la boîte de dérivation. Bien serrer le presse-étoupe dans le boîtier mural. Laisser environ 1 m de câble roulé dans le boîtier<br />
pour en cas de panne d´éffectuer un changement des lampes au-dessus de la surface du bassin.<br />
Il est important de bien faire ATTENTION de ne pas endommager le câble sur des bords coupants.<br />
2. Fixer le projecteur à l' aide des deux vis sur le boîter mural; ou sur la flasque Liner.<br />
3. Branchement à effectuer suivant le schéma.<br />
Attention:<br />
Toutes les piéces à insérer en métal sont à relier au circuit équipotentiel. (circuit équipotentiel en boucle)<br />
Elektrischer Anschluss / Electric connection / Branchement Électrique<br />
Der Unterwasserscheinwerfer darf nur mit einer Versorgungseinheit der Firma LAHME, nach EN 60742, betrieben werden.<br />
Bei der Installation ist die DIN VDE 0100-701 und 702 zu beachten. Gemäß VDE 0100-430 sind alle Kabel bauseits gegen<br />
Überlastung zu schützen. Die Betriebsspannung des Leuchtmittels darf nicht überschritten werden.<br />
Die Installation darf nur von einer zugelassenen Elektrofachkraft vorgenommen werden.<br />
The underwater floodlight may only be used in connection with a supply unit from LAHME according to EN 60742.<br />
All construction and cables have to be protected against overloading (provided by customer). Do not exceed the<br />
operating voltage of the lamps.<br />
The installation work has be conducted by a certified electrician and the rules are to be kept exacly.<br />
Les projecteurs de piscine ne doivent être raccordés qu´avec un boîtier d`alimentation de la Société LAHME aux normes EN 60742.<br />
L´installation doit être réalisée en assurant que tous les câbles sont à protéger contre une surtension. La tension nominale<br />
des sources est impérativement à respecter.<br />
L´installation doit être effectuée uniquement par du Personnel Qualifié.<br />
Versorgungseinheit / supply unit / alimentation<br />
Der Anschluss darf nur gemäß DIN EN 61558/VDE 0570, DIN EN 61347/VDE 0712,VDE 0100 Teil 410 erfolgen.<br />
Connection is only to be made at a safety supply unit according to DIN EN 61558/VDE 0570 DIN EN 61347<br />
VDE 0712, VDE 0100 pat 410.<br />
Les boîtiers d`alimentation à utiliser sont de securité selon les Normes DIN EN 61558/VDE 0570, DIN EN 61347/<br />
VDE 0712 / VDE 0100 chapitre 410<br />
Pflegeanleitung / Maintenance instruction / Guide de soins<br />
Zur Reinigung der sichtbaren Teile nur lösungsmittelfreie Reinigungsmittel verwenden. Bitte keinen Hochdruckreiniger verwenden.<br />
For cleaning of the visible parts use only solvent free cleaners. Please do not use high pressure cleaner.<br />
Effectuer le nettoyage des pièces visibles à l´aide de produits ne contenant pas de solvant. Ne pas utiliser des appareils<br />
à haute pression.<br />
<strong>Art</strong>.-Nr.: <strong>522220</strong> Stand: 09/08 Seite 2
Zubehör / Accessories / Accessoires<br />
<strong>Art</strong>. Nr. / Code / Réf.<br />
<strong>Art</strong>ikel-Bezeichnung / Product type / Type de produit<br />
533005 Transformator 220-240V -12V/AC -50/60Hz 50VA IP 65, für 1 Unterwasserscheinwerfer<br />
Transformer 220-240V -12V/AC -50/60Hz 50VA IP 65, for 1 underwater floodlight<br />
Transformateur 220-240V -12V/AC -50/60Hz 50VA IP 65, pour 1 projecteur de piscine<br />
533009 Transformator 220-240V -12V/AC -50/60Hz 100VA IP 65, für 2 Unterwasserscheinwerfer<br />
Transformer 220-240V -12V/AC -50/60Hz 100VA IP 65, for 2 underwater floodlights<br />
Transformateur 220-240V -12V/AC -50/60Hz 100VA IP 65, pour 2 projecteurs de piscine<br />
4250050 Einbaunische für Folien- und Fliesenbecken aus Rotguß / Built-in niche for liner and tile pools<br />
made of gun-metal / Boîtier pour bassin beton carrellé et liner en bronze<br />
4251050 Flanschsatz aus Rotguß mit Dichtungen und Schrauben / Flange kit made of gun-metal<br />
with seal and screws / Flasque en bronze avec joint et vis de fixation<br />
Leuchtmittelwechel / Change of lamps / Change des lampes<br />
Anlage spannungsfrei schalten. Unterwasserscheinwerfer über den Wasserspiegel führen, öffnen und reinigen. Nur lösungsmittelfreie<br />
Reiniger verwenden. Leuchtmittel auswechseln, O-Ringe austauschen, Verunreinigungen und Aufkrustungen auf dem Gehäuse<br />
beseitigen. Sie können handelsübliche Reinigungsmittel verwenden. ACHTUNG, keinen Hochdruckreiniger verwenden.<br />
Disconnect the electrical installation. Put the underwater floodlight above the water level, open and clean it. Only use solvent free<br />
cleansers. Change the lamp the O-rings. Remove soiling and incrustations on the fitting housing by using commercially available<br />
cleansers. Attention: Do not use a high pressure cleaner.<br />
L´installation doit être hors tension. Placer le projecteur de piscine au-dessus de niveau d'eau, ouvrir le projecteur et effectuer<br />
pas de solvant. Changer la lampe et les joints. Nettoyer la partie extérieure du boîtier et de le débarasser de tout dépôt.<br />
Vous pouvez utiliser des produits de nettoyage usuels. Attention: Ne pas utiliser des appareils à haute pression.<br />
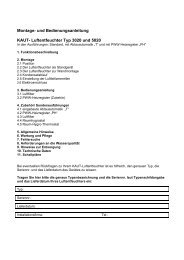
Elektrischer Anschlussplan / Electrical Connection diagram / Schéma de Branchement<br />
A<br />
A<br />
F<br />
C<br />
220-240 V/AC<br />
B<br />
D<br />
~<br />
F<br />
E<br />
A = Verteilerdose / Connection Box / Boîte de dérivation<br />
B = Nulleiter / Neutral / Neutre<br />
C = Phase / Maine / Phase<br />
D = Transformator / Transformer / transformateur<br />
E = Schalter / Switch / Interrupteur<br />
F = Sicherung / Fuse / Protection<br />
G = Unterwasserscheinwerfer / Underwater Floodlight /<br />
Projecteur de piscine<br />
Kabelbelegung / cable configuration /<br />
désignation des câbles<br />
12V + braun / brown / brun<br />
- blau / blue / bleu<br />
<strong>Art</strong>.-Nr.: <strong>522220</strong> Stand: 09/08 Seite 3
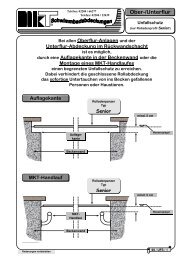
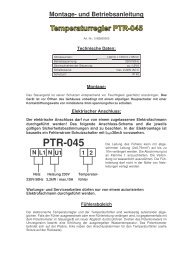
Ersatzteile / Spares / Pièces de rechange<br />
2<br />
3<br />
1<br />
5 4 6 7 8 9 10<br />
11<br />
14<br />
13 12<br />
<strong>Art</strong>. Nr.: / Code / Réf .: 4240020<br />
Pos.<br />
Stk. <strong>Art</strong>. Nr.: / Code / Réf . <strong>Art</strong>ikel Bezeichnung / Product type / Type de produit<br />
1. 1<br />
4240450101 Gehäuse / housing / boîtier<br />
2. 1<br />
7303650 Quetschverschraub. / threaded connection / presse étoupe Pg 9<br />
3. 1 576238 Kabel 2 m / cable 2 m / câble 2 m<br />
2 x 1,5 mm²<br />
4. 1<br />
576206 Fassung / socket / culot de lampe<br />
5. 1 514053 O-Ring / O-ring / joint torique<br />
ø50 x 3<br />
6. 1 536001 Halogenlampe / halogen lamp / lamp halogène 50 Watt, 12V<br />
7. 1<br />
575342 Sicherheitsglas / saftey glass / verre de sécurité<br />
8. 1 514057 O-Ring / O-ring / joint torique<br />
ø53 x 1,5<br />
9. 1<br />
4240200141 Flanschring / flange / flasque<br />
10. 3 505249 Senkschraube / counter sunk screw / vis fraisée<br />
M3 x 10<br />
11. 1<br />
4243020171 Blende / cover / bandeau<br />
12. 2 506601 Fächerscheibe / serrated lock washer / rondelle<br />
3,2<br />
13. 2 506013 Sechskantmutter / hexgon nut / écrou hexagonal<br />
M3<br />
14.<br />
2 505287 Linsensenkschraube / raised countersunk / vis<br />
M5 x 20<br />
2 505286 Linsensenkschraube / raised countersunk / vis<br />
M5 x 50<br />
<strong>Art</strong>. Nr.: / Code / Réf .: 4240021<br />
Pos.<br />
Stk.<br />
1. 1<br />
2. 1<br />
9. 1<br />
Restliche Positionen siehe vorstehende Tabelle!<br />
The other positions are in the preceeding table!<br />
Les autres positions se trouvent au tableau précédent.<br />
<strong>Art</strong>. Nr.: / Code / Réf . <strong>Art</strong>ikel Bezeichnung / Product type / Type de produit<br />
4240451121 Gehäuse / housing / boîtier<br />
7303651 Quetschverschraub. / threaded connection / Presse Étoupe Pg 9<br />
4240201131 Flanschring / flange / flasque<br />
<strong>Art</strong>.-Nr.: <strong>522220</strong> Stand: 09/08 Seite 4
Kabellänge / -querschnitt<br />
Am Unterwasserscheinwerfer ist bereits ab Werk ein Kabel von 2 m Länge angebracht. Daher steht der Kabelquerschnitt der<br />
ersten 2 m fest. Der nachfolgende Kabelquerschnitt für die Kabelverlängerung muss dann in Abhängigkeit der noch fehlenden<br />
Kabellänge von der Verteilerdose bis zur Versorgungseinheit ausgewählt werden. Der Kabelquerschnitt des zu verlängernden<br />
Kabels von der Versorgungseinheit zur Verteilerdose ist abhängig von der erforderlichen Kabellänge. Das nachfolgende Diagramm<br />
zeigt die Kabellängen und den zu wählenden Kabelquerschnitt für die gewünschte Verlängerung. Es darf jeweils immer nur mit<br />
einem Kabelquerschnitt verlängert werden! Bei einer Spannungsversorgung von 12 V ist ein Spannungsabfall von 0,6 V zwischen<br />
Versorgungseinheit und Verteilerdosen zulässig.<br />
Cable length / cable cross section<br />
You get the underwater floodlight ex works with a cable length of 2 m. That is why the cable cross section is already determined<br />
for the first 2 m. The following cable cross section for the cable extension has to be chosen from the junction box to the supply<br />
unit depending on the cable length still missing. The cable cross section for the cable extension from the supply unit to the junction<br />
box depends on the requested cable length. The following table shows the cable lengths as well as the cable cross section<br />
which has to be chosen for the extension requested. You may only carry out extensions with one cable cross section!<br />
A fall of voltage of 0,6 V between the supply unit and the junction box is acceptable at a power supply of 12 V.<br />
Longueur de câble et section<br />
Le projecteur de piscine est de série équipée de 2 m de câble, de ce fait la section de câble est au départ déjà déterminée.<br />
La section du câble de prolongation est à déterminer en fonction de la longueur complémentaire, de la boîte de dérivation au<br />
boîtier d`alimentation. La section du câble prévue pour la prolongation du câble du appareil d'alimentation à la boîte<br />
de dérivation est dépendante de la section demandée. Le tableau ci-joint vous détermine les sections à utiliser en fonction<br />
des longueurs et du voltage secondaire du contrôleur. La section de prolongation doit être la même de la boîte de dérivation<br />
au appareil d`alimentation. Une chute de tension de 0,6 V est tolérable à une sortie d´alimentation de 12 V, il est bien<br />
entendu du boîtier d`alimentation à la boîte de dérivation.<br />
Diagramm zur Auswahl der Kabelquerschnitte - Kabelverlängerungen<br />
Diagram for choice the cable cross section - cable length<br />
Diagramme de sections<br />
Kabelquerschnitte in mm² - cable cross section in mm²<br />
Section de câble en mm²<br />
16<br />
15<br />
14<br />
13<br />
12<br />
11<br />
10<br />
9<br />
8<br />
7<br />
6<br />
5<br />
4<br />
3<br />
2<br />
1<br />
0<br />
2,0<br />
4,0<br />
6,0<br />
8,0<br />
10,0<br />
12,0<br />
14,0<br />
16,0<br />
18,0<br />
20,0<br />
22,0<br />
24,0<br />
26,0<br />
28,0<br />
30,0<br />
32,0<br />
34,0<br />
Kabellänge in m - Lenght in m - Longueur en m<br />
36,0<br />
38,0<br />
40,0<br />
42,0<br />
44,0<br />
46,0<br />
48,0<br />
50,0<br />
<strong>Art</strong>.-Nr.: <strong>522220</strong> Stand: 09/08 Seite 5
Bitte beachten / Please note / Attention<br />
Der Unterwasserscheinwerfer ist nur für den Betrieb unter Wasser geeignet. Um eine dauerhaft ansprechende Optik zu<br />
gewährleisten, sollte das Wasser einen ph-Wert von 7 bis 8 haben und frei von metallangreifenden Bestandteilen sein.<br />
Unterwasserscheinwerfer vor Frost schützen. Bei der Verlegung des Anschlußkabels ist darauf zu achten, dass dieses über den<br />
Wasserspiegel geführt wird.<br />
Achtung: Je nach Wasserbeschaffenheit ist das Kabel alle 3-5 Jahre auszutauschen.<br />
The underwater floodlights are only suitable under water. The water should have a ph-value between 7 and 8 and be free of<br />
metal attacking ingredients for maintaining a permanent attractive appearance. Protect against freezing. While installing the<br />
connection cable, make sure that the cable is carried over the water level.<br />
Please note: Depending on the water condition the cable has to be exchange every 3-5 years.<br />
Le projecteur de piscine doit seulement être utilisé en situation immergée. L´eau doit avoir une valeur pH entre 7 et 8 et ne pas<br />
contenir des substances nuisibles au métal pour assurer une bonne appérance permanente. À protéger contre gelée.<br />
Le câble de projecteur de piscine doit être partiellement posé au dessus du niveau d'eau.<br />
Attention: Suivant la qualité l`eau le câble est à changer entre 3 et 5 ans.<br />
Achtung ! :<br />
Hinweis .<br />
Attention!:<br />
Assembly tip:<br />
Attention!:<br />
Info:<br />
Die Installation darf nur von einer zugelassenen Elektrofachkraft vorgenommen werden.<br />
Die Installationsvorschriften der zuständigen EVU und der DIN VDE 0100- 702 sind zu beachten.<br />
Die Zuleitung zur Versorgungseinheit ist mit einem Kabelquerschnitt von 3x1,5 mm² zu verlegen.<br />
Nach VDE 0100,Teil 701, Abschnitt 4.1.3 muss ein Fi-Fehlerstrom-Schutzschalter mit 30mA bauseits gestellt<br />
werden. Der Deckel der Versorgungseinheit darf nur bei spannungslosem Zustand geöffnet werden.<br />
Für alle Arbeiten an der Versorgungseinheit muss die Versorgungsspannung abgeschaltet werden.<br />
Installation der Versorgungseinheit nur in trockenen Räumen.<br />
Die Umgebungstemperatur darf 40°C nicht überschreit en.<br />
Mindestabstand zwischen den Versorgungseinheiten 50 mm.<br />
The installation may only be operated by admitted experts. The installation regulations of the responsible<br />
Energy Supply Company have to be followed. A cable with a cable cross section of 3x1,5 mm² has to be<br />
connected with the supply ballast unit. A FI stream protection with 30 mA has to be installed.<br />
Do only open the cover of the supply unit in a deenergised status.<br />
For all working at the supply unit, stop the supply voltage.<br />
Installation of the supply unit only in dry places.<br />
The surrounding temperature may not cross 40°C<br />
Minimum distance between the supply Ballast units 50 mm<br />
L´installation ne doit être éffectuée que par un Électricien Agrée. L´installation doit être réalisée suivant les<br />
normes locales. Le câble d´alimentation au primaire ne doit pas avoir une section du câble inférieure<br />
à 3x1,5 mm² et être protégée en Amont par une protection différentielle par défaut calibré à 30 mA suivant<br />
la norme.<br />
Le capot de fermeture de l´alimentation ne doit être ouvert que hors tension.<br />
Pour toute intervention à l´interieur du boîtier le courant d´alimentation doit être coupé.<br />
Placer le boîtier d´alimentation de projecteur de piscine dans un endroit sec.<br />
La température ambiante ne doit pas être supérieure à 40°C , l´espace minimum<br />
entre les alimentations ne doit pas être inférieure à 50 mm<br />
Technische Änderungen vorbehalten Technical amendments reserved Modifications techniques sous réserve<br />
<strong>Art</strong>.-Nr.: <strong>522220</strong> Stand: 09/08 Seite 6