Technik nach Maß Bedienungsanleitung Nebelpistole, inkl ... - Lindab
Technik nach Maß Bedienungsanleitung Nebelpistole, inkl ... - Lindab
Technik nach Maß Bedienungsanleitung Nebelpistole, inkl ... - Lindab

Erfolgreiche ePaper selbst erstellen
Machen Sie aus Ihren PDF Publikationen ein blätterbares Flipbook mit unserer einzigartigen Google optimierten e-Paper Software.
<strong>Bedienungsanleitung</strong><br />
<strong>Nebelpistole</strong>, <strong>inkl</strong>. Fluid<br />
Operating manual<br />
Fog Spray Gun with Fluid<br />
EN<br />
.Best.-Nr. 22714 – 2012-02-17<br />
<strong>Technik</strong> <strong>nach</strong> <strong>Maß</strong>
Inhalt<br />
Inhalt<br />
1 Allgemeines ........................................... 3<br />
1.1 Informationen zur <strong>Bedienungsanleitung</strong> ........ 3<br />
1.2 Hinweise in der <strong>Bedienungsanleitung</strong> ........... 3<br />
1.3 Bestimmungsgemäße Verwendung .............. 3<br />
1.4 Lieferumfang ................................................. 3<br />
1.5 Entsorgung .................................................... 4<br />
1.6 Anschrift ........................................................ 4<br />
2 Sicherheitshinweise ............................. 5<br />
2.1 Einsatz der <strong>Nebelpistole</strong> ............................... 5<br />
2.2 Nebelfluid ...................................................... 5<br />
3 Aufbau und Funktion ............................ 6<br />
4 Vorbereitung zur Bedienung ............... 8<br />
4.1 Einlegen der Batterien ................................... 8<br />
4.2 Einfüllen des Fluids ....................................... 9<br />
4.3 Absaugen des Fluids ..................................... 9<br />
5 Bedienung ........................................... 10<br />
5.1 Produzieren von Nebel ................................ 10<br />
5.2 Nebelaufsatz (nur Komplettset) ................... 11<br />
6 Lagerung und Transport .................... 12<br />
7 Störungen ............................................ 13<br />
8 Garantie und Service .......................... 14<br />
8.1 Garantie ...................................................... 14<br />
8.2 Service ........................................................ 14<br />
9 Konformitätserklärung ....................... 15<br />
2
Allgemeines<br />
1 Allgemeines<br />
1.1 Informationen zur<br />
<strong>Bedienungsanleitung</strong><br />
1.2 Hinweise in der<br />
<strong>Bedienungsanleitung</strong><br />
Diese <strong>Bedienungsanleitung</strong> ermöglicht Ihnen die<br />
sichere Bedienung der <strong>Nebelpistole</strong> <strong>inkl</strong>. Fluid.<br />
Bewahren Sie diese <strong>Bedienungsanleitung</strong> dauerhaft<br />
auf.<br />
Die <strong>Nebelpistole</strong> darf grundsätzlich nur von fachkundigem<br />
Personal für den bestimmungsgemäßen<br />
Gebrauch eingesetzt werden.<br />
Für Schäden, die aufgrund der Nichtbeachtung<br />
dieser <strong>Bedienungsanleitung</strong> entstehen, übernehmen<br />
wir keine Haftung.<br />
WARNUNG!<br />
Kennzeichnet Hinweise, bei deren Nichtbeachtung<br />
die Gefahr der Verletzung besteht.<br />
1.3 Bestimmungsgem<br />
äße Verwendung<br />
HINWEIS!<br />
Hebt Tipps und andere nützliche Informationen<br />
hervor.<br />
Mit der <strong>Nebelpistole</strong> werden kleine Nebelwolken<br />
zur Visualisierung von Luftströmen erzeugt, die<br />
zur Lokalisierung von Undichtigkeiten im und am<br />
Gebäude genutzt werden können.<br />
1.4 Lieferumfang Gerät Lieferumfang<br />
ACHTUNG!<br />
Kennzeichnet Hinweise auf Gefahren, die Beschädigungen<br />
des Geräts zur Folge haben können.<br />
<strong>Nebelpistole</strong><br />
Unterteil <strong>Nebelpistole</strong><br />
Nebelaufsatz (nur Komplettset)<br />
6 Mignonzellen 1,5 V, LR6 Alkaline<br />
(Komplettset: 7 Mignonzellen)<br />
Nebelfluid, 85 ml<br />
3
Allgemeines<br />
1.5 Entsorgung<br />
Elektronische Geräte dürfen nicht im Hausmüll<br />
entsorgt werden, sondern müssen gemäß den<br />
geltenden Umweltvorschriften entsorgt werden.<br />
Schadhafte Akkus gelten als Sondermüll und<br />
müssen zur Entsorgung in den vorgesehenen<br />
Sammelstellen abgegeben werden.<br />
1.6 Anschrift Wöhler Messgeräte Kehrgeräte GmbH<br />
Schützenstr. 41<br />
33181 Bad Wünnenberg<br />
Tel.: +49 2953 73-100<br />
Fax: +49 2953 7396-100<br />
E-Mail: mgkg@woehler.de<br />
Hotline:<br />
+49 2953 73-100<br />
4
Sicherheitshinweise<br />
2 Sicherheitshinweise<br />
2.1 Einsatz der<br />
<strong>Nebelpistole</strong><br />
WARNUNG!<br />
Schalten Sie die <strong>Nebelpistole</strong> nicht in einer Umgebung<br />
mit entzündlichen Gasen ein.<br />
2.2 Nebelfluid Bei dem Nebelfluid handelt es sich um eine Mischung<br />
aus Glycerin, Propylenglycol und destilliertem<br />
Wasser. Dieses Produkt ist nicht entzündlich<br />
und nicht gefährlich. Dennoch sollten folgende<br />
<strong>Maß</strong>nahmen beachtet werden:<br />
WARNUNG!<br />
- Das Nebelfluid kann leichte Augenirritationen<br />
hervorrufen, die sich durch Rötung der Bindehaut<br />
bemerkbar machen. Spülen Sie die<br />
geöffneten Augen in diesem Fall gründlich<br />
über mehrere Minuten mit Wasser.<br />
- In seltenen Fällen kann der Nebel asthmatische<br />
Reaktionen auslösen.<br />
- Nicht essen oder trinken.<br />
5
Aufbau und Funktion<br />
3 Aufbau und Funktion<br />
2<br />
10<br />
11<br />
9<br />
8<br />
3<br />
7<br />
5<br />
1<br />
4<br />
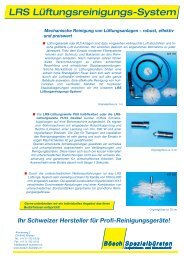
Abb. 1: Geräteteile<br />
6<br />
12<br />
6
Aufbau und Funktion<br />
Legende 1 <strong>Nebelpistole</strong> (schwarz)<br />
2 Nebelaufsatz (blau), nur im Komplettset<br />
3 Nebeltaste<br />
4 Einfüllöffnung für Nebelfluid<br />
(unter Abdeckung)<br />
5 Absaugöffnung für Nebelfluid<br />
(unter Abdeckung)<br />
6 Sichtfenster Fluidtank<br />
7 Schlot<br />
8 Luftschlitz<br />
9 Ein-/Aus-Schalter Nebelaufsatz<br />
10 Batteriefach Nebelaufsatz, nur Kompletset<br />
11 LED-Leuchte, nur Kompletset<br />
7
Vorbereitung zur Bedienung<br />
4 Vorbereitung zur Bedienung<br />
4.1 Einlegen der Batterien<br />
• Öffnen Sie das Batteriefach mit einem Kreuzschlitzschraubenzieher.<br />
Das Batteriefach befindet<br />
sich auf der Unterseite der <strong>Nebelpistole</strong>.<br />
• Legen Sie 6 Batterien ein, und zwar 6 Mignonzellen,<br />
1,5 V LR6, Alkaline.<br />
Abb. 2: Batteriefach <strong>Nebelpistole</strong><br />
Abb. 3: Geöffnetes Batteriefach mit<br />
eingelegten Batterien<br />
ACHTUNG!<br />
Verwenden Sie niemals Batterien unterschiedlichen<br />
Alters und tauschen Sie immer alle 6 Batterien<br />
gleichzeitig aus.<br />
• Dabei sind jeweils zwei Mignonzellen übereinander<br />
zu stecken.<br />
ACHTUNG!<br />
Beachten Sie unbedingt die korrekte Polung. Diese<br />
ist innen im Batteriedeckel angegeben.<br />
• Verschließen Sie den Bateriefachdeckel wieder<br />
und ziehen Sie die Kreuzschlitzschraube<br />
fest.<br />
HINWEIS!<br />
Statt der Batterien können Sie entsprechende Akkus<br />
verwenden.<br />
8
Vorbereitung zur Bedienung<br />
4.2 Einfüllen des<br />
Fluids<br />
Abb. 4: Fluid-Flasche<br />
Spritzröhrchen<br />
Abb. 5: Einfüllen des Fluids<br />
• Ziehen Sie die Abdecklasche über den Einfüllund<br />
Absaugöffnungen der <strong>Nebelpistole</strong> ab.<br />
• Saugen Sie zunächst eventuell verbliebenes<br />
Fluid aus dem Tank, vgl. Punkt 4.3.<br />
• Legen Sie die <strong>Nebelpistole</strong> auf die Seite.<br />
• Stecken Sie das Spritzröhrchen der Fluid-<br />
Flasche so weit wie möglich in die Öffnung<br />
„Fill“ und befüllen Sie den Tank der <strong>Nebelpistole</strong><br />
mit Fluid.<br />
• Kontrollieren Sie den Füllstand über das Sichtfenster<br />
unterhalb der Einfüllöffnung (vgl. Abb.<br />
1, Teil 6). Dazu müssen Sie die <strong>Nebelpistole</strong><br />
aufrecht stellen. Der Tank sollte etwa zu 2/3<br />
befüllt werden.<br />
HINWEIS!<br />
Der Füllstand ist leichter zu erkennen, wenn Sie<br />
die <strong>Nebelpistole</strong> vor eine Lichtquelle halten.<br />
4.3 Absaugen des<br />
Fluids<br />
Wurde zu viel Fluid eingefüllt oder wollen Sie die<br />
<strong>Nebelpistole</strong> <strong>nach</strong> dem Gebrauch lagern, kann<br />
das Fluid folgendermaßen wieder abgesaugt werden:<br />
• Drücken Sie die Fluid-Flasche vorsichtig zusammen.<br />
• Stecken Sie das Spritzröhrchen so weit wie<br />
möglich in die Öffnung „Empty“ und saugen<br />
Sie das Fluid wieder in die Flasche, indem Sie<br />
die Flasche nicht mehr zusammendrücken.<br />
Abb. 6: Einfüllen des Fluids<br />
9
Bedienung<br />
5 Bedienung<br />
WARNUNG!<br />
Benutzen Sie die <strong>Nebelpistole</strong> nicht in einer Umgebung<br />
mit entzündlichen Gasen.<br />
5.1 Produzieren von<br />
Nebel<br />
ACHTUNG!<br />
Achten Sie darauf, dass der Luftschlitz (Abb. 1,<br />
Teil 8) während des Betriebs nicht abgedeckt ist.<br />
Nebeltaste<br />
Abb. 7: Nebeltaste<br />
• Drücken Sie die Nebeltaste leicht mit zwei<br />
Fingern, bis die LED (Abb. 1, Teil 11) oben auf<br />
der <strong>Nebelpistole</strong> leuchtet.<br />
HINWEIS!<br />
Halten Sie die Nebeltaste etwa 6 bis 9 Sekunden<br />
leicht gedrückt, so dass sich die Spule der <strong>Nebelpistole</strong><br />
aufheizen kann.<br />
• Drücken Sie die Nebeltaste anschließend<br />
fester, bis Nebel aus dem Schlot austritt.<br />
• Um einen Nebelstrom über einen längeren<br />
Zeitraum zu produzieren, drücken Sie die Nebeltaste<br />
jeweils nur so fest, bis ausreichend<br />
Nebel produziert wird.<br />
• Halten Sie die ausströmende Nebelmenge<br />
konstant, indem Sie immer wieder leicht die<br />
Nebeltaste betätigen.<br />
10
Bedienung<br />
5.2 Nebelaufsatz (nur<br />
Komplettset)<br />
Um einen feinen Nebelstrahl zu erhalten, der den<br />
Luftzug besonders gut sichtbar macht, arbeiten<br />
Sie mit dem Nebelaufsatz (vgl Abb. 1, Teil 2).<br />
HINWEIS!<br />
Um eine breitere Austrittsöffnung und damit einen<br />
breiteren Nebelstrahl zu erhalten, sägen Sie die<br />
Spitze des Nebelaufsatzes etwa 0,5 bis 1 cm ab.<br />
Abb. 8: Konus des Nebelaufsatzes<br />
• Öffnen Sie das Batteriefach des Nebelaufsatzes<br />
mit einem Kreuzschlitzschrauber und legen<br />
Sie eine Mignonzelle 1,5 V LR6 ein.<br />
ACHTUNG!<br />
Beachten Sie unbedingt die korrekte Polung. Diese<br />
ist innen im Batteriefach eingezeichnet. Sie ist<br />
am besten zu erkennen, wenn Sie den Aufsatz mit<br />
geöffnetem Batteriefach auf einen dunklen Untergrund<br />
legen.<br />
Abb. 9: Batteriefach des Nebelaufsatzes<br />
• Stecken Sie nun den Nebelaufsatz auf den<br />
Schlot der <strong>Nebelpistole</strong>.<br />
• Schalten Sie das Gebläse des Nebelaufsatzes<br />
mit dem EIN-/AUS-Schalter ein (vgl Abb. 1,<br />
Teil 9).<br />
• Produzieren Sie nun den Nebel, wie unter<br />
Punkt 5.1 beschrieben.<br />
11
Lagerung und Transport<br />
6 Lagerung und<br />
Transport<br />
Sperröffnung<br />
ACHTUNG!<br />
Durch unsachgemäßen Transport oder Lagerung<br />
kann die <strong>Nebelpistole</strong> beschädigt werden oder es<br />
können andere Teile durch austretenden Nebel<br />
oder Fluid verschmiert oder beschädigt werden!<br />
• Schalten Sie <strong>nach</strong> dem Gebrauch das Gebläse<br />
des Nebelaufsatzes mit dem Ein-/Aus-<br />
Schalter-Schalter aus (vgl. Abb. 1, Teil 9).<br />
• Entleeren Sie den Fluid-Tank, indem Sie das<br />
Fluid zurück in die Flasche saugen (vgl.<br />
Kap.4.3).<br />
• Entfernen Sie den Pin unterhalb der Nebeltaste<br />
und stecken Sie ihn in die kleine Sperröffnung<br />
an der Nebeltaste. Bringen Sie den Pin<br />
vor dem nächsten Gebrauch wieder in seine<br />
ursprüngliche Position.<br />
Pin<br />
HINWEIS!<br />
Sollte der Pin verloren gehen, können Sie ersatzweise<br />
ein dünnes Stück Draht verwenden.<br />
Abb. 10: Pin zum Sperren der Nebeltaste<br />
12
Störungen<br />
7 Störungen<br />
Störung Mögliche Ursache Behebung<br />
LED leuchtet nicht oder es<br />
tritt kein Nebel aus<br />
LED leuchtet, aber kein<br />
Nebel oder nur wenig Nebel<br />
tritt aus.<br />
Aus der <strong>Nebelpistole</strong> tritt<br />
Fluid aus.<br />
Batterien/Akkus sind leer.<br />
Batterien sind falsch eingelegt.<br />
Der Fluid-Tank ist leer.<br />
Die Abdeckung über dem<br />
Tank fehlt, so dass im Tank<br />
kein Druck aufgebaut werden<br />
kann.<br />
Der Fluid-Tank ist überfüllt,<br />
so dass das Fluid den Nebel-Generator<br />
kühlt.<br />
Die Nebeltaste wurde gedrückt,<br />
ohne dass vorher 6<br />
– 9 Sekunden zum Aufwärmen<br />
abgewartet wurden.<br />
Der Fluid-Tank ist überfüllt.<br />
Das Fluid tritt aus den Luftschlitzen<br />
aus.<br />
Die Tankabdeckung ist<br />
nicht dicht.<br />
Das Gerät steht während<br />
der Lagerung oder des<br />
Transports nicht aufrecht.<br />
Der ölige Nebel ist auf der<br />
Geräteoberfläche kondensiert,<br />
so dass es nur so<br />
aussieht, als sei Fluid ausgetreten.<br />
Wechseln Sie die Batterien<br />
bzw. laden Sie die Akkus<br />
auf.<br />
Kontrollieren Sie die<br />
Polung.<br />
Befüllen Sie den Tank, bis<br />
er ¾ voll ist, siehe Kap 4.2.<br />
Drücken Sie die Abdeckung<br />
dicht auf die Tanköffnungen.<br />
Saugen Sie mit der Fluid-<br />
Flasche Fluid ab, bis der<br />
Tank nur noch zu 3/4 gefüllt<br />
ist (siehe Kap. 4.3).<br />
Halten Sie die Nebeltaste<br />
für 6 – 9 Sekunden nur<br />
leicht gedrückt, bevor Sie<br />
sie ganz herunterdrücken.<br />
Saugen Sie mit der Fluid-<br />
Flasche Fluid ab, siehe<br />
Kap. 4.3.<br />
Drücken Sie die Abdeckung<br />
dicht auf.<br />
Saugen Sie vor Transport<br />
oder Lagerung mit der<br />
Fluid-Flasche Fluid ab,<br />
siehe Kap.4.3.<br />
Reinigen Sie die Geräteoberfläche<br />
mit einem Zellstofftuch.<br />
13
Garantie und Service<br />
8 Garantie und Service<br />
8.1 Garantie Jede <strong>Nebelpistole</strong> wird im Werk in allen Funktionen<br />
geprüft und verlässt unser Werk erst <strong>nach</strong><br />
einer ausführlichen Qualitätskontrolle.<br />
Bei sachgemäßem Gebrauch beträgt die Garantiezeit<br />
auf die <strong>Nebelpistole</strong> 12 Monate ab Verkaufsdatum,<br />
ausgenommen ist das Fluid, da es<br />
ein Verbrauchsartikel ist.<br />
Die Kosten für den Transport und die Verpackung<br />
des Geräts im Reparaturfall werden von dieser<br />
Garantie nicht abgedeckt.<br />
Diese Garantie erlischt, wenn Reparaturen und<br />
Abänderungen von dritter, nicht autorisierter Stelle<br />
an dem Gerät vorgenommen wurden.<br />
8.2 Service Der SERVICE wird bei uns sehr groß geschrieben.<br />
Deshalb sind wir auch selbstverständlich<br />
<strong>nach</strong> der Garantiezeit für Sie da.<br />
• Sie schicken das Messgerät zu uns, wir reparieren<br />
es innerhalb weniger Tage und schicken<br />
es Ihnen mit unserem Paketdienst.<br />
• Sofortige Hilfe erhalten Sie durch unsere<br />
<strong>Technik</strong>er am Telefon.<br />
14
Konformitätserklärung<br />
9 Konformitätserklärung<br />
Das Produkt:<br />
Produktname: <strong>Nebelpistole</strong><br />
entspricht den wesentlichen Schutzanforderungen, die in den Richtlinien des Rates zur<br />
Angleichung der Rechtsvorschriften der Mitgliedsstaaten über die elektromagnetische<br />
Verträglichkeit (2004/108/EG) festgelegt sind.<br />
Zur Beurteilung des Produkts hinsichtlich der elektromagnetischen Verträglichkeit wurden<br />
folgende Normen herangezogen:<br />
EN 55014-1:2006+A1:2009<br />
EN 55014-2:1997 + A1:2001 + A2:2008<br />
Test-Bericht-Nr.: 2023213/EE.<br />
15
Contents<br />
1 General Information ............................ 17<br />
1.1 Operation Manual Information ..................... 17<br />
1.2 Notes ........................................................... 17<br />
1.3 Intended Use ............................................... 17<br />
1.4 Components ................................................ 17<br />
1.5 Information on disposal ............................... 18<br />
1.6 Direction ...................................................... 18<br />
2 Safety information .............................. 19<br />
2.1 Operation of the Fog Spray Gun ................. 19<br />
2.2 Fluid ............................................................ 19<br />
3 Component explanation ..................... 20<br />
4 Getting started .................................... 22<br />
4.1 Installing the batteries ................................. 22<br />
4.2 Filling the tank with fluid .............................. 23<br />
4.3 Suction of the excess fluid from the tank ..... 23<br />
5 Operation ............................................. 24<br />
5.1 Creating the fog ........................................... 24<br />
5.2 Fan Body and Cone (only full set) .............. 25<br />
6 Storage and transport ........................ 26<br />
7 Failures ................................................ 27<br />
8 Warranty and Service ......................... 28<br />
8.1 Warranty ...................................................... 28<br />
8.2 Service ........................................................ 28<br />
9 Declaration of conformity .................. 29<br />
Points of sale and service ............................ 30<br />
16
General Information<br />
1 General Information<br />
1.1 Operation Manual<br />
Information<br />
This operation manual allows you to safely work<br />
with the Fog Spray Gun. Please keep this manual<br />
for your information.<br />
The Fog Spray Gun should be used by professionals<br />
for its intended use only.<br />
Liability is void for any damages caused by not<br />
following this manual.<br />
1.2 Notes<br />
WARNING!<br />
Not following this warning can cause injury.<br />
ATTENTION!<br />
Not following this note can cause permanent<br />
damage to the device.<br />
NOTE!<br />
Useful information<br />
1.3 Intended Use The Fog Spray Gun produces small fog clouds for<br />
the visualization of air streams and the leakage<br />
detection in the building shell.<br />
1.4 Components Device Components<br />
Fog Spray Gun<br />
Fog Spray Gun<br />
Fan Body with Cone, only<br />
full set<br />
6 standard batteries 1,5 V,<br />
LR6 alcaline<br />
(full set: 7 batteries)<br />
Fluid, 85 ml<br />
17
General Information<br />
1.5 Information on disposal<br />
Electronic equipment does not belong into domestic<br />
waste, but must be disposed in accordance<br />
with the applicable statutory provisions.<br />
You may hand in any defective batteries taken out<br />
of the unit to our company as well as to recycling<br />
places of public disposal systems or to selling<br />
points of new batteries or storage batteries.<br />
1.6 Direction Wöhler Messgeräte Kehrgeräte GmbH<br />
Schützenstr. 41<br />
33181 Bad Wünnenberg<br />
Tel.: +49 2953 73-100<br />
Fax: +49 2953 73-250<br />
E-Mail: mgkg@woehler.com<br />
Phone:<br />
+49 2953 73-100<br />
18
Safety information<br />
2 Safety information<br />
2.1 Operation of the<br />
Fog Spray Gun<br />
WARNING!<br />
This is a battery powered device. Do not use in<br />
volatile combustible environments.<br />
2.2 Fluid The fluid contains glycerin, propylene glycol and<br />
distilled water. The fluid is not inflammable and<br />
not dangerous. Nevertheless the following rules<br />
should be observed.<br />
WARNING!<br />
- The fluid can cause eye irritations. In this<br />
case the conjunctiva will be reddened. In this<br />
case flush eyes with plenty of water.<br />
- In rare cases the fog can provoke asthmatic<br />
reactions.<br />
- Do not eat and drink the fluid.<br />
19
Component explanation<br />
3 Component explanation<br />
2<br />
10<br />
11<br />
9<br />
8<br />
3<br />
7<br />
5<br />
1<br />
4<br />
Fig. 11: Overview<br />
6<br />
12<br />
20
Component explanation<br />
Component Explanation 1 Fog Spray Gun (black)<br />
2 Fan Body with Cone (blue), only full set<br />
3 Power/Vapor Lever<br />
4 Tank filling opening (under plug)<br />
5 Suction hole (under plug)<br />
6 Fluid level window<br />
7 Vapor chimney<br />
8 Air intake<br />
9 On/Off switch for fan<br />
10 Battery case of the Fan Body, only full set<br />
11 LED Power Light, only full set<br />
21
Getting started<br />
4 Getting started<br />
4.1 Installing the batteries<br />
• Open the battery case with a screwdriver. The<br />
battery case is at the bottom side of the Fog<br />
Spray Gun.<br />
• Install 6 standard batteries LR6, 1.5 V,<br />
alcaline.<br />
Fig. 12: Battery case of the<br />
Fog Spray Gun<br />
ATTENTION!<br />
Do not mix old and new batteries and always<br />
change 6 batteries at the same time.<br />
• Always put two batteries in one case, one on<br />
top of the other.<br />
ATTENTION!<br />
Make sure the polarity is correct. The correct polarity<br />
is shown in the battery lid.<br />
• Close the battery lid and tighten the crosshead<br />
screws.<br />
Fig. 13: Battery case, opened,<br />
with batteries<br />
NOTE!<br />
Instead of the cells, rechargeable batteries can be<br />
used.<br />
22
Getting started<br />
4.2 Filling the tank<br />
with fluid<br />
Spout<br />
Fig. 14: Fluid bottle<br />
• Remove the plug from the tank of the Fog<br />
Spray Gun.<br />
• First, suck remaining fluid out of the tank, see<br />
chapter 4.3.<br />
• Before filling, lay the Fog Spray Gun on its<br />
side.<br />
• Insert the long sprout far into the tank (opening<br />
"Fill") and fill the tank with fluid.<br />
• Control the fluid level in the tank at the Fluid<br />
Level Window. (under the Filling opening, see<br />
fig. 1, part 6). For this purpose, replace the<br />
Fog Spray Gun in an upright position. Fill the<br />
tank to 3/4 full.<br />
NOTE!<br />
Hold the Fluid Level Window to a light source to<br />
easily see the level of the fluid.<br />
Fig. 15: Filling the tank with fluid<br />
4.3 Suction of the<br />
excess fluid from<br />
the tank<br />
If the tank is overfilled or before storing the Fog<br />
Spray Gun, the fluid has to be sucked in the following<br />
way:<br />
• Squeeze the Fluid bottle.<br />
• Insert the long nozzle into the "Empty" tank<br />
and release the pressure on the bottle so that<br />
the excess fluid in the tank is sucked back into<br />
the bottle.<br />
Fig. 16: Suction of the excess<br />
fluid<br />
23
Operation<br />
5 Operation<br />
WARNING!<br />
Operation in an environment with inflammable gas<br />
or vapor is not permitted.<br />
5.1 Creating the fog<br />
ATTENTION!<br />
Do not cover the air intake (fig. 1, part 8) during<br />
the operation.<br />
Power/Vapor<br />
Lever<br />
Fig. 17: Power/Vapor Lever<br />
• Press the Power/Vapor Lever gently with two<br />
fingers, until the LED power light (fig. 1, part<br />
11) glows, indicating that power is on.<br />
NOTE!<br />
Hold the lever for 6 to 9 seconds. This gives the<br />
coil in the vapor generator time to heat up.<br />
• Then squeeze the Power/Vapor Lever more<br />
firmly.<br />
• To produce a longer duration vapor stream,<br />
squeeze the Power/Vapor Lever just enough<br />
to see a thick vapor from the top of the<br />
chimney.<br />
• Then simply pulse the Power/Vapor Lever by<br />
easing up on the lever, so the power light<br />
stays on, then increasing pressure on the lever<br />
to produce a controlled volume of vapor.<br />
Repeat this pulsing action as long as vapor is<br />
needed.<br />
24
Operation<br />
5.2 Fan Body and<br />
Cone<br />
(only full set)<br />
Use the Cone to create a narrow fog stream that<br />
makes the air stream clearly visible (see fig. 1,<br />
part 2).<br />
NOTE!<br />
Cut the Cone Tube with an utility knife for a larger<br />
opening (0.5 to 1 cm).<br />
Fig. 18: Cone of the Fan Body<br />
• Open the battery case of the Fan Body with a<br />
screw-driver and install a standard battery<br />
1,5 V LR6.<br />
ATTENTION!<br />
Make sure the polarity is correct. The correct polarity<br />
is shown in the battery case. To see the polarity<br />
symbols better, open the battery case and<br />
put the Fan Body on a dark background.<br />
Fig. 19: Battery case of the Fan Body<br />
• Place the Fan Body on the Vapor Chimney of<br />
the Fog Spray Gun.<br />
• Turn on the Fan with the ON/OFF-key of the<br />
Fan Body (see fig. 1, part 9).<br />
• Create the fog as described in chapter 5.1 .<br />
25
Storage and transport<br />
6 Storage and<br />
transport<br />
ATTENTION!<br />
Improper transport or storage can harm the Fog<br />
Spray Gun. Other objects may become soiled by<br />
the fog or fluid.<br />
• After having used the Fog Spray Gun turn off<br />
the Fan with the ON/OFF-key of the Fan Body<br />
(see fig. 1, part 9).<br />
• Empty the fluid tank by sucking the fluid back<br />
into the bottle (see chapter4.3).<br />
• To lock the Power/Vapor Lever when transporting<br />
or storing remove the Lock Pin from<br />
the storage hole (in base) and insert it into the<br />
Lock Pin Hole in the shaft of the Power/Vapor<br />
Lock Pin Hole lever. Bring the pin to its original position to<br />
unlock the Power/Vapor Lever before working<br />
with the Fog Spray Gun again.<br />
Fig. 20: Pin for locking the<br />
Power/Vapor Lever<br />
Lock Pin<br />
NOTE!<br />
Use a paper clip or wire if the pin is lost.<br />
26
Failures<br />
7 Failures<br />
Failure Possible reason Solution<br />
There is no power indicator<br />
light or vapor<br />
The power light shines but<br />
very little or no vapor is<br />
being produced.<br />
Fluid is getting out of the<br />
Fog Spray Gun<br />
Disposable or rechargeable<br />
batteries are empty.<br />
The batteries are not installed<br />
correctly.<br />
The fluid tank is empty.<br />
The tank plug is not tight, so<br />
that there is no pressure in<br />
the tank.<br />
The fluid tank is overfilled<br />
so that excess fluid is cooling<br />
the Vapor Generator.<br />
The Power/Vapor Lever is<br />
being depressed without<br />
allowing for the Vapor Generator<br />
to heat up.<br />
The tank is overfilled. Excess<br />
fluid is running out of<br />
the Air Intake vents of the<br />
chimney.<br />
The tank plug is not tight.<br />
The unit is not transported<br />
or stored in an upright position.<br />
Due to the oily nature of the<br />
Fog Fluid, when vaporized,<br />
the fog easily condenses on<br />
the plastic surfaces of the<br />
Fog Spray Gun and there<br />
will be some unavoidable<br />
residue of fluid.<br />
Replace the batteries or, if<br />
using rechargeables, recharge<br />
the batteries.<br />
Make sure that all batteries<br />
are in the correct polarity<br />
position.<br />
Fill the tank to 3/4 full, see<br />
chapter 4.2.<br />
Make sure that the plug is<br />
making a good seal.<br />
Suck out excess fluid with<br />
the Fluid Bottle (see chapter<br />
4.3).<br />
Hold the Power/Vapor Lever<br />
gently depressed for 6 -<br />
9 seconds, than press more<br />
firmly.<br />
Suck out excess fluid with<br />
the Fluid Bottle (see chapter<br />
4.3).<br />
Press the plug down firmly<br />
to seal.<br />
Suck out the fluid with the<br />
Fluid Bottle<br />
(see chapter 4.3).<br />
Clean the Fog Spray Gun<br />
with a paper tissue.<br />
27
Warranty and Service<br />
8 Warranty and Service<br />
8.1 Warranty Each Fog Spray Gun will be tested in all functions<br />
and will leave our factory only after extensive<br />
quality control testing.<br />
If used properly, the warranty period for the Fog<br />
Spray Gun will be twelve month from the date of<br />
sale. The Fluid is not covered by this warranty.<br />
This warranty does not cover the freight and packing<br />
costs when the device is sent to the factory for<br />
repair.<br />
Service by non authorized personnel or making<br />
modifications to the analyzer voids any warranty.<br />
8.2 Service Wöhler has built our reputation on excellence in<br />
customer service. Therefore, of course, we are<br />
readily available to assist you after the warranty<br />
period ends.<br />
• Send us the device and we will repair it and<br />
return it to you with our package service.<br />
• Immediate help is provided by our technical<br />
staff over the telephone.<br />
28
Declaration of conformity<br />
9 Declaration of conformity<br />
The product<br />
product name: Fog Spray Gun<br />
complies with the key safety requirements set down in the guidelines of the Council for<br />
the Harmonization of the Legal Requirements of the Member States in relation to the<br />
electromagnetic compatibility (2004/108/EG).<br />
The following standards were availed of to evaluate the product in respect of the electromagnetic<br />
compatibility:<br />
EN 55014-1:2006+A1:2009<br />
EN 55014-2:1997 + A1:2001 + A2:2008<br />
Certificate n° 2023213/EE<br />
29
Points of sale and service<br />
Points of sale and service<br />
Germany<br />
Wöhler Messgeräte Kehrgeräte<br />
GmbH<br />
Schützenstr. 41<br />
33181 Bad Wünnenberg<br />
Tel.: +49 2953 73-100<br />
Fax: +49 2953 73-96100<br />
mgkg@woehler.de<br />
http://mgkg.woehler.de<br />
International<br />
USA<br />
Wohler USA Inc.<br />
20 Locust Street, Suite 205<br />
Danvers, MA 01923<br />
Tel.: +1 978 750 9876<br />
Fax.: +1 978 750 9799<br />
www.wohlerusa.com<br />
Italy<br />
Wöhler Italia srl<br />
Corso Libertà 9<br />
39100 Bolzano<br />
Tel.: +390471402422<br />
Fax: +39 0471<br />
http://mgkg.woehler.it<br />
Wöhler West<br />
Castroper Str. 105<br />
44791 Bochum<br />
Tel.: +49 234 516993-0<br />
Fax: +49 234 516993-99<br />
west@woehler.de<br />
Wöhler Süd<br />
Gneisenaustr.12<br />
80992 München<br />
Tel.: +49 89 1589223-0<br />
Fax: +49 89 1589223-99<br />
sued@woehler.de<br />
Czech Republic<br />
Wöhler Bohemia s.r.o.<br />
Za Naspern 1993<br />
393 01 Pelhrimov<br />
Tel.: +420 5653 49019<br />
Fax: +420 5653 23078<br />
info@woehler.cz<br />
France<br />
Wöhler France SARL<br />
16 Chemin de Fondeyre<br />
31200 Toulouse<br />
Tel. : 05 61 52 40 39<br />
Fax : 05 62 27 11 31<br />
info@woehler.fr<br />
http://mgkg.woehler.fr<br />
Your contact:<br />
30