SDH-FALZ - Typ Doppelstehfalz - Isotosi.ch
SDH-FALZ - Typ Doppelstehfalz - Isotosi.ch
SDH-FALZ - Typ Doppelstehfalz - Isotosi.ch

Erfolgreiche ePaper selbst erstellen
Machen Sie aus Ihren PDF Publikationen ein blätterbares Flipbook mit unserer einzigartigen Google optimierten e-Paper Software.
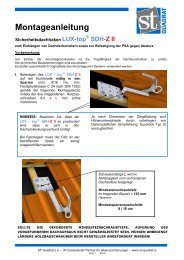
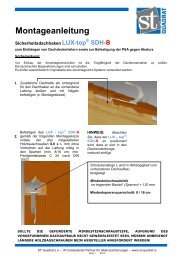
Montageanleitung<br />
Si<strong>ch</strong>erheitsda<strong>ch</strong>haken LUX-top ® <strong>SDH</strong>-<strong>FALZ</strong> - <strong>Typ</strong> <strong>Doppelstehfalz</strong><br />
zum Einhängen von Da<strong>ch</strong>deckerleitern sowie zur Befestigung der PSA gegen Absturz<br />
Vor Montage der Ans<strong>ch</strong>lageinri<strong>ch</strong>tung ist die Tragfähigkeit der Unterkonstruktion zu prüfen.<br />
Die te<strong>ch</strong>nis<strong>ch</strong>en Baubestimmungen sind einzuhalten. Die Montage der Ans<strong>ch</strong>lageinri<strong>ch</strong>tung darf nur auf na<strong>ch</strong><br />
Herstellerangaben montierten Untergründen erfolgen. Die Montageri<strong>ch</strong>tlinie des Profil-Herstellers muss unbedingt<br />
eingehalten werden! Bei na<strong>ch</strong>trägli<strong>ch</strong>er Montage des Si<strong>ch</strong>erungssystems ist eine eingehende statis<strong>ch</strong>e bzw.<br />
konstruktive Überprüfung des Da<strong>ch</strong>aufbaus erforderli<strong>ch</strong>. Es dürfen keine Veränderungen an der Ans<strong>ch</strong>lageinri<strong>ch</strong>tung<br />
vorgenommen werden und auss<strong>ch</strong>ließli<strong>ch</strong> Originalteile des Systems verwendet werden.<br />
Zulässige Befestigungsuntergründe +<br />
Mindestmaterialstärken<br />
- Edelstahl: 0,50 mm<br />
- Stahlble<strong>ch</strong> verzinkt: 0,60 mm<br />
- Zink: 0,70 mm<br />
Montage des Si<strong>ch</strong>erheitsda<strong>ch</strong>hakens<br />
1. Den Si<strong>ch</strong>erheitsda<strong>ch</strong>haken und die Alu –<br />
Falzklemms<strong>ch</strong>iene entspre<strong>ch</strong>end der<br />
Verlegeri<strong>ch</strong>tung der <strong>Doppelstehfalz</strong>ble<strong>ch</strong>e<br />
ausri<strong>ch</strong>ten und so auf den Falzen der<br />
<strong>Doppelstehfalz</strong>bahn von oben aufsetzen,<br />
dass die Falzklemms<strong>ch</strong>iene gemäß<br />
nebenstehender Darstellungen mit dem<br />
Hintergriff unter die Bördelung greift.<br />
S<strong>ch</strong>losss<strong>ch</strong>raube M10 x 30<br />
(A2)<br />
S<strong>ch</strong>losss<strong>ch</strong>raube M10 x 35 (A2)<br />
2. Die Alu – Falzklemms<strong>ch</strong>iene<br />
kontakts<strong>ch</strong>lüssig unter die Bördelung<br />
ziehen und die Befestigungss<strong>ch</strong>rauben<br />
(auf korrekte Längenauswahl a<strong>ch</strong>ten) mit<br />
einem Drehmoment von 50 Nm<br />
anziehen. Dabei ist auf glei<strong>ch</strong>mäßigen Sitz<br />
der Falzklemms<strong>ch</strong>iene zu a<strong>ch</strong>ten. Der<br />
Vierkant der S<strong>ch</strong>losss<strong>ch</strong>rauben muss<br />
korrekt in den dafür vorgesehenen<br />
Stanzungen in der Klemms<strong>ch</strong>iene sitzen.<br />
3. Na<strong>ch</strong> den Anbauarbeiten müssen alle<br />
S<strong>ch</strong>raubverbindungen auf festen Sitz<br />
überprüft werden.<br />
4. Die in der Verwendungsanleitung<br />
enthaltene Kontrollkarte ist na<strong>ch</strong> erfolgter<br />
Montage auszufüllen und dem Bauherrn<br />
auszuhändigen! Bei Bedarf steht diese<br />
au<strong>ch</strong> auf unserer Website<br />
www.st-quadrat.lu zum Download bereit.<br />
ST Quadrat s.a. – Ihr kompetenter Partner für Absturzsi<strong>ch</strong>erungen – www.st-quadrat.lu<br />
Seite 1 09/12
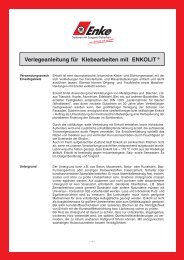
Einbauskizze für:<br />
LUX-top ® <strong>SDH</strong>-<strong>FALZ</strong> - <strong>Typ</strong> <strong>Doppelstehfalz</strong><br />
Positionsskizze:<br />
ST Quadrat s.a. – Ihr kompetenter Partner für Absturzsi<strong>ch</strong>erungen – www.st-quadrat.lu<br />
Seite 2 09/12
Installation Instructions<br />
LUX-top ® <strong>SDH</strong>-<strong>FALZ</strong> roof safety hook <strong>Typ</strong>e: double-welted standing seam<br />
for atta<strong>ch</strong>ing roofers' ladders / duck runs and for atta<strong>ch</strong>ing the personal protective equipment<br />
against falls from a height<br />
Before installing the an<strong>ch</strong>or device the load-bearing capacity of the substructure must be <strong>ch</strong>ecked.<br />
The te<strong>ch</strong>nical building regulations must be complied with. The an<strong>ch</strong>or device may only be installed on surfaces/substrates<br />
installed according to the manufacturer's instructions. Always comply with the installation guidelines of the profile<br />
manufacturer! If the safety system is installed subsequently, in-depth structural <strong>ch</strong>ecks and <strong>ch</strong>ecking of the roof construction<br />
is necessary. Do not make any <strong>ch</strong>anges to the an<strong>ch</strong>or device and only use original parts of the system.<br />
Allowable fixing surfaces + minimum<br />
material thickness:<br />
- Stainless steel: 0.50 mm<br />
- Steel plate, galvanised: 0.60 mm<br />
- Zinc: 0.70 mm<br />
Installing the roof safety hook<br />
5. Align the roof safety hook and the<br />
aluminium welt clamping strip according<br />
to the laying direction of the doublewelted<br />
standing seam sheets and position<br />
on the welts of the double-welted<br />
standing seam sheet from above so that<br />
the rear grip of the welt clamping rail<br />
grips under the beading as shown in the<br />
diagrams to the right.<br />
Coa<strong>ch</strong> bolt M10 x 30<br />
(A2)<br />
Coa<strong>ch</strong> bolt M10 x 35 (A2)<br />
6. Pull the aluminium welt clamping strip<br />
under the beading so that it is in tight<br />
contact with it and tighten the fastening<br />
bolts (ensure correct length is <strong>ch</strong>osen)<br />
with a torque of 50 Nm. Ensure the welt<br />
clamping rail fits uniformly. The square of<br />
the coa<strong>ch</strong> bolts must sit correctly in the<br />
not<strong>ch</strong>ing provided in the clamping strip.<br />
7. After completing the atta<strong>ch</strong>ment work, all<br />
bolted connections must be <strong>ch</strong>ecked for<br />
secure fit.<br />
8. The inspection log card included in the<br />
user instructions must be completed after<br />
finishing the installation and issued to the<br />
owner! If necessary, this can also be<br />
downloaded from our website<br />
www.st-quadrat.lu.<br />
ST Quadrat s.a. – Ihr kompetenter Partner für Absturzsi<strong>ch</strong>erungen – www.st-quadrat.lu<br />
Seite 3 09/12
mind. 3,50 m S<strong>ch</strong>arenlänge<br />
mind. 1,50 m vom Ende der Stehfalzbahn<br />
(wenn ni<strong>ch</strong>t Absturzkante)<br />
Installation sket<strong>ch</strong> for:<br />
LUX-top ® <strong>SDH</strong>-<strong>FALZ</strong> - <strong>Typ</strong>e: double-welted standing seam<br />
Sket<strong>ch</strong> of installed position:<br />
At mind. least 22 S<strong>ch</strong>aren courses<br />
At mind. least 22 S<strong>ch</strong>aren courses<br />
ST Quadrat s.a. – Ihr kompetenter Partner für Absturzsi<strong>ch</strong>erungen – www.st-quadrat.lu<br />
Seite 4 09/12
Manuel de montage<br />
Cro<strong>ch</strong>et d'ancrage de sécurité LUX-top ® <strong>SDH</strong>-<strong>FALZ</strong> - modèle à<br />
crapotage double sur joint debout<br />
à suspendre aux é<strong>ch</strong>elles de couvreur pour l'ancrage de l'équipement de protection<br />
individuelle anti<strong>ch</strong>ute<br />
Contrôlez la force portante de la structure portante / du support avant de monter le dispositif d'ancrage.<br />
Respectez les dispositions te<strong>ch</strong>niques spécifiques à l'édifice. Le montage du dispositif d'ancrage est uniquement permis sur<br />
des supports montés dans le respect des indications du fabricant. Respectez impérativement la directive de montage du<br />
fabricant du profilé ! Procédez à une vérification approfondie de la statique et de la construction de la surélévation de<br />
comble lors de tout montage ultérieur d'un système de ligne de vie / d’un dispositif d’ancrage. Il est interdit de modifier le<br />
système de ligne de vie / le dispositif d'ancrage et imposé de n'utiliser que les pièces d'origine du système.<br />
Supports de fixation admissibles +<br />
épaisseurs minimales des matériaux<br />
- Acier inoxydable : 0,50 mm<br />
- Tôle d'acier galvanisée : 0,60 mm<br />
- Zinc : 0,70 mm<br />
Montage du cro<strong>ch</strong>et d'ancrage de<br />
sécurité<br />
9. Alignez le cro<strong>ch</strong>et d'ancrage de sécurité et la<br />
mâ<strong>ch</strong>oire de serrage du profil en aluminium<br />
dans le sens de pose des tôles de crapotage<br />
double sur joint debout et placez-les par le<br />
haut sur les profilés de la bande de<br />
crapotage double de manière à ce que la<br />
mâ<strong>ch</strong>oire de serrage du profil s'enclen<strong>ch</strong>e<br />
avec l'arrière sous le bord rabattu.<br />
Boulon brut à tête bombée et<br />
collet carré M10 x 30<br />
(A2)<br />
Boulon brut à tête bombée et<br />
collet carré M10 x 35 (A2)<br />
10. Tirez la mâ<strong>ch</strong>oire de serrage du profil en<br />
aluminium à plan sous le bord rabattu et<br />
serrez les vis de fixation (en veillant à <strong>ch</strong>oisir<br />
une longueur correcte) en appliquant un<br />
couple de serrage de 50 Nm. Veillez au<br />
logement régulier de la mâ<strong>ch</strong>oire de serrage<br />
du profil. La section carrée des boulons<br />
bruts à tête bombée et collet carré doit être<br />
logée correctement dans les perforations<br />
prévues à cet effet dans la mâ<strong>ch</strong>oire de<br />
serrage.<br />
11. Contrôlez le logement correct et à bloc de<br />
tous les vissages après les travaux de<br />
montage.<br />
12. Complétez la carte de contrôle fournie avec le<br />
manuel d'utilisation après le montage et<br />
remettez-la au maître de l'ouvrage. Cette carte<br />
est aussi disponible pour télé<strong>ch</strong>argement sur notre<br />
site web www.st-quadrat.lu si besoin est.<br />
ST Quadrat s.a. – Ihr kompetenter Partner für Absturzsi<strong>ch</strong>erungen – www.st-quadrat.lu<br />
Seite 5 09/12
mind. 3,50 m S<strong>ch</strong>arenlänge<br />
mind. 1,50 m vom Ende der Stehfalzbahn<br />
(wenn ni<strong>ch</strong>t Absturzkante)<br />
S<strong>ch</strong>éma de montage pour :<br />
LUX-top ® <strong>SDH</strong>-<strong>FALZ</strong> - modèle à crapotage double sur joint<br />
debout<br />
S<strong>ch</strong>éma de positionnement :<br />
au moins mind. 2 tôles S<strong>ch</strong>aren profilées<br />
au moins mind. 22 tôles S<strong>ch</strong>aren profilées<br />
ST Quadrat s.a. – Ihr kompetenter Partner für Absturzsi<strong>ch</strong>erungen – www.st-quadrat.lu<br />
Seite 6 09/12
Montagehandleiding<br />
Veiligheidsdakhaak LUX-top ® <strong>SDH</strong>-<strong>FALZ</strong> - type dubbele staande fels<br />
voor het inhangen van dakdekkersladders en voor de bevestiging van de PBM tegen vallen<br />
Vóór montage van de verankering moet het draagvermogen van de draagconstructie gecontroleerd worden.<br />
De te<strong>ch</strong>nis<strong>ch</strong>e bouwbepalingen moeten worden nageleefd. De montage van de verankering mag alleen plaatsvinden op<br />
volgens de informatie van de fabrikant gemonteerde ondergronden. De montageri<strong>ch</strong>tlijn van de profielenfabrikant moet<br />
absoluut in a<strong>ch</strong>t genomen worden! Bij montage van het veiligheidssysteem a<strong>ch</strong>teraf is een nauwkeurige statis<strong>ch</strong>e resp.<br />
constructieve controle van de dakopbouw vereist. Er mogen geen wijzigingen aan de verankering worden uitgevoerd, en<br />
uitsluitend originele reserveonderdelen van het systeem gebruikt worden.<br />
Toegestane<br />
bevestigingsondergronden +<br />
minimum materiaaldiktes:<br />
- Roestvrij staal: 0,50 mm<br />
- Staalplaat, verzinkt: 0,60 mm<br />
- Zink: 0,70 mm<br />
Montage van de veiligheidshaak<br />
13. De veiligheidshaak en de aluminium -<br />
felsklemrail overeenkomstig de legri<strong>ch</strong>ting<br />
van de platen met dubbele staande fels<br />
uitri<strong>ch</strong>ten en zo van bovenaf op de fels<br />
van de baan met dubbele staande fels<br />
zetten, dat de felsklemrail net zo als in de<br />
afbeeldingen hiernaast met de<br />
a<strong>ch</strong>tergreep over de rand grijpt.<br />
Borgs<strong>ch</strong>roef M10 x 30<br />
(A2)<br />
Borgs<strong>ch</strong>roef M10 x 35 (A2)<br />
14. De aluminium felsklemrail goed<br />
aangedrukt onder de rand trekken en de<br />
bevestigingss<strong>ch</strong>roeven (letten op correcte<br />
lengtekeuze) met een koppel van 50<br />
Nm aandraaien. Daarbij moet gelet<br />
worden op gelijkmatige plaatsing van de<br />
felsklemrail. Het vierkant van de<br />
borgs<strong>ch</strong>roeven moet correct in de<br />
daarvoor voorziene stansingen in de<br />
klemrail zitten.<br />
15. Na de montagewerkzaamheden moet<br />
gecontroleerd worden of alle<br />
s<strong>ch</strong>roefverbindingen goed vastzitten.<br />
16. De controlekaart die zi<strong>ch</strong> in de<br />
gebruikershandleiding bevindt, moet na<br />
voltooiing van de montage worden<br />
ingevuld en aan de hoofdaannemer<br />
overhandigd worden! Indien nodig is deze<br />
ook bes<strong>ch</strong>ikbaar op onze website<br />
www.st-quadrat.lu om te downloaden.<br />
ST Quadrat s.a. – Ihr kompetenter Partner für Absturzsi<strong>ch</strong>erungen – www.st-quadrat.lu<br />
Seite 7 09/12
mind. 3,50 m S<strong>ch</strong>arenlänge<br />
mind. 1,50 m vom Ende der Stehfalzbahn<br />
(wenn ni<strong>ch</strong>t Absturzkante)<br />
Montages<strong>ch</strong>ema voor:<br />
LUX-top ® <strong>SDH</strong>-<strong>FALZ</strong> - type dubbele staande fels<br />
Posities<strong>ch</strong>ema:<br />
mind. 2 S<strong>ch</strong>aren<br />
mind. 2 S<strong>ch</strong>aren<br />
ST Quadrat s.a. – Ihr kompetenter Partner für Absturzsi<strong>ch</strong>erungen – www.st-quadrat.lu<br />
Seite 8 09/12