Produktinformation Celtra Glasurbrand DE / EN ... - DeguDent GmbH
Produktinformation Celtra Glasurbrand DE / EN ... - DeguDent GmbH
Produktinformation Celtra Glasurbrand DE / EN ... - DeguDent GmbH

Erfolgreiche ePaper selbst erstellen
Machen Sie aus Ihren PDF Publikationen ein blätterbares Flipbook mit unserer einzigartigen Google optimierten e-Paper Software.
<strong>Produktinformation</strong><br />
für das Aufbringen von<br />
CELTRA Malfarben und Glasur<br />
Product information<br />
for the application of<br />
CELTRA stains and glaze<br />
1
Glasieren<br />
einer CELTRA Duo-<br />
Restauration<br />
GLAZING A CELTRA DUO<br />
RESTORATION<br />
CELTRA Duo zeichnet sich, aufgrund seiner hohen Transluzenz<br />
und Opaleszenz, durch eine lebendige Farbwirkung und einen<br />
besonderen Chamäleon-Effekt aus. Hierdurch ist eine Individualisierung<br />
über Malfarben tendenziell weniger erforderlich<br />
als bei opakeren Keramiken. Ist eine Individualisierung/Glasur<br />
erwünscht, wird die Arbeit durch CELTRA Duo erleichtert. Das<br />
final kristallisierte Werkstück zeigt bereits nach dem Schleifen<br />
die finale Zahnfarbe, so dass das endgültige Ergebnis bereits<br />
bei der Individualisierung einzuschätzen ist.<br />
CELTRA Duo, with its high translucency and opalescence, is<br />
characterized by a lively shade effect and a special “chameleon”<br />
appearance. This means that the need to customize using<br />
stains tends to feel less urgent than with more opaque<br />
ceramics. Is customization/glazing desired anyway, this is<br />
still made easy by CELTRA duo. The completely crystallized<br />
object already exhibits the final tooth shade after milling, so<br />
that the final result is already close as you start to perform the<br />
customization steps.<br />
1 <strong>DE</strong>R GLASURPROZESS<br />
1 GLAZING PROCESS<br />
Hinweise<br />
Notes<br />
››<br />
Eine intensivere Farbwirkung kann<br />
durch mehrfaches Aufbringen und<br />
jeweils anschließendes Brennen<br />
erreicht werden. Jedoch kann die<br />
Anwendung von zu vielen Schichten<br />
Malfarben eine unnatürliche<br />
Farbwirkung ergeben.<br />
››<br />
Die Höcker und die Fissuren<br />
können mit Malfarben individuell<br />
charakterisiert werden.<br />
››<br />
Der grundlegende Farbton wird<br />
auf Basis der Vita Zahn-Farbgruppen<br />
(A, B, C, D) festgelegt (siehe<br />
Tabelle 1).<br />
››<br />
A more intensive shade effect<br />
can be achieved by repeated<br />
cycles of applying and firing the<br />
material. However, the use of too<br />
many layers of stain may result<br />
in an unnatural appearance.<br />
››<br />
The cusps and fissures can be<br />
individually characterized with<br />
stains.<br />
››<br />
The underlying chromatic shade<br />
is supported by the<br />
corresponding shade group (see<br />
Tables 1 and 2 below).<br />
2
TAB 1 Zuordnung der Farbgruppen TAB 1 Assignment of shade groups<br />
Gewünschte Farbton<br />
nach Vita Zahn-Farbgruppen<br />
Bleach A B C D<br />
Desired shade group Bleach A B C D<br />
Universal Malfarbe<br />
shade<br />
0 1 2 3 4<br />
Stain 0 1 2 3 4<br />
TAB 2 Verwendung der Incisal Malfarben TAB 2 Use of incisal stains<br />
Malfarbe<br />
Zahnfarbe<br />
Stain<br />
Tooth shade<br />
Universal Malfarbe<br />
(stain I1)<br />
A1, A2, A3, B1, B2, B3, B4, Bleach<br />
Incisal stain<br />
(stain i1)<br />
A1, A2, A3, B1, B2, B3, B4, Bleach<br />
Universal Malfarbe<br />
(stain I2)<br />
A 3,5, A4, C1, C2, C3, C4, D2, D3, D4<br />
Incisal stain<br />
(stain i2)<br />
A 3,5, A4, C1, C2, C3, C4, D2, D3, D4<br />
Verwendung von Glasuren und Malfarben<br />
anderer Hersteller<br />
Für die Indiviualisierung und Glasur von CELTRA Duo wird<br />
ausschließlich das systemeigene Sortiment von Glasur<br />
und Malfarben ("CELTRA Universal Stain&Glaze") mit dem<br />
entsprechenden Liquid empfohlen, da dessen Kompatibilität<br />
zu CELTRA Duo getestet wurde und gewährleistet ist.<br />
Glasuren und Malfarben anderer Hersteller haben unter<br />
Umständen andere als die für CELTRA Duo empfohlenen<br />
Brenntemperaturen und Brandführungen. Es kann derzeit<br />
nicht ausgeschlossen werden, dass dies im Einzelfall zu<br />
einer Verschlechterung des Brennergebnisses führt.<br />
Use of glazes and stains by third-party manufacturers<br />
Only the native range of glaze and stains (CELTRA Universal<br />
Stain & Glaze) in conjunction with the appropriate liquid is<br />
recommended for customizing and glazing CELTRA Duo, as<br />
its compatibility with CELTRA Duo has been tested and is<br />
guaranteed. Glazes and stains by third-party manufacturers<br />
may require other firing temperature and cycles than those<br />
recommended for CELTRA duo. The possibility that this may<br />
lead to inferior firing results in some cases cannot currently<br />
be ruled out.<br />
3
Anwendung<br />
Application<br />
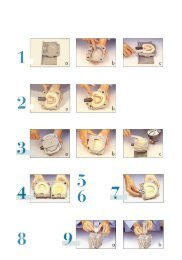
Die Masse gründlich durchspateln.<br />
Dabei keinen<br />
Metallspatel verwenden,<br />
da dies zu Verfärbungen<br />
und Bildung von Luftblasen<br />
führen kann. Anschließend<br />
die benötigte Menge CELTRA<br />
Glasur entnehmen und auf die<br />
Anmischplatte bringen. Wird<br />
eine dünnflüssigere Konsistenz<br />
erwünscht, das Material mit<br />
CELTRA Stain&Glaze Liquid<br />
verdünnen.<br />
Mix the mass thoroughly with<br />
a spatula. Do not use a metal<br />
spatula, as this may cause<br />
discolouration and promote the<br />
formation of air bubbles. Then<br />
withdraw the required amount<br />
of CELTRA glaze and place it<br />
on the mixing plate.<br />
For a thinner consistency, dilute<br />
the material with CELTRA<br />
Stain&Glaze Liquid.<br />
Eine dünne Schicht Glasur<br />
in üblicher Weise mit einem<br />
Pinsel auf die gesamte<br />
Kronenoberfläche auftragen.<br />
Die Glasurschicht darf weder zu<br />
dick noch zu dünn sein.<br />
Eine zu dünne Schicht ergibt<br />
einen eher matten Glanz.<br />
Eine zu dicke Schicht kann zu<br />
Pfützen- oder Kraterbildung im<br />
Material führen.<br />
Apply a thin layer of glaze to<br />
the entire crown surface in the<br />
usual way, using a brush. The<br />
glaze layer should be neither<br />
too thick nor too thin. Thinner<br />
layers may result in a rather dull<br />
lustre. Thicker layers can lead<br />
to pooling or cratering.<br />
4
Eine dünne Schicht Farb-<br />
Malfarbe im gingivalen Bereich<br />
aufbringen und mit dem Pinsel<br />
nach inzisal (oder wo benötigt)<br />
ausdünnen. Den Farbton mit<br />
dem Farbring überprüfen.<br />
Mit dem Pinsel die Menge<br />
erhöhen oder verringern, um<br />
den gewünschten Farbton zu<br />
erzielen.<br />
Apply a thin layer of stain in<br />
the gingival area and spread<br />
with a brush toward the incisal<br />
region (or as needed). Check<br />
the shade using the shade ring.<br />
Use the brush to increase or<br />
decrease the stain amount to<br />
achieve the desired shade.<br />
Eine dünne Schicht Incisal<br />
Malfarben mit dem Pinsel auf<br />
der Schneidekante aufbringen.<br />
Den Farbton mit dem Farbring<br />
überprüfen. Mit dem Pinsel<br />
die Menge erhöhen oder<br />
verringern, um die ästhetisch<br />
gewünschten inzisalen Effekte<br />
zu erzielen.<br />
Again using the brush, apply a<br />
thin layer of incisal stain to the<br />
incisal edge. Check the shade<br />
using the shade ring. Use the<br />
brush to increase or decrease<br />
the stain amount to achieve the<br />
desired aesthetic incisal effects.<br />
5
ennen<br />
einer CELTRA Duo-<br />
Restauration<br />
FIRING A CELTRA DUO<br />
RESTORATION<br />
Als bereits final kristallisierte Keramik zeigt CELTRA Duo<br />
keine nennenswerten Dimensionsveränderungen während des<br />
<strong>Glasurbrand</strong>es. Die Verwendung einer feuerfesten Brennpaste<br />
ist nicht zwingend erforderlich. Empfohlen wird daher die<br />
ausschließliche Verwendung von Brennwatte.<br />
CELTRA duo is already completely crystallized and exhibits no<br />
significant dimensional changes during glaze firing. The use of<br />
a refractory firing paste is not required. We recommend the<br />
use of a firing pad only.<br />
2 <strong>DE</strong>R GLASURbrand<br />
2 GLAZE FIRING<br />
Anwendung<br />
Application<br />
Bei Verwendung von Brennwatte<br />
When using a firing pad<br />
1<br />
1<br />
Glasierte/Bemalte Restauration mit einer<br />
Pinzette aufnehmen und auf die Brennwatte<br />
legen. Die Haupt-Auflagefläche sollte auf der<br />
unglasierten/unbemalten Seite sein. Bei<br />
Kronen sollte die Restauration, soweit<br />
möglich, innen gefasst werden.<br />
Take up the glazed/painted restoration with<br />
a pair of tweezers and place it on the firing<br />
pad. The main supporting surface should<br />
be the unglazed/unstained surface. In the<br />
case of crowns, the restoration should be<br />
supported on the inside if possible.<br />
2<br />
2<br />
Die Objekte können zusätzlich auf Platinfolie<br />
gelagert werden, um das Anhaften<br />
von Fasern der Brennwatte zu vermeiden.<br />
You may additionally place the objects on a<br />
sheet of platinum foil to avoid the adhesion<br />
of fibres from the firing pad.<br />
6
Bei Verwendung von Brennpaste/Brennstiften<br />
When using firing paste<br />
CELTRA DUO ist sehr brennstabil und kann somit<br />
ohne Brennpaste im Keramikofen gebrannt werden.<br />
Sollte dennoch der Malfarben/<strong>Glasurbrand</strong> mit einer<br />
Brennpaste durchgeführt werden, so sind folgende<br />
Punkte zu beachten:<br />
››<br />
Es sollten ausschließlich dünne, zunderfreie Metallstifte<br />
oder dünne Keramikstifte zur Lagerung der<br />
Objekte in der Brennpaste verwendet werden. Dabei<br />
ist darauf zu achten, dass die Stifte nicht mit der<br />
Restauration in Berührung kommen.<br />
››<br />
Die Brennpaste sollte nur in kleinen Mengen zur<br />
Fixierung der Restauration am Stift eingebracht<br />
werden. Ein komplettes Ausfüllen der Restauration<br />
mit Brennpaste muss vermieden werden.<br />
CELTRA Duo is very stable when fired and can be<br />
processed in a ceramic furnace without the use of firing<br />
paste. However, if a stain/glaze firing with a firing paste<br />
is desired anyway, the following points should be noted:<br />
››<br />
Only thin, scale-free metal pins or thin ceramic pins<br />
should be used for anchoring the objects in the<br />
firing paste. Make sure that the pins do not touch the<br />
restoration.<br />
››<br />
Apply only small quantities of firing paste, just<br />
enough to secure the restoration, on the pin. Avoid<br />
filling the restoration completely with firing paste.<br />
1<br />
1<br />
Restauration auf dem Brennstift platzieren.<br />
Falls erforderlich, die Restauration mit Hilfe<br />
einer kleinen Menge feuerfesten Brennpaste<br />
auf dem Stift fixieren. Den Stift anschließend<br />
in der Brennwatte befestigen.<br />
Place the restoration on the firing pin. If<br />
necessary, secure the restoration on the pin<br />
with a small amount of refractory firing<br />
paste. Then anchor the pin securely within<br />
the firing pad.<br />
2<br />
2<br />
Alternativ kann statt Brennwatte auch ein<br />
Brenngutträger verwendet werden. Wird<br />
die Restauration zusätzlich in feuerfester<br />
Brennpaste eingebettet, sollte diese nur<br />
in kleinen Mengen zur Fixierung der<br />
Restauration am Stift verwendet werden.<br />
Alternatively, you may use a firing support<br />
(lower thermal insulation) instead of<br />
firing pad. If the restoration is additionally<br />
embedded in refractory firing paste, use only<br />
small quantities of firing paste on the pin,<br />
just enough to secure the restoration.<br />
7
Einstellung des Brennofens<br />
Der <strong>Glasurbrand</strong> von CELTRA Duo sollte mit den<br />
folgenden Brennparametern durchgeführt werden:<br />
Furnace settings<br />
Glaze firing of CELTRA duo should be performed using<br />
the following firing parameters:<br />
››<br />
Starttemperatur 500°C<br />
››<br />
Use a starting temperature of 500°C<br />
››<br />
Objekt auf Brenngutträger oder<br />
Brennwatte im Ofen platzieren<br />
››<br />
Place the object in the furnace on a firing support<br />
or firing pad<br />
››<br />
Das Objekt ausreichend vortrocknen<br />
››<br />
Pre-dry the object sufficiently<br />
1. Malfarben/<strong>Glasurbrand</strong><br />
1. Stain/glaze firing<br />
Vortrocknen Trocknen Vorwärmen<br />
Pre-drying Drying Preheating<br />
2:00 min<br />
(bis Weißverfärbung<br />
des Objekts)<br />
2:00 min<br />
(je nach Ofentyp)<br />
500 °C/2:00 min<br />
2:00 min<br />
(until the object<br />
shows a white<br />
discoloration)<br />
2:00 min<br />
(depending on the<br />
type of furnace)<br />
500°C/2:00 min<br />
Steigrate Endtemp Haltezeit<br />
Heating rate Final temp. Holding time<br />
55 °C/ pro min 820 °C 1:30 min<br />
55°C/min 820 °C 1:30 min<br />
2. Malfarben/<strong>Glasurbrand</strong><br />
2. Stain/glaze firing<br />
Vortrocknen Trocknen Vorwärmen<br />
Pre-drying Drying Preheating<br />
2:00 min 2:00 min 500 °C/2:00 min<br />
2:00 min 2:00 min 500°C/2:00 min<br />
Steigrate Endtemp Haltezeit<br />
Heating rate Final temp. Holding time<br />
55 °C/ pro min 770 °C 1:30 min<br />
55°C/min 770 °C 1:30 min<br />
8
››<br />
Bei Verwendung von Brennpaste sollte die Vortrockenzeit<br />
um 2 - 3 Minuten verlängert werden.<br />
Die Paste kann dann ausreichend austrocknen und<br />
Spannungen werden vermieden.<br />
››<br />
Bei Verwendung von Brennpaste wird empfohlen<br />
eine 3-minütige Kühlphase nach jedem Brand dem<br />
Brennprogramm anzuschließen.<br />
Der <strong>Glasurbrand</strong> kann wiederholt werden mit Malfarben<br />
zum Akzentuieren oder mit Glasurmasse zur Erhöhung<br />
des Glanzgrades. Bei diesem zweiten Brand wird mit<br />
einer geringeren Endtemperatur von 770°C gearbeitet .<br />
Wird die Anwendung mit einer Brennhilfspaste bevorzugt,<br />
dann ist die ausschließliche Verwendung von Super<br />
Peg II feuerfeste Paste empfohlen, die man locker in die<br />
Krone einfügt.<br />
››<br />
When using a firing paste, extend the pre-drying<br />
time by 2 to 3 minutes to allow the paste to dry<br />
sufficiently to avoid tensions.<br />
››<br />
Also, when using a firing paste, it is recommended to<br />
allow for a cooling period of 3 minutes to reach the<br />
baseline temperature.<br />
The glaze firing may be repeated with accentuating<br />
stains or with a glazing compound to increase the gloss.<br />
A lower final temperature of 770°C may be selected for<br />
this second firing.<br />
If you prefer working with an auxiliary firing paste, we<br />
recommend using only Super PEG II refractory firing<br />
paste, applied loosely to the inside of the crown.<br />
Verwendung von Brennöfen anderer Hersteller<br />
Use of furnaces of different manufacturers<br />
Da Brennöfen verschiedener Hersteller sich in Bezug<br />
auf Software und Leistung stark unterscheiden, können<br />
diese Parameter je nach verwendetem Brennofen<br />
abweichen. Dies gilt insbesondere für die Zeiträume des<br />
Vortrocknens (bei geöffneter Brennkammer) sowie für die<br />
Steig- oder Aufheizrate.<br />
Der <strong>Glasurbrand</strong> für CELTRA Duo kann auch auf diesen Brennöfen<br />
durchgeführt werden. Die folgenden Brennparameter<br />
sollten jedoch in jedem Fall eingehalten werden:<br />
››<br />
a. Die finale Brenntemperatur von 820°C sollte, auch im<br />
Rahmen von Aufheizschwankungen, nicht überschritten<br />
werden.<br />
Since furnaces of different manufacturers can differ greatly<br />
in terms of software and performance, these parameters may<br />
vary depending on the furnace used. This is especially true of<br />
the pre-drying times (with open combustion chamber) and of<br />
the heating rate.<br />
CELTRA Duo can be glaze-fired in these furnaces. However,<br />
you must adhere to the following firing parameters:<br />
››<br />
a. The final firing temperature of 820°C must not be<br />
exceeded, not even briefly as a result of heating unit hysteresis.<br />
››<br />
b. The holding time of 1:30 min must not be exceeded.<br />
››<br />
b. Die Haltezeit von 1:30 Min. sollte nicht unterschritten<br />
werden.<br />
9
estellinformationen<br />
Produkt<br />
Bestellnummer<br />
CELTRA TM Universal Glasur<br />
Universal Glasur 5 g D 601322<br />
CELTRA TM Universal Liquids<br />
Universal Malfarben & Glasur Liquid 15 ml D 601315<br />
Universal Malfarben & Glasur Liquid 50 ml D 601350<br />
CELTRA TM Universal Malfarben<br />
Universal Malfarbe Shade 0 5 g D 601500<br />
Universal Malfarbe Shade 1 5 g D 601501<br />
Universal Malfarbe Shade 2 5 g D 601502<br />
Universal Malfarbe Shade 3 5 g D 601503<br />
Universal Malfarbe Shade 4 5 g D 601504<br />
Universal Malfarbe Shade i1 5 g D 601511<br />
Universal Malfarbe Shade i2 5 g D 601512<br />
Universal Malfarbe weiss 5 g D 601520<br />
Universal Malfarbe creme 5 g D 601521<br />
Universal Malfarbe sunset 5 g D 601522<br />
Universal Malfarbe kupfer 5 g D 601523<br />
Universal Malfarbe khaki 5 g D 601524<br />
Universal Malfarbe olive 5 g D 601525<br />
Universal Malfarbe mahagoni 5 g D 601526<br />
Universal Malfarbe violet 5 g D 601505<br />
Ätzgel und Neutralisator D 430491<br />
10
Ordering information<br />
Product<br />
REF<br />
CELTRA TM Universal Glaze<br />
Universal Glaze 5 g D 601322<br />
CELTRA TM Universal Liquids<br />
Universal Stain & Glaze Liquid 15 ml D 601315<br />
Universal Stain & Glaze Liquid 50 ml D 601350<br />
CELTRA TM Universal Malfarben<br />
Universal stain, shade 0 5 g D 601500<br />
Universal stain, shade 1 5 g D 601501<br />
Universal stain, shade 2 5 g D 601502<br />
Universal stain, shade 3 5 g D 601503<br />
Universal stain, shade 4 5 g D 601504<br />
Universal stain, shade i1 5 g D 601511<br />
Universal stain, shade i2 5 g D 601512<br />
Universal stain, white 5 g D 601520<br />
Universal stain, cream 5 g D 601521<br />
Universal stain, sunset 5 g D 601522<br />
Universal stain, copper 5 g D 601523<br />
Universal stain, khaki 5 g D 601524<br />
Universal stain, olive 5 g D 601525<br />
Universal stain, mahogany 5 g D 601526<br />
Universal stain, purple 5 g D 601505<br />
Etching gel and neutralizer D 430491<br />
11
50539988/a<br />
Last Revision: 08/2013<br />
EC<br />
REP<br />
<strong>DeguDent</strong> <strong>GmbH</strong><br />
Rodenbacher Chaussee 4<br />
63457 Hanau-Wolfgang<br />
Germany<br />
+ 49 6181 59 - 50<br />
www.dentsply-degudent.com<br />
12