Grundeinstellungen des PA 3000 HV - T+A Elektroakustik
Grundeinstellungen des PA 3000 HV - T+A Elektroakustik
Grundeinstellungen des PA 3000 HV - T+A Elektroakustik

Erfolgreiche ePaper selbst erstellen
Machen Sie aus Ihren PDF Publikationen ein blätterbares Flipbook mit unserer einzigartigen Google optimierten e-Paper Software.
Remote control receiver<br />
When using the remote control system please point the F<strong>3000</strong> handset in the<br />
direction of the receiver.<br />
It is essential to prevent potentially interfering light (from fluorescent lamps and<br />
energy-saving bulbs) falling directly on the receiver, as this may markedly<br />
reduce the effective range of the remote control system.<br />
The line of sight between the F<strong>3000</strong> and the remote control receiver in the<br />
<strong>PA</strong> <strong>3000</strong> <strong>HV</strong> must not be interrupted by any obstacles. Installing the<br />
<strong>PA</strong> <strong>3000</strong> <strong>HV</strong> behind the glass doors of a cabinet will also adversely affect the<br />
remote control system.<br />
The operating range of the F<strong>3000</strong> remote control handset with the internal infrared<br />
receiver of the <strong>PA</strong> <strong>3000</strong> <strong>HV</strong> is about 4...5 m. In cases where operation from<br />
a greater distance is <strong>des</strong>ired or where the <strong>PA</strong> <strong>3000</strong> <strong>HV</strong> is placed outside the<br />
direct line of sight from the remote control handset, the external IR-receiver<br />
E2000 from the accessories can be connected to the <strong>PA</strong> <strong>3000</strong> <strong>HV</strong> (refer to p.<br />
43, paragraph RC IN). By placing the E2000 at a proper location a trouble free<br />
operation even under adverse conditions can be achieved.<br />
<br />
Screen<br />
Normal display<br />
<br />
All information relating to the machine’s status is displayed on the integral<br />
graphic screen of the <strong>PA</strong> <strong>3000</strong> <strong>HV</strong>, as is the menu navigation system. The<br />
screen brightness can be adjusted to any of several levels (see chapter entitled<br />
‘Basic settings of the <strong>PA</strong> <strong>3000</strong> <strong>HV</strong>’).<br />
The <strong>PA</strong> <strong>3000</strong> <strong>HV</strong> features two screen mo<strong>des</strong>.<br />
You can cycle through the both screen mo<strong>des</strong> listed below by briefly pressing<br />
the button on the machine, or the button on the F<strong>3000</strong> handset.<br />
• Normal display<br />
• Detail display with VU meter - average value display with peak value<br />
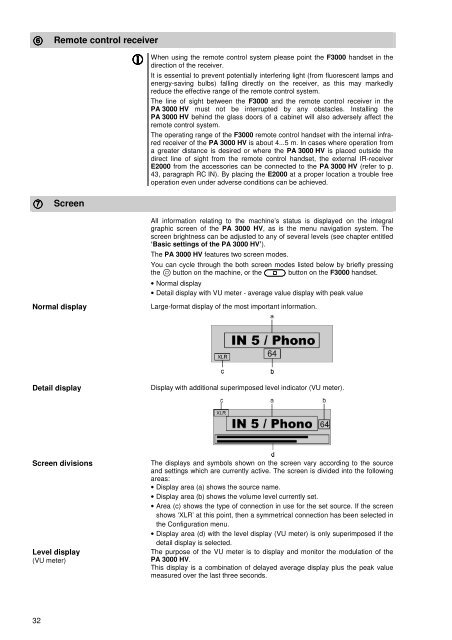
Large-format display of the most important information.<br />
<br />
Detail display<br />
<br />
Display with additional superimposed level indicator (VU meter).<br />
Screen divisions The displays and symbols shown on the screen vary according to the source<br />
and settings which are currently active. The screen is divided into the following<br />
areas:<br />
• Display area (a) shows the source name.<br />
• Display area (b) shows the volume level currently set.<br />
• Area (c) shows the type of connection in use for the set source. If the screen<br />
shows ‘XLR’ at this point, then a symmetrical connection has been selected in<br />
the Configuration menu.<br />
• Display area (d) with the level display (VU meter) is only superimposed if the<br />
detail display is selected.<br />
Level display<br />
(VU meter)<br />
<br />
The purpose of the VU meter is to display and monitor the modulation of the<br />
<strong>PA</strong> <strong>3000</strong> <strong>HV</strong>.<br />
This display is a combination of delayed average display plus the peak value<br />
measured over the last three seconds.<br />
32