ND 1200 R Radial - Heidenhain.de
ND 1200 R Radial - Heidenhain.de
ND 1200 R Radial - Heidenhain.de

Sie wollen auch ein ePaper? Erhöhen Sie die Reichweite Ihrer Titel.
YUMPU macht aus Druck-PDFs automatisch weboptimierte ePaper, die Google liebt.
Quick Reference Gui<strong>de</strong><br />
Kurzanleitung<br />
<strong>ND</strong> <strong>1200</strong> R<br />
<strong>Radial</strong><br />
Software Version<br />
2.8.x<br />
2/2011
<strong>ND</strong> <strong>1200</strong> R RADIAL<br />
Front panel<br />
F<br />
H<br />
C<br />
7<br />
8 9<br />
A<br />
G<br />
4<br />
1<br />
5 6<br />
2 3<br />
D<br />
0<br />
+/-<br />
B<br />
E<br />
enter<br />
cancel<br />
finish<br />
quit<br />
I<br />
Rear si<strong>de</strong><br />
3<br />
6<br />
7<br />
1<br />
4<br />
2<br />
5<br />
Si<strong>de</strong> view<br />
8<br />
9<br />
10
<strong>ND</strong> <strong>1200</strong> R RADIAL<br />
Setup<br />
For <strong>de</strong>tailed <strong>de</strong>scription, see www.hei<strong>de</strong>nhain.<strong>de</strong><br />
Very important<br />
Please note<br />
For your information<br />
English<br />
Before Power up<br />
Electrical connection<br />
Line voltage: 100V~ to 240V<br />
(–15 % to +10 %)<br />
Line frequency: 43 Hz to 63 Hz<br />
Line fuse: T1600 mA, 250 V<br />
5 x 20 mm<br />
Power connector wiring<br />
L: Line voltage (brown)<br />
N: Neutral (blue)<br />
Earth ground (yellow/green)<br />
Danger of electrical shock!<br />
• Do not open the enclosure<br />
• Never use 3-wire to 2-wire adapters<br />
or allow the ground connection to<br />
the <strong>ND</strong> <strong>1200</strong> R to be interrupted or<br />
disconnected.<br />
Caution<br />
Changes to the power cable may be<br />
ma<strong>de</strong> only by an electrical technician.<br />
Caution<br />
Do not connect enco<strong>de</strong>rs or other<br />
equipment to the <strong>ND</strong> <strong>1200</strong> R when the<br />
power is on.<br />
Safety Consi<strong>de</strong>rations<br />
General accepted safety precautions<br />
must be followed when operating the<br />
<strong>ND</strong> <strong>1200</strong> R. Failure to observe these<br />
precautions could result in damage to<br />
the equipment, or injury to personnel.<br />
It is un<strong>de</strong>rstood that safety rules within<br />
individual companies vary. If a conflict<br />
exists between the material contained<br />
in this gui<strong>de</strong> and the rules of a company<br />
using this system, the more stringent<br />
rules should take prece<strong>de</strong>nce.<br />
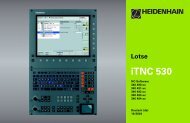
Controls and Displays<br />
A LCD screen<br />
B Soft keys: Change to support<br />
functions<br />
C Axis keys: Enter target<br />
information<br />
D Command keys: Control<br />
operations<br />
E Arrow cursor keys: Menu<br />
navigation<br />
F Fast track keys: Programmable<br />
for frequently used functions<br />
G Numeric keypad: Enter numeric<br />
data<br />
H Send key: Transmit data to PC,<br />
USB printer or USB drive<br />
I LCD on/off key: Turn LCD on or<br />
off and clear data<br />
Connections rear si<strong>de</strong><br />
1 Power switch<br />
2 Power connection with fuse<br />
3 Ground (protective ground)<br />
4 Enco<strong>de</strong>r inputs, X, Y and Z axis.<br />
5 RS-232-C interface for PC<br />
connection. RS-232 cable must<br />
not inclu<strong>de</strong> crossovers.<br />
6 Probe connector for<br />
HEIDENHAIN 15 pin universal<br />
touch probe sensor.<br />
7 Unused<br />
Connections si<strong>de</strong> view<br />
8 Audio out, for 3.5 mm<br />
headphone / speaker jack,<br />
monaural, 8 Ohm<br />
9 USB type A interface for printer<br />
or data storage<br />
10 Remote accessory interface<br />
RJ-45 for optional foot switch or<br />
keypad accessory. Two optional<br />
remote accessories can be used<br />
simultaneously using an RJ-45<br />
splitter.<br />
Mounting<br />
The <strong>ND</strong> <strong>1200</strong> R is secured to the swivel<br />
slots of the mounting stand or arm<br />
mount by a shoul<strong>de</strong>r screw, a cap<br />
screw mount as shown and associated<br />
washers.<br />
Initial power up<br />
• Press the power switch to power<br />
the <strong>ND</strong> <strong>1200</strong> R. The startup screen is<br />
displayed. Press the FINISH key to<br />
display the current axis positions on<br />
the DRO screen.<br />
Software setup<br />
The operating parameters of the<br />
<strong>ND</strong> <strong>1200</strong> R must be configured prior<br />
to using it for the first time, and any<br />
time part measurement, reporting or<br />
communication requirements change.<br />
Settings will be retained until:<br />
• The data-backup battery is changed<br />
• The data and settings are cleared<br />
Caution<br />
Setup parameters control the operation<br />
of the <strong>ND</strong> <strong>1200</strong> R and are passwordprotected.<br />
Only qualified personnel<br />
should be given password access to<br />
setup screens.<br />
1. Access setup menu<br />
Press the MENU soft key and then the<br />
SETUP soft key. The setup menu is<br />
displayed.<br />
2. Select the language<br />
• Use the arrow cursor keys to highlight<br />
the <strong>de</strong>sired language field.<br />
• Press the YES soft key.<br />
• Press the FINISH key.<br />
3. Enter password<br />
• Use the arrow cursor keys to navigate<br />
to the SUPERVISOR setup screen.<br />
• Highlight the PASSWORD field and<br />
enter the password.<br />
• Enable STARTUP ZERO if a machine<br />
zero will be used for error correction.<br />
• Press the FINISH key.<br />
1
<strong>ND</strong> <strong>1200</strong> R RADIAL<br />
Setup<br />
Operation<br />
2<br />
4. Enco<strong>de</strong>r setup<br />
• Use the arrow cursor keys to navigate<br />
to the ENCODERS setup screen.<br />
• Select an axis and enter the required<br />
enco<strong>de</strong>r parameters.<br />
• Repeat setup for all axes.<br />
• Press the FINISH key.<br />
5. <strong>Radial</strong> Drill setup<br />
• Use the arrow cursor keys to navigate<br />
to the RADIAL DRILL setup screen.<br />
• Enter the <strong>de</strong>sired parameters and<br />
press the FINISH key.<br />
6. Error correction<br />
Linear error correction (LEC) methods<br />
can be used to compensate for enco<strong>de</strong>r<br />
and machine measurement errors.<br />
Refer to the <strong>ND</strong> <strong>1200</strong> R User Gui<strong>de</strong> for<br />
instructions.<br />
7. Display formatting<br />
• Use the arrow cursor keys to navigate<br />
to the DISPLAY screen.<br />
• Enter the <strong>de</strong>sired display resolutions<br />
and other parameters.<br />
• Press the FINISH key.<br />
Note:<br />
Refer to the <strong>ND</strong> <strong>1200</strong> R User Gui<strong>de</strong> for<br />
additional setup functions.<br />
Preparation<br />
1. Power up the <strong>ND</strong> <strong>1200</strong> R<br />
• Check connections to the <strong>ND</strong> <strong>1200</strong> R.<br />
• Press the POWER switch to power<br />
the <strong>ND</strong> <strong>1200</strong> R.<br />
• Press the FINISH key to display the<br />
DRO screen.<br />
2. Find machine zero<br />
Move the stage to cross reference<br />
marks if the system was setup to<br />
establish machine zero at startup.<br />
3. Select a unit of measure<br />
Press the MM (IN) soft key to toggle<br />
between mm and inches.<br />
4. Select coordinates<br />
Press the X/Y (R/A) soft key to toggle<br />
between rectangular and polar<br />
coordinates<br />
5. Replacement<br />
The <strong>ND</strong> <strong>1200</strong> R must be parameterized<br />
in accordance with the machine<br />
settings. Transfer the correct parameters<br />
or have a (re)calibration performed.<br />
Probing a position<br />
A position can be probed with a hard<br />
probe or a touch probe.<br />
1. Probing with a hard probe<br />
• Touch the probe to the edge of the<br />
workpiece.<br />
• Press ENTER.<br />
• Enter the probe diameter.<br />
• Press the arrow cursor key that<br />
indicates the probe compensation<br />
direction.<br />
2. Probing with a touch probe<br />
• Touch the edge of the workpiece with<br />
the probe.<br />
Aligning the part<br />
Perform a skew alignment to eliminate<br />
cosine errors resulting from misaligned<br />
parts.<br />
1. Align the part on the stage<br />
Align the reference edge of the part to a<br />
measurement axis.<br />
2. Perform a skew alignment<br />
• Press the DATUM soft key.<br />
• Press the SKEW soft key.<br />
• Probe points along the part edge<br />
aligned to the reference axis.<br />
• Press the FINISH key to complete the<br />
alignment.<br />
Set zero point<br />
The first point of the skew will be used<br />
as the zero point. Use ZERO to change<br />
the zero point along the reference axis.<br />
• Press the ZERO soft key.<br />
• Press the soft key for the axis to zero<br />
along (skew edge).<br />
• Probe the part edge perpendicular to<br />
the skew edge.<br />
Note:<br />
The center of a hole can be used as a<br />
point for a skew alignment or setting a<br />
zero point. Refer to the <strong>ND</strong> <strong>1200</strong> R User<br />
Gui<strong>de</strong> for <strong>de</strong>tailed instructions.<br />
Move zero point<br />
If the zero point of a part is not reachable<br />
by a probe the zero point can be moved.<br />
• Press the DATUM soft key<br />
• Press the MOVE 0 soft key.<br />
• Enter the X and Y coordinates to<br />
move the zero point to.<br />
• Press FINISH.<br />
Target entry<br />
• Press the X or Y axis key.<br />
• Enter the <strong>de</strong>sired position to target.<br />
• Press the ENTER key.<br />
• Repeat for the opposite axis.<br />
• Press the FINISH key. The distance<br />
from the target is displayed.<br />
Hole patterns<br />
• Press the MENU soft key.<br />
• Press the PATTERN soft key.<br />
• Press the soft key to select the<br />
<strong>de</strong>sired pattern.<br />
• Enter the <strong>de</strong>sired parameters.<br />
• Press FINISH.<br />
Programs<br />
1. Save a program<br />
• Create a target sequence.<br />
• Press the MENU soft key.<br />
• Press the PROG soft key.<br />
• Press the SAVE soft key.<br />
• Use the numeric keypad to enter a<br />
name for the program.<br />
• Press the ENTER key.<br />
2. Run a program<br />
• Press the MENU soft key.<br />
• Press the PROG soft key.<br />
• Use the arrow cursor keys to highlight<br />
a program.<br />
• Press the RUN soft key.<br />
3. Delete a program<br />
• Press the MENU soft key.<br />
• Press the PROG soft key.<br />
• Use the arrow cursor keys to highlight<br />
a program.<br />
• Press the DELETE soft key.<br />
• Press the YES soft key.<br />
Note:<br />
Refer to the <strong>ND</strong> <strong>1200</strong> R User Gui<strong>de</strong> for<br />
<strong>de</strong>tailed instructions.<br />
DR. JOHANNES HEIDENHAIN GmbH<br />
Dr.-Johannes-<strong>Hei<strong>de</strong>nhain</strong>-Straße 5<br />
83301 Traunreut, Germany<br />
{ +49 8669 31-0<br />
| +49 8669 5061<br />
E-mail: info@hei<strong>de</strong>nhain.<strong>de</strong><br />
www.hei<strong>de</strong>nhain.<strong>de</strong>
<strong>ND</strong> <strong>1200</strong> R RADIAL<br />
Einrichten<br />
Eine genaue Beschreibung fin<strong>de</strong>n Sie unter www.hei<strong>de</strong>nhain.<strong>de</strong><br />
unbedingt beachten<br />
wichtig<br />
informativ<br />
Deutsch<br />
Vor <strong>de</strong>r Inbetriebnahme<br />
Elektrischer Anschluss<br />
Netzspannung: 100 V~ bis 240 V<br />
(–15 % bis +10 %)<br />
Netzfrequenz: 43 Hz bis 63 Hz<br />
Netzsicherung: T1600 mA, 250 V<br />
5 x 20 mm<br />
Anschluss <strong>de</strong>s Netzsteckers<br />
L: Phase (braun)<br />
N: Nullleiter (blau)<br />
Schutzleiter (gelb/grün)<br />
Stromschlaggefahr!<br />
• Gerät nicht öffnen!<br />
• Schutzleiter <strong>de</strong>r <strong>ND</strong> <strong>1200</strong> R darf nie<br />
unterbrochen sein, auch nicht bei<br />
Anschluss über Adapter.<br />
Achtung<br />
Än<strong>de</strong>rungen am Netzkabel nur durch<br />
Elektrotechniker!<br />
Achtung<br />
Keine Messgeräte o<strong>de</strong>r an<strong>de</strong>ren Geräte<br />
anschließen, während die <strong>ND</strong> <strong>1200</strong> R<br />
eingeschaltet ist.<br />
Sicherheitsvorkehrungen<br />
Für <strong>de</strong>n Betrieb <strong>de</strong>r <strong>ND</strong> <strong>1200</strong> R<br />
gelten die allgemein anerkannten<br />
Sicherheitsvorschriften. Nichtbeachtung<br />
dieser Sicherheitsvorschriften kann zu<br />
Sach- o<strong>de</strong>r Personenschä<strong>de</strong>n führen.<br />
Die Sicherheitsvorschriften können je<br />
nach Unternehmen variieren. Im Falle<br />
eines Konflikts zwischen <strong>de</strong>m Inhalt<br />
dieser Kurzanleitung und <strong>de</strong>n internen<br />
Regelungen eines Unternehmens, in<br />
<strong>de</strong>m dieses Gerät verwen<strong>de</strong>t wird,<br />
sollten die strengeren Regelungen<br />
gelten.<br />
Anzeige- und Bedienelemente<br />
A LCD-Bildschirm<br />
B Softkeys: funktionsabhängig<br />
C Achstasten: Eingabe von<br />
Zielinformationen<br />
D Befehlstasten: Bestätigung von<br />
Aktionen<br />
E Pfeiltasten: Navigation durch die<br />
Menüs<br />
F Schnellzugriffstasten: programmierbar<br />
für häufig genutzte<br />
Funktionen<br />
G Zahlenblock: Eingabe von Zahlen<br />
H Taste SE<strong>ND</strong>EN: Daten an<br />
PC, USB-Drucker o<strong>de</strong>r USB-<br />
Speichermedium sen<strong>de</strong>n<br />
I Taste LCD Ein/Aus: LCD-Anzeige<br />
ein-/ausschalten o<strong>de</strong>r Daten<br />
löschen<br />
Anschlüsse auf <strong>de</strong>r Rückseite<br />
1 Netzschalter<br />
2 Netzanschluss mit Sicherung<br />
3 Erdungsanschluss<br />
(Schutzerdung)<br />
4 Messgerät-Eingänge, X-, Y- und<br />
Z-Achse<br />
5 Schnittstelle V.24/RS-232-C<br />
für PC-Anschluss. Kabel für V.24/<br />
RS-232 darf keine gekreuzten<br />
A<strong>de</strong>rn haben.<br />
6 Anschluss für 15-poliges universelles<br />
Tastsystem von HEIDENHAIN<br />
7 Nicht belegt<br />
Anschlüsse auf <strong>de</strong>r Seite<br />
8 Audio-Ausgang für Kopfhörer<br />
3,5 mm / Lautsprecherbuchse,<br />
Einohr, 8 Ohm<br />
9 USB-Schnittstelle, Typ A, für<br />
Drucker o<strong>de</strong>r Speichermedien<br />
10 Schnittstelle RJ-45 für Fernbedienung<br />
über optionalen Fußschalter<br />
o<strong>de</strong>r externes Bedienfeld.<br />
Mithilfe eines RJ-45-Splitters können<br />
zwei Fernbedienungsoptionen<br />
gleichzeitig genutzt wer<strong>de</strong>n.<br />
Montage<br />
Die <strong>ND</strong> <strong>1200</strong> R wird mit einer<br />
Passschraube, einer Kopfschraube und<br />
passen<strong>de</strong>n Unterlegscheiben in <strong>de</strong>n<br />
Schwenkschlitzen <strong>de</strong>s Montagefußes<br />
o<strong>de</strong>r -arms befestigt (s. Abb.)<br />
Erstinbetriebnahme<br />
• Zum Einschalten <strong>de</strong>r <strong>ND</strong> <strong>1200</strong> R<br />
<strong>de</strong>n Netzschalter drücken. Der<br />
Startbildschirm erscheint. Zur Anzeige<br />
<strong>de</strong>r aktuellen Achspositionen (IST-<br />
POSITION) Taste FINISH drücken.<br />
Software-Setup<br />
Die Betriebsparameter <strong>de</strong>r <strong>ND</strong> <strong>1200</strong> R<br />
müssen vor <strong>de</strong>r Erstinbetriebnahme und<br />
immer, wenn sich die Anfor<strong>de</strong>rungen an<br />
die Vermessung von Teilen, Berichterstellung<br />
o<strong>de</strong>r Kommunikation än<strong>de</strong>rn,<br />
konfiguriert wer<strong>de</strong>n.<br />
Einstellungen wer<strong>de</strong>n beibehalten bis:<br />
• Batterie für Daten-Backup gewechselt<br />
wird.<br />
• Daten und Einstellungen gelöscht<br />
wer<strong>de</strong>n.<br />
Achtung<br />
Die Setup-Parameter steuern die<br />
Bedienung <strong>de</strong>r <strong>ND</strong> <strong>1200</strong> R und sind<br />
passwortgeschützt. Das Passwort für<br />
die Setup-Menüs sollte nur an geschulte<br />
Personen weitergegeben wer<strong>de</strong>n.<br />
1. Menü „Setup“ öffnen<br />
MENÜ-Softkey und dann Softkey SETUP<br />
drücken. Das Menü „Setup“ wird<br />
angezeigt.<br />
2. Sprache wählen<br />
• Mit <strong>de</strong>n Pfeiltasten das gewünschte<br />
Sprachfeld markieren.<br />
• Softkey JA drücken.<br />
• Taste FINISH drücken.<br />
3. Passwort eingeben<br />
• Mit <strong>de</strong>n Pfeiltasten zum Untermenü<br />
PASSWORT navigieren.<br />
• Das PASSWORT-Datenfeld markieren<br />
und Passwort eingeben.<br />
• NULLEN AM START aktivieren, wenn<br />
ein Maschinen-Bezugspunkt für die<br />
Fehlerkompensation verwen<strong>de</strong>t<br />
wer<strong>de</strong>n soll.<br />
• Taste FINISH drücken.<br />
1
<strong>ND</strong> <strong>1200</strong> R RADIAL<br />
Einrichten<br />
Bedienung<br />
2<br />
4. Setup für Messgerät<br />
• Mit <strong>de</strong>n Pfeiltasten zum Untermenü<br />
MESSGERÄT navigieren.<br />
• Achse auswählen und erfor<strong>de</strong>rliche<br />
Messgerät-Parameter eingeben.<br />
• Setup für alle Achsen wie<strong>de</strong>rholen.<br />
• Taste FINISH drücken.<br />
5. Setup für <strong>Radial</strong> Drill<br />
• Mit <strong>de</strong>n Pfeiltasten zum Untermenü<br />
RADIAL DRILL navigieren.<br />
• Gewünschte Parameter eingeben und<br />
mit Taste FINISH bestätigen.<br />
6. Fehlerkompensation<br />
Messgerät- und Maschinenmessfehler<br />
können mit <strong>de</strong>r linearen<br />
Fehlerkompensation (LEC) korrigiert<br />
wer<strong>de</strong>n. Siehe auch Geräte-Handbuch<br />
<strong>ND</strong> <strong>1200</strong> R.<br />
7. Anzeigeformat<br />
• Mit <strong>de</strong>n Pfeiltasten zum Untermenü<br />
ANZEIGE navigieren.<br />
• Anzeigeauflösungen und weitere<br />
Parameter eingeben.<br />
• Taste FINISH drücken.<br />
Hinweis:<br />
Für weitere Einrichtefunktionen, siehe<br />
auch Geräte-Handbuch <strong>ND</strong> <strong>1200</strong> R.<br />
Vorbereitung<br />
1. <strong>ND</strong> <strong>1200</strong> R einschalten<br />
• Anschlüsse <strong>de</strong>r <strong>ND</strong> <strong>1200</strong> R<br />
überprüfen.<br />
• Zum Einschalten <strong>de</strong>r <strong>ND</strong> <strong>1200</strong> R <strong>de</strong>n<br />
NETZSCHALTER drücken.<br />
• Taste FINISH drücken, um die<br />
Anzeige „IST-Position“ zu öffnen.<br />
2. Maschinen-Nullpunkt ermitteln<br />
Zum Überfahren <strong>de</strong>r Referenzmarken<br />
Tisch verschieben, wenn beim<br />
Systemstart ein Maschinen-<br />
Bezugspunkt festgelegt wer<strong>de</strong>n soll.<br />
3. Maßeinheit wählen<br />
Softkey MM (IN) drücken, um zwischen<br />
Millimeter und Zoll umzuschalten.<br />
4. Koordinatensystem auswählen<br />
Softkey X/Y (R/A) drücken, um<br />
zwischen kartesischem und polarem<br />
Koordinatensystem umzuschalten.<br />
5. Gerät austauschen<br />
Die Parametrierung <strong>de</strong>r <strong>ND</strong> <strong>1200</strong> R muss<br />
auf die Maschine abgestimmt sein.<br />
Übertragen Sie die korrekten Parameter<br />
o<strong>de</strong>r lassen Sie eine Kalibrierung<br />
durchführen.<br />
Position erfassen<br />
Eine Position kann mittels Taststift o<strong>de</strong>r<br />
Kantentaster erfasst wer<strong>de</strong>n.<br />
1. Erfassung mittels Taststift<br />
• Werkstückkante mit <strong>de</strong>m Taststift<br />
antasten.<br />
• ENTER drücken.<br />
• Taststift-Durchmesser eingeben.<br />
• Pfeiltaste für die Richtung <strong>de</strong>r<br />
Taststiftkorrektur drücken.<br />
2. Erfassung mittels Kantentaster<br />
• Werkstückkante mit <strong>de</strong>m<br />
Kantentaster antasten.<br />
Teileausrichtung<br />
Mit <strong>de</strong>r Teileausrichtung wer<strong>de</strong>n<br />
Kosinus-Messfehler aufgrund falsch<br />
ausgerichteter Teile beseitigt.<br />
1. Werkstück auf <strong>de</strong>m Tisch<br />
ausrichten<br />
Bezugskante <strong>de</strong>s Werkstücks an einer<br />
Messachse ausrichten.<br />
2. Ausrichtung durchführen<br />
• Softkey BEZUGSPUNKT drücken.<br />
• Softkey AUSRICHTUNG drücken.<br />
• Punkte entlang <strong>de</strong>r an <strong>de</strong>r Messachse<br />
ausgerichteten Werkstückkante<br />
erfassen.<br />
• Taste FINISH drücken, um die<br />
Ausrichtung abzuschließen.<br />
Nullpunkt setzen<br />
Der erste Punkt <strong>de</strong>r Ausrichtung dient<br />
als Nullpunkt. Mit NULLEN kann <strong>de</strong>r<br />
Nullpunkt entlang <strong>de</strong>r Bezugsachse<br />
verschoben wer<strong>de</strong>n.<br />
• Softkey NULLEN drücken.<br />
• Softkey für die Achse, an <strong>de</strong>r <strong>de</strong>r<br />
Nullpunkt verschoben wer<strong>de</strong>n soll,<br />
drücken (Ausrichtungskante).<br />
• Werkstückkante senkrecht zur<br />
Ausrichtkante antasten.<br />
Hinweis:<br />
Ein Loch-Mittelpunkt kann als<br />
Ausrichtungspunkt dienen o<strong>de</strong>r zum<br />
Nullpunkt-Setzen verwen<strong>de</strong>t wer<strong>de</strong>n.<br />
Eine genaue Anleitung fin<strong>de</strong>n Sie im<br />
Geräte-Handbuch <strong>ND</strong> <strong>1200</strong> R.<br />
Nullpunkt verschieben<br />
Wenn <strong>de</strong>r Nullpunkt eines Teils mit <strong>de</strong>m<br />
Tastsystem nicht zu erreichen ist, kann<br />
er verschoben wer<strong>de</strong>n.<br />
• Softkey BEZUGSPUNKT drücken.<br />
• Softkey NULL VER. drücken.<br />
• Die X- und Y-Koordinaten für die<br />
Nullpunktverschiebung eingeben.<br />
• FINISH drücken.<br />
Zieleingabe<br />
• Taste für die X- o<strong>de</strong>r Y-Achse drücken.<br />
• Gewünschte Zielposition eingeben.<br />
• Mit ENTER bestätigen.<br />
• Für die gegenüberliegen<strong>de</strong> Achse<br />
wie<strong>de</strong>rholen.<br />
• Taste FINISH drücken. Die Entfernung<br />
zum Ziel wird angezeigt.<br />
Lochmuster<br />
• Softkey MENÜ drücken.<br />
• Softkey LÖCHER drücken.<br />
• Mittels Softkey das gewünschte<br />
Lochmuster auswählen.<br />
• Die gewünschten Parameter<br />
eingeben.<br />
• FINISH drücken.<br />
Programme<br />
1. Programm speichern<br />
• Zielsequenz erstellen.<br />
• Softkey MENÜ drücken.<br />
• Softkey PROG drücken.<br />
• Softkey SPEICHERN drücken.<br />
• Mittels Zahlenblock einen<br />
Programmnamen eingeben.<br />
• Mit ENTER bestätigen.<br />
2. Programm ausführen<br />
• Softkey MENÜ drücken.<br />
• Softkey PROG drücken.<br />
• Mit <strong>de</strong>n Pfeiltasten ein Programm<br />
markieren.<br />
• Softkey AUSF. drücken.<br />
3. Programm löschen<br />
• Softkey MENÜ drücken.<br />
• Softkey PROG drücken.<br />
• Mit <strong>de</strong>n Pfeiltasten ein Programm<br />
markieren.<br />
• Softkey LÖSCH. drücken.<br />
• Softkey JA drücken.<br />
Hinweis:<br />
Eine genaue Anleitung fin<strong>de</strong>n Sie im<br />
Geräte-Handbuch <strong>ND</strong> <strong>1200</strong> R.<br />
DR. JOHANNES HEIDENHAIN GmbH<br />
Dr.-Johannes-<strong>Hei<strong>de</strong>nhain</strong>-Straße 5<br />
83301 Traunreut, Germany<br />
{ +49 8669 31-0<br />
| +49 8669 5061<br />
E-mail: info@hei<strong>de</strong>nhain.<strong>de</strong><br />
www.hei<strong>de</strong>nhain.<strong>de</strong>
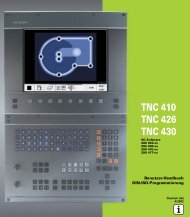
<strong>ND</strong> <strong>1200</strong> R RADIAL<br />
Tilting base<br />
A<br />
203.2<br />
M5<br />
158.75<br />
200<br />
260<br />
Mounting base<br />
B<br />
M6.3 - 1.3 x 16.5<br />
(1/4 - 20" x 0.65")<br />
203.5<br />
125<br />
43.5 38<br />
27.5<br />
55<br />
B<br />
mm<br />
Tolerancing ISO 8015<br />
ISO 2768 - m H<br />
< 6 mm: ±0.2 mm
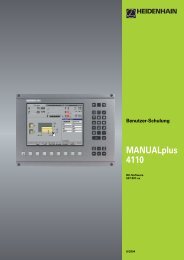
4<br />
XYZQ » 1 V PP<br />
4 12 2 10 1 9 3 11 14 7 5/6/8/<br />
13/15<br />
» 1 V pp U P Sensor 0 V Sensor<br />
U P 0 V<br />
A+ A– B+ B– R+ R– /<br />
4<br />
XYZQ « TTL<br />
7 6 2 3 4 5 9 8 1<br />
« TTL U P 0 V U a1 U a2 £ U a0 ¤ /<br />
5<br />
V.24/RS-232-C<br />
1 2 3 4 5 6 7 8 9<br />
/ TXD RXD DTR Signal<br />
G<strong>ND</strong><br />
DSR RTS CTS /<br />
6<br />
HEIDENHAIN<br />
Universal Touch Probe<br />
1 2 4 5 6 8 10 11 13 15 3/7/9/<br />
12/14<br />
G<strong>ND</strong> LED+ 12 Vdc 15 Vdc 5 Vdc G<strong>ND</strong> In S+ I(2) S+ I(1) LED- /<br />
7<br />
Parallel Input/Output Port<br />
2 3 4 5 6 7 8 9 1 14 16 17 18<br />
Data<br />
Out 1<br />
Data<br />
Out 2<br />
Data<br />
Out 3<br />
Data<br />
Out 4<br />
Data<br />
Out 5<br />
Data<br />
Out 6<br />
Data<br />
Out 7<br />
Data<br />
Out 8<br />
Data<br />
Out 9<br />
Data<br />
Out 10<br />
Data<br />
Out 11<br />
Data<br />
Out 12<br />
Signal<br />
G<strong>ND</strong><br />
15 13 12 11 10 19 20 21 22 23 24 25 –<br />
Data<br />
In 1<br />
Data<br />
In 2<br />
Data<br />
In 3<br />
Data<br />
In 4<br />
Data<br />
In 5<br />
Signal<br />
G<strong>ND</strong><br />
Signal<br />
G<strong>ND</strong><br />
Signal<br />
G<strong>ND</strong><br />
Signal<br />
G<strong>ND</strong><br />
Signal<br />
G<strong>ND</strong><br />
Signal<br />
G<strong>ND</strong><br />
Signal<br />
G<strong>ND</strong><br />
/
8<br />
Audio out<br />
1 2<br />
Out<br />
Signal G<strong>ND</strong><br />
9<br />
USB Type A<br />
Data I/O<br />
1 2 3 4<br />
/ Data (-) Data (+) Data<br />
G<strong>ND</strong><br />
10<br />
RJ-45<br />
Remote Footswitch<br />
1 2 3 4 5 6 7 8<br />
Signal<br />
G<strong>ND</strong><br />
S-2<br />
NO<br />
S-1<br />
NO<br />
/ S-1 and S-2<br />
CO<br />
/ / /
DR. JOHANNES HEIDENHAIN GmbH<br />
Dr.-Johannes-<strong>Hei<strong>de</strong>nhain</strong>-Straße 5<br />
83301 Traunreut, Germany<br />
{ +49 8669 31-0<br />
| +49 8669 5061<br />
E-mail: info@hei<strong>de</strong>nhain.<strong>de</strong><br />
Technical support | +49 8669 32-1000<br />
Measuring systems { +49 8669 31-3104<br />
E-mail: service.ms-support@hei<strong>de</strong>nhain.<strong>de</strong><br />
TNC support { +49 8669 31-3101<br />
E-mail: service.nc-support@hei<strong>de</strong>nhain.<strong>de</strong><br />
NC programming { +49 8669 31-3103<br />
E-mail: service.nc-pgm@hei<strong>de</strong>nhain.<strong>de</strong><br />
PLC programming { +49 8669 31-3102<br />
E-mail: service.plc@hei<strong>de</strong>nhain.<strong>de</strong><br />
Lathe controls { +49 8669 31-3105<br />
E-mail: service.lathe-support@hei<strong>de</strong>nhain.<strong>de</strong><br />
www.hei<strong>de</strong>nhain.<strong>de</strong>
DR. JOHANNES HEIDENHAIN GmbH<br />
Dr.-Johannes-<strong>Hei<strong>de</strong>nhain</strong>-Straße 5<br />
83301 Traunreut, Germany<br />
{ +49 8669 31-0<br />
| +49 8669 5061<br />
E-mail: info@hei<strong>de</strong>nhain.<strong>de</strong><br />
www.hei<strong>de</strong>nhain.<strong>de</strong><br />
Vollständige und weitere Adressen siehe www.hei<strong>de</strong>nhain.<strong>de</strong><br />
For complete and further addresses see www.hei<strong>de</strong>nhain.<strong>de</strong><br />
DE<br />
HEIDENHAIN Technisches Büro Nord<br />
12681 Berlin, Deutschland<br />
{ 030 54705-240<br />
ES<br />
FARRESA ELECTRONICA S.A.<br />
08028 Barcelona, Spain<br />
www.farresa.es<br />
PH<br />
Machinebanks` Corporation<br />
Quezon City, Philippines 1113<br />
E-mail: info@machinebanks.com<br />
HEIDENHAIN Technisches Büro Mitte<br />
08468 Heinsdorfergrund, Deutschland<br />
{ 03765 69544<br />
FI<br />
HEIDENHAIN Scandinavia AB<br />
02770 Espoo, Finland<br />
www.hei<strong>de</strong>nhain.fi<br />
PL<br />
APS<br />
02-489 Warszawa, Poland<br />
www.apserwis.com.pl<br />
HEIDENHAIN Technisches Büro West<br />
44379 Dortmund, Deutschland<br />
{ 0231 618083-0<br />
FR<br />
HEIDENHAIN FRANCE sarl<br />
92310 Sèvres, France<br />
www.hei<strong>de</strong>nhain.fr<br />
PT<br />
FARRESA ELECTRÓNICA, LDA.<br />
4470 - 177 Maia, Portugal<br />
www.farresa.pt<br />
HEIDENHAIN Technisches Büro Südwest<br />
70771 Leinfel<strong>de</strong>n-Echterdingen, Deutschland<br />
{ 0711 993395-0<br />
GB<br />
HEIDENHAIN (G.B.) Limited<br />
Burgess Hill RH15 9RD, United Kingdom<br />
www.hei<strong>de</strong>nhain.co.uk<br />
RO<br />
HEIDENHAIN Reprezentanţă Romania<br />
Braşov, 500338, Romania<br />
www.hei<strong>de</strong>nhain.ro<br />
AR<br />
AT<br />
AU<br />
BA<br />
BE<br />
BG<br />
BR<br />
BY<br />
CA<br />
CH<br />
CN<br />
CZ<br />
DK<br />
HEIDENHAIN Technisches Büro Südost<br />
83301 Traunreut, Deutschland<br />
{ 08669 31-1345<br />
NAKASE SRL.<br />
B1653AOX Villa Ballester, Argentina<br />
www.hei<strong>de</strong>nhain.com.ar<br />
HEIDENHAIN Techn. Büro Österreich<br />
83301 Traunreut, Germany<br />
www.hei<strong>de</strong>nhain.<strong>de</strong><br />
FCR Motion Technology Pty. Ltd<br />
Laverton North 3026, Australia<br />
E-mail: vicsales@fcrmotion.com<br />
Bosnia and Herzegovina − SL<br />
HEIDENHAIN NV/SA<br />
1760 Roosdaal, Belgium<br />
www.hei<strong>de</strong>nhain.be<br />
ESD Bulgaria Ltd.<br />
Sofia 1172, Bulgaria<br />
www.esd.bg<br />
DIADUR Indústria e Comércio Ltda.<br />
04763-070 – São Paulo – SP, Brazil<br />
www.hei<strong>de</strong>nhain.com.br<br />
Belarus<br />
GERTNER Service GmbH<br />
50354 Huerth, Germany<br />
www.gertner.biz<br />
HEIDENHAIN CORPORATION<br />
Mississauga, OntarioL5T2N2, Canada<br />
www.hei<strong>de</strong>nhain.com<br />
HEIDENHAIN (SCHWEIZ) AG<br />
8603 Schwerzenbach, Switzerland<br />
www.hei<strong>de</strong>nhain.ch<br />
DR. JOHANNES HEIDENHAIN<br />
(CHINA) Co., Ltd.<br />
Beijing 101312, China<br />
www.hei<strong>de</strong>nhain.com.cn<br />
HEIDENHAIN s.r.o.<br />
102 00 Praha 10, Czech Republic<br />
www.hei<strong>de</strong>nhain.cz<br />
TP TEKNIK A/S<br />
2670 Greve, Denmark<br />
www.tp-gruppen.dk<br />
GR<br />
HK<br />
HR<br />
HU<br />
ID<br />
IL<br />
IN<br />
IT<br />
JP<br />
KR<br />
ME<br />
MK<br />
MX<br />
MY<br />
NL<br />
NO<br />
MB Milionis Vassilis<br />
17341 Athens, Greece<br />
www.hei<strong>de</strong>nhain.gr<br />
HEIDENHAIN LTD<br />
Kowloon, Hong Kong<br />
E-mail: sales@hei<strong>de</strong>nhain.com.hk<br />
Croatia − SL<br />
HEIDENHAIN Kereske<strong>de</strong>lmi Képviselet<br />
1239 Budapest, Hungary<br />
www.hei<strong>de</strong>nhain.hu<br />
PT Servitama Era Toolsindo<br />
Jakarta 13930, Indonesia<br />
E-mail: ptset@group.gts.co.id<br />
NEUMO VARGUS MARKETING LTD.<br />
Tel Aviv 61570, Israel<br />
E-mail: neumo@neumo-vargus.co.il<br />
HEIDENHAIN Optics & Electronics<br />
India Private Limited<br />
Chetpet, Chennai 600 031, India<br />
www.hei<strong>de</strong>nhain.in<br />
HEIDENHAIN ITALIANA S.r.l.<br />
20128 Milano, Italy<br />
www.hei<strong>de</strong>nhain.it<br />
HEIDENHAIN K.K.<br />
Tokyo 102-0083, Japan<br />
www.hei<strong>de</strong>nhain.co.jp<br />
HEIDENHAIN Korea LTD.<br />
Gasan-Dong, Seoul, Korea 153-782<br />
www.hei<strong>de</strong>nhain.co.kr<br />
Montenegro − SL<br />
Macedonia − BG<br />
HEIDENHAIN CORPORATION MEXICO<br />
20235 Aguascalientes, Ags., Mexico<br />
E-mail: info@hei<strong>de</strong>nhain.com<br />
ISOSERVE Sdn. Bhd<br />
56100 Kuala Lumpur, Malaysia<br />
E-mail: isoserve@po.jaring.my<br />
HEIDENHAIN NEDERLA<strong>ND</strong> B.V.<br />
6716 BM E<strong>de</strong>, Netherlands<br />
www.hei<strong>de</strong>nhain.nl<br />
HEIDENHAIN Scandinavia AB<br />
7300 Orkanger, Norway<br />
www.hei<strong>de</strong>nhain.no<br />
RS<br />
RU<br />
SE<br />
SG<br />
SK<br />
SL<br />
TH<br />
TR<br />
TW<br />
UA<br />
US<br />
VE<br />
VN<br />
ZA<br />
Serbia − BG<br />
OOO HEIDENHAIN<br />
125315 Moscow, Russia<br />
www.hei<strong>de</strong>nhain.ru<br />
HEIDENHAIN Scandinavia AB<br />
12739 Skärholmen, Swe<strong>de</strong>n<br />
www.hei<strong>de</strong>nhain.se<br />
HEIDENHAIN PACIFIC PTE LTD.<br />
Singapore 408593<br />
www.hei<strong>de</strong>nhain.com.sg<br />
KOPRETINA TN s.r.o.<br />
91101 Trencin, Slovakia<br />
www.kopretina.sk<br />
Posredništvo HEIDENHAIN<br />
NAVO d.o.o.<br />
2000 Maribor, Slovenia<br />
www.hei<strong>de</strong>nhain-hubl.si<br />
HEIDENHAIN (THAILA<strong>ND</strong>) LTD<br />
Bangkok 10250, Thailand<br />
www.hei<strong>de</strong>nhain.co.th<br />
T&M Mühendislik San. ve Tic. LTD. ŞTI·.<br />
34728 Ümraniye-Istanbul, Turkey<br />
www.hei<strong>de</strong>nhain.com.tr<br />
HEIDENHAIN Co., Ltd.<br />
Taichung 40768, Taiwan R.O.C.<br />
www.hei<strong>de</strong>nhain.com.tw<br />
Gertner Service GmbH Büro Kiev<br />
01133 Kiev, Ukraine<br />
www.gertner.biz<br />
HEIDENHAIN CORPORATION<br />
Schaumburg, IL 60173-5337, USA<br />
www.hei<strong>de</strong>nhain.com<br />
Maquinaria Diekmann S.A.<br />
Caracas, 1040-A, Venezuela<br />
E-mail: purchase@diekmann.com.ve<br />
AMS Co. Ltd<br />
HCM City, Vietnam<br />
E-mail: davidgoh@amsvn.com<br />
MAFEMA SALES SERVICES C.C.<br />
Midrand 1685, South Africa<br />
www.hei<strong>de</strong>nhain.co.za<br />
Zum Abheften hier falzen! / Fold here for filing!<br />
<br />
732 602-90 · Ver00 · 0.5 · 2/2011 · Printed in USA