VGA 3 - Grundig-info.de
VGA 3 - Grundig-info.de
VGA 3 - Grundig-info.de

Sie wollen auch ein ePaper? Erhöhen Sie die Reichweite Ihrer Titel.
YUMPU macht aus Druck-PDFs automatisch weboptimierte ePaper, die Google liebt.
Umstellung <strong>de</strong>r Bildschirmauflösung <strong>de</strong>r<br />
Graphikkarte auf 640x480 Bildpunkte für<br />
Win 3.xx<br />
unter DOS:<br />
- Computer mit "DOS" starten.<br />
- In das Windows-Verzeichnis mit <strong>de</strong>r Eingabe "cd windows"<br />
wechseln.<br />
- Systemsteuerung mit <strong>de</strong>r Eingabe "setup" aufrufen.<br />
- Mit <strong>de</strong>n Cursortasten die Anzeige auswählen, auf <strong>VGA</strong> stellen<br />
und abspeichern (siehe Anweisung letzte Zeile).<br />
unter Windows:<br />
- Windows-Setup aufrufen (zu fin<strong>de</strong>n in <strong>de</strong>r Hauptgruppe <strong>de</strong>s<br />
Programm-Managers).<br />
- Den Menüpunkt Optionen - "Systemeinstellungen än<strong>de</strong>rn" aufrufen.<br />
Optionen<br />
(Options)<br />
- Unter <strong>de</strong>m Punkt Anzeige die Einstellung "<strong>VGA</strong>" wählen und mit<br />
OK abspeichern.<br />
Changing the Screen Resolution of the<br />
Graphics Card to 640x480 Pixels for<br />
Win 3.xx<br />
un<strong>de</strong>r DOS:<br />
- Start the computer with "DOS".<br />
- Enter "cd windows" to change to the Windows directory.<br />
- Enter "Setup" to call up the "Systemsteuerung" (System<br />
Control) option.<br />
- Select "Anzeige" (Display) with the cursor buttons, set it to <strong>VGA</strong><br />
and store this change (see instruction on the bottom line).<br />
un<strong>de</strong>r Windows:<br />
- Call up "Windows-Setup" (to be found in the main group within<br />
the programme manager).<br />
- Choose "Systemeinstellungen än<strong>de</strong>rn" (change System<br />
setting) from the "Optionen" (Options) menu item.<br />
- Un<strong>de</strong>r "Anzeige" (Display), select "<strong>VGA</strong>" and store this setting<br />
with "OK".<br />
D Montageanleitung<br />
Modul <strong>VGA</strong> 3, Bestellnummer G.AF 4900<br />
für TV-Chassis Digi Basic 3<br />
bestehend aus: Prozessormodul 29504 203 0100 / 0600<br />
Steckverbindung 3-polig 29210 233 7101<br />
Montageanleitung 72010 026 3000<br />
Achtung: MOS-Vorschriften beachten<br />
ESD<br />
Montage :<br />
- Netzstecker ziehen.<br />
- Gehäuserückwand lösen und nach hinten ziehen, Stecker <strong>de</strong>s Subwoofers von "Click Fit"-Platte abziehen (optional) und<br />
Rückwand abnehmen.<br />
- Sicherungsschrauben links/rechts am Chassis herausschrauben und Chassis nach hinten ziehen.<br />
- Haltebügel lösen.<br />
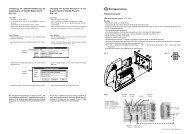
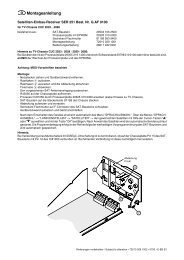
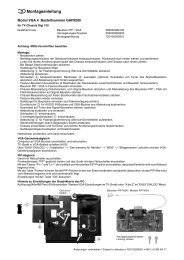
- Ab<strong>de</strong>ckung abnehmen:<br />
Seitlichen Rasthaken A am Chassisrahmen lösen (Fig. 1), Rastnasen B ausrasten und Ab<strong>de</strong>ckung wegklappen.<br />
- Prozessormodul herausziehen und durch Prozessormodul 29504 203 0100 / 0600 ersetzen.<br />
- Bei Geräten ohne SAT-Baustein 3-polige Steckverbindung von ST-AUX1 <strong>de</strong>s NF-Verstärkers auf Prozessormodul<br />
ST-AUX1 stecken.<br />
- Bei Geräten mit SAT-Baustein 3-polige Steckverbindung von ST-AUX1 <strong>de</strong>s NF-Verstärkers mit ST-AUX1B <strong>de</strong>s SAT-<br />
Bausteins und ST-AUX1A <strong>de</strong>s SAT-Bausteins mit ST-AUX1 <strong>de</strong>s Prozessormoduls verbin<strong>de</strong>n.<br />
- Haltebügel einrasten (auf Kabelverlegung achten).<br />
- Aus Ab<strong>de</strong>ckung Durchbrüche C ausbrechen (Fig.1), Ab<strong>de</strong>ckung aufsetzen und einrasten.<br />
- Chassis einschieben und mit <strong>de</strong>n 2 Sicherungsschrauben (links/rechts) festschrauben.<br />
- Stecker <strong>de</strong>s Subwoofers auf "Click Fit"-Platte stecken (optional) und Gehäuserückwand aufsetzen.<br />
- Gerät schließen.<br />
Anzeige<br />
(Display)<br />
Durch <strong>de</strong>n Tausch <strong>de</strong>r Prozessorplatte sind alle im NVM gespeicherten Daten (z.B. Abgleich, Sen<strong>de</strong>reinstellungen)<br />
nicht mehr vorhan<strong>de</strong>n.<br />
Das Gerät muss mit <strong>de</strong>n Mittelwerten / Notdatensatz (ROM-Daten) gela<strong>de</strong>n wer<strong>de</strong>n:<br />
Nahbedientaste "P-“ gedrückt halten und das Gerät mit <strong>de</strong>m Netzschalter einschalten.<br />
Durch diesen Vorgang wer<strong>de</strong>n die Grunddaten aus <strong>de</strong>m EPROM IC80070 in <strong>de</strong>n NVM CIC80095 kopiert.<br />
Der Software-Abgleich muss komplett durchgeführt wer<strong>de</strong>n (siehe Service Manual Materialnummer 72010 024 9000 /<br />
Kapitel 2 Abgleich).<br />
- Windows neu starten, damit die Än<strong>de</strong>rungen wirksam wer<strong>de</strong>n.<br />
- Restart Windows to make the changes take effect.<br />
Fig.1<br />
Bei <strong>de</strong>n genannten Einstellungen ist darauf zu achten, dass<br />
kein zusätzliches Auflösungs- / Einstellprogramm aktiv ist<br />
(siehe auch z.B. Einstellungen in <strong>de</strong>r Autoexec.bat), da diese<br />
Programme die normalen Einstellungen beeinflussen können.<br />
Be sure that no additional resolution setting programme is<br />
active when making the above mentioned settings (see also<br />
settings in Autoexec.bat for example) because these<br />
programmes may influence the normal settings.<br />
B<br />
C<br />
Prozessormodul<br />
B<br />
A<br />
Än<strong>de</strong>rungen vorbehalten / Subject to alteration • 72010 026 3000 • 0999 • E-BS33
GB Fitting Instructions<br />
<strong>VGA</strong> 3 Module, Or<strong>de</strong>r Number G.AF 4900<br />
for Digi Basic 3 TV chassis<br />
consisting of: Processor Modul 29504 203 0100 / 0600<br />
Cable 3-core 29210 233 7101<br />
Fitting Instructions 72010 026 3000<br />
Umstellung <strong>de</strong>r Bildschirmauflösung<br />
<strong>de</strong>r Graphikkarte<br />
auf 640x480 Bildpunkte unter<br />
Win 95<br />
1. Anklicken <strong>de</strong>s "Start"-Fel<strong>de</strong>s mit <strong>de</strong>r<br />
linken Maustaste und Auswahl <strong>de</strong>r<br />
"Systemsteuerung" unter <strong>de</strong>m Punkt<br />
"Einstellungen".<br />
Changing the Screen Resolution<br />
of the Graphics Card to<br />
640x480 Pixels with Win 95<br />
1. Click on the "Start" box with the left<br />
mouse button and choose "Systemsteuerung"<br />
(System Control) from the<br />
"Einstellungen" (Settings) menu.<br />
Attention: Observe MOS regulations<br />
ESD<br />
Assembly:<br />
- Disconnect the mains plug<br />
- Loosen the rear of the cabinet and pull it backwards, pull the connector of the subwoofer out of the "Click Fit" Board (option)<br />
and remove the rear of the cabinet<br />
- Undo the securing screws on the left/right of the chassis and pull the chassis backwards<br />
- Loosen the securing bracket<br />
- Remove the cover:<br />
Detach catch A at the si<strong>de</strong> of the chassis frame (Fig.1), disengage catches B and hinge away the cover<br />
- Pull the Processor Module out and replace it by Processor Module 29504 203 0100 / 0600<br />
- Connect the 3-core cable from ST-AUX1 of the AF Amplifier with ST-AUX1 of the Processor Module of the television sets<br />
not fitted with a SAT Module<br />
- Connect the 3-core cable from ST-AUX1 of the AF Amplifier with ST-AUX1B of the SAT Module and ST-AUX1A of the SAT<br />
Module with ST-AUX1 of the Processor Module of the television sets fitted with a SAT Module<br />
- Lock in the securing bracket (take care of the cable layout)<br />
- Break the prepunched cutouts C off (Fig.1), attach the cover and lock it in<br />
- Sli<strong>de</strong> the chassis in and fasten it with the 2 securing screws (on the left/right)<br />
- Plug the connector of the subwoofer into the "Click Fit" Board (option) and refit the rear of the cabinet<br />
- Close the television set<br />
2. Doppel-Klicken mit <strong>de</strong>r linken Maustaste<br />
auf das "Anzeige"-Icon.<br />
2. Double-click in the "Anzeige" (Display)<br />
icon with the left mouse button.<br />
When changing the Processing Board, all data stored in the NVM (e.g. adjustment, channels) are cancelled.<br />
The television set has to be loa<strong>de</strong>d with the <strong>de</strong>fault values/emergency data set (ROM data):<br />
Depress and hold the „P-“ button down while switching the television set on with the mains switch.<br />
In doing so the <strong>de</strong>fault values are loa<strong>de</strong>d from EPROM IC80070 into NVM CIC80095.<br />
The software has to be adjusted completely (see Service Manual, part number 72010 024 9000 / chapter 2, Adjustment).<br />
3. Einfach-Klicken (linke Maustaste) auf<br />
<strong>de</strong>n Unterpunkt "Einstellungen".<br />
3. Click (left mouse button) on the "Einstellungen"<br />
(Settings) option.<br />
Fig.1<br />
Processor Module<br />
B<br />
C<br />
4. Durch Ziehen <strong>de</strong>s Zeigers mit <strong>de</strong>r gedrückten<br />
linken Maustaste kann die Auflösung<br />
auf die erfor<strong>de</strong>rlichen 640x480 /<br />
16 Farben eingestellt wer<strong>de</strong>n.<br />
4. Hold down the left mouse button and<br />
drag the pointer to the required resolution<br />
of 640x480/16 colours pixels.<br />
B<br />
A<br />
5. Mit "OK" lassen sich die Verän<strong>de</strong>rungen<br />
abspeichern (gegebenenfalls muß<br />
Windows neu gestartet wer<strong>de</strong>n - siehe<br />
Computermeldung).<br />
5. The new setting can be stored with "OK"<br />
(it may be necessary to restart Windows<br />
- see message on the computer).