Einbauhinweise Montageanweisung Kaminaufsatz T2 Cowl ... - Truma
Einbauhinweise Montageanweisung Kaminaufsatz T2 Cowl ... - Truma
Einbauhinweise Montageanweisung Kaminaufsatz T2 Cowl ... - Truma

Erfolgreiche ePaper selbst erstellen
Machen Sie aus Ihren PDF Publikationen ein blätterbares Flipbook mit unserer einzigartigen Google optimierten e-Paper Software.
1<br />
<strong>Kaminaufsatz</strong> <strong>T2</strong><br />
(Art.-Nr. 30700-02)<br />
für <strong>Truma</strong>tic S 3002, S 3002 P, S 3002 K, S 5002,<br />
S 5002 K<br />
<strong>Cowl</strong> top <strong>T2</strong><br />
(Part no. 30700-02)<br />
for <strong>Truma</strong>tic S 3002, S 3002 P, S 3002 K, S 5002,<br />
S 5002 K<br />
<strong>Einbauhinweise</strong><br />
Dieser <strong>Kaminaufsatz</strong> <strong>T2</strong> ist einzusetzen für Heizungen,<br />
die im Reisemobil während der Fahrt bei Verwendung<br />
des <strong>Kaminaufsatz</strong>es T3 durch Überzug verlöschen.<br />
Der <strong>Kaminaufsatz</strong>, der frei im Luftstrom liegen<br />
muss, ist gegebenenfalls zusätzlich mit einer Kaminverlängerung<br />
AKV (Art.-Nr. 30010-20800) einzubauen.<br />
Die Reisemobilhersteller sind angehalten, die optimale<br />
Kombination von <strong>Kaminaufsatz</strong> und ggf. Verlängerung<br />
bei den einzelnen Auslieferungszuständen ihrer Fahrzeuge<br />
durch Versuchsfahrten zu ermitteln und mit<br />
dem <strong>Truma</strong>-Kundendienst abzustimmen.<br />
Fitting notes<br />
This cowl top <strong>T2</strong> is indispensable in such cases when<br />
heaters being installed in motorized caravans and fitted<br />
by the cowl top T3, will expire during the drive<br />
due to air streams. The cowl top must be free in the<br />
stream of air and, if necessary, a cowl extension AKV<br />
(Part no. 30010-20800) shall be fitted additionally.<br />
The manufacturers of motorized caravans are required<br />
to determine the best combination of cowl top and, if<br />
necessary, of cowl extension in their vehicles according<br />
to equipment by test-drives and to coordinate the<br />
results with the <strong>Truma</strong> service.<br />
2<br />
Abhängig vom Fahrzeugtyp und von den Dachaufbauten,<br />
kann in Einzelfällen auch der <strong>Kaminaufsatz</strong> T1<br />
(Art.-Nr. 30700-01) erforderlich sein.<br />
Depending on the type of vehicle and the roof<br />
mountings the cowl top T1 (Part no. 30700-01) will<br />
be necessary in some cases.<br />
Chapeau de cheminée <strong>T2</strong><br />
(N° d'art. 30700-02)<br />
pour <strong>Truma</strong>tic S 3002, S 3002 P, S 3002 K, S 5002,<br />
S 5002 K<br />
<strong>Montageanweisung</strong><br />
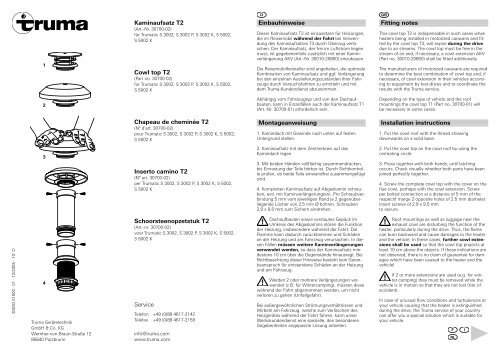
1. Kamindach mit Gewinde nach unten auf festen<br />
Untergrund stellen.<br />
Installation instructions<br />
1. Put the cowl roof with the thread showing<br />
downwards on a solid base.<br />
3<br />
Inserto camino <strong>T2</strong><br />
(N° art. 30700-02)<br />
per <strong>Truma</strong>tic S 3002, S 3002 P, S 3002 K, S 5002,<br />
S 5002 K<br />
2. <strong>Kaminaufsatz</strong> mit dem Zentrierkreis auf das<br />
Kamindach legen.<br />
3. Mit beiden Händen vollflächig zusammendrücken,<br />
bis Einrastung der Teile hörbar ist. Durch Sichtkontrolle<br />
prüfen, ob beide Teile einwandfrei zusammengefügt<br />
sind.<br />
4. Kompletten <strong>Kaminaufsatz</strong> auf Abgaskamin schrauben,<br />
evtl. mit Kamin verlänge run g(en). Pro Schraubverbindung<br />
5 mm vom jeweiligen Rand je 2 gegenüberliegende<br />
Löcher von 2,5 mm Ø bohren. Schrauben<br />
2,9 x 9,5 mm zum Sichern eindrehen.<br />
2. Put the cowl top on the cowl roof by using the<br />
centrating circle.<br />
3. Press together with both hands, until latching<br />
occurs. Check visually whether both parts have been<br />
joined perfectly together.<br />
4. Screw the complete cowl top with the cover on the<br />
flue cowl, perhaps with the cowl extension. Screw<br />
per bolted connection at a distance of 5 mm of the<br />
respectif marge 2 opposite holes of 2.5 mm diameter.<br />
Insert screws of 2.9 x 9.5 mm<br />
to secure.<br />
30030-31500 · 01 · 12/2005 · 10’ O<br />
4<br />
<strong>Truma</strong> Gerätetechnik<br />
GmbH & Co. KG<br />
Wernher-von-Braun-Straße 12<br />
85640 Putzbrunn<br />
Schoor steenop zetstuk <strong>T2</strong><br />
(Art.-nr. 30700-02)<br />
voor <strong>Truma</strong>tic S 3002, S 3002 P, S 3002 K, S 5002,<br />
S 5002 K<br />
Service<br />
Telefon +49 (0)89 4617-2142<br />
Telefax +49 (0)89 4617-2159<br />
info@truma.com<br />
www.truma.com<br />
Dachaufbauten sowie verstautes Gepäck im<br />
Umkreis des Abgaskamins stören die Funktion<br />
der Heizung, insbesondere während der Fahrt. Die<br />
Flamme kann dadurch zurückbrennen und Schäden<br />
an der Heizung und am Fahrzeug verursachen. In diesen<br />
Fällen müssen weitere Kaminverlängerungen<br />
verwendet werden, so dass der <strong>Kaminaufsatz</strong> mindestens<br />
10 cm über die Ge gen stände hinausragt. Bei<br />
Nichtbeachtung dieser Hinweise besteht kein Garantieanspruch<br />
für entstandene Schäden an der Heizung<br />
und am Fahrzeug.<br />
Werden 2 oder mehrere Verlängerungen verwendet<br />
(z.B. für Wintercamping), müssen diese<br />
während der Fahrt abgenommen werden, um nicht<br />
verloren zu gehen (Unfallgefahr).<br />
Bei außergewöhnlichen Strö mungsver hält nissen und<br />
Wirbeln am Fahrzeug, welche zum Verlöschen des<br />
Heizgerätes während der Fahrt führen, kann unser<br />
Werkskundendienst eine spezielle, den besonderen<br />
Gegebenheiten angepasste Lösung anbieten.<br />
Roof mountings as well as luggage near the<br />
exhaust cowl are disturbing the function of the<br />
heater, particularly during the drive. Thus, the flame<br />
can burn backward and cause damages to the heater<br />
and the vehicle. In these cases, further cowl extensions<br />
shall be used so that the cowl top projects at<br />
least 10 cm above the objects. If these indications are<br />
not observed, there is no claim of guarantee for damages<br />
which have been caused to the heater and the<br />
vehicle!<br />
If 2 or more extensions are used (e.g. for winter<br />
camping) they must be removed while the<br />
vehicle is in motion so that they are not lost (risk of<br />
accident).<br />
In case of unusual flow conditions and turbulences at<br />
your vehicle causing that the heater is extinguished<br />
during the drive, the <strong>Truma</strong> service of your country<br />
can offer you a special solution which is suitable for<br />
your vehicle.
Indications de montage<br />
Avvertenze per l’installazione<br />
Inbouwvoorschrift<br />
1<br />
2<br />
3<br />
4<br />
Le chapeau de cheminée <strong>T2</strong> doit être utilisé dans le<br />
cas où des chauffages installés dans des campingcars<br />
et munis d’un chapeau de cheminée T3 s’éteindraient<br />
pendant le trajet à cause de courants d’air.<br />
Le chapeau de cheminée <strong>T2</strong> doit être librement exposé<br />
à l’air. Eventuellement, il faut monter une rallonge<br />
de cheminée AKV (n° d’art. 30010-20800) en sus.<br />
A l’aide de véhicules d’épreuve et à l’aide du Service<br />
Après-Vente <strong>Truma</strong>, les fabricants de camping-cars<br />
doivent trouver la combinaison optimale du chapeau<br />
de cheminée, la rallonge de celui-ci, en fonction des<br />
options possibles sur les véhicules.<br />
Il se peut que, dépendant du type de véhicule et<br />
des lanterneaux, le chapeau de cheminée T1<br />
(n° d’art. 30700-01) soit nécessaire.<br />
Instructions de montage<br />
1. Poser le toît de cheminée avec le filetage vers le bas<br />
sur un fond solide.<br />
2. Poser le chapeau du cheminée en utilisant le cercle<br />
de centrage sur le toît de cheminée.<br />
3. Exercer une pression avec les deux mains jusqu’à<br />
ce que les deux parties s’encliquent. Vérifier par un<br />
contrôle visuel que les deux parties sont parfaitement<br />
reliées.<br />
4. Visser le chapeau de cheminée complet sur la<br />
cheminée d’évacuation, éventuellement avec la/les<br />
rallonge(s) de cheminée. Percer pur chaque raccord<br />
à une distance de 5 mm du bord respéctif 2 trous de<br />
2,5 mm Ø l’un vis à vis de l’autre. Fixer par des vis<br />
2,9 x 9,5 mm pour des raisons de sécurité.<br />
Des lanterneaux et des bagages près de la cheminée<br />
gênent la fonction du chauffage, surtout<br />
pendant le trajet. Ainsi un retour de flamme est possible<br />
causant des dommages au chauffage et au véhicule.<br />
Dans ces cas, d’autres rallonges de cheminée<br />
doivent être utilisées de façon à ce que le chapeau<br />
de cheminée dépasse d’au moins 10 cm au-dessus<br />
des objets. Si ces indications ne sont pas suivies, il<br />
n’y a aucune garantie pour des dommages ayant été<br />
causés au chauffage et au véhicule.<br />
Si 2 rallonges ou plus sont utilisées (par exemple<br />
pour le camping hivernal), elles doivent être<br />
retirées pendant le trajet pour ne pas être perdues<br />
(risque d‘accident).<br />
Pour des conditions extraordinaires de courant et de<br />
tourbillons autour du véhicule entraînant l’arrêt du<br />
chauffage pendant le trajet, le Service Après-Vente<br />
<strong>Truma</strong> peut fournir une solution spécialement adaptée<br />
à ces conditions.<br />
L’inserto camino <strong>T2</strong> dev’essere applicato per stufe<br />
che con l’inserto camino T3 sul veicolo, durante il<br />
viaggio si spengono a causa della corrente. L’inserto<br />
camino <strong>T2</strong> dev’essere liberamente esposto all’aria. Se<br />
del caso, deve aggiungersi anche la prolunga camino<br />
AKV (n° art. 30010-20800).<br />
I costruttori di veicoli ricreazionali sono tenuti a trovare<br />
la combinazione ottimale di inserto camino, con<br />
l’eventuale aggiunta della prolunga camino, valutando<br />
le condizioni dei mezzi da vendere mediante corse di<br />
prova e consultazioni con il servizio assistenza <strong>Truma</strong>.<br />
A seconda del tipo di veicolo e le costruzioni sul<br />
tetto, in alcuni casi è necessario l’inserto camino T1<br />
(n° art. 30700-01).<br />
Istruzioni di montaggio<br />
1. Appoggiare il tetto camino su un piano fisso, con il<br />
filetto rivolto in basso.<br />
2. Applicarvi l’inserto camino con l’anello centratore.<br />
3. Premere assieme tutt’e due le parti, con ambedue<br />
le mani, sino ad arresto udibile. Verificare bene che le<br />
due parti siano perfettamente congiunte.<br />
4. Avvitare l’inserto camino completo sul camino di<br />
scarico, eventualmente con prolunga (prolunghe) camino.<br />
Per l’avvitamento forare, a 5 mm dal rispettivo<br />
bordo, cad. 2 fori, uno di fronte all’altro, del diam. di<br />
2,5 mm ciascuno. Fissare con viti 2,9 x 9,5 mm, per<br />
la tenuta.<br />
Costruzioni sul tetto e bagagliai intorno al camino<br />
di scarico disturbano il funzionamento<br />
della stufa specialmente durante il viaggio. Postrebbe<br />
avvenire un ritorno di fiamma con conseguente danno<br />
alla stufa ed al veicolo. Nel caso di dette situazioni<br />
occorre applicare ulteriori prolunghe per il<br />
camino, in modo che l’inserto camino sporga almeno<br />
10 cm al di sopra degli oggetti. L’inosservanza di<br />
queste avvertenze annulla ogni diritto alla garanzia<br />
per danni alla stufa e al veicolo.<br />
Se si utilizzano due o più prolunghe (ad es. per<br />
il camping invernale), è necessario rimuoverle<br />
durante la marcia affinché non si stacchino (pericolo<br />
di incidente).<br />
Nei casi di forti venti e vortici intorno al veicolo, che<br />
potrebbero provocare lo spegnimento della fiamma<br />
durante la marcia, il servizio assistenza <strong>Truma</strong> è in grado<br />
di offrire soluzioni speciali, adeguate alle particolari<br />
condizioni.<br />
Dit schorsteenopzetstuk <strong>T2</strong> kan gebruikt worden bij<br />
in Campers gemonteerde <strong>Truma</strong> kachels, die voorzien<br />
zijn van een schoorsteenopzetstuk T3 en die, door<br />
en te grote trek van de schoorsteen, uitgaarn.<br />
Het schoorsteenopzetstuk dat vrij in de luchtstroom<br />
gemonteerd moet zijn, kan eventueel met een extra<br />
schoorsteenverlenging AKV (art.-nr. 30010-20800)<br />
ingebouwd worden.<br />
De camperbouwers zijn verplicht de optimale combinatie<br />
van schoorsteenopzetstuk T3 en de daarbij behorende<br />
verlenging per camper bij elke aflevering door<br />
testritten afzonderlijk vast te stellen en met de <strong>Truma</strong><br />
Klantenservice af te stemmen.<br />
Afhankelijk van het voertuigtype en van de dakopbouw<br />
kan in enkele gevallen ook het schoorsteenopzetstuk<br />
T1 (art.-nr. 30070-01) nodig zijn.<br />
Montagehandleiding<br />
1. Schoorsteenkap met schroefdraad naar onderen op<br />
een stevige ondergrond plaatsen.<br />
2. Schoorsteenopzetstuk met de centeerrand op<br />
schoorsteenkap leggen.<br />
3. Met beide handen over het gehele oppervlak samendrukken,<br />
tot het samenvoegen door een klik te<br />
horen is. Door visuele controle nagaan, of beide delen<br />
geheel zijn samengevoegd.<br />
4. Komplete schoorsteenopzetstuk op de schoorsteen<br />
schroeven, eventueel met schoorsteen verlenging(en).<br />
Per schroef verbinding 5 mm uit elke rand 2 tegenover<br />
elkaar liggende gaten van Ø 2,5 mm boren. Schroeven<br />
2,9 x 9,5 mm voor het borgen monteren.<br />
Dakopbouwen alsook bagage in de buurt van de<br />
schoorsteen beinvloeden het functioneren van de<br />
kachel en met name gedurende het rijden. De vlammen<br />
op de brander kunnen daardoor naar onderen branden<br />
en schade aan de kachel en aan het voertuig veroorzaken.<br />
In deze situatie moeten meerdere schoorsteenverlengstukken<br />
gebruikt worden, dusdanig dat het<br />
schoorsteenopzetstuk minstens 10 cm boven de bepakking<br />
uitsteekt. Bij niet nakomen van deze aanwijzing kan<br />
geen garantieaanspraak voor de ontstane schade aan de<br />
kachel en het voertuig gedaan worden.<br />
Als 2 of meer verlengstukken gebruikt worden<br />
(bijv. voor wintercamping), moeten deze er<br />
tijdens het rijden afgehaald worden anders kunnen ze<br />
kwijt raken (gevaar voor ongelukken).<br />
Bij uitzonderlijke stromingsverhoudingen en wervelingen<br />
aan het voertuig, welke tot het uitgaan van de<br />
kachel tijdens het rijden leiden, kan onze technische<br />
dienst een speciale, aan de bijzonder omstandigheden<br />
aangepaste oplossing aanbieden.