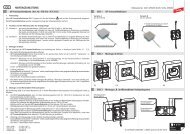
Installation Instructions - DEHN (UK)
Installation Instructions - DEHN (UK)
Installation Instructions - DEHN (UK)

Sie wollen auch ein ePaper? Erhöhen Sie die Reichweite Ihrer Titel.
YUMPU macht aus Druck-PDFs automatisch weboptimierte ePaper, die Google liebt.
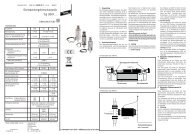
Due to its centred position, the tube support has enough space for “swinging”. If this space is not<br />
provided, the aluminium roof tile might be damaged in the course of time (see Fig. 13 and 14).<br />
centred position<br />
correct<br />
bottom<br />
position<br />
incorrect<br />
top<br />
position<br />
incorrect<br />
Fig.<br />
13<br />
3. Remove the three adhesive protection strips from the aluminium roof tile and firmly press it on the<br />
adjoining roof tiles. The adhesive joint of the aluminium roof tile is vulcanised by solar radiation and<br />
will gradually harden (see Fig. 14 and Fig. 15, page 14).<br />
Note:<br />
If the surface to which the<br />
aluminium roof tile is adhered is<br />
not clean enough, the adhesive<br />
strips will not properly stick to the<br />
surface. In this case, it is advisable<br />
to use replacement adhesive<br />
strips.<br />
The sealing tape must<br />
be wrapped around the<br />
rubber sleeve!<br />
sealing tape<br />
The aluminium roof tile must be<br />
flanged underneath the roof tiles<br />
situated above, making it<br />
impossible for rain water (driving<br />
rain) to penetrate underneath the<br />
roofing.<br />
Moreover, the aluminium roof tile<br />
must cover the roof tile on the<br />
right side and the roof tiles<br />
underneath it.<br />
The aluminium roof tile must be<br />
flanged to these roof tiles in a<br />
plane way (see Fig. 14 and Fig. 15,<br />
page 14).<br />
rubber sleeve<br />
aluminium roof tile<br />
Fig.<br />
14<br />
Page 13<br />
1759_MO_0811_DE_GB_059294