Installation Instructions - DEHN (UK)
Installation Instructions - DEHN (UK)
Installation Instructions - DEHN (UK)

Sie wollen auch ein ePaper? Erhöhen Sie die Reichweite Ihrer Titel.
YUMPU macht aus Druck-PDFs automatisch weboptimierte ePaper, die Google liebt.
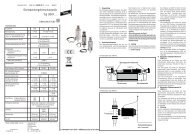
- Lead the HVI conductor through<br />
the supporting tube as far as it will<br />
go up to the internal socket. The<br />
M8 locking screw of the supporting<br />
tube must be loosened.<br />
- Insert the air-termination rod into<br />
the supporting tube and tighten.<br />
- Tighten the M8 locking screw (10<br />
Nm).<br />
- Position the supporting tube onto<br />
the tube support and tighten using<br />
the eight headless screws (hexagon<br />
socket screws, 10 Nm)<br />
- Attach the sealing tape around the<br />
tube support<br />
Earthing<br />
An equipotential bonding conductor leads<br />
the special integrated sealing end out of<br />
the supporting tube for connection to the<br />
rafter holder.<br />
It also serves as direct connection to the<br />
the equipotneital bonding system (min. 6<br />
mm 2 Cu). Where necessary, the<br />
conductor can be cut to length<br />
(see Fig. 11, detail)<br />
M8 locking screw<br />
supporting tube<br />
air-termination rod<br />
16/10 mm<br />
head piece with<br />
M10 thread<br />
HVI conductor<br />
supporting tube with<br />
eight headless screws<br />
detail<br />
sealing tape<br />
Fig.<br />
11<br />
equipotential bonding<br />
(clamp, earth connection)<br />
Page 11<br />
equipotential<br />
bonding conductor<br />
1759_MO_0811_DE_GB_059294