Installation Instructions - DEHN (UK)
Installation Instructions - DEHN (UK)
Installation Instructions - DEHN (UK)

Sie wollen auch ein ePaper? Erhöhen Sie die Reichweite Ihrer Titel.
YUMPU macht aus Druck-PDFs automatisch weboptimierte ePaper, die Google liebt.
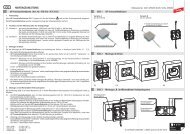
<strong>Installation</strong> option 2<br />
The HVI conductor / HVI conductor light is<br />
installed underneath the roofing and led through<br />
e.g. the ventilation grille of the roofing (see also<br />
Fig. 10 and Fig. 17, page 16). The second<br />
water-bearing layer (sarking membranes) must<br />
not be damaged (see Fig. 10 and Fig. 17, page<br />
16).<br />
Before installing the supporting tube on the rafter<br />
holder, the prewired HVI conductor must be led<br />
through the rafter holder / tube support (see Fig.<br />
10).<br />
sealing tape<br />
cut rubber sleeve to size<br />
aluminium roof tile<br />
tube support<br />
Note:<br />
To facilitate installation, the angle of the tube<br />
support can be adjusted to the roof inclination.<br />
The installation steps are, however, shown in the<br />
installation position (see also installation step 3,<br />
Fig. 12, page 12).<br />
Proceed as follows:<br />
head piece with M10 thread<br />
HVI conducto /<br />
HVI conducto light<br />
PA-Element<br />
- Preform the aluminium roof tile according to<br />
the shape of the roofing (roof tiles)<br />
- Put the aluminium roof tile over the tube<br />
support<br />
- Adjust the rubber sleeve to the tube support /<br />
cut the rubber sleeve to size according to the<br />
diameter of the tube support<br />
- Put the rubber sleeve over the tube support<br />
- Insert HVI conductor into the tube support<br />
Fig.<br />
10<br />
Page 10<br />
1759_MO_0811_DE_GB_059294