Installation Instructions - DEHN (UK)
Installation Instructions - DEHN (UK)
Installation Instructions - DEHN (UK)

Sie wollen auch ein ePaper? Erhöhen Sie die Reichweite Ihrer Titel.
YUMPU macht aus Druck-PDFs automatisch weboptimierte ePaper, die Google liebt.
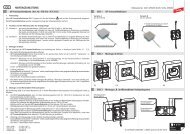
2. Connection / installation of the HVI conductor<br />
The rafter holder allows two different installation options:<br />
<strong>Installation</strong> option 1<br />
The HVI conductor / HVI conductor light in the<br />
supporting tube (3.2 m in length with air-termination<br />
tip) or <strong>DEHN</strong>con-H is installed above the roofing and<br />
routed to the earth-termination system along the<br />
wall (see also Fig. 16, page 15).<br />
Before installing the supporting tube on the rafter<br />
holder, the prewired HVI conductor / HVI <br />
conductor light has to be led through the supporting<br />
tube (see Fig. 7).<br />
Proceed as follows:<br />
- Insert (if required, slightly turn) the HVI <br />
conductor light in such a way that the<br />
threaded head piece (M10) protrudes from the<br />
supporting tube.<br />
- Securely tighten the lock nut (M10) against<br />
the threaded bolt.<br />
- Firmly fix the hexagonal connector (M10/M10)<br />
with the lock nut.<br />
- Firmly connect the air-termination tip to the<br />
hexagonal connector and tighten (see Fig. 7).<br />
air-termination tip<br />
L=1000 mm<br />
hexagonal<br />
connector<br />
M10 lock nut<br />
GRP/Al<br />
supporting tube<br />
as-delivered state<br />
head piece with<br />
M10 thread<br />
HVI conductor<br />
HVI conductor light<br />
PA-Element<br />
equipotential<br />
bonding conductor<br />
installed state<br />
Note:<br />
For more detailed information, please refer to the<br />
relevant installation instructions:<br />
- HVI conductor, see installation instructions<br />
No. 1566<br />
- <strong>DEHN</strong>con-H, see installation instructions<br />
No. 1632<br />
Fig.<br />
7<br />
Page 7<br />
1759_MO_0811_DE_GB_059294