Installation Instructions - DEHN (UK)
Installation Instructions - DEHN (UK)
Installation Instructions - DEHN (UK)

Erfolgreiche ePaper selbst erstellen
Machen Sie aus Ihren PDF Publikationen ein blätterbares Flipbook mit unserer einzigartigen Google optimierten e-Paper Software.
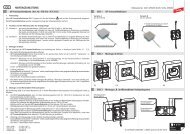
Depending on the rafter spacing / counter battens, the rafter holder can now be pre-adjusted. All locking<br />
screws should only be tightened by hand (see Fig. 3 and Fig. 4, page 4).<br />
<strong>Installation</strong> step<br />
2<br />
Depending on the pre-adjustment (rafter spacing), the rafter holder is placed in between the two<br />
rafters or the counter battens. The rafter holder must be positioned in such a way that the basic support<br />
of the rafter holder is located exactly in the centre of the removed roof tiles.<br />
The right position is particularly important since the aluminium roof tile will later be fitted over the<br />
basic support. For preliminary fixing it is advisable to fix both cross rods on the relevant rafter by<br />
means of screws (in the long hole). After the rafter holder has been exactly positioned, it is tightened<br />
using the remaining screws delivered with the rafter holder (see Fig. 5 and Fig. 6, page 6).<br />
2<br />
adjustable range<br />
from 60 - 75 mm<br />
pilot holes in<br />
counter battens<br />
Fig.<br />
5<br />
Rafter spacing with counter battens<br />
Note:<br />
For rafters with counter battens it is advisable to drill pilot holes in the relevant counter battens so<br />
that they are not damaged (cracked, broken) when fixing the cross rods (see Fig. 5).<br />
Page 5<br />
1759_MO_0811_DE_GB_059294