CLICKTRONIC® POS-Regal für die HC SPC-Serie ... - Wentronic
CLICKTRONIC® POS-Regal für die HC SPC-Serie ... - Wentronic
CLICKTRONIC® POS-Regal für die HC SPC-Serie ... - Wentronic

Erfolgreiche ePaper selbst erstellen
Machen Sie aus Ihren PDF Publikationen ein blätterbares Flipbook mit unserer einzigartigen Google optimierten e-Paper Software.
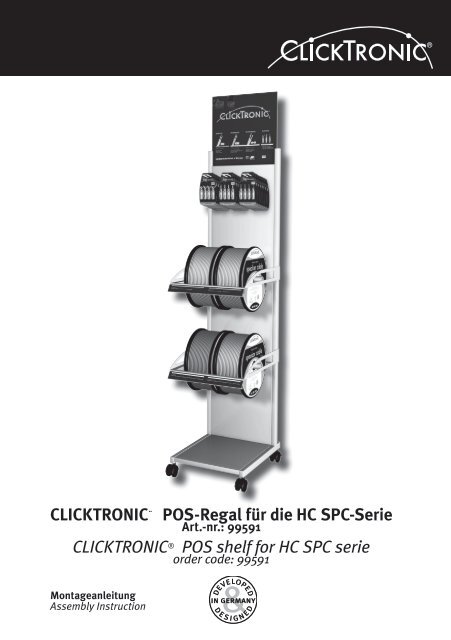
CLICKTRONIC ® <strong>POS</strong>-<strong>Regal</strong> <strong>für</strong> <strong>die</strong> <strong>HC</strong> <strong>SPC</strong>-<strong>Serie</strong><br />
Art.-nr.: 99591<br />
CLICKTRONIC ® <strong>POS</strong> shelf for <strong>HC</strong> <strong>SPC</strong> serie<br />
order code: 99591<br />
Montageanleitung<br />
Assembly Instruction
2<br />
Montageanleitung<br />
Montageanleitung <strong>für</strong> WM CLICKTRONIC ® <strong>POS</strong> <strong>Regal</strong><br />
ACHTUNG! Lesen Sie <strong>die</strong> Montageanleitung vollständig und sorgfältig durch.<br />
Sie ist Bestandteil des Produktes und enthält wichtige Hinweise zur korrekten Montage<br />
und Benutzung. Bewahren Sie sie auf, damit Sie <strong>die</strong>se bei Unsicherheiten und Weitergabe<br />
des Produktes parat haben.<br />
Inhalt Seite<br />
1. Beschreibung und Funktion 2<br />
2. Bestimmungsgemäßer Gebrauch 2<br />
3. Lieferumfang 2<br />
4. Sicherheitshinweise 3<br />
5. Montage 4<br />
6. Gewährleistung und Haftung 6<br />
7. Pflege, Wartung, Lagerung und Transport 6<br />
8. Problembehebung 6<br />
9. Technische Daten 7<br />
10. Technische Zeichnungen 7<br />
11. Entsorgungshinweise 7<br />
1. Beschreibung und Funktion:<br />
Ihr Clicktronic ® <strong>POS</strong>-<strong>Regal</strong> <strong>für</strong> <strong>HC</strong> SpeakerCables <strong>die</strong>nt der idealen Präsentation Ihrer<br />
Clicktronic ® Kabelrollen am Point of Sale. Das <strong>POS</strong>-<strong>Regal</strong> kann bis zu 4 Kabelrollen und 3<br />
Blisterkartenarten aufnehmen. Die Kabelrollen können in der Höhe individuell positioniert<br />
werden. Mit den 4 Kunststoffrollen ist das <strong>POS</strong>-<strong>Regal</strong> auch mobil einsetzbar. Die Metallteile<br />
sind Kunststoff pulverbeschichtet. Mit dem mitgelieferten Zangenhalter und der hochwertigen<br />
Kabelzange sind Sie bestens ausgestattet.<br />
2. Bestimmungsgemäßer Gebrauch:<br />
Eine andere als in Kapitel 1 vorgesehene Verwendung ist nicht gestattet. Das Nichtbeachten<br />
und Nichteinhalten der Bestimmungen und der Sicherheitshinweise kann zu schweren<br />
Unfällen, Personen- und Sachschäden führen. Beachten Sie auch Kapitel Gewährleistung<br />
und Haftung.<br />
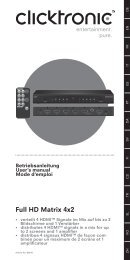
3. Lieferumfang:<br />
(1) 1 x Grundgestell mit Rollen<br />
(2) 2 x Kabelrollenetage<br />
(3) 2 x Rollenachse mit Distanzringen<br />
(4) 3 x Schlaufenhaken, Länge: 24 cm<br />
(5) 3 x Scannerfähnchen <strong>für</strong> Schlaufenhaken Größe: 2,7 x 4,3 cm<br />
(6) 1 x Plexi-Tasche <strong>für</strong> Wechseltopschild<br />
(7) 2 x Papierlaschen zur Beschriftung der Kabelrollenetagen<br />
inklusive Zangenhalter und einer hochwertigen Zange
4. Sicherheitshinweise:<br />
ACHTUNG! Die Montage, Demontage und das Bestücken des Produkts darf<br />
nur durch ausgebildetes Fachpersonal erfolgen! Es besteht u. a. Absturz- und<br />
Quetschgefahr!<br />
• Ihr Clicktronic ® Produkt ist kein Spielzeug und gehört nicht in Kinderhände, weil<br />
zerbrechliche, kleine und verschluckbare Teile enthalten sind, <strong>die</strong> bei unsachgemäßem<br />
Gebrauch Personen schädigen können!<br />
• Bitte installieren Sie das Produkt und sein Zubehör so, dass keine Personen oder Sachen<br />
z.B. durch Herabstürzen oder Stolpern verletzt oder beschädigt werden können.<br />
• Lassen Sie Verpackungsmaterial nicht einfach liegen, da sich spielende Kinder<br />
daran schneiden können. Weiterhin besteht <strong>die</strong> Gefahr des Verschluckens und Einatmens<br />
von Kleinmaterial und Dämmmaterial.<br />
• Wir empfehlen alle Installationsarbeiten nur von qualifizierten Technikern ausführen zu<br />
lassen.<br />
• Das <strong>POS</strong>-<strong>Regal</strong> und dessen Zubehör ist solider Bauart. Achten Sie am Aufstell- und<br />
Standort deshalb auf ausreichend stabilen Untergrund.<br />
• Lesen Sie hierzu auch das Kapitel „technische Daten“.<br />
• Vermeiden Sie Stellen mit hohen Temperaturen oder Feuchtigkeit, bzw. Stellen, <strong>die</strong> mit<br />
Wasser in Berührung kommen können.<br />
• Installieren Sie das Produkt nicht in der Nähe von Klimaanlagenöffnungen oder an einer<br />
Stelle, an der es übermäßig viel Staub oder Rauch gibt.<br />
• Stellen Sie es nur auf waagerechten, ebenen und ausreichend soliden Böden auf.<br />
Vermeiden Sie schräge Oberflächen, weil dann andere Zugbelastungen auf das Material<br />
einwirken und das <strong>POS</strong>-<strong>Regal</strong> durch <strong>die</strong> Rollen seine Position ungewollt verändern kann.<br />
• Installieren Sie das Produkt nicht an Stellen, an denen es Erschütterungen oder<br />
Schwingungen ausgesetzt ist.<br />
• Modifizieren und ändern Sie weder Produkt noch Zubehörteile! Beachten Sie dazu auch<br />
das Kapitel „Gewährleistung und Haftung“.<br />
• Verwenden Sie keine beschädigten Teile.<br />
• Ziehen Sie alle Schrauben fest. Wenden Sie aber nicht zu viel Kraft an, um das Brechen<br />
der Schrauben und Überdrehen der Gewinde zu vermeiden.<br />
• Achten Sie beim Transport auf <strong>die</strong> im Kapitel „technischen Daten“ gelisteten Angaben<br />
und treffen Sie geeignete Transportmaßnahmen.<br />
• Bei Fragen, Defekten, mechanischen Beschädigungen, Störungen und anderen nicht<br />
durch <strong>die</strong>se Anleitung behebbaren Funktionsproblemen, wenden Sie sich an Ihren<br />
Händler zur Reparatur oder zum Austausch wie in Kapitel „Gewährleistung und Haftung“<br />
beschrieben.<br />
• Beachten Sie <strong>die</strong> maximalen Traglasten im Kapitel „technischen Daten“ und <strong>die</strong><br />
Nutzungsbedingungen im Kapitel „bestimmungsgemäßer Gebrauch“.<br />
• Heben und montieren Sie Kabelrollen aufgrund des Gewichtes nur zu zweit und<br />
positionieren Sie sie langsam und vorsichtig, um Quetschungen zu vermeiden.<br />
3
4<br />
Montageanleitung<br />
5. Montage:<br />
a) Packen Sie alle Teile vorsichtig aus<br />
und vergewissern Sie sich, dass der<br />
Lieferumfang komplett ist.<br />
b) Prüfen Sie alle Teile auf Beschädigung.<br />
c) Entfernen Sie <strong>die</strong> 2 Transportsicherungen<br />
mit ienem geeigneten Kreuzschlitzschraubendreher.<br />
Die Rückwand, <strong>die</strong> Bodenplatte, <strong>die</strong><br />
2 L-Profilträger und <strong>die</strong> 4 Rollen sind bereits<br />
vormontiert und bilden das Grundgestell.<br />
c) Wechseln Sie <strong>die</strong> 4 Rollen bei Bedarf mit<br />
einem 12mm Maulschlüssel am liegenden<br />
Ständer. Achten Sie auf eine gleichmäßige<br />
Höhe und festen Sitz.<br />
Die Rollen verfügen über eine Feststellbremse, Feststellbremse<br />
<strong>die</strong> per Fuß durch Herunterdrücken aktiviert und<br />
durch Heraufdrücken deaktiviert wird.<br />
d) Stellen Sie das Grundgestell (1) auf und<br />
betätigen Sie <strong>die</strong> Feststellbremse durch<br />
Herunterdrücken mit dem Fuß.<br />
e)<br />
• Hängen Sie <strong>die</strong> Kabelrollenetagen (2) nur zu<br />
zweit ein.<br />
• Führen Sie sie nacheinander von<br />
oben schräg ein und führen Sie sie so bis zur<br />
gewünschten Höhe und lassen Sie durch<br />
Geradestellen einrasten.<br />
Es gibt insgesamt 32 mögliche Positionen.<br />
Die Kabelrollenetagen müssen parallel zur<br />
Bodenplatte eingehängt werden. Diese lassen<br />
sich nur angekippt und ohne Belastung in der<br />
Höhe verstellen.<br />
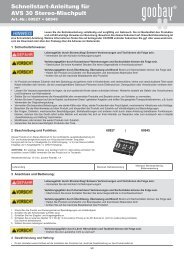
f) Führen Sie das Wechseltopschild (7) vorsichtig<br />
in <strong>die</strong> Plexi-Tasche (6) durch Schieben wie<br />
abgebildet ein, bis es bündig mit dem Rand<br />
abschließt. Stecken Sie <strong>die</strong> Plexi-Tasche<br />
dann von oben in das Grundgestell.<br />
(1)<br />
(6)<br />
(2)<br />
2.<br />
(2)<br />
1.<br />
(7)
g) Führen Sie <strong>die</strong> Rollenachsen (3) durch <strong>die</strong><br />
Kabelrollen und platzieren Sie bei Bedarf<br />
<strong>die</strong> Distanzscheiben zwischen den<br />
Kabelrollen.<br />
Es dürfen maximal 2 Kabelrollen pro<br />
Kabelrollenetage platziert werden.<br />
Hängen Sie bei der Verwendung mehrerer<br />
Kabelrollenetagen aus statischen Gründen<br />
zuerst <strong>die</strong> unteren Kabelrollen ein.<br />
h)<br />
• Positionieren Sie nun <strong>die</strong> Rollenachse (3) mit den<br />
Distanzringen und den Kabelrollen in der<br />
• Führung der Kabelrollenetage (2) beidseitig. Tun<br />
Sie <strong>die</strong>s zu zweit um Verletzungen und<br />
Quetschungen zu vermeiden!<br />
i)<br />
• Klipsen Sie <strong>die</strong> Scannerfähnchen an <strong>die</strong><br />
Schlaufenhaken (4).<br />
• Hängen Sie <strong>die</strong>se schräg von oben in <strong>die</strong><br />
da<strong>für</strong> vorgesehenen Löcher.<br />
j)<br />
• Befestigen Sie den Zangenhalter mit den<br />
Schrauben nach oben an der rechten<br />
Außenseite einer Kabelrollenetage (2) mit<br />
den 2 Hutmuttern und einem 8mm Ring- oder<br />
Maulschlüssel.<br />
• Befestigen Sie <strong>die</strong> Zange an der Kette und<br />
<strong>die</strong> Kette an den Zangenhalter durch je einen<br />
Schlüsselring.<br />
Ende der Montage.<br />
5
6<br />
Montageanleitung<br />
6. Gewährleistung und Haftung:<br />
• Über <strong>die</strong> europäischen Gewährleistungsregeln<br />
hinaus gewährt der Hersteller Ihnen<br />
auf ein neues Produkt 10 Jahre Garantie.<br />
• Da der Hersteller keinen Einfluss auf <strong>die</strong><br />
Installation des Produktes hat, deckt <strong>die</strong><br />
Garantie nur das Produkt selbst ab.<br />
• Falls ein Fehler oder Defekt an Ihrem<br />
Produkt festgestellt werden sollte, wenden<br />
Sie sich bitte an Ihren Fachhändler und<br />
zeigen Sie ggf. Ihre Quittung oder Rechnung<br />
als Kaufnachweis vor. Ihr Händler wird den<br />
Fehler entweder vor Ort beheben, oder das<br />
Produkt an den Hersteller weiterleiten. Sie<br />
erleichtern unseren Technikern Ihre Arbeit<br />
sehr, wenn Sie eventuelle Fehler ausführlich<br />
beschreiben – nur dann haben Sie Gewähr,<br />
7. Pflege, Wartung, Lagerung und Transport:<br />
• Reinigen Sie Ihr Produkt mit einem<br />
trockenen oder bei starker Verschmutzung<br />
mit einem leicht angefeuchteten Leinentuch.<br />
Achten Sie hierbei unbedingt auf lose Kabel<br />
und Teile, um Verletzungen zu vermeiden.<br />
• Achten Sie beim Wechsel von Kabelrollen<br />
und bei Höhenverstellungen der Kabelrollenetagen<br />
darauf, dass Sie keine Körperteilezwischen<br />
den Metallteilen einklemmen.<br />
8. Problembehebung:<br />
Problem Hilfe<br />
dass auch selten auftretende Fehler mit<br />
Sicherheit gefunden und beseitigt werden!<br />
• Der Hersteller haftet nicht <strong>für</strong> Personenoder<br />
Sachschäden, <strong>die</strong> durch unsachgemäße<br />
Installation oder Be<strong>die</strong>nungsschritte, <strong>die</strong><br />
nicht in <strong>die</strong>ser Anleitung beschrieben sind,<br />
entstanden sind. Dazu zählt u. a. jegliche<br />
Änderung und Modifikation des Produktes<br />
und seines Zubehörs.<br />
• Ein anderer als in <strong>die</strong>ser Montageanleitung<br />
beschriebener Einsatz ist unzulässig<br />
und führt zu Gewährleistungsverlust,<br />
Garantieverlust und Haftungsausschluss.<br />
• Druckfehler und Änderungen an Gerät,<br />
Verpackung oder Anleitung behalten wir uns<br />
vor.<br />
• Personen dürfen nicht z.B. durch<br />
Herabstürzen verletzt oder Sachen<br />
beschädigt werden!<br />
• Prüfen Sie bei Bedarf alle Befestigungen<br />
und ziehen Sie <strong>die</strong>se nach.<br />
• Achten Sie bei Lagerung und Transport<br />
auf <strong>die</strong> Sicherheitshinweise, demontieren<br />
Sie in umgekehrter Montagereihenfolge.<br />
Wie wechselt man <strong>die</strong> Kabelrollen? Lesen Sie Kapitel 5 und 7.<br />
Lassen Sie sich von einer 2. Person helfen.<br />
Wie wechselt man das Wechseltopschild? Nehmen Sie <strong>die</strong> Plexitasche aus der<br />
Halterung. Biegen Sie den Kunststoff an der<br />
Falzöffnung etwas auf um das Schild<br />
herauszunehmen.<br />
Das <strong>POS</strong>-<strong>Regal</strong> lässt sich nicht bewegen. Lösen Sie alle Feststellbremsen an den<br />
Rollen. Überladen Sie das <strong>POS</strong>-<strong>Regal</strong> nicht.<br />
andere Fragen Wenden Sie sich an Ihren Händler.
9. Technische Daten:<br />
Material der Metallteile Kunststoff pulverbeschichter Stahl<br />
max. Kapazität pro Kabelrollenetage 2 Kabelrollen<br />
max. Gewicht pro Kabelrollenetage 30 kg<br />
Maße (montiert) 182 x 50 x 40 cm<br />
Gewicht (ohne Kabelrollen) 33 kg<br />
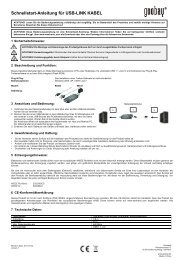
10. Technische Zeichnungen:<br />
Kabelrollenetage Plexi-Tasche<br />
Rollenachse Grundgestell<br />
11. Entsorgungshinweise:<br />
Dieses Produkt gehört nicht in den Hausmüll.<br />
Bitte geben Sie Ihr Produkt am Ende<br />
seiner Lebensdauer an <strong>die</strong> da<strong>für</strong> eingerichteten,<br />
öffentlichen Sammelstellen oder an <strong>die</strong><br />
Verkaufsstelle kostenlos zurück. Einzelheiten<br />
zur Entsorgung regelt das jeweilige<br />
Landesrecht. Wertstoffe werden dem<br />
Recyclingkreislauf zugeführt, um daraus<br />
neue Rohstoffe zu gewinnen.<br />
Folgende Wertstoffe werden in kommunalen<br />
Sammelstellen gesammelt:<br />
• Altglas, Kunststoffe, Altmetalle, Bleche<br />
uvm.<br />
Mit <strong>die</strong>ser Art der Verwertung von Altgeräten<br />
leisten Sie einen wichtigen Beitrag zum<br />
Schutz unserer Umwelt.<br />
7
8<br />
Assembly Instruction<br />
Assembly Instruction for WM CLICKTRONIC ® <strong>POS</strong> shelf<br />
ATTENTION! Please read the instructions completely and carefully. It is part of the product<br />
and includes important information for proper installation and use. Keep this guide to<br />
have it available, when there are uncertainties, or the product will be passed on.<br />
Content: Page<br />
1. Description and Function 8<br />
2. Intended Use 8<br />
3. Parts Package 8<br />
4. Notes of Safety 9<br />
5. Installation 10<br />
6. Warranty and Liability 12<br />
7. Care, Maintenance, Storage and Transport 12<br />
8. Troubleshooting 12<br />
9. Specifications 13<br />
10. Technical Drawings 13<br />
11. Notes on Waste Disposal 13<br />
1. Description and Function:<br />
Your Clicktronic ® <strong>POS</strong> shelf for <strong>HC</strong> Speaker Cables is made for presenting your<br />
Clicktronic ® cable reels ideally at the Point of Sale. The <strong>POS</strong> shelf can contain up to 4 cable<br />
reels and 3 blister packs. Place the cable reels individually in height. Including 4 plastic rolls<br />
the <strong>POS</strong> shelf is also mobile. The metal parts are coated of plastics. With the included nipper<br />
holder and the high quality cable nipper you are well appointed.<br />
3. Intended Use:<br />
Any use other than that specified in Chapter 1 is not allowed. Ignoring the regulations and<br />
notes on safety may cause serious accidents, bodily injuries, as well as damages to<br />
property. Please also make sure to read Chapter Warranty and Liability.<br />
3. Parts Package:<br />
(1) 1 pc base frame with rolls<br />
(2) 2 pcs cable reel holders<br />
(3) 2 pcs axles with washers<br />
(4) 3 pcs hanger hook, length: 24 cm<br />
(5) 3 pcs scanner flags for hanger hooks, dimensions: 2.7 x 4.3 cm<br />
(6) 1 pc perspex bag for removeable label<br />
(7) 2 pcs labels for cable reel holders<br />
including nipper holder and high quality nipper
4. Notes on Safety:<br />
ATTENTION! Only trained professionals are authorized to install and remove the product<br />
and its accessories! Among others, there is a risk of electric shock, bruises, and crashes!<br />
• Your Clicktronic ® product is not a toy and is not meant for children, because it contains small<br />
parts which can be swallowed and can injure persons when used inappropriately!<br />
• Please install the system and devices attached to it in a way that persons cannot be<br />
injured, or objects not be damaged for example by dropping.<br />
• Please remove the packing materials, because children may cut themselves on them<br />
while playing. Furthermore, there is a risk of swallowing and inhalation of incidentals and<br />
insulating material.<br />
• We recommend that installation only is performed by qualified technicians.<br />
• The <strong>POS</strong> shelf and its accessories are very solid. Attend to a solid surface, the shelf will be<br />
placed on.<br />
• Please also read the Chapter “Specifications”.<br />
• Avoid places with high temperatures, or humidity, or places which might come into<br />
contact with water.<br />
• Do not install the product close to openings of air conditioners, or at places with an excessive<br />
amount of dust or smoke.<br />
• Install it only on horizontal surfaces. Avoid slant surfaces, because other kinds of tensile<br />
stress may then interact with the material.<br />
• Do not install the product at places subjected to vibration, or oscillation.<br />
• Do not modify and alter any accessories! Make sure you also read the Chapter “Warranty<br />
and Liability”. Do not use any damaged parts.<br />
• Tighten all screws. Do not use too much force to avoid breakage of screws and<br />
overturning of threads.<br />
• During transport, observe the details listed in the Chapter “Specifications”, and implement<br />
measures suitable for transport.<br />
• For questions, defects, mechanical damages, malfunctions, and other functional problems<br />
which cannot be resolved by this guide, please contact your dealer for repair or<br />
replacement, as described in the Chapter “Warranty and Liability”.<br />
• Please observe the maximum bearing loads listed in the Chapter “Specifications”.<br />
• Please also observe the terms of use described in the Chapter “Intended Use”.<br />
• Only lift cable reels toghether with a second person because of the high weight. Place them<br />
slow and carefully to avoid bruises.<br />
9
10<br />
Assembly Instruction<br />
5. Installation:<br />
a) Unpack all parts carefully and assure the<br />
content is complete.<br />
b) Check all parts for damages.<br />
The back board, the floor plate, the 2 L-profiled<br />
straps and the 4 rolls are already pre-assembled<br />
and build the base frame.<br />
c) If requested, replace the rolls with a 12 mm<br />
combination wrench in lying position.<br />
Mind an identic height.<br />
The rolls have fixing brakes, activated and<br />
deactivated by stepping it with the foot.<br />
d) Set up the base frame (1) and fix the fixing<br />
brake. fixing brake<br />
e)<br />
• Hinge the cable reel holders (2) one after<br />
another slant from above and move it to the<br />
preferred position.<br />
• The holder is fixed by straighten it.<br />
There are 32 possible adjustments.<br />
Hinge the cable reel holders (2) parallel to the floor<br />
plate. It is only possible to adjust them unloaded<br />
and slanted.<br />
f) Slide in the the removeable label (7) into the<br />
perspex bag (6) carefully until it is plane to<br />
the edge. Insert the perspex bag to the top<br />
of the base frame like shown.<br />
(1)<br />
(6)<br />
(2)<br />
2.<br />
(2)<br />
1.<br />
(7)
g) Slide the axle trough the cable reels (3)<br />
with the washers between them optionally.<br />
Never place more than 2 cable reels to one<br />
cable reel holder.<br />
Hinge the lower cable reel holder firstly caused to<br />
static reasons.<br />
h)<br />
• Pose the axle toghether with cable reels (3) and<br />
the washers to the guidance of the cable reel<br />
holder (2) on both sites.<br />
• Let a second person<br />
help you to avoid injuries and bruises.<br />
i)<br />
• Clip in the scanner flags to the hanger hooks (4).<br />
• Place them to the destinated holes in the<br />
base frame by slant connecting.<br />
j)<br />
• Fix the nipper holder to the right outside of a<br />
cable reel holder (2). Use the 2 cap nuts and a<br />
8 mm ring wrench.<br />
• Connect the nipper to the chain and the chain<br />
to the nipper holder by key rings.<br />
The installation is finished.<br />
11
12<br />
Assembly Instruction<br />
6. Warranty and Liability:<br />
• The manufacturer warrants this new device<br />
for 10 years beyond the European warranty<br />
regulations.<br />
• As the manufacturer has no influence on the<br />
installation of the product, warranty of the<br />
product only applies to the product itself.<br />
• If any fault or damage is detected on your<br />
device, please contact your dealer and<br />
provide your sales slip or invoice as<br />
evidence of the purchase, if necessary. Your<br />
dealer will repair the fault either on site, or<br />
send the device to the manufacturer.<br />
• You make the work of our technicians<br />
considerably easier, when you describe<br />
possible faults in detail – only then you can<br />
be assured that faults occurring only<br />
7. Care, Maintenance, Storage, and Transport:<br />
• Use a dry linen cloth to clean your product,<br />
or use a slightly moist cloth for heavy<br />
stains. Look out cables of your device during<br />
cleaning!<br />
• Make sure no body parts will be pinched<br />
by the product or its metal parts, when<br />
moving them!<br />
• Please install the system and devices<br />
attached to it in a way that persons cannot<br />
be injured, or objects not be damaged for<br />
example by dropping.<br />
8. Troubleshooting:<br />
Problem Help<br />
arely will be found and repaired with<br />
certainty!<br />
• The manufacturer is not liable for<br />
damages to persons or property caused<br />
by improper installation or operation not<br />
described in this guide. This includes,<br />
among others, any alteration and<br />
modification of the product and its<br />
accessories.<br />
• Any use other than described in this<br />
guide is not permitted, and causes loss of<br />
warranty, loss of guarantee, and<br />
non-liability.<br />
• We reserve our right for misprints,<br />
changes of the device, packing, or<br />
manual.<br />
• Periodically check, if all attachments and<br />
screws are secured, and tighten them again<br />
when they are loose. This may be caused for<br />
example by frequent movements.<br />
• Avoid places with high temperatures,<br />
humidity, or places which can become wet,<br />
also during care, maintenance, storage, and<br />
transport.<br />
• Follow the safety instructions during<br />
transport. Disassemble in reverse installation<br />
order.<br />
How to change the cable reels? Read chapter 5 and 7.<br />
Led a second person help you.<br />
How to remove the label? Remove the perspex bag off the shelf. Bend<br />
the plastics at the notch a little bit to<br />
remove the label.<br />
The <strong>POS</strong> shelf is impossible to move. Loosen all fixing brakes at the rolls. Do not<br />
overload the shelf.<br />
other questions Contact your dealer.
9. Specifications:<br />
material of the metal parts plastic coated steel<br />
max. capacity of a cable reel holder 2 cable reels<br />
max. weight per cable reel holder 30 kg<br />
dimensions (assembled) 182 x 50 x 40 cm<br />
weight (without cable reels) 33 kg<br />
10. Technical Drawings:<br />
cable reel holder perspex bag<br />
axle base frame<br />
11. Notes on Waste Disposal:<br />
This product should be not disposed<br />
together with domestic waste. Please return<br />
your device free of charge at the end of its<br />
service life at public collection points<br />
established for this purpose, or at the sales<br />
outlet. Details for disposal are regulated in<br />
the relevant federal state law. Potential<br />
recyclable materials are fed into the<br />
recycling cycle to obtain new raw materials<br />
from them.<br />
Following recyclable materials are collected<br />
a local collection points:<br />
• Waste glass, plastic, waste metal, metal<br />
sheet, and more.<br />
This type of recycling of waste equipment<br />
contributes significantly to the protection of<br />
our environment.<br />
13
14<br />
Assembly Instruction
Revision Date: 2010-10-06<br />
Version 2<br />
Clicktronic ® is a registered<br />
trademark of <strong>Wentronic</strong> GmbH<br />
in Germany and/or other countries.<br />
<strong>Wentronic</strong> GmbH,<br />
Pillmannstraße 12,<br />
38112 Braunschweig<br />
Germany<br />
Designed and Developed in Germany.<br />
Assembled in ROC