Einbauanleitung
Einbauanleitung
Einbauanleitung

Erfolgreiche ePaper selbst erstellen
Machen Sie aus Ihren PDF Publikationen ein blätterbares Flipbook mit unserer einzigartigen Google optimierten e-Paper Software.
Recommendation<br />
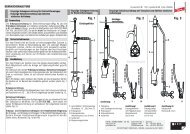
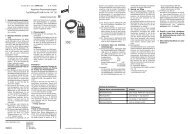
Before fitting the air-termination rod in the air-termination rod support, it is advisable to put the<br />
aluminium roof tile over the relevant air-termination rod. The rubber sleeve (cut to size according to<br />
the diameter of the air-termination rod/air-termination tip) is also put over the air-termination rod (see<br />
Fig. 8, page 10)!<br />
The relevant air-termination rod/air-termination tip is inserted into the bushing and tightened.<br />
Air-termination tips with a diameter of 10 mm are inserted into the left recess of the bushing and<br />
tightened using the opposite locking screw M10 x 16 mm 1 (see Fig. 1 , Fig. 7, page 9).<br />
Metal air-termination rods with a diameter of 16/10 mm are tightened with the upper locking<br />
screw 2 and then with locking screw 1 (see Fig. 2 , Fig. 7, page 9).<br />
GRP (glass-fibre reinforced plastic) air-termination rods may only be tightened using the upper<br />
locking screw 2 (see Fig. 3 and Fig. 4<br />
, Fig. 7, page 9).<br />
The tightening torques stated in Fig. 7, page 9 must be observed!<br />
8