Einbauanleitung
Einbauanleitung
Einbauanleitung

Erfolgreiche ePaper selbst erstellen
Machen Sie aus Ihren PDF Publikationen ein blätterbares Flipbook mit unserer einzigartigen Google optimierten e-Paper Software.
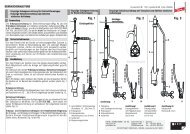
Installation step<br />
After the air-termination rod support has been exactly positioned, it is tightened using the wood<br />
screws, spring washers and cleats delivered with the air-termination rod support:<br />
Two wood screws<br />
Two spring washers<br />
Two cleats<br />
Note:<br />
It is advisable to drill pilot holes in the counter battens (wood drill, (diameter of 5 mm)) to ensure that<br />
they are not damaged (cracked, broken) when tightening the air-termination rod support<br />
(see Fig. 4).<br />
Bild<br />
4<br />
2<br />
3<br />
1<br />
2<br />
2<br />
hole Ø 5 mm<br />
3<br />
1<br />
rafter spacing<br />
1<br />
2<br />
3<br />
hole Ø 5 mm<br />
counter batten spacing<br />
5