Anleitungen - Wunderlich
Anleitungen - Wunderlich
Anleitungen - Wunderlich

Sie wollen auch ein ePaper? Erhöhen Sie die Reichweite Ihrer Titel.
YUMPU macht aus Druck-PDFs automatisch weboptimierte ePaper, die Google liebt.
News, Downloads und Informationen<br />
www.wunderlich.de<br />
Anbauhilfe User Manual<br />
Artikel: Power-Inlet Kit K 1200 R<br />
Bestellnummer: 8601397<br />
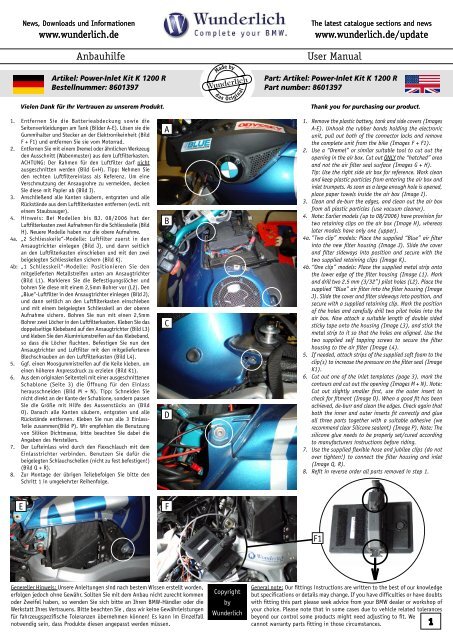
1. Entfernen Sie die Batterieabdeckung sowie die<br />
Seitenverkleidungen am Tank (Bilder A-E). Lösen sie die<br />
Gummihalter und Stecker an der Elektronikeinheit (Bild<br />
F + F1) und entfernen Sie sie vom Motorrad.<br />
2. Entfernen Sie mit einem Dremel oder ähnlichen Werkzeug<br />
den Ausschnitt (Wabenmuster) aus dem Luftfilterkasten.<br />
ACHTUNG: Der Rahmen für den Luftfilter darf nicht<br />
ausgeschnitten werden (Bild G+H). Tipp: Nehmen Sie<br />
den rechten Luftfiltereinlass als Referenz. Um eine<br />
Verschmutzung der Ansaugrohre zu vermeiden, decken<br />
Sie diese mit Papier ab (Bild I).<br />
3. Anschließend alle Kanten säubern, entgraten und alle<br />
Rückstände aus dem Luftfilterkasten entfernen (evtl. mit<br />
einem Staubsauger).<br />
4. Hinweis: Bei Modellen bis BJ. 08/2006 hat der<br />
Luftfilterkasten zwei Aufnahmen für die Schliesskeile (Bild<br />
H). Neuere Modelle haben nur die obere Aufnahme.<br />
4a. „2 Schliesskeile“-Modelle: Luftfilter zuerst in den<br />
Ansaugtrichter einlegen (Bild J), und dann seitlich<br />
an den Luftfilterkasten einschieben und mit den zwei<br />
beigelegten Schliesskeilen sichern (Bild K).<br />
4b: „1 Schliesskeil“-Modelle: Positionieren Sie den<br />
mitgelieferten Metallstreifen unten am Ansaugtrichter<br />
(Bild L1). Markieren Sie die Befestigungslöcher und<br />
bohren Sie diese mit einem 2,5mm Bohrer vor (L2). Den<br />
„Blue“-Luftfilter in den Ansaugtrichter einlegen (Bild J),<br />
und dann seitlich an den Luftfilterkasten einschieben<br />
und mit einem beigelegten Schliesskeil an der oberen<br />
Aufnahme sichern. Bohren Sie nun mit einen 2,5mm<br />
Bohrer zwei Löcher in den Luftfilterkasten. Kleben Sie das<br />
doppelseitige Klebeband auf den Ansaugtrichter (Bild L3)<br />
und kleben Sie den Aluminiumstreifen auf das Klebeband,<br />
so dass die Löcher fluchten. Befestigen Sie nun den<br />
Ansaugtrichter und Luftfilter mit den mitgelieferteren<br />
Blechschrauben an den Luftfilterkasten (Bild L4).<br />
5. Ggf. einen Moosgummistreifen auf die Keile kleben, um<br />
einen höheren Anpressdruck zu erzielen (Bild K1).<br />
6. Aus dem originalen Seitenteil mit einer ausgeschnittenen<br />
Schablone (Seite 3) die Öffnung für den Einlass<br />
herausschneiden (Bild M + N). Tipp: Schneiden Sie<br />
nicht direkt an der Kante der Schablone, sondern passen<br />
Sie die Größe mit Hilfe des Aussenstücks an (Bild<br />
O). Danach alle Kanten säubern, entgraten und alle<br />
Rückstände entfernen. Kleben Sie nun alle 3 Einlass-<br />
Teile zusammen(Bild P). Wir empfehlen die Benutzung<br />
von Silikon Dichtmasse, bitte beachten Sie dabei die<br />
Angaben des Herstellers.<br />
7. Der Lufteinlass wird durch den Flexschlauch mit dem<br />
Einlasstrichter verbinden. Benutzen Sie dafür die<br />
beigelegten Schlauchschellen (nicht zu fest befestigen!)<br />
(Bild Q + R).<br />
8. Zur Montage der übrigen Teilebefolgen Sie bitte den<br />
Schritt 1 in umgekehrter Reihenfolge.<br />
Genereller Hinweis: Unsere <strong>Anleitungen</strong> sind nach bestem Wissen erstellt worden,<br />
erfolgen jedoch ohne Gewähr. Sollten Sie mit dem Anbau nicht zurecht kommen<br />
oder Zweifel haben, so wenden Sie sich bitte an Ihren BMW-Händler oder die<br />
Werkstatt Ihres Vertrauens. Bitte beachten Sie , dass wir keine Gewährleistungen<br />
für fahrzeugspezifische Toleranzen übernehmen können! Es kann im Einzelfall<br />
notwendig sein, dass Produkte diesen angepasst werden müssen.<br />
Copyright<br />
by<br />
<strong>Wunderlich</strong><br />
The latest catalogue sections and news<br />
www.wunderlich.de/update<br />
Vielen Dank für Ihr Vertrauen zu unserem Produkt. Thank you for purchasing our product.<br />
E F<br />
A<br />
B<br />
C<br />
D<br />
Part: Artikel: Power-Inlet Kit K 1200 R<br />
Part number: 8601397<br />
1. Remove the plastic battery, tank and side covers (Images<br />
A-E). Unhook the rubber bands holding the electronic<br />
unit, pull out both of the connector locks and remove<br />
the complete unit from the bike (Images F + F1).<br />
2. Use a “Dremel” or similar suitable tool to cut out the<br />
opening in the air box. Cut out ONLY the “hatched” area<br />
and not the air filter seal surface (Images G + H).<br />
Tip: Use the right side air box for reference. Work clean<br />
and keep plastic particles from entering the air box and<br />
inlet trumpets. As soon as a large enough hole is opened,<br />
place paper towels inside the air box (Image I).<br />
3. Clean and de-burr the edges, and clean out the air box<br />
from all plastic particles (use vacuum cleaner).<br />
4. Note: Earlier models (up to 08/2006) have provision for<br />
two retaining clips on the air box (Image H), whereas<br />
later models have only one (upper).<br />
4a. ”Two clip” models: Place the supplied “Blue” air filter<br />
into the new filter housing (Image J). Slide the cover<br />
and filter sideways into position and secure with the<br />
two supplied retaining clips (Image K).<br />
4b. “One clip” models: Place the supplied metal strip onto<br />
the lower edge of the filter housing (Image L1). Mark<br />
and drill two 2.5 mm (3/32”) pilot holes (L2). Place the<br />
supplied “Blue” air filter into the filter housing (Image<br />
J). Slide the cover and filter sideways into position, and<br />
secure with a supplied retaining clip. Mark the position<br />
of the holes and carefully drill two pilot holes into the<br />
air box. Now attach a suitable length of double sided<br />
sticky tape onto the housing (Image L3), and stick the<br />
metal strip to it so that the holes are aligned. Use the<br />
two supplied self tapping screws to secure the filter<br />
housing to the air filter (Image L4).<br />
5. If needed, attach strips of the supplied soft foam to the<br />
clip(s) to increase the pressure on the filter seal (Image<br />
K1).<br />
6. Cut out one of the inlet templates (page 3), mark the<br />
contours and cut out the opening (Images M + N). Note:<br />
Cut out slightly smaller first, use the outer insert to<br />
check for fitment (Image O). When a good fit has been<br />
achieved, de-burr and clean the edges. Check again that<br />
both the inner and outer inserts fit correctly and glue<br />
all three parts together with a suitable adhesive (we<br />
recommend clear Silicone sealant) (Image P). Note: The<br />
silicone glue needs to be properly set/cured according<br />
to manufacturers instructions before riding.<br />
7. Use the supplied flexible hose and jubilee clips (do not<br />
over tighten!) to connect the filter housing and inlet<br />
(Image Q, R).<br />
8. Refit in reverse order all parts removed in step 1.<br />
F1<br />
General note: Our fittings instructions are written to the best of our knowledge<br />
but specifications or details may change. If you have difficulties or have doubts<br />
with fitting this part please seek advice from your BMW dealer or workshop of<br />
your choice. Please note that in some cases due to vehicle related tolerances<br />
beyond our control some products might need adjusting to fit. We<br />
cannot warranty parts fitting in those circumstances.<br />
1
News, Downloads und Informationen<br />
www.wunderlich.de<br />
Anbauhilfe User Manual<br />
Artikel: Power-Inlet Kit K 1200 R<br />
Bestellnummer: 8601397<br />
G H<br />
J K L<br />
M N P<br />
Genereller Hinweis: Unsere <strong>Anleitungen</strong> sind nach bestem Wissen erstellt worden,<br />
erfolgen jedoch ohne Gewähr. Sollten Sie mit dem Anbau nicht zurecht kommen<br />
oder Zweifel haben, so wenden Sie sich bitte an Ihren BMW-Händler oder die<br />
Werkstatt Ihres Vertrauens. Bitte beachten Sie , dass wir keine Gewährleistungen<br />
für fahrzeugspezifische Toleranzen übernehmen können! Es kann im Einzelfall<br />
notwendig sein, dass Produkte diesen angepasst werden müssen.<br />
O<br />
1<br />
Copyright<br />
by<br />
<strong>Wunderlich</strong><br />
The latest catalogue sections and news<br />
www.wunderlich.de/update<br />
Part: Artikel: Power-Inlet Kit K 1200 R<br />
Part number: 8601397<br />
I<br />
1 2<br />
3 4<br />
Q<br />
General note: Our fittings instructions are written to the best of our knowledge<br />
but specifications or details may change. If you have difficulties or have doubts<br />
with fitting this part please seek advice from your BMW dealer or workshop of<br />
your choice. Please note that in some cases due to vehicle related tolerances<br />
beyond our control some products might need adjusting to fit. We<br />
cannot warranty parts fitting in those circumstances.<br />
2
R<br />
S<br />
Anbauhilfe User Manual<br />
Artikel: Power-Inlet Kit K 1200 R<br />
Bestellnummer: 8601397<br />
Schablone<br />
Template<br />
Template<br />
must be<br />
printed 1:1 !!<br />
Genereller Hinweis: Unsere <strong>Anleitungen</strong> sind nach bestem Wissen erstellt worden,<br />
erfolgen jedoch ohne Gewähr. Sollten Sie mit dem Anbau nicht zurecht kommen<br />
oder Zweifel haben, so wenden Sie sich bitte an Ihren BMW-Händler oder die<br />
Werkstatt Ihres Vertrauens. Bitte beachten Sie , dass wir keine Gewährleistungen<br />
für fahrzeugspezifische Toleranzen übernehmen können! Es kann im Einzelfall<br />
notwendig sein, dass Produkte diesen angepasst werden müssen.<br />
Copyright<br />
by<br />
<strong>Wunderlich</strong><br />
T<br />
Part: Artikel: Power-Inlet Kit K 1200 R<br />
Part number: 8601397<br />
Schablone (Kopie)<br />
Template (Copy)<br />
Ausdruck der<br />
Schablone<br />
muss 1:1<br />
erfolgen!!<br />
General note: Our fittings instructions are written to the best of our knowledge<br />
but specifications or details may change. If you have difficulties or have doubts<br />
with fitting this part please seek advice from your BMW dealer or workshop of<br />
your choice. Please note that in some cases due to vehicle related tolerances<br />
beyond our control some products might need adjusting to fit. We<br />
cannot warranty parts fitting in those circumstances.<br />
3