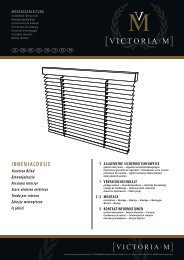
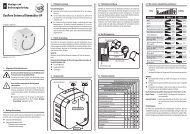
Bedienungsanleitung DuoFern Handsender - Rademacher
Bedienungsanleitung DuoFern Handsender - Rademacher
Bedienungsanleitung DuoFern Handsender - Rademacher

Sie wollen auch ein ePaper? Erhöhen Sie die Reichweite Ihrer Titel.
YUMPU macht aus Druck-PDFs automatisch weboptimierte ePaper, die Google liebt.
D Betriebsanleitung <strong>DuoFern</strong> Standard <strong>Handsender</strong> ....................................................................................... 1<br />
EN <strong>DuoFern</strong> Standard manual transmitter Operating instructions ............................................................... 27<br />
Artikel-Nr.; Item no.: 3248 03 66/3248 03 61<br />
VBD 473-2 (05.12)
2<br />
i<br />
Sehr geehrte Kunden...<br />
mit dem Kauf des <strong>DuoFern</strong> Standard <strong>Handsender</strong>s haben Sie sich für ein Qualitätsprodukt aus dem<br />
Hause RADEMACHER entschieden. Wir danken Ihnen für Ihr Vertrauen.<br />
Dieser <strong>Handsender</strong> ist sowohl unter Aspekten des größten Komforts und der optimalen Bedienbarkeit,<br />
als auch unter Gesichtspunkten der Solidität und Langlebigkeit entstanden. Mit einem kompromisslosen<br />
Qualitätsanspruch und nach langen Versuchsreihen sind wir stolz, Ihnen dieses innovative Produkt zu<br />
präsentieren.<br />
Dahinter stehen alle hochqualifizierten Mitarbeiterinnen und Mitarbeiter aus dem<br />
Hause RADEMACHER.<br />
Diese Anleitung...<br />
...beschreibt Ihnen die Montage, den elektrischen Anschluss und die Bedienung Ihres <strong>Handsender</strong>s.<br />
Bitte lesen Sie diese Anleitung vollständig durch und beachten Sie alle Sicherheitshinweise, bevor Sie<br />
mit den Arbeiten beginnen. Bitte bewahren Sie diese Anleitung auf und übergeben Sie die Anleitung<br />
bei einem Besitzerwechsel auch dem Nachbesitzer.<br />
Bei Schäden, die durch Nichtbeachtung dieser Anleitung und der Sicherheitshinweise entstehen, erlischt<br />
die Garantie. Für Folgeschäden, die daraus resultieren, übernehmen wir keine Haftung.<br />
D
i<br />
Inhaltsverzeichnis<br />
Sehr geehrte Kunden... .....................................2<br />
Gesamtansicht/Bedienelemente .......................4<br />
Geräterückseite .................................................5<br />
Zeichenerklärung ..............................................6<br />
Allgemeine Sicherheitshinweise .......................6<br />
Richtige Verwendung / Einsatzbedingungen ....7<br />
Falsche Verwendung .........................................7<br />
Kurzbeschreibung des<br />
<strong>DuoFern</strong> Standard <strong>Handsender</strong>s ........................8<br />
Anmelden von <strong>DuoFern</strong> Endgeräten<br />
(gültig für Art.-Nr. 3248 03 66) .......................10<br />
Anmelden von <strong>DuoFern</strong> Endgeräten<br />
(gültig für Art.-Nr. 3248 03 61) .......................12<br />
Abmelden von <strong>DuoFern</strong> Endgeräten................14<br />
Endpunkteinstellung .......................................15<br />
Drehrichtungsumkehr .....................................17<br />
Die Funktion „Aufräumen“ aktivieren ..............19<br />
Manuelle Bedienung von Aktoren mit<br />
mehreren Kanälen ..........................................20<br />
Manuelle Bedienung .......................................20<br />
Steuerung von Jalousien bzw. Dimmern<br />
durch Tipp-Betrieb ..........................................21<br />
Ein- und ausschalten des Tipp-Betriebs ...........21<br />
Einstellungen löschen (Reset) .........................22<br />
Technische Daten ............................................23<br />
Batteriewechsel ..............................................24<br />
CE-Zeichen und EG-Konformität .....................25<br />
Garantiebedingungen .....................................26<br />
D<br />
3
4<br />
i<br />
Gesamtansicht/Bedienelemente<br />
Geräte- bzw.<br />
Gruppentasten<br />
. . .<br />
Art.-Nr.:<br />
3248 03 66<br />
Status-LED<br />
grün<br />
orange<br />
AUF (Ein/Aus)<br />
STOPP (Aus)*<br />
AB (Aus/Ein)<br />
* Tipp-Betrieb<br />
ein-/ausschalten<br />
Art.-Nr.:<br />
3248 03 61<br />
D
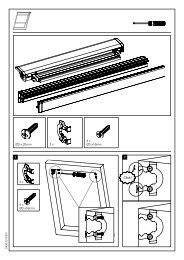
i Geräterückseite<br />
Art.-Nr.:<br />
3248 03 66<br />
3248 03 61<br />
Typenschildbeispiel<br />
für Art.-Nr. 3248 03 66<br />
Verbinden-<br />
Taste<br />
Anmeldemodus<br />
Drehrichtungsumkehr<br />
Aufräumen-Funktion<br />
1 x<br />
2 x<br />
5 s halten<br />
Platz für Notizen<br />
Befestigungsschraube<br />
Trennen-<br />
Taste<br />
1 x Abmeldemodus<br />
2 x Endpunkteinstellung<br />
5 s halten Reset<br />
D<br />
5
6<br />
i<br />
i<br />
Zeichenerklärung<br />
STOP<br />
HINWEIS HINWEIS/WIcHtIG/AcHtuNG<br />
Auf diese Weise machen wir Sie auf weitere für die einwandfreie Funktion wichtige Inhalte aufmerksam<br />
Allgemeine Sicherheitshinweise<br />
STOP<br />
Hier geht es um Ihre Sicherheit.<br />
Beachten und befolgen Sie bitte alle so gekennzeichneten Hinweise.<br />
So warnen wir vor Fehlverhalten, das zu Personen- oder Sachschäden führen kann.<br />
Bei unsachgemäßem Gebrauch besteht erhöhte Verletzungsgefahr.<br />
◆ Es darf Kindern nicht erlaubt werden, mit dem <strong>DuoFern</strong> Standard <strong>Handsender</strong> zu spielen.<br />
◆ Bewahren Sie die <strong>DuoFern</strong> Standard <strong>Handsender</strong> so auf, dass ein ungewollter Betrieb, z.B. durch<br />
spielende Kinder, ausgeschlossen ist.<br />
D
i<br />
i<br />
Richtige Verwendung / Einsatzbedingungen<br />
Falsche Verwendung<br />
Verwenden Sie die <strong>DuoFern</strong> Standard <strong>Handsender</strong> nur zur Fernbedienung von:<br />
◆ Rollläden<br />
◆ Elektrischen Verbrauchern (z.B. Beleuchtungen)<br />
Einsatzbedingungen<br />
◆ Der Einbau und der Betrieb des <strong>DuoFern</strong> Funksystems ist nur für solche Anlagen und Geräte zulässig,<br />
bei denen eine Funktionsstörung im Sender oder Empfänger keine Gefahr für Personen oder<br />
Sachen ergibt oder bei denen dieses Risiko durch andere Sicherheitseinrichtungen abgedeckt wird.<br />
◆ Verwenden Sie den <strong>DuoFern</strong> Standard <strong>Handsender</strong> nur in trockenen Räumen.<br />
Verwenden Sie Steuerungen mit <strong>DuoFern</strong> Funktechnik (z. B. RolloTron Comfort <strong>DuoFern</strong> und <strong>DuoFern</strong><br />
Standard <strong>Handsender</strong>) nie zur Fernsteuerung von Geräten und Anlagen mit erhöhten sicherheitstechnischen<br />
Anforderungen oder erhöhter Unfallgefahr. Dies bedarf zusätzlicher Sicherheitseinrichtungen.<br />
Beachten Sie die jeweiligen gesetzlichen Regelungen zum Errichten solcher Anlagen.<br />
D<br />
7
8<br />
i<br />
Kurzbeschreibung des <strong>DuoFern</strong> Standard <strong>Handsender</strong>s<br />
Mit dem <strong>DuoFern</strong>-Funksystem ist ein bi-direktionaler Datenaustausch zwischen den verschiedenen<br />
Teilnehmern eines Funknetzwerks möglich. Alle Schaltbefehle eines <strong>DuoFern</strong> Senders werden von den<br />
<strong>DuoFern</strong> Empfängern bestätigt.<br />
Mit dem <strong>DuoFern</strong> Standard <strong>Handsender</strong> können Sie verschiedene <strong>DuoFern</strong> Geräte (z. B. RolloTron Comfort/<br />
Standard <strong>DuoFern</strong> oder Duo-Fern Aktoren für Beleuchtung) manuell fernbedienen.<br />
Kommandotasten<br />
Mit Hilfe der drei Kommandotasten, AUF (Ein/Aus)/STOPP (Aus)/AB (Aus/Ein), s. Seite 4, können Sie<br />
manuelle Schaltbefehle an die angemeldeten <strong>DuoFern</strong>-Endgeräte senden.<br />
Geräte- bzw. Gruppentasten (nur für Artikel-Nr. 3248 03 66)<br />
Der <strong>DuoFern</strong> Standard <strong>Handsender</strong> 3248 03 66 verfügt über 6 Geräte- bzw.- Gruppentasten (s. Seite 4),<br />
die Sie beliebig mit <strong>DuoFern</strong> Endgeräten belegen können (s. Tabelle auf Seite 9). Auf diese Weise ist<br />
sowohl eine Einzel- als auch eine Gruppensteuerung verschiedener Geräte möglich (s. Seite 11).<br />
Verbinden-taste<br />
Mit Hilfe der Verbinden-Taste können Sie folgende Funktionen ausführen:<br />
◆ Anmeldemodus <strong>DuoFern</strong>-Endgeräte am <strong>Handsender</strong> anmelden.<br />
◆ Drehrichtungsumkehr Die Drehrichtung des Rohrmotors ändern bzw.<br />
Umschaltung zwischen der Geräte und der Lichtfunktion.<br />
◆ Aufräumen Die Verbindung vom <strong>Handsender</strong> zu nicht mehr vorhandenen Aktoren<br />
löschen.<br />
D
i<br />
Kurzbeschreibung des <strong>DuoFern</strong> Standard <strong>Handsender</strong>s<br />
trennen-taste<br />
Mit Hilfe der Trennen-Taste können Sie folgenden Funktionen ausführen:<br />
◆ Abmeldemodus <strong>DuoFern</strong>-Endgeräte vom <strong>Handsender</strong> abmelden.<br />
◆ Endpunkteinstellung Die Endpunkte von elektronischen RADEMACHER-Rohrmotoren einstellen.<br />
◆ Reset Zurücksetzen auf die Werkseinstellungen.<br />
Status-LED<br />
Die zweifarbige Status-LED zeigt an, ob alle <strong>DuoFern</strong> Endgeräte das Schaltsignal empfangen und<br />
bestätigt haben.<br />
typenübersicht mit Anzahl der steuerbaren Gruppen und <strong>DuoFern</strong> Endgeräten.<br />
Artikel-Nr.:<br />
3248 03 66<br />
3248 03 61<br />
Anzahl der<br />
Gruppen<br />
6<br />
1<br />
Anzahl der<br />
Endgeräte pro<br />
Gruppe<br />
8<br />
48<br />
D<br />
Maximale<br />
Anzahl der Endgeräte<br />
48<br />
48<br />
9
1.<br />
2.<br />
3.<br />
10<br />
Anmelden von <strong>DuoFern</strong> Endgeräten (gültig für Art.-Nr. 3248 03 66)<br />
. . .<br />
▲<br />
Um ein <strong>DuoFern</strong> Endgerät mit dem <strong>DuoFern</strong> Standard <strong>Handsender</strong> bedienen zu können, muss dieser<br />
am jeweiligen <strong>DuoFern</strong> Endgerät angemeldet sein.<br />
tIPP<br />
Verwenden Sie zum Drücken der Verbinden-Taste einen dünnen, nicht zu spitzen Gegenstand.<br />
1 1 x<br />
60 Sekunden<br />
Das gewünschte <strong>DuoFern</strong> Endgerät bzw. den <strong>DuoFern</strong><br />
Aktor in den Anmeldemodus schalten.<br />
(s. entsprechende <strong>Bedienungsanleitung</strong>)<br />
Den <strong>DuoFern</strong> Standard <strong>Handsender</strong> in den Anmeldemodus<br />
schalten.<br />
Dazu die „Verbinden-Taste“ einmal kurz drücken.<br />
Die LED’s von allen Geräte- bzw.- Gruppentasten<br />
leuchten.<br />
HINWEIS<br />
◆ Eine vollständig belegte Gruppentaste leuchtet nicht.<br />
◆ Der Anmeldemodus bleibt 60 Sekunden aktiv.<br />
D
4.<br />
. . .<br />
5. 1. ... ... 4.<br />
Anmelden von <strong>DuoFern</strong> Endgeräten (gültig für Art.-Nr. 3248 03 66)<br />
HINWEIS 1<br />
◆ Hat ein Gerät mehrere Kanäle (z. B. <strong>DuoFern</strong> Universalaktor),<br />
müssen Sie für jeden Kanal eine Gruppentaste auswählen.<br />
◆ Bei Geräten mit mehreren Kanälen wird automatisch zu Punkt 3<br />
gesprungen, bis diese alle abgearbeitet sind.<br />
◆ Soll ein Kanal nicht belegt bzw. übersprungen werden, müssen<br />
Sie die Stopp-Taste drücken.<br />
Gewünschte Gerätetaste drücken, mit der Sie das<br />
Gerät später anwählen möchten.<br />
Beachten Sie die Status-LED<br />
grün: Die Anmeldung war erfolgreich.<br />
orange: Die Taste ist schon vollständig belegt.<br />
Pkt. 1 bis 4 wiederholen, um das nächste Gerät<br />
bzw. den nächsten Aktor anzumelden.<br />
HINWEIS 2<br />
Sie können ein Gerät auch mehrfach anmelden, um z.B. eine<br />
Einzelsteuerung und eine Gruppensteuerung zu realisieren:<br />
- RolloTron Standard <strong>DuoFern</strong> 1 auf Taste 1<br />
- RolloTron Standard <strong>DuoFern</strong> 2 auf Taste 2<br />
- RolloTron Standard <strong>DuoFern</strong> 3 auf Taste 3<br />
- RolloTron Standard <strong>DuoFern</strong> 1/2/3 auf Taste 4<br />
Beachten Sie die maximal mögliche Anzahl von Geräten<br />
pro Taste (s. Seite 9).<br />
D<br />
11
12<br />
Anmelden von <strong>DuoFern</strong> Endgeräten (gültig für Art.-Nr. 3248 03 61)<br />
Bei dem <strong>DuoFern</strong> Standard <strong>Handsender</strong> 3248 03 61 können keine Geräte oder Gruppentasten ausgewählt<br />
bzw. betätigt werden. Die angemeldeten Aktoren werden automatisch der einzigen vorhandenen Gruppe<br />
zugeordnet.<br />
HINWEIS<br />
◆ Beim Anmeldevorgang von Aktoren mit mehreren Kanälen werden bei dem <strong>DuoFern</strong> Standard Hand-<br />
sender 3248 03 61 (1 Gruppe) grundsätzlich alle Kanäle in der Gruppe angemeldet.<br />
D
1.<br />
2.<br />
3.<br />
4.<br />
Anmelden von <strong>DuoFern</strong> Endgeräten (gültig für Art.-Nr. 3248 03 61)<br />
1 x<br />
▲<br />
Das gewünschte <strong>DuoFern</strong> Endgerät bzw. den Duo-<br />
Fern Aktor in den Anmeldemodus schalten.<br />
(s. entsprechende <strong>Bedienungsanleitung</strong>)<br />
Den <strong>DuoFern</strong> Standard <strong>Handsender</strong> in den Anmeldemodus<br />
schalten.<br />
Dazu die „Verbinden-Taste“ einmal kurz drücken.<br />
Beachten Sie die Status-LED<br />
grün: Die Anmeldung war erfolgreich.<br />
orange: Die Taste ist schon vollständig belegt<br />
Punkt 1. und 2. müssen für jeden Aktor wiederholt<br />
werden.<br />
D<br />
13
1.<br />
2.<br />
3.<br />
14<br />
Abmelden von <strong>DuoFern</strong> Endgeräten<br />
▲<br />
1 x<br />
Gewünschtes <strong>DuoFern</strong> Endgerät in den Abmeldemodus<br />
schalten.<br />
(s. entsprechende <strong>Bedienungsanleitung</strong>)<br />
Den <strong>DuoFern</strong> Standard <strong>Handsender</strong> in den Abmeldemodus<br />
schalten.<br />
Dazu die „Trennen-Taste“ einmal kurz drücken.<br />
Bei erfolgreicher Abmeldung leuchtet die Status-<br />
LED grün.<br />
HINWEIS<br />
Das <strong>DuoFern</strong> Endgerät wurde von allen Geräte- bzw.<br />
Gruppentasten abgemeldet.<br />
D
1.<br />
2.<br />
Endpunkteinstellung<br />
. . .<br />
Mit Hilfe dieser Funktion können Sie bei angeschlossenen Rohrmotoren nachträglich die Endpunkte<br />
einstellen bzw. korrigieren.<br />
HINWEIS<br />
◆ Die Endpunkteinstellung kann nur durchgeführt werden, wenn in der ausgewählten Gruppe nur ein<br />
Gerät (Aktor) angemeldet ist, sind in der ausgewählten Gruppe mehr als ein Teilnehmer angemeldet,<br />
ist die Funktion gesperrt.<br />
◆ Die Endpunkteinstellung ist nur bei elektronischen Rohrmotoren von RADEMACHER ab Baujahr 2000<br />
möglich, die mit einem korrekt installiertem <strong>DuoFern</strong> Aktor gesteuert werden.<br />
◆ Bei parallel geschalteten Rohrmotoren ist keine Endpunkteinstellung möglich.<br />
◆ Die Funktion wird automatisch beendet, falls ca. 30 Sekunden lang keine Taste betätigt wird.<br />
Wählen Sie das gewünschte <strong>DuoFern</strong> Endgerät aus.<br />
2 x / Sekunde Aktivieren Sie die Funktion „Endpunkteinstellung“.<br />
Dazu muss die „Trennen-Taste“ innerhalb von einer Sekunde<br />
zweimal kurz hintereinander betätigt werden (ähnlich dem<br />
Doppelklick bei Computermäusen).<br />
D<br />
15
3.<br />
4.<br />
5.<br />
6.<br />
7.<br />
8.<br />
16<br />
Endpunkteinstellung<br />
▲<br />
Bei erfolgreicher Aktivierung blinkt die Status-LED<br />
regelmäßig (ca. 2 x pro Sekunde) grün auf.<br />
Den oberen Endpunkt einstellen.<br />
Halten Sie die Taste solange gedrückt, bis der gewünschte<br />
Endpunkt erreicht ist.<br />
taste loslassen, sobald der obere Endpunkt erreicht<br />
ist.<br />
Den unteren Endpunkt einstellen.<br />
taste loslassen, sobald der untere Endpunkt<br />
erreicht ist.<br />
Die Endpunkteinstellung beenden.<br />
Der <strong>Handsender</strong> fällt dann in den normalen Betriebsmodus<br />
zurück (das regelmäßige Blinken der Status-LED wird<br />
beendet).<br />
D
Drehrichtungsumkehr<br />
Mit Hilfe dieser Funktion können Sie bei angeschlossenen Rohrmotoren nachträglich die Drehrichtung<br />
einstellen bzw. korrigieren.<br />
Alternative Anwendung zur Drehrichtungsumkehr:<br />
umschaltung zwischen Licht- und Gerätfunktion<br />
Bei Universalaktoren für Licht bzw. Geräte (z.B. <strong>DuoFern</strong> Universalaktor oder Steckdosenaktor ) bewirkt<br />
die Drehrichtungsumkehr das Umschalten zwischen der Licht- und der Gerätefunktion.<br />
HINWEIS<br />
◆ Die Drehrichtungsumkehr bzw. die Umschaltung zwischen der Licht- und Gerätefunktion kann nur<br />
durchgeführt werden, wenn in der ausgewählten Gruppe nur ein Gerät (Aktor) angemeldet ist,<br />
sind in der ausgewählten Gruppe mehr als ein Teilnehmer angemeldet, ist die Funktion gesperrt.<br />
◆ Nicht alle Geräte unterstützen die Funktion der Drehrichtungsumkehr bzw. die Umschaltung zwischen<br />
Licht- und Gerätefunktion. Prüfen Sie daher in der <strong>Bedienungsanleitung</strong> des jeweiligen Gerätes, ob die<br />
Funktion zur Verfügung steht.<br />
◆ Bei dem <strong>Handsender</strong> 3248 03 61 gilt folgendes:<br />
Ist ein mehrkanaliger Aktor (z. B. <strong>DuoFern</strong> Universalaktor ) angemeldet, wird die Drehrichtungsumkehr<br />
bzw. die Umschaltung zwischen der Licht- und Gerätefunktion immer auf beide Kanäle angewendet.<br />
D<br />
17
1.<br />
2.<br />
3.<br />
i)<br />
18<br />
Drehrichtungsumkehr<br />
. . .<br />
▲<br />
▲<br />
Wählen Sie das gewünschte <strong>DuoFern</strong> Endgerät aus.<br />
2 x / Sekunde Aktivieren Sie die Funktion „Drehrichtungsumkehr“.<br />
Dazu muss die „Verbinden-Taste“ innerhalb von einer Sekunde<br />
zweimal kurz hintereinander betätigt werden (ähnlich<br />
dem Doppelklick bei Computermäusen).<br />
> der Aktor schaltet ab.<br />
> der Aktor schaltet ein.<br />
Bei erfolgreicher Aktivierung quittiert der am Aktor<br />
angeschlossene Rohrmotor durch kurzes Anfahren.<br />
Bei universalaktoren schaltet sich das Licht- / Gerät<br />
zur Quittierung kurz ein bzw. aus.<br />
So können Sie erkennen, ob die Licht- oder die<br />
Gerätefunktion aktiv ist:<br />
Die Lichtfunktion ist aktiviert.<br />
Die Gerätefunktion ist aktiviert.<br />
D
1.<br />
Die Funktion „Aufräumen“ aktivieren<br />
Diese Funktion meldet alle angemeldeten <strong>DuoFern</strong> Endgeräte ab, die nicht mehr reagieren. Dies könnte<br />
z.B. bei einem defekten Gerät erforderlich sein, das nicht mehr, wie zuvor beschrieben, abzumelden ist.<br />
HINWEIS ◆ Alle batteriebetriebenen <strong>DuoFern</strong> Geräte werden/können nicht auf diese Weise abgemeldet werden.<br />
◆ Um alle <strong>DuoFern</strong> Endgeräte vom <strong>DuoFern</strong> Standard <strong>Handsender</strong> abzumelden, müssen Sie die Funktion<br />
„Reset (Einstellungen löschen)“ (s. Seite 22) ausführen.<br />
▲<br />
Die „Verbinden-taste“ ca. 5 Sekunden gedrückt<br />
halten, bis die Status-LED grün leuchtet.<br />
Der <strong>DuoFern</strong> Standard <strong>Handsender</strong> sendet nun ein Kontrollsignal<br />
an alle angemeldeten <strong>DuoFern</strong> Endgeräte. Die Geräte,<br />
die das Signal nicht bestätigen, werden automatisch<br />
gelöscht.<br />
Beachten Sie die Status-LED<br />
grün: Das Aufräumen war erfolgreich.<br />
orange blinkend: Der Aufräummodus ist noch aktiv.<br />
D<br />
19
1.<br />
2.<br />
3.<br />
4.<br />
20<br />
Manuelle Bedienung von Aktoren mit mehreren Kanälen<br />
Manuelle Bedienung<br />
. . .<br />
Beim Anmeldevorgang von Aktoren mit mehreren Kanälen werden bei dem <strong>DuoFern</strong> Standard <strong>Handsender</strong><br />
3248 03 61 (1 Gruppe) grundsätzlich alle Kanäle in der Gruppe angemeldet. Die Bedienung einzelner<br />
Kanäle ist daher bei diesen <strong>Handsender</strong>n nicht möglich.<br />
Gewünschte Geräte- bzw. Gruppentaste<br />
drücken (soweit vorhanden).<br />
Rollladen öffnen oder<br />
Verbraucher ein-/ausschalten<br />
Rollladen anhalten oder<br />
Verbraucher ausschalten<br />
Rollladen schließen oder<br />
Verbraucher aus-/einschalten<br />
Beachten Sie die Status-LED<br />
orange: Das Schaltsignal wird gesendet.<br />
grün: Bestätigung erhalten.<br />
D
1.<br />
2.<br />
Steuerung von Jalousien bzw. Dimmern durch tipp-Betrieb<br />
Funktionsbeschreibung des<br />
tipp-Betriebs<br />
Ein- und ausschalten des tipp-Betriebs<br />
. . .<br />
ca. 10 s<br />
◆ Wird bei aktiviertem Tipp-Betrieb die AUF- bzw. AB-Taste kurz betätigt, wird ein tipp-Befehl ausgesendet.<br />
Die Lamellen einer Jalousie lassen sich so komfortabel einstellen, da der Motor nur kurz anläuft.<br />
◆ Bei Dimmern führt der Tipp-Betrieb um eine Erhöhung bzw. Reduzierung der Helligkeit um 10%.<br />
◆ Wird die Taste AUF- bzw. AB-Taste lange betätigt (>1/2 Sekunde) werden die normalen AUF- oder<br />
AB-Befehle ausgesendet. Soweit vorhanden, kann für jede Gruppe der Tipp-Betrieb separat ein- und<br />
ausgeschaltet werden.<br />
. . .<br />
3 x +<br />
HINWEIS<br />
Soweit vorhanden, gewünschte Gruppe mit der entsprechenden<br />
Gruppentaste (1-6) auswählen.<br />
Die StOPP-taste ca. 10 Sekunden lang gedrückt<br />
halten.<br />
Beachten Sie die tasten-LED und die Status-LED:<br />
Die LED der ausgewählten Gruppentaste blinkt dreimal<br />
und die Status-LED leuchtet:<br />
grün (Tipp-Betrieb wurde eingeschaltet)<br />
orange (Tipp-Betrieb wurde ausgeschaltet).<br />
Aktoren, die den Tipp-Betrieb nicht unterstützen, ignorieren<br />
die Tipp-Befehle.<br />
21<br />
D
1.<br />
2.<br />
22<br />
Einstellungen löschen (Reset)<br />
Die „trennen-taste“ ca. 5 Sekunden gedrückt<br />
halten, bis die Status-LED orange blinkt.<br />
Die Status-LED blinkt orange.<br />
Die „trennen-taste“ loslassen, sobald die<br />
Status-LED dauerhaft orange leuchtet.<br />
Alle Einstellungen im <strong>DuoFern</strong> Standard <strong>Handsender</strong> sind<br />
gelöscht.<br />
D
tD<br />
technische Daten<br />
Sendefrequenz: 434,5 MHz<br />
Sendeleistung: 10 mW<br />
Reichweite:<br />
- Freifeld: ca. 100 m<br />
- Im Gebäude: ca. 30 m (Abhängig von der Bausubstanz)<br />
Versorgungsspannung: 3 V<br />
Batterie-Typ: CR2450<br />
- Lebensdauer 1: ca. 2 Jahre, bei 5 Betätigungen pro Tag<br />
- Lebensdauer 2: ca. 5 Jahre, Stand-by<br />
Max. Anzahl Gruppen:<br />
- Art.-Nr. 3248 03 66: 6<br />
- Art.-Nr. 3248 03 61:<br />
Max. Anzahl Geräte:<br />
1<br />
- Art.-Nr. 3248 03 66/3248 03 61: 48<br />
Zulässige Umgebungstemperatur: + 5 °C bis + 40 °C<br />
Abmessungen (L x B x H): 140 x 43 x 18 mm<br />
Gewicht: 70 g<br />
D<br />
23
24<br />
tD<br />
Batteriewechsel<br />
Bei fast leerer Batterie blinkt die Status-LED orange, wenn<br />
Sie den <strong>DuoFern</strong> Standard <strong>Handsender</strong> bedienen.<br />
◆ Das Batteriefach befindet sich auf der Rückseite des<br />
<strong>DuoFern</strong> Standard <strong>Handsender</strong>s.<br />
◆ Lösen Sie die Rückseite mit einem Schraubendreher.<br />
◆ Die Gehäuserückseite vorsichtig nach oben abheben.<br />
◆ Die Batterie seitlich herausschieben.<br />
◆ Achten Sie beim Einsetzen der Batterie auf die Richtige<br />
Polarität. Der Plus-Pol (+) der Batterie muss oben<br />
liegen.<br />
HINWEIS<br />
Leere Batterien sind Sondermüll und gehören nicht in den<br />
Restmüll.<br />
D
i cE-Zeichen und EG-Konformität<br />
Das vorliegende Produkt erfüllt die Anforderungen der geltenden europäischen und nationalen Richtlinien.<br />
1999/5/EG R&ttE Richtlinie<br />
Die Konformität wurde nachgewiesen. Die entsprechenden Erklärungen und Unterlagen sind beim Hersteller hinterlegt.<br />
RADEMACHER Geräte-Elektronik GmbH&Co. KG<br />
Buschkamp 7<br />
46414 Rhede<br />
D<br />
25
26<br />
i<br />
Garantiebedingungen<br />
RADEMACHER Geräte-Elektronik GmbH & Co. KG gibt eine 24-monatige Garantie für Neugeräte, die entsprechend der Einbauanleitung<br />
montiert wurden. Von der Garantie abgedeckt sind alle Konstruktionsfehler, Materialfehler und Fabrikationsfehler.<br />
Ausgenommen von der Garantie sind:<br />
◆ Fehlerhafter Einbau oder Installation<br />
◆ Nichtbeachtung der Einbau- und <strong>Bedienungsanleitung</strong><br />
◆ Unsachgemäße Bedienung oder Beanspruchung<br />
unverbindlich.<br />
◆ Äußere Einwirkungen wie Stöße, Schläge oder Witterung<br />
◆ Reparaturen und Abänderungen von dritten, nicht autorisierten Stellen<br />
◆ Verwendung ungeeigneter Zubehörteile<br />
Abbildungen<br />
◆ Schäden durch unzulässige Überspannungen (z. B. Blitzeinschlag)<br />
◆ Funktionsstörungen durch Funkfrequenzüberlagerungen und sonstige Funkstörungen<br />
vorbehalten.<br />
Innerhalb der Garantiezeit auftretende Mängel beseitigt RADEMACHER kostenlos entweder durch Reparatur oder durch<br />
Ersatz der betreffenden Teile oder durch Lieferung eines gleichwertigen oder neuen Ersatzgerätes. Durch Ersatzlieferung oder Irrtümer<br />
Reparatur aus Garantiegründen tritt keine generelle Verlängerung der ursprünglichen Garantiezeit ein.<br />
und<br />
RADEMAcHER<br />
Service:<br />
Druckfehler<br />
Geräte-Elektronik GmbH & Co. KG<br />
Hotline 01805 933-171*<br />
Buschkamp 7<br />
Telefax +49 2872 933-253<br />
46414 Rhede<br />
service@rademacher.de<br />
Änderungen,<br />
info@rademacher.de<br />
* 14 ct/Minute aus dem deutschen Festnetz der DT AG/<br />
www.rademacher.de Mobilfunk max. 42 ct/Minute (gilt nur für Deutschland)<br />
Technische<br />
D
D<br />
EN<br />
<strong>Bedienungsanleitung</strong> <strong>DuoFern</strong> Standard <strong>Handsender</strong> ............................................................................... 1<br />
<strong>DuoFern</strong> Standard manual transmitter Operating instructions ............................................................... 27<br />
Item no. 3248 03 66/3248 03 61<br />
VBD 473-2 (05.12)
28<br />
i<br />
Dear customer ...<br />
…in purchasing this <strong>DuoFern</strong> Standard manual transmitter, you have decided on a quality product<br />
manufactured by RADEMACHER. We would like to thank you for your confidence.<br />
This manual transmitter has been developed with such aspects as optimum operability and convenience<br />
in mind, as well as those of solidity and durability. With uncompromising quality requirements and after<br />
an extensive test series phase, we are now proud to present you with this innovative product.<br />
All of our highly qualified staff at RADEMACHER<br />
stand behind this product.<br />
These operating instructions…<br />
... describe the installation, the electrical connection and the operation of your manual transmitter.<br />
Please read these instructions completely and observe all of the safety instructions before commencing<br />
with the installation. Please keep these instructions in a safe place and include them with the device in<br />
the event it changes owners.<br />
The warranty becomes null and void in the event of any damage or loss caused by failure to observe these<br />
operating and safety instructions. We accept no liability for any consequential losses or damage resulting<br />
from non-observance of these instructions.<br />
EN
i<br />
Contents<br />
Dear customer ... .............................................28<br />
General view/Operating elements ..................30<br />
Rear side of device ..........................................31<br />
Key to symbols ................................................32<br />
General safety advice ......................................32<br />
Proper use / operating conditions ...................33<br />
Improper use ...................................................33<br />
Short description of the<br />
<strong>DuoFern</strong> Standard manual transmitter ............34<br />
Register <strong>DuoFern</strong> end devices<br />
(applies to item nos. 3248 03 66) ....................36<br />
Register <strong>DuoFern</strong> end devices<br />
(applies to item nos. 3248 03 61) ....................38<br />
Delete <strong>DuoFern</strong> end devices ............................40<br />
End point setting.............................................41<br />
Reversal of rotational direction .......................43<br />
Activate “purge“ function ................................45<br />
EN<br />
Manual operation of actuators with<br />
several channels ..............................................46<br />
Manual operation ...........................................46<br />
Controlling blinds and dimmers in jog mode ..47<br />
Switching jog mode on and off .......................47<br />
Delete settings (Reset) ....................................48<br />
Technical Data .................................................49<br />
Battery change................................................50<br />
CE Mark and EC Conformity .............................51<br />
Warranty conditions .......................................52<br />
29
30<br />
i<br />
General view/Operating elements<br />
Device buttons or<br />
group buttons<br />
. . .<br />
Item no.:<br />
3248 03 66<br />
LED-status<br />
green<br />
orange<br />
UP (on/off)<br />
STOP (off)<br />
DOWN (on/off)<br />
* Switching jog mode<br />
on/off<br />
Item no.:<br />
3248 03 61<br />
EN
i Rear side of device<br />
Item no.:<br />
3248 03 66<br />
3248 03 61<br />
Example of identification plate<br />
for Item no. 3248 03 66<br />
Connect<br />
button<br />
Registering mode 1 x<br />
Reversal of rotational direction 2 x<br />
Purge function<br />
Hold for 5 s<br />
Space for note<br />
Fixing screw<br />
Disconnect<br />
button<br />
1 x Disconnect mode<br />
2 x End point setting<br />
Hold for 5 s Reset<br />
EN<br />
31
32<br />
i<br />
i<br />
Key to symbols<br />
STOP<br />
General safety advice<br />
NOTE NOTE/IMPORTANT/CAUTION<br />
This heading indicates information that is important to the proper functioning of the device.<br />
STOP<br />
This concerns your safety.<br />
Please pay particular attention to and carefully follow all instructions with this symbol.<br />
This symbol advises of malpractices that may cause damage to people and property.<br />
Improper use increases risk of injury.<br />
u Children must not be allowed to play with the <strong>DuoFern</strong> Standard manual transmitter.<br />
u Please store the <strong>DuoFern</strong> Standard manual transmitter in such a way that it cannot unintentionally<br />
be operated by playing children, for example.<br />
EN
i<br />
i<br />
Proper use / operating conditions<br />
Improper use<br />
Use the <strong>DuoFern</strong> Standard manual transmitter only for the remote control of:<br />
u Roller shutters<br />
u Electrical consumers (e.g. lighting)<br />
Operating conditions<br />
u The <strong>DuoFern</strong> radio system may only be operated with and installed in systems and devices in which<br />
transmitter or receiver faults do not present any danger to persons or property or for which these<br />
hazards are removed by the use of other safety equipment.<br />
u Use the <strong>DuoFern</strong> Standard manual transmitter only in dry rooms.<br />
Never use controls with <strong>DuoFern</strong> radio technology (e. g. RolloTron Comfort <strong>DuoFern</strong> and <strong>DuoFern</strong> Standard<br />
manual transmitter) for remote operation of devices and equipment with increased safety requirements<br />
or increased risk of accident. Additional safety equipment is required to do so. Please observe the relevant<br />
legal regulations for setting up such systems.<br />
EN<br />
33
34<br />
i<br />
Short description of the <strong>DuoFern</strong> Standard manual transmitter<br />
The <strong>DuoFern</strong> wireless system enables bidirectional data exchange between the various participants<br />
of a wireless network. All switching commands from a <strong>DuoFern</strong> transmitter will be confirmed by the<br />
<strong>DuoFern</strong> receivers.<br />
Using the <strong>DuoFern</strong> Standard manual transmitter you can manually remotely control various <strong>DuoFern</strong><br />
devices (e. g. RolloTron Comfort/Standard <strong>DuoFern</strong> or <strong>DuoFern</strong> actuators for lighting).<br />
Command buttons<br />
With the aid of the three command buttons, UP (on/off)/STOP (off) / DOWN (on/off), see page 30, you<br />
can transmit manual switching commands to the registered <strong>DuoFern</strong> end devices.<br />
Device buttons or group buttons (only for item nos. 3248 03 66)<br />
<strong>DuoFern</strong> Standard manual transmitter 3248 03 66 has 6 device or group buttons (see page30) which<br />
you can allocate to any <strong>DuoFern</strong> end device (see table on page 35). In this way it is possible to have an<br />
individual as well as a group control of various devices (see page 37).<br />
Connect button<br />
You can call up the following functions with the connect button:<br />
u Registering mode Register <strong>DuoFern</strong> end device on manual transmitter.<br />
u Reversal of rotational direction. Reverse rotational direction of tubular motor or switchover between<br />
the devices and the lighting function.<br />
u Purge Delete the connection between manual transmitter and actuators<br />
that no longer exist.<br />
EN
i<br />
Short description of the <strong>DuoFern</strong> Standard manual transmitter<br />
Disconnect button<br />
You can call up the following functions with the disconnect button:<br />
u Disconnect mode Disconnect <strong>DuoFern</strong> end devices from manual transmitter.<br />
u End point setting Set the end points of RADEMACHER electronic tubular motors.<br />
u Reset Resetting to factory settings.<br />
Status LED<br />
The two-coloured status LED shows whether all <strong>DuoFern</strong> end devices have received and confirmed the<br />
switch signal.<br />
List of models with number of controllable groups and <strong>DuoFern</strong> end devices.<br />
Item no.:<br />
3248 03 66<br />
3248 03 61<br />
Number of<br />
groups<br />
6<br />
1<br />
Number of end<br />
devices for each<br />
group<br />
8<br />
48<br />
EN<br />
Maximum<br />
number of end<br />
devices<br />
48<br />
48<br />
35
1.<br />
2.<br />
3.<br />
36<br />
Register <strong>DuoFern</strong> end devices (applies to item no. 3248 03 66)<br />
. . .<br />
▲<br />
In order to be able to operate a <strong>DuoFern</strong> end device with the <strong>DuoFern</strong> Standard manual transmitter,<br />
this must be registered with the <strong>DuoFern</strong> end device concerned.<br />
TIP<br />
Use a thin, not too sharp object to press the connect button.<br />
1 1 x<br />
60 seconds<br />
Switch the desired <strong>DuoFern</strong> end device or<br />
<strong>DuoFern</strong> actuator to registering mode.<br />
(see corresponding operating instructions)<br />
The LED’s from all device buttons or group<br />
buttons light up.<br />
NOTE<br />
u A fully allocated group button does not light up.<br />
u The register mode remains active for 60 seconds.<br />
EN<br />
Switch the <strong>DuoFern</strong> Standard manual transmitter to<br />
registering mode.<br />
In order to do so, briefly press the ”connect” button.
4.<br />
. . .<br />
5. 1. ... ... 4.<br />
Register <strong>DuoFern</strong> end devices (applies to item no. 3248 03 66)<br />
ADVICE 1<br />
u If a device has several channels (e.g. 2-channel actuator), you<br />
must select a group button for each channel.<br />
u In the case of devices with several channels, it will jump automatically<br />
to point 3 until all of these channels have been worked<br />
through.<br />
u If a channel should not be allocated or should be skipped over,<br />
you must press the stop button.<br />
EN<br />
Press the desired device button that you wish to use<br />
later to select the device.<br />
Observe the status LED<br />
Green: The registration was successful.<br />
Orange: The button is already fully allocated.<br />
Repeat points 1 to 4 in order to register the next<br />
device or the next actuator.<br />
ADVICE 2<br />
You can also register a device several times, e. g. to realise an<br />
individual control and a group control:<br />
- RolloTron Standard <strong>DuoFern</strong> 1 on button 1<br />
- RolloTron Standard <strong>DuoFern</strong> 2 on button 2<br />
- RolloTron Standard <strong>DuoFern</strong> 3 on button 3<br />
- RolloTron Standard <strong>DuoFern</strong> 1/2/3 on button 4<br />
Please observe the maximum possible number of devices<br />
per button (see page 35).<br />
37
38<br />
Register <strong>DuoFern</strong> end devices (applies to item no. 3248 03 61)<br />
No devices or group buttons can be selected or pressed for <strong>DuoFern</strong> Standard manual transmitter<br />
3248 03 61. The registered actuators are automatically allocated to the only existing group.<br />
NOTE<br />
u When registering actuators with several channels, all channels are always registered in the group for<br />
<strong>DuoFern</strong> Standard manual transmitter 3248 03 61 (1 group).<br />
EN
1.<br />
2.<br />
3.<br />
4.<br />
Register <strong>DuoFern</strong> end devices (applies to item no. 3248 03 61)<br />
1 x<br />
▲<br />
Switch the desired <strong>DuoFern</strong> end device or<br />
<strong>DuoFern</strong> actuator to registering mode.<br />
(see corresponding operating instructions)<br />
Switch the <strong>DuoFern</strong> Standard manual transmitter<br />
to registering mode.<br />
In order to do so, briefly press the ”connect” button.<br />
Observe the status LED<br />
Green: The registration was successful.<br />
Orange: The button is already fully allocated.<br />
EN<br />
Points 1 and 2 must be repeated for each actuator.<br />
39
1.<br />
2.<br />
3.<br />
40<br />
Delete <strong>DuoFern</strong> end devices<br />
▲<br />
1 x<br />
EN<br />
Switch desired <strong>DuoFern</strong> end devices to delete mode.<br />
(see corresponding operating instructions)<br />
Switch the <strong>DuoFern</strong> Standard manual transmitter<br />
to delete mode.<br />
In order to do so, briefly press the ”disconnect” button.<br />
If the deletion is successful the green status LED<br />
lights up.<br />
NOTE<br />
The <strong>DuoFern</strong> end device has been deleted from all device<br />
buttons or group buttons.
1.<br />
2.<br />
End point setting<br />
. . .<br />
You can subsequently set or correct the end points of connected tubular motors using this function.<br />
NOTE<br />
u The end point setting can only be adjusted when only one device (actuator) is registered within the<br />
selected group ; if more than one component is registered within the selected group then the function<br />
is blocked.<br />
u The end point setting can only be made for RADEMACHER electronic tubular motors from 2000 onwards<br />
that are controlled with a correctly installed <strong>DuoFern</strong> actuator.<br />
u The end point setting cannot be adjusted for tubular motors connected in parallel.<br />
u The function is automatically cancelled if no button is pressed for approx. 30 seconds.<br />
2 x / second<br />
Select the desired <strong>DuoFern</strong> end device.<br />
EN<br />
Activate the „end point setting” function.<br />
In order to do so, press the “disconnect” button twice in short<br />
succession within one second (similar to the double-click of<br />
a computer mouse).<br />
41
3.<br />
4.<br />
5.<br />
6.<br />
7.<br />
8.<br />
42<br />
End point setting<br />
▲<br />
EN<br />
The status LED flashes (approx. twice per second) on<br />
successful activation.<br />
Set the upper end point.<br />
Keep the button pressed until the desired end point is<br />
reached.<br />
Release the button as soon as the upper end point<br />
is reached.<br />
Set the lower end point.<br />
Release the button as soon as the lower end point<br />
is reached.<br />
Cancel end point setting.<br />
The manual transmitter returns to normal operating mode<br />
(regular flashing of the status LED is cancelled).
Reversal of rotational direction<br />
You can subsequently set or correct the rotational direction of connected tubular motors using this<br />
function.<br />
Alternative use for reversal of directional rotation:<br />
Switch over between lighting function and device function<br />
In case of universal actuators for lighting or for devices (e.g. <strong>DuoFern</strong> universal actuator or <strong>DuoFern</strong><br />
socket actuator), reversing the rotational direction switches over between the lighting function and<br />
the device function.<br />
NOTE<br />
u Reversal of rotational direction or switching over between the lighting function and the device function<br />
can only be carried out when only one device (actuator) is registered within the selected group;<br />
if more than one component is registered within the selected group then the function is blocked.<br />
u Not all devices support the reversal of rotational direction function or switchover between the lighting<br />
and device function. You should therefore check in the operating instructions of the respective device<br />
whether this function is available.<br />
u The following applies for manual transmitter 3248 03 61:<br />
If a multichannel actuator is registered (e. g. <strong>DuoFern</strong> universal actuator) then the reversal of rotational<br />
direction or switchover between the lighting and the device function is always applied to both<br />
channels.<br />
EN<br />
43
1.<br />
2.<br />
3.<br />
i)<br />
44<br />
Reversal of rotational direction<br />
. . .<br />
▲<br />
2 x / second<br />
> the actuator switches off.<br />
> the actuator switches on.<br />
▲<br />
Select the desired <strong>DuoFern</strong> end device.<br />
EN<br />
Activate the “reversal of rotational direction” function.<br />
In order to do so, press the “connect” button twice in short<br />
succession within one second (similar to the double-click<br />
of a computer mouse).<br />
If successfully activated, the tubular motor connected<br />
to the actuator confirms this by starting up<br />
for a short time.<br />
In case of universal actuators, the lighting / device<br />
switches on or off briefly to confirm activation.<br />
How to determine whether the lighting function or<br />
the device function is active:<br />
The lighting function is activated.<br />
The device function is activated.
1.<br />
Activate “purge“ function<br />
NOTE<br />
This function deletes all <strong>DuoFern</strong> end devices that are registered but that no longer react. This could be<br />
necessary, for example, in the case of a faulty device which can no longer be deleted as described above.<br />
u All battery powered <strong>DuoFern</strong> devices are not to be/cannot be deleted in this way.<br />
u To delete all DuoFer end devices from the <strong>DuoFern</strong> Standard manual transmitter, you must perform<br />
the function “Reset delete settings“ (see page 48).<br />
▲<br />
EN<br />
Press the “connect” button for approx. 5 seconds until<br />
the green status LED lights up.<br />
The <strong>DuoFern</strong> Standard manual transmitter now sends a<br />
control signal to all registered <strong>DuoFern</strong> dend devices. The<br />
devices which do not confirm the signal will be automatically<br />
deleted.<br />
Observe the status LED<br />
Green: The purge was successful<br />
Orange flashing: The purge mode is still active<br />
45
1.<br />
2.<br />
3.<br />
4.<br />
46<br />
Manual operation of actuators with several channels<br />
Manual operation<br />
. . .<br />
When registering actuators with several channels, all channels in the group are always registered for<br />
<strong>DuoFern</strong> Standard manual transmitter 3248 03 61 (1 group). Operation of single channels is therefore<br />
not possible using these manual transmitters.<br />
Press the desired device or group button<br />
(where applicable).<br />
Open the roller shutter or<br />
switch electrical consumer on/off<br />
Stop the roller shutter or<br />
switch off electrical consumer<br />
Close the roller shutter or<br />
switch electrical consumer on/off<br />
Observe the status LED<br />
Orange: Switch signal is being transmitted<br />
Green: Confirmation received<br />
EN
1.<br />
2.<br />
Controlling blinds and dimmers in jog mode<br />
Functional description of jog<br />
mode<br />
Switching jog mode on and off<br />
. . .<br />
approx. 10 s<br />
u If the UP and DOWN buttons are pressed briefly in jog mode, a jog command is transmitted. This<br />
enables convenient adjustment of Venetian blind slats, as the motor only runs briefly.<br />
u When used in combination with dimmers, jog mode causes the brightness to be increased or decreased<br />
by 10%.<br />
u If the UP and DOWN buttons are pressed for a longer duration (>1/2 second) then the normal UP and DOWN<br />
signals are transmitted. Jog mode can be switched on and off separately for each group, where applicable.<br />
. . .<br />
3 x +<br />
EN<br />
Select the desired group (1-6) with the corresponding<br />
group button, where applicable.<br />
Press and hold the STOP button for approx. 10<br />
seconds.<br />
Observe the button LED and status LED:<br />
The LED for the selected group button flashes three times<br />
and the status LED lights up:<br />
green (jog mode is switched on)<br />
orange (jog mode is switched off).<br />
NOTE Actuators which do not support jog mode will ignore jog<br />
commands.<br />
47
1.<br />
2.<br />
48<br />
Delete settings (Reset)<br />
EN<br />
Press the “disconnect” button for approx. 5 seconds<br />
until the orange status LED flashes.<br />
The status LED flashes orange<br />
Let go of the „disconnect button“ as soon as the<br />
orange status LED is permanently lit up<br />
All settings on the <strong>DuoFern</strong> Standard manual transmitter<br />
are deleted.
TD<br />
Technical Data<br />
Transmission frequency: 434,5 MHz<br />
Transmitting power: 10 mW<br />
Range:<br />
- Free field: approx. 100 m<br />
- Indoors: approx. 30 m<br />
(depending upon the building fabric)<br />
Supply voltage: 3 V<br />
Battery type: CR2450<br />
- Service life 1: approx. 2 years, if actuated 5 times per day<br />
- Service life 2:<br />
Max. number of groups:<br />
approx. 5 years, Stand-by<br />
- item no. 3248 03 66: 6<br />
- item-no. 3248 03 61:<br />
Max. number of end devices:<br />
1<br />
- Item no. 3248 03 66/3248 03 61: 48<br />
Permissible ambient temperature: + 5 °C bis + 40 °C<br />
Dimensions L x W x H: 140 x 43 x 18 mm<br />
Weight: 70 g<br />
EN<br />
49
50<br />
TD<br />
Battery change<br />
EN<br />
If the battery is almost empty, the status LED flashes orange<br />
when you operate the <strong>DuoFern</strong> Standard manual transmitter.<br />
u The battery can be found in the battery compartment on<br />
the rear of the <strong>DuoFern</strong> Standard manual transmitter.<br />
u Unfasten the rear housing with a screwdriver.<br />
u Carefully lift off the rear housing.<br />
u Push the battery out from the side.<br />
u When you insert the battery ensure that the polarity is<br />
correct. The plus connector (+) of the battery must be at<br />
the top.<br />
NOTE<br />
Empty batteries are hazardous waste and must not be<br />
disposed of with non-recyclable refuse.
i<br />
CE Mark and EC Conformity<br />
The present product complies with the requirements of the current European and national directives.<br />
1999/5/EC R&TTE directive<br />
Conformity has been verified. The corresponding declarations and documentation are available on file at the manufacturer’s<br />
premises.<br />
RADEMACHER Geräte-Elektronik GmbH&Co. KG<br />
Buschkamp 7<br />
46414 Rhede<br />
EN<br />
51
52<br />
i<br />
Warranty conditions<br />
RADEMACHER Geräte-Elektronik GmbH&Co. KG offers a 24 month guarantee for new devices that have been installed in<br />
accordance with the installation manual. The guarantee covers all design faults, material faults and fabrication faults.<br />
The guarantee does not cover:<br />
u Incorrect mounting or installation<br />
u Non-observance of the installation and operation manual<br />
u Improper operation or utilisation<br />
u External influences such as knocks, blows or weather<br />
u Repairs and modifications made by unauthorised third parties<br />
u Use of unsuitable accessory parts<br />
u Damage due to inadmissible voltage surges (e.g. caused by lightning)<br />
u Dysfunction due to superimposed radio frequencies and other radio disturbances.<br />
Any defects occurring within the period of guarantee will be rectified by RADEMACHER at no cost either by repairing or replacing<br />
the parts concerned or by delivery of a device of the same value or a new replacement. Generally the original guarantee<br />
period will not be extended because of replacement delivery or repair resulting from the guarantee.<br />
RADEMACHER<br />
Geräte-Elektronik GmbH & Co. KG<br />
Buschkamp 7<br />
46414 Rhede (Germany)<br />
info@rademacher.de<br />
www.rademacher.de<br />
Service:<br />
Hotline 01805 933-171*<br />
Fax +49 2872 933-253<br />
service@rademacher.de<br />
* 14 cents / minute from a German fixed line network operated by DT AG/<br />
Mobile charges max. 42 cents / minute (applies to Germany only)<br />
EN<br />
Subject to technical modifications, misprints and errors excepted. Illustrations not binding.