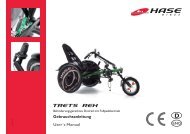
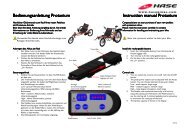
Pino Anleitung (Mit Rahmentrennung) deutsch ... - Hase Bikes
Pino Anleitung (Mit Rahmentrennung) deutsch ... - Hase Bikes
Pino Anleitung (Mit Rahmentrennung) deutsch ... - Hase Bikes

Erfolgreiche ePaper selbst erstellen
Machen Sie aus Ihren PDF Publikationen ein blätterbares Flipbook mit unserer einzigartigen Google optimierten e-Paper Software.
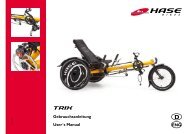
Anpassen an Körpergröße<br />
Die richtige Einstellung des <strong>Pino</strong>s ist wichtig für das Wohlbefinden<br />
und die Leistungsfähigkeit beim Fahren. Das <strong>Pino</strong> lässt<br />
sich individuell auf die Körpergröße der fahrenden Personen<br />
von ca. 1,50 bis 2,00 m Größe einstellen. Für mitfahrende Kinder<br />
ist eine zusätzliche Tretkurbel als Zubehör erhältlich.<br />
Prüfen der Sitzposition des Fahrers<br />
Setzen Sie sich auf den Sattel des <strong>Pino</strong>s mit den Füßen auf den<br />
Pedalen und mit den Ballen über der <strong>Mit</strong>te der Pedalachsen.<br />
Befindet sich eine Pedale ganz unten, dann sollte dieses Bein<br />
fast ganz ausgestreckt sein. Lässt sich das Bein nicht ausstrecken<br />
oder der Fuß erreicht nur sehr schwer die Pedale, dann<br />
müssen Sie die Höhe des Sattels neu einstellen.<br />
Die Lenkereinstellung kann variiert werden . Der Oberkörper<br />
sollte leicht nach vorne geneigt sein (bequeme Position) oder<br />
weit nach vorne geneigt sein (sportliche Position) und die Arme<br />
ausgestreckt sein.<br />
Sattel einstellen<br />
Der Sattel lässt sich in der Höhe, Neigung und Abstand zum<br />
Lenker verstellen.<br />
1. Lösen Sie den Schnellspanner (1), ziehen Sie die Sattelstütze<br />
nach oben oder schieben Sie sie in das Sitzrohr<br />
hinein.<br />
Achtung!<br />
Die Sattelstütze darf nur bis zur Markierung herausgezogen<br />
werden. Diese Markierung darf nicht sichtbar sein.<br />
Wenn sie sichtbar wird, ist die Sattelstütze zu weit herausgezogen.<br />
Es drohen Unfallgefahr und Rahmenschaden.<br />
2. Ziehen Sie den Schnellspanner (1) wieder fest.<br />
3. Lösen Sie die Schraube (2) unter dem Sattel mit einem<br />
Innensechskantschlüssel 6 mm. Der Sattel lässt sich im<br />
Winkel verstellen und nach vorne oder nach hinten verschieben.<br />
Hinweis:<br />
Bei <strong>Pino</strong> Fast ist der Sattel mit zwei Schrauben an der<br />
Sattelstütze befestigt.<br />
4. Ziehen Sie die Schraube (2) wieder fest. Um die bequemste<br />
Position zu finden sind eventuell mehrere Versuche<br />
notwendig.<br />
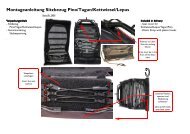
Foto Sitzposition <strong>Mit</strong>fahrer<br />
Adjusting your <strong>Pino</strong><br />
The proper adjustment of the <strong>Pino</strong> is important for riding<br />
comfort and performance. The <strong>Pino</strong> can be adjusted to fit riders<br />
between approx. 1.50 and 2.00 m (5’ and 6’7”) in height.<br />
A special pedal crank is available (accessory) for children in<br />
the front riding position.<br />
Checking the seat position of the rear rider<br />
Sit on the rear seat of the <strong>Pino</strong> with your feet on the pedals<br />
and the balls of your feet on the pedal axles. When one pedal<br />
is in the lowest position, the corresponding leg should be<br />
almost straight. If the leg cannot be straightened or the foot<br />
cannot comfortably reach the pedal, then the height of the<br />
seat must be readjusted.<br />
The position of the handlebars can also be adjusted. The upper<br />
body should lean either slightly forward (comfortable position)<br />
or far forward (sporty position), and the arms should<br />
be straight.<br />
Adjusting the seat position of the rear rider<br />
It is possible to adjust the height and angle of the seat and the<br />
distance between the seat and handlebars.<br />
1. Open the quick-release (1); adjust the seat height by pulling<br />
the seat post further out or pushing it further in.<br />
Caution!<br />
The seat post should never be extended past the minimum<br />
insertion mark. This mark should not be visible. If<br />
the mark is visible, the seat post has been extended past<br />
its minimum insertion length. Riding with an over-extended<br />
seat post can cause accidents or damage to the<br />
frame.<br />
2. Retighten the quick-release (1).<br />
3. Loosen the screw (2) beneath the seat using a 6mm Allen<br />
key. Adjust the angle and lateral position of the seat.<br />
Note:<br />
The seat of the <strong>Pino</strong> Fast is secured to the seat post with<br />
two screws.<br />
4. Retighten the screw (2). You may have to readjust the<br />
seat several times in order to find the most comfortable<br />
position.<br />
<strong>Pino</strong> 11/09-D-ENG 7<br />
1<br />
2