Pino Anleitung (Mit Rahmentrennung) deutsch ... - Hase Bikes
Pino Anleitung (Mit Rahmentrennung) deutsch ... - Hase Bikes
Pino Anleitung (Mit Rahmentrennung) deutsch ... - Hase Bikes

Erfolgreiche ePaper selbst erstellen
Machen Sie aus Ihren PDF Publikationen ein blätterbares Flipbook mit unserer einzigartigen Google optimierten e-Paper Software.
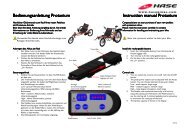
Zubehör montieren<br />
Installing accessories<br />
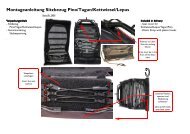
Zweibeinständer und Lowriderstrebe montieren<br />
ohne montierten Lowrider<br />
1. Stecken Sie den Halter (1) in die Bohrung und schrauben<br />
Sie ihn mit der mitgelieferten Schraube (2) mit einem<br />
Innensechskantschlüssel 3 mm fest.<br />
2. Stecken Sie die beiden mitgelieferten Schrauben (3) von<br />
innen in die Bohrung (siehe Hinweis) im Sitzblech.<br />
3. Setzen Sie den Zweibeinständer so wie im Bild gezeigt an<br />
den Hauptrahmen. Schrauben Sie mit den beiden Muttern<br />
(4) den Zweibeinständer handfest an.<br />
4. Schrauben Sie den Zweibeinständer mit den mitgelieferten<br />
Innensechskantschrauben (5) an den Halter (1) handfest<br />
an.<br />
mit montiertem Lowrider<br />
5. Entfernen Sie die Schrauben (5) und die Muttern (4).<br />
6. Setzen Sie den Zweibeinständer so wie im Bild gezeigt auf<br />
die Schrauben (3) und schrauben Sie die beiden Muttern<br />
(4) handfest an.<br />
Hinweis:<br />
Die Wahl der Bohrung hängt von der Art bzw. Länge der<br />
Gabel ab. Oberste Bohrung: starre Gabel, mittlere Bohrung:<br />
Federgabel, untere Bohrung: High-End-Federgabel.<br />
Bei einem ausgeklappten Zweibeinständer sollte sich das<br />
Vorderrad nur wenige Millimeter über dem Boden befinden.<br />
So lässt sich das belastete <strong>Pino</strong> mit dem geringsten<br />
Kraftaufwand auf- und abstellen.<br />
7. Setzen Sie den Zweibeinständer (und die zusätzliche<br />
Lowriderstrebe (6) für ein zweites Paar Taschen, falls<br />
diese montiert werden soll) so wie im Bild gezeigt an den<br />
Halter (1) und schrauben Sie ihn mit den mitgelieferten<br />
Innensechskantschrauben (5) handfest an.<br />
8. Stecken Sie die zusätzliche Lowriderstrebe (6) (falls diese<br />
montiert werden soll) in die Schelle (7) und schrauben Sie<br />
diese an den Zweibeinständer mit einem Innensechskantschlüssel<br />
5 mm fest. Positionieren Sie sie horizontal.<br />
9. Ziehen Sie alle Schrauben mit einem Innensechskantschlüssel<br />
5 mm fest an.<br />
26<br />
4 3<br />
5 1<br />
7<br />
6<br />
2<br />
Mounting the Double Kickstand and Lowrider Bars<br />
Without lowrider rack<br />
1. Insert the supports (1) in to the holes on either side of<br />
the frame and secure them with the enclosed screws (2)<br />
using a 3mm Allen key.<br />
2. Insert the two enclosed screws (3) through the hole (for<br />
choice of hole, see Note below) in the seat-mounting<br />
plate from the inside (with the head of the screw on the<br />
inside of the plate and the threads on the outside).<br />
3. Mount the Double Kickstand to the frame as shown in the<br />
picture. Attach the top mounts of the kickstand with the<br />
two nuts (4), tightening lightly at first.<br />
4. Then fasten the rear mounts of the kickstand with the<br />
enclosed Allen screws (5) screwing them lightly at first<br />
into the supports (1).<br />
With lowrider rack<br />
5. Remove the screws (5) of the middle rack mounts and the<br />
nuts (4) of the end mounts.<br />
6. Mount the Double Kickstand onto the screws (3) as<br />
shown in the picture and attach it with the two nuts (4),<br />
tightening lightly at first.<br />
Note:<br />
The kickstand can be mounted to any of the three holes<br />
in the seat-mounting plate, depending on the type and<br />
length of the fork. Use the top hole for rigid forks, the<br />
middle hole for suspension forks, and the lower hole for<br />
high-end suspension forks. When the tandem is resting<br />
on the kickstand, the front wheel should be suspended<br />
no more than a few millimeters above the ground. This<br />
positioning allows the kickstand of a loaded <strong>Pino</strong> to be<br />
engaged and disengaged with minimal effort.<br />
7. Place the rear mounts of the kickstand (and the additional<br />
Lowrider Bars (6) for an additional set of panniers, if<br />
applicable) onto the supports (1) as shown in the picture<br />
and fasten them with the enclosed Allen screws (5), tightening<br />
lightly at first.<br />
8. Insert the ends of the additional Lowrider Bars (6) (if<br />
applicable) into the clamps (7) and fasten them to the<br />
kickstand using a 5mm Allen key. Position the bar so that<br />
it is level (horizontal).<br />
9. Tighten all screws and nuts securely.<br />
<strong>Pino</strong> 11/09-D-ENG