Pino Anleitung (Mit Rahmentrennung) deutsch ... - Hase Bikes
Pino Anleitung (Mit Rahmentrennung) deutsch ... - Hase Bikes
Pino Anleitung (Mit Rahmentrennung) deutsch ... - Hase Bikes

Sie wollen auch ein ePaper? Erhöhen Sie die Reichweite Ihrer Titel.
YUMPU macht aus Druck-PDFs automatisch weboptimierte ePaper, die Google liebt.
Prüfen der Sitzposition des <strong>Mit</strong>fahrers<br />
Setzen Sie sich auf den Sitz des <strong>Pino</strong>s mit den Füßen auf den<br />
Pedalen und mit den Ballen über der <strong>Mit</strong>te der Pedalachsen.<br />
Wenn sich die Kurbeln in einer Linie mit dem Vorbau befinden,<br />
sollte ein Bein fast ganz ausgestreckt sein. Lässt sich das<br />
Bein nicht ausstrecken oder der Fuß erreicht nur sehr schwer<br />
die Pedale, dann müssen Sie die Rahmenlänge neu einstellen.<br />
Der Verstellbereich beträgt 27 cm.<br />
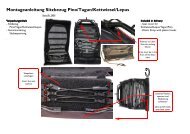
Rahmenlänge einstellen<br />
1. Lösen Sie die Innensechskantschraube zwischen Vorbau<br />
und Hauptrahmen (1) mit einem Innensechskantschlüssel<br />
6 mm.<br />
2. Lösen Sie den Kettenspanner (2), indem Sie die Klemmung<br />
am linken Sitzrohr mit einem Innensechskantschlüssel<br />
6 mm gegen den Uhrzeigersinn drehen.<br />
3. Schieben Sie den Vorbau in den Hauptrahmen oder ziehen<br />
Sie den Vorbau aus dem Rahmen heraus.<br />
Achtung!<br />
Der Vorbau darf nur bis zur Markierung, einer Bohrung<br />
auf der Oberseite des Vorbaus, herausgezogen werden.<br />
Diese Bohrung darf nicht sichtbar sein. Wenn sie sichtbar<br />
wird, ist der Vorbau zu weit herausgezogen.<br />
Es drohen Unfallgefahr und Rahmenschaden.<br />
4. Ziehen Sie die Innensechskantschraube (1) leicht an.<br />
5. Prüfen Sie die Sitzposition. Sind noch Änderungen notwendig,<br />
dann wiederholen Sie die Schritte 1 bis 4.<br />
6. Richten Sie den Vorbaus so aus, dass die Tretlagerachse<br />
waagerecht verläuft. Ziehen Sie die Innensechskantschraube<br />
(1) zwischen Vorbau und Hauptrahmen mit einem<br />
6 mm Innensechskantschlüssel mit 12 Nm fest.<br />
Achtung!<br />
Diese Schraube muss unbedingt mit 12 Nm fest angezogen<br />
werden. Bei Fahrten mit loser Schraube droht<br />
Unfallgefahr und Beschädigung des Rahmens.<br />
7. Spannen Sie die Kette, indem Sie den Kettenspanner<br />
(3) nach vorne ziehen und die Klemmung (2) am linken<br />
Sitzrohr mit einem Innensechskantschlüssel 6 mm wieder<br />
festziehen.<br />
3<br />
Anpassen an Körpergröße<br />
Adjusting your <strong>Pino</strong><br />
<strong>Pino</strong> 11/09-D-ENG 9<br />
1<br />
2<br />
Checking the seat position of the front rider<br />
Sit in the front seat of the <strong>Pino</strong> with your feet on the pedals<br />
and the balls of your feet on the pedal axles. When the crank<br />
arms are lined up with the front boom, one leg should be<br />
almost straight. If the leg cannot be straightened or the foot<br />
does not comfortably reach the pedal, then the frame length<br />
must be readjusted. The adjustment range is 27 cm (10 ½”).<br />
Adjusting the frame length<br />
1. Loosen the Allen bolt between the front boom and the<br />
main frame (1) using a 6mm Allen key.<br />
2. Loosen the chain tensioner (2) by turning the recessed<br />
clamp fitting inside the hole on the left seat tube counterclockwise<br />
using a 6mm Allen key.<br />
3. Push the front boom further into the frame tube, or pull<br />
the front boom further out of the frame.<br />
Caution!<br />
The front boom cannot be extended past the minimum<br />
insertion mark, which is a small hole located on the top<br />
of the boom. This hole should not be visible. If the hole<br />
is visible, the front boom has been extended past its<br />
minimum insertion length. Riding with an over-extended<br />
boom could cause accidents or damage to the frame.<br />
4. Tighten the Allen bolt (1) lightly.<br />
5. Check the seat position. If further adjustment is required,<br />
repeat steps 1 to 4.<br />
6. Position the front boom so that the axle of the bottom<br />
bracket is parallel to the surface of the ground. Tighten<br />
the Allen bolt (1) between the front boom and the main<br />
frame using a 6mm Allen key and a torque of 12 Nm<br />
(8.9 ft-lbs).<br />
Caution!<br />
It is absolutely necessary to tighten this bolt with a torque<br />
of 12 Nm (8.9 ft-lbs). Riding with a loose bolt poses a<br />
high risk of accident and damage to the frame.<br />
7. Tighten the chain by loosening the recessed clamp fitting<br />
inside the hole on the left seat tube using a 6mm Allen<br />
key, pulling the chain tensioner (3) forward, and retightening<br />
the clamp fitting (2).