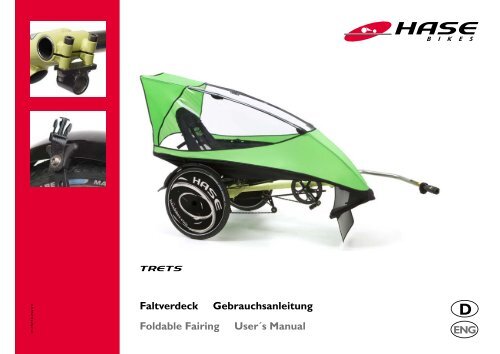
Faltverdeck Gebrauchsanleitung Foldable Fairing User ... - Hase Bikes
Faltverdeck Gebrauchsanleitung Foldable Fairing User ... - Hase Bikes
Faltverdeck Gebrauchsanleitung Foldable Fairing User ... - Hase Bikes

Sie wollen auch ein ePaper? Erhöhen Sie die Reichweite Ihrer Titel.
YUMPU macht aus Druck-PDFs automatisch weboptimierte ePaper, die Google liebt.
RV-TRETS D-ENG 5/11<br />
TRETS<br />
<strong>Faltverdeck</strong> <strong>Gebrauchsanleitung</strong><br />
<strong>Foldable</strong> <strong>Fairing</strong> <strong>User</strong>´s Manual<br />
D<br />
ENG
Seitliche Befestigung<br />
Side mount<br />
Aufgespanntes Verdeck<br />
Mounted fairing<br />
Gestänge<br />
Frame<br />
Stangengelenke<br />
Frame joints<br />
Spritzschutz<br />
Splash guard<br />
Vordere Befestigung<br />
Front mount
FALTVERDECK<br />
Inhalt<br />
Lieferumfang und Zubehör .......................................................2<br />
Sicherheitshinweise....................................................................3<br />
<strong>Gebrauchsanleitung</strong> beachten ....................................................................... 3<br />
Verwendungszweck ......................................................................................... 3<br />
Montage und Einstellung ................................................................................. 3<br />
Fahren bei Wind............................................................................................... 3<br />
Parken bei Wind .............................................................................................. 3<br />
Sichtbar sein für andere .................................................................................. 4<br />
Öffnen des <strong>Faltverdeck</strong>s ................................................................................. 4<br />
Bevor Sie losfahren... ....................................................................................... 4<br />
Technischer Zustand ....................................................................................... 4<br />
Montage ......................................................................................5<br />
Rund ums Fahren .......................................................................6<br />
<strong>Faltverdeck</strong> an Trets anbringen .................................................................... 6<br />
<strong>Faltverdeck</strong> an Trets Trike anbringen ........................................................ 8<br />
Ein- und Ausstiegen. ....................................................................................... 9<br />
Beleuchtung anbringen ..................................................................................10<br />
<strong>Faltverdeck</strong> abnehmen ..................................................................................10<br />
Reinigung und Lagerung des <strong>Faltverdeck</strong>s ................................................10<br />
Ersatzteile .................................................................................11<br />
Content<br />
Scope of delivery .......................................................................2<br />
Safety information .....................................................................3<br />
Read <strong>User</strong>’s Manual ......................................................................................... 3<br />
Intended use ...................................................................................................... 3<br />
Mounting and adjustment ............................................................................... 3<br />
Riding in windy conditions ............................................................................ 3<br />
Parking in windy conditions ........................................................................... 3<br />
Being visible for others ................................................................................... 4<br />
Caution when opening the <strong>Foldable</strong> <strong>Fairing</strong> .............................................. 4<br />
Before each ride ............................................................................................... 4<br />
Technical condition ......................................................................................... 4<br />
Mounting the fairing mounts ....................................................5<br />
Riding with the <strong>Foldable</strong> <strong>Fairing</strong> ...............................................6<br />
Mounting the <strong>Foldable</strong> <strong>Fairing</strong> to the Trets ............................................... 6<br />
Mounting the <strong>Foldable</strong> <strong>Fairing</strong> to the Trets Trike .................................... 8<br />
Mounting and dismounting ........................................................................... 9<br />
Mounting the lighting system .......................................................................10<br />
Removing the <strong>Foldable</strong> <strong>Fairing</strong> ....................................................................10<br />
Cleaning and storing the <strong>Foldable</strong> <strong>Fairing</strong> ................................................10<br />
Replacement parts ...................................................................11<br />
RV-TRETS 5/11 D-ENG 1
Lieferumfang und Zubehör<br />
Vordere Befestigung: Steckhülse<br />
Front mount: Mounting sleeve<br />
<strong>Faltverdeck</strong> mit Spritzschutz<br />
<strong>Foldable</strong> <strong>Fairing</strong> with splash guard<br />
Scope of delivery<br />
Steckschnallen und Schrauben<br />
Snap buckles and bolts<br />
x<br />
RV-TRETS 5/11 D-ENG
FALTVERDECK<br />
Sicherheitshinweise<br />
<strong>Gebrauchsanleitung</strong> beachten<br />
Lesen Sie diese <strong>Gebrauchsanleitung</strong> sorgfältig und machen<br />
Sie sich mit dem <strong>Faltverdeck</strong> praktisch vertraut. Beachten Sie<br />
ebenfalls die Trets-<strong>Gebrauchsanleitung</strong>.<br />
Verwendungszweck<br />
Das <strong>Faltverdeck</strong> darf nur an dem <strong>Hase</strong>-Anhänger Trets, sowie<br />
an dem Kinder-Trike Trets Trike verwendet werden. Bei<br />
Trets Trike darf das <strong>Faltverdeck</strong> nur im Anhängerbetrieb benutzt<br />
werden, da sonst mit Enschränkungen der Lenkung und<br />
der Sicht zu rechenen ist. Die Benutzung in Verbindung mit<br />
anderen Fahrzeugen ist nicht erlaubt. Für eventuelle Schäden<br />
übernehmen wir keine Haftung.<br />
Montage und Einstellung<br />
Ihr Fachhändler hat das <strong>Faltverdeck</strong> montiert und auf die benötigte<br />
Körpergröße eingestellt. Sollten Sie das <strong>Faltverdeck</strong><br />
selbst montieren, beachten Sie die Montageanleitung.<br />
Fahren bei Wind<br />
Ein Anhänger mit <strong>Faltverdeck</strong> bietet dem Wind eine größere<br />
Angriffsfläche an. Deshalb kann sich das Fahrverhalten bei<br />
Wind verändern. Eine Windböe könnte den Anhänger anheben,<br />
versetzen oder sogar umstoßen. Fahren Sie daher nicht<br />
bei Sturm oder starkem Wind.<br />
Parken bei Wind<br />
Bei starkem Wind empfehlen wir das <strong>Faltverdeck</strong> zum<br />
Parken abzunehmen, damit der Anhänger nicht umkippt.<br />
Wenn Sie das <strong>Faltverdeck</strong> nicht abnehmen, müssen Sie sicherstellen,<br />
dass der Anhänger nicht umkippen kann.<br />
Safety information<br />
Read <strong>User</strong>’s Manual<br />
Read this <strong>User</strong>’s Manual carefully, and familiarize yourself with<br />
the construction and function of the <strong>Foldable</strong> <strong>Fairing</strong>. Also be<br />
sure to read and observe all safety, installation, and operating<br />
instructions in the Trets <strong>User</strong>’s Manual.<br />
Intended use<br />
The <strong>Foldable</strong> <strong>Fairing</strong> can only be used with the <strong>Hase</strong> trailer<br />
Trets and the children’s trike Trets Trike. With the Trets<br />
Trike, however, the <strong>Foldable</strong> <strong>Fairing</strong> can only be used when<br />
the trike is being pulled as a trailer. For trike use, the fairing<br />
would dangerously impair steering and visibility. The use of<br />
the <strong>Foldable</strong> <strong>Fairing</strong> with other vehicles is prohibited. <strong>Hase</strong> assumes<br />
no liability for any consequential damage.<br />
Mounting and adjustment<br />
Your authorized <strong>Hase</strong> retailer has mounted the <strong>Foldable</strong> <strong>Fairing</strong><br />
and adjusted it to the appropriate passenger size. If you<br />
are mounting the <strong>Foldable</strong> <strong>Fairing</strong> yourself, be sure to follow<br />
the mounting instructions in this manual.<br />
Riding in windy conditions<br />
A trailer with a <strong>Foldable</strong> <strong>Fairing</strong> has a greater surface area,<br />
making it more susceptible to wind gusts. This can affect vehicle<br />
handling. A strong gust of wind could lift up the trailer,<br />
push it to the side, or even overturn it. For this reason, <strong>Hase</strong><br />
strongly discourages the use of the <strong>Foldable</strong> <strong>Fairing</strong> in windy<br />
conditions.<br />
Parking in windy conditions<br />
In windy conditions, <strong>Hase</strong> recommends removing the <strong>Foldable</strong><br />
<strong>Fairing</strong> when parking outdoors. Otherwise, a gust of wind<br />
could overturn the trailer. If you do not remove the <strong>Foldable</strong><br />
<strong>Fairing</strong>, then be sure to secure the trailer from tipping.<br />
RV-TRETS 5/11 D-ENG 3
Sicherheitshinweise<br />
Safety information<br />
Sichtbar sein für andere<br />
Bei Regen sind die Sichtverhältnisse in der Regel geringer.<br />
Deshalb können Sie möglicherweise von anderen Verkehrsteilnehmern<br />
schlechter gesehen werden. Fahren Sie auch am<br />
Tage mit Licht, dieses erhöht die Aufmerksamkeit der anderen<br />
Verkehrsteilnehmer. Trets und Trets Trike müssen bei<br />
Benutzung auf öffentlichen Straßen In Deutschland mit dynamobetriebenen<br />
Beleuchtung ausgestattet sein.<br />
Batteriebetriebene Rücklichter dürfen nur als Zusatz zu dynamobetriebenen<br />
Beleuchtung benutzt werden. Batteriebetriebene<br />
Rücklichter sind nach StVZO nur für Sporträder unter<br />
11 kg Gewicht erlaubt. Für die Benutzung in anderen Staaten<br />
beachten Sie die örtlichen Verkehrsregeln und Gesetze.<br />
Öffnen des <strong>Faltverdeck</strong>s<br />
Lösen Sie die seitlichen Steckschnallen des <strong>Faltverdeck</strong>s nur<br />
vorsichtig. Das <strong>Faltverdeck</strong> könnte sich durch die Spannung<br />
des Gestänges plötzlich entfalten und möglicherweise Personen<br />
in der Nähe verletzen. Achten Sie darauf, dass sich keine<br />
Personen in unmittelbarer Nähe befinden.<br />
Bevor Sie losfahren...<br />
Kontrollieren Sie das <strong>Faltverdeck</strong> auf eine korrekte Befestigung.<br />
Ein nicht korrekt befestigtes <strong>Faltverdeck</strong> könnte sich<br />
während der Fahrt öffnen und andere Verkehrsteilnehmer<br />
verletzen oder Unfälle verursachen.<br />
Technischer Zustand<br />
Fahren Sie stets nur mit einem technisch einwandfreien und<br />
korrekt befestigtem <strong>Faltverdeck</strong>. Führen Sie vor jeder Fahrt<br />
eine Sichtprüfung auf eventuelle Schäden durch.<br />
4<br />
Being visible for others<br />
Visibility is generally poor in wet weather. Therefore, it may<br />
be more difficult for other road users to see you. <strong>Hase</strong> recommends<br />
riding with your lights on in wet weather to make it<br />
easier for other road users to see you. In Germany, the Trets<br />
and Trets Trike must be equipped with a dynamo-powered<br />
lighting system when used on public roads.<br />
Battery-powered taillights can only be used in addition to dynamo-powered<br />
lighting. According to the German road traffic<br />
regulations (StVZO), battery-powered taillights can only be<br />
used with sports bikes weighing less than 11 kg ( 4 lbs). For<br />
use in other countries, please observe local traffic laws and<br />
regulations.<br />
Caution when opening the <strong>Foldable</strong> <strong>Fairing</strong><br />
Use caution when releasing the buckle on the side mount of<br />
the <strong>Foldable</strong> <strong>Fairing</strong>. The frame tension could cause the fairing<br />
to spring open, potentially injuring bystanders. Be sure that no<br />
one is standing near the fairing before you release the buckle.<br />
Before each ride<br />
Check the <strong>Foldable</strong> <strong>Fairing</strong> to ensure that it has been mounted<br />
correctly and cannot open while riding. A fairing that<br />
comes open during the ride could injure you or other road<br />
users or cause accidents.<br />
Technical condition<br />
The <strong>Foldable</strong> <strong>Fairing</strong> should only be used if it is in perfect<br />
technical condition and has been mounted properly. Before<br />
each trip, be sure to check the condition of the fairing and vehicle<br />
for possible faults or damage.<br />
RV-TRETS 5/11 D-ENG
FALTVERDECK<br />
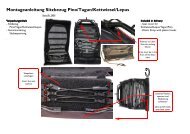
Montage<br />
Im Lieferumfang befindet sich das <strong>Faltverdeck</strong>, zwei Steckschnallen<br />
und eine Steckhülse. Die beiden Steckschnallen (1)<br />
werden an den hinteren Schutzblechstreben und die Steckhülse<br />
( ) an der Deichselklemmung befestigt.<br />
Achtung!<br />
Die Montage muss fachgerecht durchgeführt werden.<br />
Lassen Sie deshalb das <strong>Faltverdeck</strong> von einer Fachwerkstatt<br />
montieren. Fehlerhafte Montage oder Einstellungen<br />
können zu Unfällen führen..<br />
1. Schrauben Sie die vorhandene Schraube (3) der hinteren<br />
Schutzblechklemme (4) mit einem Torx TX 5-Schlüssel<br />
heraus.<br />
. Schrauben Sie das mitgelieferte Band der Steckschnalle<br />
(1) mit der mitgelieferten Schraube (5) und der Unterlegscheibe<br />
(6) an die Schutzblechklemme (4), an die Stelle wo<br />
Sie die Schraube ( 3) entfernt haben.<br />
3. Schrauben Sie das zweite Band mit der Steckschnalle auf<br />
die gleiche Weise an die hintere Schutzblechstrebe auf<br />
der anderen Seite des Fahrzeugs.<br />
4. Markieren Sie (z.B. mit einem Bleistift oder einem<br />
wasserlöslichen Filzstift) die Stellung der Deichsel an der<br />
Deichselklemmung und der Deichsel.<br />
5. Schrauben Sie die beiden Klemmschrauben (7) der Deichselbefestigung<br />
mit einem Innensechskantschlüssel 6 mm<br />
heraus.<br />
6. Stecken Sie die beiden mitgelieferten längeren Schrauben<br />
(7) von oben in die Bohrungen der Deichselklemmung.<br />
Schrauben Sie anschließend die Steckhülse ( ) von<br />
unten mit den beiden Klemmschrauben (7) und Muttern<br />
(9) handfest an die Deichselklemmung.<br />
7. Richten Sie die Deichsel mit Hilfe der vorher angebrachten<br />
Markierung an der Deichselklemmung und der<br />
Deichsel aus. Beachten Sie auch Kapitel: „Deichsel einstellen“<br />
in der Trets-<strong>Gebrauchsanleitung</strong>.<br />
8. Ziehen Sie die beiden Klemmschrauben (7) mit 1 Nm<br />
fest.<br />
4<br />
3<br />
8<br />
7<br />
RV-TRETS 5/11 D-ENG 5<br />
1<br />
6<br />
7<br />
5<br />
1<br />
Mounting the fairing mounts<br />
The <strong>Foldable</strong> <strong>Fairing</strong> comes with two snap buckles and one<br />
mounting sleeve. The two snap buckles (1) are mounted to<br />
the rear fender stays, and the mounting sleeve ( ) is fastened<br />
to the drawbar attachment socket.<br />
Caution!<br />
The fairing mounts must be mounted properly. Therefore,<br />
<strong>Hase</strong> recommends having a qualified bicycle mechanic<br />
mount the <strong>Foldable</strong> <strong>Fairing</strong> hardware. An improperly<br />
mounted or adjusted fairing can cause accidents.<br />
1. Unscrew the bolt (3) of the rear fender stay (4) using a<br />
TX 5 torx key.<br />
. Screw the bolt (5) with the strap of the snap buckle (1)<br />
and washer (6) (all hardware included with the fairing)<br />
into the fender clip (4) in place of the removed bolt (3).<br />
3. Repeat steps 1 and for the second strap with snap<br />
buckle, mounting it to the rear fender stay on the other<br />
side of the trailer.<br />
4. Record the position of the drawbar by making a mark<br />
across the edge of the drawbar tube and drawbar attachment<br />
socket (using a pencil or non-permanent marker) as<br />
shown.<br />
5. Unscrew the two clamp bolts (7) of the drawbar attachment<br />
socket using a 6mm Allen key.<br />
6. Insert the two longer bolts (7) (included with the fairing)<br />
from above into the holes of the drawbar attachment<br />
socket. Then attach the mounting sleeve ( ) from below<br />
to the two clamp bolts (7) by tightening the nuts (8) with<br />
light hand pressure.<br />
7. Return the drawbar to its original position by aligning the<br />
marks on the drawbar attachment socket and drawbar<br />
tube. See the section “Adjusting the drawbar” in the Trets<br />
<strong>User</strong>’s Manual.<br />
8. Now tighten the two clamp bolts (7) with a torque of 1<br />
Nm (8.9 ft-lbs).
Rund ums Fahren<br />
<strong>Faltverdeck</strong> an Trets anbringen<br />
Das Gestänge des faltverdecks ist mit Hilfe von Gelenken<br />
3-fach gefaltet.<br />
1. Drücken Sie den Knopf am Snap Button (1) des <strong>Faltverdeck</strong>s<br />
und stecken Sie das Steckrohr ( ) in die montierte<br />
Steckhülse (3) an der Deichselklemmung. Verdrehen Sie<br />
das Steckrohr ( ) des <strong>Faltverdeck</strong>s bis der Snap Button (4)<br />
in der Steckhülse (3) einrastet.<br />
6<br />
. Fächern Sie das <strong>Faltverdeck</strong> zu beiden Seiten auseinander.<br />
3. Klappen Sie das <strong>Faltverdeck</strong> an den unteren Gelenken (5)<br />
nach oben auseinander.<br />
1<br />
5<br />
4<br />
3<br />
Riding with the <strong>Foldable</strong> <strong>Fairing</strong><br />
Mounting the <strong>Foldable</strong> <strong>Fairing</strong> to the Trets<br />
The frame is folded three ways by means of frame joints.<br />
1. Compress the head of the Snap Button (1) on the <strong>Foldable</strong><br />
<strong>Fairing</strong> extension rod ( ); then insert the extension<br />
rod ( ) into the mounting sleeve (3) on the drawbar<br />
attachment socket. Rotate the extension rod ( ) of the<br />
<strong>Foldable</strong> <strong>Fairing</strong> until the lower pin of the Snap Button (4)<br />
engages in the hole of the mounting sleeve (3).<br />
. Hold the outer edges of the fairing frame, and spread the<br />
fairing apart as shown.<br />
3. Unfold the fairing at the lower frame joints (5), opening it<br />
upwards.<br />
RV-TRETS 5/11 D-ENG
FALTVERDECK<br />
4. Klappen Sie das <strong>Faltverdeck</strong> an den oberen Gelenken (6)<br />
nach oben auseinander und ziehen Sie beide Seiten zum<br />
Sitz hin.<br />
Hinweis:<br />
Das <strong>Faltverdeck</strong> wird am hinteren Teil des Anhängers an<br />
den Schutzblechstreben mit Steckschnallen befestigt, die<br />
aus zwei Teilen bestehen. Ein Teil befindet sich am <strong>Faltverdeck</strong><br />
(7), das andere an der Schutzblechstrebe (8).<br />
5. Sollten sich die beiden Teile der Steckschnallen nicht in<br />
einer Linie befinden, dann verschieben Sie das obere Teil<br />
(7) an die benötigte Position.<br />
6. Stecken Sie das untere Teil (8) in das obere Teil (7) der<br />
Steckschnalle.<br />
7<br />
8<br />
6<br />
Rund ums Fahren<br />
Riding with the <strong>Foldable</strong> <strong>Fairing</strong><br />
4. Unfold the fairing at the upper frame joints (6), opening it<br />
upwards and pulling both sides out toward the seat.<br />
Note:<br />
The <strong>Foldable</strong> <strong>Fairing</strong> is attached to the rear of the trailer<br />
by means of two-part snap buckles on the rear fender<br />
stays. One part of the snap buckle is attached to the<br />
<strong>Foldable</strong> <strong>Fairing</strong> (7), and the other part is mounted to the<br />
fender stay (8).<br />
5. If the two parts of the snap buckle are not aligned correctly,<br />
then slide the upper part (7) into the correct position.<br />
6. Close the snap buckle by inserting the lower part (8) into<br />
the upper part (7).<br />
RV-TRETS 5/11 D-ENG 7
Rund ums Fahren<br />
Riding with the <strong>Foldable</strong> <strong>Fairing</strong><br />
7. Befestigen Sie den Spritzschutz (9), indem Sie die „Tenax“-Stecker<br />
(11), die sich am Spritzschutz befinden, auf<br />
die am Gestänge (10) angebrachten „Tenax“-Köpfe (1 )<br />
drücken.<br />
8<br />
Hinweis:<br />
Zum Schließen werden die Stecker einfach auf die Köpfe<br />
gedrückt. (Bild A)<br />
Zum Öffnen werden die Stecker leicht angehoben (Bild B).<br />
<strong>Faltverdeck</strong> an Trets Trike anbringen<br />
Achtung!<br />
Das <strong>Faltverdeck</strong> dürfen Sie bei einem Trets Trike nur<br />
dann benutzen, wenn Sie es als Anhänger betreiben. Bei<br />
Benutzung an einem Trike wäre die Lenkung eingeschränkt<br />
und die Sicht nicht ausreichend. Dieses könnte<br />
zu Unfällen führen.<br />
Wie Sie ein Trets Trike zu einem Anhänger umfunktionieren<br />
finden Sie in der <strong>Gebrauchsanleitung</strong> des Trets Trike im Kapitel<br />
„Deichsel montieren“.<br />
1. Bauen Sie das Vorderrad aus. Dieses können Sie mit<br />
einem Spanngurt an der Rückseite der Sitzlehne anbringen.<br />
Stellen Sie die Deichsel ein (Beachten Sie die Trets-<br />
<strong>Gebrauchsanleitung</strong>).<br />
. Führen Sie die Anweisungen 1 bis 6 auf Seite 6 und 7 aus.<br />
3. Stecken Sie die Gabel (1) des Trets Trikes durch die<br />
Öffnungen ( ) im unteren Teil des <strong>Faltverdeck</strong>s.<br />
4. Befestigen Sie den Spritzschutz (9), indem Sie die „Tenax“-Stecker<br />
(11), die sich am Spritzschutz befinden, auf<br />
die am Gestänge (10) angebrachten „Tenax“-Köpfe (1 )<br />
drücken.<br />
Achtung!<br />
Wenn Sie den Trets Trike-Anhänger in Verbindung mit<br />
einem Kettwiesel mit Tandemkupplung nutzen, beachten<br />
Sie, dass die Lenkung des Trets Trike-Anhängers eingeschränkt<br />
wird. Fahren Sie daher keine engen Kurven.<br />
Unfallgefahr!<br />
9<br />
11<br />
A<br />
1<br />
10 B<br />
9<br />
1<br />
7. Attach the splash guard (9) by pressing the Tenax buttons<br />
(11) of the splash guard onto the Tenax studs (1 ) attached<br />
to frame (10) of the fairing.<br />
Note:<br />
Tenax fasteners can be locked into place by simply pressing<br />
the button onto the stud. (Fig. A)<br />
To release the fasteners, gently pull up on the button.<br />
(Fig. B).<br />
Mounting the <strong>Foldable</strong> <strong>Fairing</strong> to the Trets Trike<br />
Caution!<br />
Only the trailer version of the Trets Trike can be used with<br />
the <strong>Foldable</strong> <strong>Fairing</strong>. If a child were to attempt to ride the<br />
trike version of the Trets with the mounted fairing, the<br />
steering would be severely impaired, and the rider’s vision,<br />
inadequate for safe riding. This could cause accidents.<br />
See the section “Mounting the drawbar” in the <strong>User</strong>’s Manual<br />
of the Trets Trike for instructions on converting the trike to<br />
a trailer.<br />
1. Remove the front wheel. The wheel can be strapped to<br />
the back of the seat for transport, using a strap or bungee<br />
cord. Adjust the drawbar to the proper position (refer to<br />
Trets <strong>User</strong>’s Manual).<br />
. Mount the <strong>Foldable</strong> <strong>Fairing</strong> as described on pages 6 and 7<br />
of this manual (steps 1 through 6).<br />
3. Insert the fork (1) of the Trets Trike through the openings<br />
( ) in the lower section of the <strong>Foldable</strong> <strong>Fairing</strong>.<br />
4. Secure the splash guard (9) by pressing the Tenax buttons<br />
(11) of the splash guard (9) onto the Tenax studs (1 )<br />
attached to frame (10) of the fairing.<br />
Caution!<br />
If you are pulling the Trets Trike as a trailer behind a<br />
Kettwiesel using a tandem coupling, keep in mind that<br />
the steering of the Trets Trike trailer is restricted; be sure<br />
to avoid tight curves. Risk of accidents!<br />
RV-TRETS 5/11 D-ENG
FALTVERDECK<br />
Ein- und Ausstiegen.<br />
1. Lösen Sie die beiden Teile der Steckschnalle (1) auseinander<br />
und heben Sie die gelöste Seite des <strong>Faltverdeck</strong>s nach<br />
oben.<br />
Achtung!<br />
Lösen Sie die seitliche Befestigung des <strong>Faltverdeck</strong>s vorsichtig.<br />
Das <strong>Faltverdeck</strong> könnte sich durch die Spannung<br />
des Gestänges plötzlich entfalten und möglicherweise<br />
Personen in der Nähe verletzen. Achten Sie darauf, dass<br />
sich keine Personen in unmittelbarer Nähe befinden.<br />
Hinweis!<br />
Zum Ein- und Aussteigen, beachten Sie auch die<br />
Gabrauchsanleitung des Trets.<br />
. Ziehen Sie das Seil zwischen Lenkervorbau und dem Steuerlager<br />
ein wenig zu sich. Die Arretierung gibt nach.<br />
3. Schwenken Sie den Lenker zum leichteren Einstieg nach<br />
vorne.<br />
4. Schwenken Sie den Lenker zurück in die Fahrposition. Er<br />
rastet automatisch ein.<br />
5. Führen Sie die gelöste Seite des <strong>Faltverdeck</strong>s nach unten<br />
und drücken Sie die beiden Teile der Steckschnalle (1)<br />
ineinander.<br />
6. Vergewissern Sie sich, dass die Befestigung des <strong>Faltverdeck</strong>s<br />
fest sitzt.<br />
Achtung!<br />
Kontrollieren Sie das <strong>Faltverdeck</strong> auf eine korrekte<br />
Befestigung, damit es sich während der Fahrt nicht öffnen<br />
kann. Fahren mit losem <strong>Faltverdeck</strong> kann zu Unfällen<br />
führen.<br />
7. Jetzt können Sie losfahren.<br />
Zum Aussteigen gehen Sie umgekehrt vor.<br />
RV-TRETS 5/11 D-ENG 9<br />
1<br />
1<br />
Rund ums Fahren<br />
Riding with the <strong>Foldable</strong> <strong>Fairing</strong><br />
Mounting and dismounting<br />
1. Open the snap buckle (1) on one side of the <strong>Foldable</strong><br />
<strong>Fairing</strong>, and raise the opened side.<br />
Caution!<br />
Use caution when releasing the buckle on the side mount<br />
of the <strong>Foldable</strong> <strong>Fairing</strong>. The frame tension could cause the<br />
fairing to spring open, potentially injuring bystanders. Be<br />
sure that no one is standing near the fairing before you<br />
release the buckle.<br />
Note:<br />
When mounting and dismounting, be sure to follow the<br />
instructions given in the <strong>User</strong>’s Manual of the Trets.<br />
. Pull the wire cable between the stem and the headset to<br />
unlock the locking mechanism.<br />
3. Lift the handlebar stem to make additional space for<br />
mounting.<br />
4. After you have mounted the trike, lower the handlebar<br />
stem to lock it back into place.<br />
5. Pull down the opened side of the <strong>Foldable</strong> <strong>Fairing</strong> and<br />
close the snap buckle (1).<br />
6. Check to make sure that the fairing is securely mounted.<br />
Caution!<br />
Check the <strong>Foldable</strong> <strong>Fairing</strong> to make sure it is securely<br />
mounted. A loose fairing could come open while you are<br />
riding and cause accidents.<br />
7. Now you are ready to ride.<br />
Follow these instructions in the reverse order for dismounting.
Rund ums Fahren<br />
Riding with the <strong>Foldable</strong> <strong>Fairing</strong><br />
Beleuchtung anbringen<br />
Damit Sie und Ihr Kind sicher unterwegs sein können, müssen<br />
Trets und Trets Trike bei Benutzung auf öffentlichen Straßen<br />
mit dynamobetriebenen Beleuchtung ausgestattet sein. Zusätzlich<br />
dazu, ist am Heck des <strong>Faltverdeck</strong>s eine Möglichkeit<br />
für die Befestigung eines zusätzlichen, steckbaren, batteriebetriebenen<br />
Rücklichts vorgesehen.<br />
10<br />
Achtung!<br />
Batteriebetriebene Rücklichter dürfen nur als Zusatz<br />
zu dynamobetriebenen Beleuchtung benutzt werden.<br />
Batteriebetriebene Rücklichter sind nach StVZO nur<br />
für Sporträder unter 11 kg erlaubt. Für die Benutzung<br />
in anderen Staaten beachten Sie die örtlichen Verkehrsregeln<br />
und Gesetze.<br />
<strong>Faltverdeck</strong> abnehmen<br />
Wenn Sie das <strong>Faltverdeck</strong> abnehmen möchten, gehen Sie<br />
umgekehrt vor wie im Kapitel „<strong>Faltverdeck</strong> anbringen“ auf<br />
Seite 6 bis 8.<br />
Hinweis:<br />
Am leichtesten geht es, wenn Sie beide Steckschnallen<br />
gleichzeitig lösen. Fächern Sie das <strong>Faltverdeck</strong> auf und<br />
legen Sie es dann zusammen.<br />
Reinigung und Lagerung des <strong>Faltverdeck</strong>s<br />
Reinigen Sie das <strong>Faltverdeck</strong> nur mit reinem Wasser. Benutzen<br />
Sie am besten einen feuchten Lappen. Verwenden Sie keine<br />
Reinigungsmittel, da sich sonst die Imprägnierung des Materials<br />
lösen könnte. Obwohl sich die Stoffhülle vom Gestänge<br />
abnehmen lässt, dürfen Sie sie nicht in einer Waschmaschine<br />
waschen. Hier könnte ebenfalls die Imprägnierung beschädigt<br />
werden. Verwenden Sie keinen Hochdruckreiniger.<br />
Lagern Sie das <strong>Faltverdeck</strong> nur trocken, um Schimmelbildung<br />
zu vermeiden. Falls das <strong>Faltverdeck</strong> nach einer Fahrt noch<br />
feucht sein sollte, lassen Sie es ausgebreitet an einem trocknen<br />
Ort trocknen.<br />
Mounting the lighting system<br />
When used on public roads, the Trets and Trets Trike should<br />
be equipped with a dynamo-powered lighting system to ensure<br />
safety for you and your child. There is also a place on the<br />
rear of the <strong>Foldable</strong> <strong>Fairing</strong> for the attachment of an additional<br />
clip-on, battery-powered taillight.<br />
Caution!<br />
In Germany, battery-powered taillights can only be used<br />
in addition to dynamo-powered lighting. According to the<br />
German road traffic regulations (StVZO), the use of a<br />
battery-powered taillight without an additional dynamopowered<br />
taillight is only permitted on sports bikes weighing<br />
less than 11 kg (24 lbs). For use in other countries,<br />
please observe local traffic laws and regulations.<br />
Removing the <strong>Foldable</strong> <strong>Fairing</strong><br />
To remove the <strong>Foldable</strong> <strong>Fairing</strong>, refer to the section “Mounting<br />
the <strong>Foldable</strong> <strong>Fairing</strong>” on pages 6 to 8, and follow the steps<br />
in the reverse order.<br />
Note:<br />
The easiest way to remove the fairing is to release both<br />
snap buckles at the same time. Fan out the fairing, and<br />
then fold it.<br />
Cleaning and storing the <strong>Foldable</strong> <strong>Fairing</strong><br />
Use only clean, clear water for cleaning the <strong>Foldable</strong> <strong>Fairing</strong>,<br />
ideally with a damp cloth. Do not use cleaning agents, as these<br />
could damage the impregnation of the material. The fabric itself<br />
can be removed from the frame of the fairing. However, it<br />
cannot be washed in a washing machine. This could also damage<br />
the impregnation. Do not use a pressure washer.<br />
In order to avoid problems with mold and mildew, make sure<br />
the <strong>Foldable</strong> <strong>Fairing</strong> is completely dry before storing. If the<br />
<strong>Foldable</strong> <strong>Fairing</strong> is still wet or damp when removed from the<br />
trike, spread the fairing out on a clean, dry surface and allow<br />
it to dry completely before packing it away.<br />
RV-TRETS 5/11 D-ENG
FALTVERDECK<br />
Ersatzteile<br />
3<br />
Position Bezeichnung Art.-Nr. Anzahl<br />
1 Stangenaufnahme 365 6<br />
Snap Button 3649 1<br />
3 Sechs-Achsen-Gelenk, Alu 3634 1<br />
4 Stangengelenk 365 6<br />
5 Trets Befestigung vorne 3901 1<br />
6 Tenax-Verschluss, Oberteil 3790<br />
7<br />
Tenax-Verschluss, Gewindeschraube<br />
M5x10<br />
3791<br />
8 Steckschnalle 4366<br />
9 Stange 364 1<br />
Stoffbespannung (ohne Abbildung) 3897 1<br />
1<br />
4<br />
9<br />
Replacement parts<br />
RV-TRETS 5/11 D-ENG 11<br />
5<br />
6<br />
7<br />
Position Description Art. No Number<br />
8<br />
1 Rod holder 365 6<br />
Snap Button 3649 1<br />
3 Aluminum 6-axis joint 3634 1<br />
4 Frame joint 365 6<br />
5 Trets Mounting sleeve, front 3901 1<br />
6 Tenax fastener, top part 3790<br />
7 Tenax fastener, threaded bolt M5x10 3791<br />
8 Snap buckle 4366<br />
9 Rod 364 1<br />
Fabric covering (not pictured) 3897 1
Ersatzteile<br />
Replacement parts<br />
1<br />
RV-TRETS 5/11 D-ENG
erstellt von:<br />
Technische Dokumentation<br />
www.technik-transparent.de<br />
<strong>Hase</strong> Spezialräder · Hiberniastraße 2 · 45731 Waltrop · Germany · Phone ++49 (0) 23 09 / 93 77-0 · Fax ++49 (0) 23 09 / 93 77-201 · info@hasebikes.com · www.hasebikes.com