Pino Kindertrettlager Anleitung deutsch-englisch (PDF ... - Hase Bikes
Pino Kindertrettlager Anleitung deutsch-englisch (PDF ... - Hase Bikes
Pino Kindertrettlager Anleitung deutsch-englisch (PDF ... - Hase Bikes

Erfolgreiche ePaper selbst erstellen
Machen Sie aus Ihren PDF Publikationen ein blätterbares Flipbook mit unserer einzigartigen Google optimierten e-Paper Software.
Kindertretlager <strong>Pino</strong><br />
Kindertretlager<br />
Kindertretlager<br />
Kindertretlager<br />
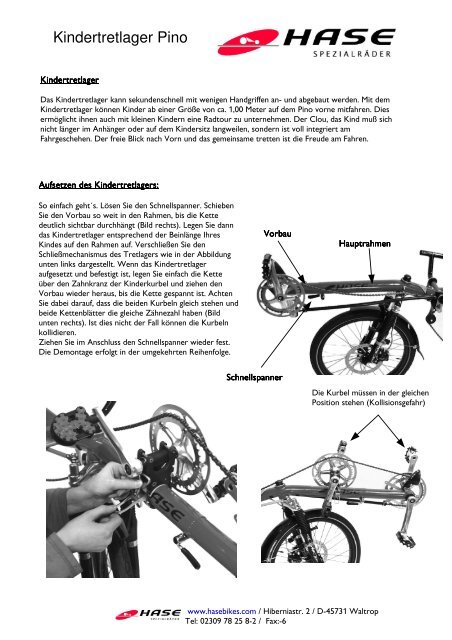
Das Kindertretlager kann sekundenschnell mit wenigen Handgriffen an- und abgebaut werden. Mit dem<br />
Kindertretlager können Kinder ab einer Größe von ca. 1,00 Meter auf dem <strong>Pino</strong> vorne mitfahren. Dies<br />
ermöglicht ihnen auch mit kleinen Kindern eine Radtour zu unternehmen. Der Clou, das Kind muß sich<br />
nicht länger im Anhänger oder auf dem Kindersitz langweilen, sondern ist voll integriert am<br />
Fahrgeschehen. Der freie Blick nach Vorn und das gemeinsame tretten ist die Freude am Fahren.<br />
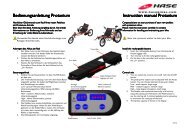
Aufsetzen Aufsetzen des des Kindertretlagers:<br />
Kindertretlagers:<br />
So einfach geht´s. Lösen Sie den Schnellspanner. Schieben<br />
Sie den Vorbau so weit in den Rahmen, bis die Kette<br />
deutlich sichtbar durchhängt (Bild rechts). Legen Sie dann<br />
das Kindertretlager entsprechend der Beinlänge Ihres<br />
Kindes auf den Rahmen auf. Verschließen Sie den<br />
Schließmechanismus des Tretlagers wie in der Abbildung<br />
unten links dargestellt. Wenn das Kindertretlager<br />
aufgesetzt und befestigt ist, legen Sie einfach die Kette<br />
über den Zahnkranz der Kinderkurbel und ziehen den<br />
Vorbau wieder heraus, bis die Kette gespannt ist. Achten<br />
Sie dabei darauf, dass die beiden Kurbeln gleich stehen und<br />
beide Kettenblätter die gleiche Zähnezahl haben (Bild<br />
unten rechts). Ist dies nicht der Fall können die Kurbeln<br />
kollidieren.<br />
Ziehen Sie im Anschluss den Schnellspanner wieder fest.<br />
Die Demontage erfolgt in der umgekehrten Reihenfolge.<br />
Vorbau Vorbau<br />
Vorbau<br />
Schnellspanner<br />
Schnellspanner<br />
Schnellspanner<br />
Hauptrahmen<br />
Hauptrahmen<br />
Hauptrahmen<br />
Die Kurbel müssen in der gleichen<br />
Position stehen (Kollisionsgefahr)<br />
www.hasebikes.com / Hiberniastr. 2 / D-45731 Waltrop<br />
Tel: 02309 78 25 8-2 / Fax:-6
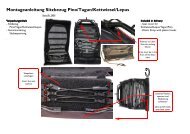
Kindertretlager <strong>Pino</strong> Montage<br />
Lieferumfang:<br />
Lieferumfang:<br />
Trettlager, Schleifblock<br />
Führungsbügel und Anschnallgurt<br />
Vorbereitende Vorbereitende Vorbereitende Arbeiten: Arbeiten:<br />
Arbeiten:<br />
Um Ihr <strong>Pino</strong> auf das Kindetretlager vorzubereiten, müssen Sie<br />
das obere der beiden Teflonrohre entfernen. Dazu müssen mit<br />
einem 8mm Schlüssel die Mutter der Teflonrohrklemme<br />
abschrauben. Dann muß die Kette geöffnet werden. Hierzu wird<br />
ein Kettennieter benötigt. Lassen Sie die Arbeit ggf. von Ihrem<br />
Fachhändler durchführen. Entfernen Sie das Teflonrohr und<br />
verschließen Sie die Kette sorgfältig.<br />
Ihr <strong>Pino</strong> ist nun soweit vorbereitet , dass das Kindertretlager<br />
jederzeit und ohne Werkzeug an und abgebaut werden kann.<br />
Bügel Bügel<br />
Bügel<br />
Ausschließliche Ausschließliche Nutzung Nutzung des des <strong>Kindertrettlager</strong>s:<br />
<strong>Kindertrettlager</strong>s:<br />
Schleifblock<br />
Schleifblock<br />
Rollen<br />
Rollen<br />
5 5 mm mm Mutter<br />
Mutter<br />
Bei Bei Bei Bei längeren längeren längeren längeren Touren Touren Touren Touren oder oder oder oder ausschließlicher ausschließlicher ausschließlicher ausschließlicher Nutzung Nutzung Nutzung Nutzung des des des des <strong>Kindertrettlager</strong>s <strong>Kindertrettlager</strong>s <strong>Kindertrettlager</strong>s <strong>Kindertrettlager</strong>s empfielt empfielt empfielt empfielt es es es es<br />
sich, sich, sich, sich, die die die die Kette Kette Kette Kette nicht nicht nicht nicht über über über über den den den den Schleifblock, Schleifblock, Schleifblock, Schleifblock, sondern sondern sondern sondern unter unter unter unter der der der der Rolle Rolle Rolle Rolle entlang entlang entlang entlang zu zu zu zu legen. legen. legen. legen.<br />
der der der der Gebrauch Gebrauch Gebrauch Gebrauch ohne ohne ohne ohne das das das das <strong>Kindertrettlager</strong> <strong>Kindertrettlager</strong> <strong>Kindertrettlager</strong> <strong>Kindertrettlager</strong> ist ist ist ist dann dann dann dann allerdings allerdings allerdings allerdings ausgeschlossen.<br />
ausgeschlossen.<br />
ausgeschlossen.<br />
ausgeschlossen.<br />
Schrauben Sie den Kettenführungsbügel an das<br />
Steuersatzrohr und vergewissern sie sich, ob Rollen<br />
und Führung in einer Linie zueinander Stehen. Somit<br />
ist gewärleistet das die Kette weiterhin gerade läuft.<br />
Desweiteren muß der Schleifblock montiert<br />
werden, dazu muß der komplette Sitz entfehrt<br />
werden um den Block auf die Querstrebe des<br />
Rahmens zu schieben.<br />
www.hasebikes.com / Hiberniastr. 2 / D-45731 Waltrop<br />
Tel: 02309 78 25 8-2 / Fax:-6
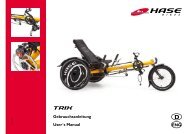
Kidsbottom bracket<br />
<strong>Pino</strong><br />
Kids Kids Kids bottom bottom bottom bracket bracket<br />
bracket<br />
In order to prepare your <strong>Pino</strong> for the Kids bottom bracket you must remove the upper of the two<br />
teflon pipes. Therefore you have to remove the teflon tubing clamp with a 8mm. Then the chain must<br />
be opened. For this a Chaintool is needed. If necessary let the work be done by your specialist dealer.<br />
Remove the teflon pipe and tighten the chain carefully again. Your <strong>Pino</strong> is now prepared for the Kids<br />
bottom bracket can be taken on and off at any time without tools.<br />
Put Put the the Kids Kids Kids bottom bottom bracket bracket on on: on<br />
Loosen the quick-release. Push the front boom in, until<br />
the chain visibly sags (picture right). Put the Kids bottom<br />
bracket on according to the leg length of your child. Lock<br />
the quick releases as shown in the illustration at the<br />
bottom left hand corner. If the Kids bottom bracket is<br />
attached, simply put the chain on the child crank and pull<br />
the front boom out again, until the chain is strained. Make<br />
sure that the two cranks are parallel and the number of<br />
theeth of the two chainrings are the same. (picture lower<br />
right). Tighten the the quick-release fastener again.<br />
The disassembly takes place in the reverse order: loosen<br />
the quick release, take off the kids bottom bracket, pull<br />
out the front boom and close the quick release again.<br />
Quickrelease<br />
Quickrelease<br />
Front Front Front boom boom<br />
boom<br />
Mainframe Mainframe<br />
Mainframe<br />
The Crank has to be in the same Position<br />
to avoid that they collide<br />
www.hasebikes.com / Hiberniastr. 2 / D-45731 Waltrop<br />
Tel: 02309 78 25 8-2 / Fax:-6
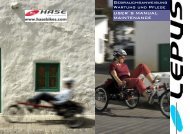
Kidsbottom bracket <strong>Pino</strong><br />
Installation<br />
Delivery:<br />
Delivery:<br />
Bottom bracket, deflector plate,<br />
shackle and suspender belt<br />
( these should be in the delivery)<br />
Preparing Preparing Preparing the the the <strong>Pino</strong> <strong>Pino</strong> <strong>Pino</strong> for for for the the the kids kids kids bb: bb:<br />
bb:<br />
In order to prepare your <strong>Pino</strong> for the Kids bottom bracket you<br />
must remove the upper of the two teflon pipes. Therefore you<br />
have to remove the teflon tubing clamp with a 8mm. Then the<br />
chain must be opened. For this a Chaintool is needed. If<br />
necessary let the work be done by your specialist dealer.<br />
Remove the teflon pipe and tighten the chain carefully again.<br />
Your <strong>Pino</strong> is now prepared for the Kids bottom bracke. It can<br />
be taken on and off now at any time without tools.<br />
Shackle<br />
Shackle<br />
Deflector Deflector Plate Plate<br />
Plate<br />
Wheels<br />
Wheels<br />
5 5 mm mm Nut<br />
Nut<br />
Bolt the shackle on the headtube and align the<br />
jockey wheels and the chain line so it runs straight.<br />
Then mount the black deflector plate. The Seat has<br />
to be taken off and the deflector plate put onto the<br />
tube that holds the Seat<br />
If If you you use use use the the Kids Kids bb bb permanently:<br />
permanently:<br />
if if if if you you you you are are are are to to to to use use use use the the the the Kids Kids Kids Kids bb bb bb bb permanently permanently permanently permanently or or or or if if if if it it it it is is is is your your your your only only only only use, use, use, use, then then then then the the the the chain chain chain chain should should should should<br />
not not not not be be be be run run run run along along along along the the the the deflector deflector deflector deflector plate. plate. plate. plate.<br />
It It It It is is is is advised advised advised advised to to to to run run run run it it it it under under under under the the the the top top top top jockey jockey jockey jockey wheel, wheel, wheel, wheel, to to to to have have have have less less less less friction friction friction friction and and and and less less less less noise. noise. noise. noise.<br />
Use Use Use Use without without without without the the the the kids kids kids kids bottom bottom bottom bottom bracket bracket bracket bracket is is is is not not not not possible possible possible possible in in in in that that that that case. case. case. case.<br />
www.hasebikes.com / Hiberniastr. 2 / D-45731 Waltrop<br />
Tel: 02309 78 25 8-2 / Fax:-6