Pino Anleitung (Mit Rahmentrennung) deutsch ... - Hase Bikes
Pino Anleitung (Mit Rahmentrennung) deutsch ... - Hase Bikes
Pino Anleitung (Mit Rahmentrennung) deutsch ... - Hase Bikes

Sie wollen auch ein ePaper? Erhöhen Sie die Reichweite Ihrer Titel.
YUMPU macht aus Druck-PDFs automatisch weboptimierte ePaper, die Google liebt.
<strong>Pino</strong> 11/09 D-ENG<br />
PINO<br />
PINO TOUR<br />
Gebrauchsanleitung<br />
PINO FAST<br />
PINO ALLROUND<br />
User´s Manual ENG<br />
D
Gepäckträger<br />
(Option)<br />
Luggage Rack<br />
Schutzblech<br />
(Option)<br />
(accessory)<br />
Fender<br />
(accessory)<br />
Kettenschaltung<br />
Rohloffschaltung (Option)<br />
Derailleur gears<br />
Rohloff gear hub<br />
(accessory)<br />
Hauptrahmen<br />
Frame<br />
Sitzverstellung<br />
Seat adjustment<br />
Lowrider (Option)<br />
Reißverschlusstasche<br />
Built-in seat pouch<br />
Lowrider Rack (accessory)<br />
Haltegriff<br />
Seat grip<br />
Seriennummer<br />
Serial number<br />
Fahrradkodierung<br />
Bike coding<br />
Schaltgriff<br />
Twist shifters<br />
Lenkergriff<br />
Handlebars<br />
Sitz<br />
Front seat<br />
Zweibeinständer (Option)<br />
Double Kickstand (accessory)<br />
Bremsgriff<br />
Brake levers<br />
<strong>Rahmentrennung</strong><br />
Frame joint<br />
Vorbau<br />
Front boom<br />
Rahmen-Längeneinstellung<br />
Frame length adjustment
Inhalt<br />
<strong>Pino</strong> Varianten und Zubehör ........................ 2<br />
Sicherheitshinweise........................................ 3<br />
Gebrauchsanweisung beachten ...................................3<br />
Verwendungszweck .......................................................3<br />
Bevor Sie losfahren... .....................................................3<br />
Verkehrszulassungsvorschriften beachten ...............3<br />
Überlastung vermeiden.................................................4<br />
Bremsen ..........................................................................4<br />
Geeignete Kleidung und Helm ....................................5<br />
Verletzungsgefahr durch Antrieb ...............................5<br />
Treten in Kurven ...........................................................5<br />
Pedale ................................................................................5<br />
Anschnallen .....................................................................5<br />
Fahren in der Dunkelheit ............................................5<br />
Technischer Zustand .....................................................6<br />
Belastung des <strong>Pino</strong> .........................................................6<br />
Seriennummer und Fahrradkodierung ......................6<br />
Anpassen an Körpergröße ............................ 7<br />
Prüfen der Sitzposition des Fahrers...........................7<br />
Sattel einstellen ...............................................................7<br />
Lenker einstellen ............................................................8<br />
Prüfen der Sitzposition des <strong>Mit</strong>fahrers .....................9<br />
Rahmenlänge einstellen.................................................9<br />
Sitzneigung einstellen ..................................................10<br />
Bremsgriffe an Handgröße anpassen ......................10<br />
Sicherheitsgurt (Zubehör) anpassen ........................10<br />
Rund ums Fahren ......................................... 11<br />
Der richtige Luftdruck ................................................11<br />
Schaltung .......................................................................11<br />
Schalten mit Drehgriff .................................................12<br />
Schalten mit Lenkerendschaltern (<strong>Pino</strong> Fast) ........12<br />
Bremsen ........................................................................13<br />
Gepäck anbringen ........................................................13<br />
<strong>Pino</strong> parken ...................................................................14<br />
Kinder mitnehmen .......................................................14<br />
<strong>Pino</strong> auf Auto-Fahrradträger transportieren ........14<br />
Rahmenlänge für Transport reduzieren .................14<br />
Rahmen teilen ...............................................................15<br />
<strong>Pino</strong> in einem Karton verpacken ..............................16<br />
<strong>Pino</strong> im Fahrradkoffer transportieren .....................17<br />
Wartung und Reparatur .............................. 19<br />
Wartungsintervalle ......................................................19<br />
Rundlauf der Laufräder kontrollieren .....................20<br />
Bereifung kontrollieren ...............................................20<br />
Scheibenbremsen kontrollieren ................................20<br />
Kettenschaltung kontrollieren und nachstellen ...21<br />
Ketten prüfen ................................................................22<br />
Ketten reinigen und schmieren ................................22<br />
Vordere Kette spannen ..............................................23<br />
Kettenschutzrohre prüfen .........................................23<br />
Dynamo einstellen (Option) ......................................24<br />
Zubehör montieren ..................................... 25<br />
Lowrider montieren ....................................................25<br />
Zweibeinständer und Lowriderstrebe montieren ...26<br />
Kindertretlager montieren ........................................27<br />
Kindersicherheitsgurte montieren ...........................28<br />
Kindergriffe montieren ...............................................28<br />
Ergogriffe montieren ...................................................29<br />
Schalensitz montieren .................................................29<br />
Anhang für Händler ..................................... 31<br />
Technische Daten ........................................................31<br />
Drehmomenttabelle ....................................................31<br />
Lieferung annehmen ....................................................32<br />
Auspacken und Lieferumfang prüfen .......................32<br />
<strong>Pino</strong> montieren .............................................................32<br />
Ersatzteile ..................................................... 33<br />
<strong>Pino</strong> Allround, komplett .............................................33<br />
Klemmung und Umlenkeinheit..................................34<br />
Lenklager ........................................................................35<br />
Lenkübertragung ..........................................................36<br />
Schalensitz ......................................................................37<br />
Gewährleistung und Garantiebedingungen ..38<br />
Contents<br />
<strong>Pino</strong> Models and Accessories ........................ 2<br />
Safety information ......................................... 3<br />
Read User’s Manual .......................................................3<br />
Intended use ....................................................................3<br />
Before your first ride... .................................................3<br />
Observing traffic regulations .......................................3<br />
Avoiding muscle strain .................................................4<br />
Braking .............................................................................4<br />
Suitable clothing and helmet ......................................5<br />
Risk of injury from gear system ..................................5<br />
Pedaling around curves ................................................5<br />
Pedals ................................................................................5<br />
Safety belt ........................................................................5<br />
Riding at night .................................................................5<br />
Technical condition .......................................................6<br />
Loading the <strong>Pino</strong> .............................................................6<br />
Serial Number and Bike Coding .................................6<br />
Adjusting your <strong>Pino</strong> ....................................... 7<br />
Checking the seat position of the rear rider ...........7<br />
Adjusting the seat position of the rear rider ...........7<br />
Adjusting the handlebars ..............................................8<br />
Checking the seat position of the front rider ........9<br />
Adjusting the frame length ...........................................9<br />
Adjusting the seat angle ..............................................10<br />
Adjusting the brake levers to hand size ................10<br />
Adjusting the Safety Belt (accessory) .....................10<br />
Riding your <strong>Pino</strong> ........................................... 11<br />
Correct tire pressure .................................................11<br />
Shifting ...........................................................................11<br />
Shifting gears with the twist shifters ........................12<br />
Shifting gears with bar end shifters (<strong>Pino</strong> Fast) .....12<br />
Braking ...........................................................................13<br />
Transporting luggage ...................................................13<br />
Parking the <strong>Pino</strong> ..........................................................14<br />
Transporting children .................................................14<br />
Transporting the <strong>Pino</strong> on a car rack ......................14<br />
Reducing frame length for transport ......................14<br />
Dismantling the frame ...............................................15<br />
Packaging the <strong>Pino</strong> ......................................................16<br />
Transporting the <strong>Pino</strong> in a bike case ......................17<br />
Maintenance and repair ............................... 19<br />
Maintenance intervals ..................................................19<br />
Checking the wheels for lateral/radial true ...........20<br />
Checking the tires ........................................................20<br />
Checking the disc brakes ...........................................20<br />
Checking and adjusting the derailleur .....................21<br />
Checking the chains .....................................................22<br />
Cleaning and oiling the chains ...................................22<br />
Tightening the front chain ..........................................23<br />
Checking the chain tube .............................................23<br />
Adjusting the dynamo (if applicable) ........................24<br />
Installing accessories ................................... 25<br />
Mounting the Lowrider Rack ...................................25<br />
Mounting the Double Kickstand and<br />
Lowrider Bars ..............................................................26<br />
Mounting the Children’s Crankset .........................27<br />
Mounting the Children’s Safety Belt .......................28<br />
Mounting the Childrens‘ Grips .................................28<br />
Mounting the Ergo Grips ..........................................29<br />
Mounting the Carbon Fiber Seat .............................30<br />
Appendix for dealers ................................... 31<br />
Technical data ...............................................................31<br />
Tightening torques .......................................................32<br />
Accepting delivery........................................................32<br />
Unpacking and checking contents ............................32<br />
Assembling the <strong>Pino</strong> ....................................................32<br />
Replacement parts ....................................... 33<br />
<strong>Pino</strong> Allround, complete ............................................33<br />
Frame joint unit and idler pulley assembly ............34<br />
Headset bearing ............................................................35<br />
Steering rod assembly .................................................36<br />
Carbon Fiber Seat ........................................................37<br />
Terms of limited warranty .......................... 38<br />
<strong>Pino</strong> 11/09-D-ENG 1
<strong>Pino</strong> Varianten und Zubehör<br />
Zubehör: Gepäckträger<br />
+ Beleuchtung<br />
Accessory: Luggage Rack<br />
+ Lighting System<br />
2<br />
Zubehör: Lowrider<br />
Accessory: Lowrider<br />
Rack<br />
Zubehör: Flaschenhalter<br />
Accessory: Bottle Holder<br />
Zubehör: Kindertretlager<br />
+ Sicherheitsgurt<br />
Accessory: Children’s<br />
Crankset + Safety Belt<br />
PINO TOUR<br />
Zubehör: <strong>Mit</strong>telständer<br />
Accessory: Center Stand<br />
Zubehör:<br />
<strong>Hase</strong>-Zweibeinständer<br />
Accessory:<br />
<strong>Hase</strong> Double Kickstand<br />
<strong>Pino</strong> Models and Accessories<br />
PINO ALLROUND<br />
Zubehör: Transportkoffer<br />
Accessory: Bike Case<br />
PINO FAST<br />
Option: Federgabel<br />
Optional: Suspension<br />
Fork<br />
<strong>Pino</strong> 11/09-D-ENG
Sicherheitshinweise<br />
Gebrauchsanweisung beachten<br />
Lesen Sie diese Gebrauchsanleitung sorgfältig und machen Sie<br />
sich mit dem Fahrzeug praktisch vertraut. Da beim Fahren des<br />
Tandems beide Piloten aktive Fahrer sind, sollten grundsätzlich<br />
auch beide Fahrer diese Gebrauchsanleitung lesen und alle<br />
Funktionen kennen. Falls die mitfahrende Person ein Kind ist,<br />
beziehen Sie es mit ein und geben Sie die gelesenen Informationen<br />
weiter. Achten Sie darauf, dass es alle für die Sicherheit<br />
wichtigen Funktionen verstanden hat.<br />
Verwendungszweck<br />
Das <strong>Pino</strong> ist ein Stufentandem, eine Kombination eines herkömlichen<br />
und eines Liegefahrrads. Es ist zur Benutzung auf<br />
Straßen und befestigten Wegen gedacht. Das Fahren im Straßenverkehr<br />
ist nur mit Zubehör nach den jeweiligen Verkehrszulassungsvorschriften<br />
des Landes in dem es benutzt<br />
wird, erlaubt. Das <strong>Pino</strong> Fast ist ein reines Sportgerät.<br />
Bevor Sie losfahren...<br />
Ihr Fachhändler hat das <strong>Pino</strong> montiert und auf die gewünschte<br />
Körpergröße eingestellt. Wenn das <strong>Pino</strong> für eine andere Person<br />
eingestellt werden soll, lesen Sie im Kapitel: „Anpassen an<br />
Körpergröße“, Seite 7. Machen Sie sich vor der ersten Fahrt<br />
zuerst mit dem Fahrzeug vertraut. Falls die mitfahrende Person<br />
ein Kind ist, erklären Sie ihm ausführlich alle relevanten<br />
Funktionen und machen Sie es auf eventuelle Risiken aufmerksam.<br />
Vor der Benutzung im Straßenverkehr, empfehlen wir<br />
das Verhalten des Fahrzeugs auf einem ruhigen unbefahrenen<br />
Gelände zu testen. Aufgrund der Bauweise gibt es deutliche<br />
Unterschiede zur Fahrweise gegenüber einem gewöhnlichen<br />
Fahrrad oder Tandem. Die lenkende und die mitfahrende Person<br />
müssen sich aufeinander einstellen, da beide aktive Fahrer<br />
sind. Das gilt besonders für Kurvenfahrten, bei denen der<br />
Schwerpunkt verlagert werden muss. Es ist vorteilhaft, wenn<br />
sich beiden Personen gut kennen.<br />
Verkehrszulassungsvorschriften beachten<br />
Das <strong>Pino</strong> wird in der Grundversion ohne Beleuchtungsanlage<br />
ausgeliefert und darf nur mit Ergänzungen im Straßenverkehr<br />
benutzt werden. Lassen Sie sich von ihrem Fachhändler beraten<br />
und lassen Sie Änderungen nur von ihrer Fachwerkstatt<br />
Safety information<br />
Read User’s Manual<br />
Read the User’s Manual carefully and familiarize yourself with<br />
the construction and function of the vehicle in practice. Both<br />
riders should read the User’s Manual and learn all of the bicycle’s<br />
functions because both pilots are active riders. If one of<br />
the riders is a child, read the information together and make<br />
sure the child has understood all safety-related functions.<br />
Intended use<br />
The <strong>Pino</strong> is a semi-recumbent tandem, a combination of an<br />
upright and a recumbent bicycle. It is intended for use on<br />
paved roads and paths. The tandem should not be used in<br />
traffic until it has been equipped with the accessories required<br />
by the applicable traffic regulations of the country and state<br />
in which it is being used. The <strong>Pino</strong> Fast has been designed as a<br />
“competitive bicycle”. Your state or country may have special<br />
regulations (e.g. lighting equipment, etc.) for the use of such<br />
vehicles in traffic.<br />
Before your first ride...<br />
Your authorized retailer has assembled your new <strong>Pino</strong> and<br />
adjusted it to the specified size requirements. Please refer<br />
to the section “Adjusting your <strong>Pino</strong>” on page 7 if you need<br />
to make adjustments for another rider. Before the first ride,<br />
please take some time to familiarize yourself with the vehicle.<br />
If the second rider is a child, be sure to explain all important<br />
functions and discuss potential risks. We recommend testing<br />
the vehicle’s handling in a quiet, open area away from traffic<br />
before riding on public roads. Owing to the unique construction,<br />
there are significant differences in handling in comparison<br />
with a standard bicycle or tandem. The riders must take some<br />
time to practice handling the tandem cooperatively. This is<br />
especially true for cornering, when the riders must shift the<br />
center of gravity. It is advantageous when the riders know<br />
one another well.<br />
Observing traffic regulations<br />
All standard <strong>Pino</strong> models are delivered without a lighting system<br />
and cannot be used on public roads until the required accessories<br />
have been installed. Consult your authorized retailer<br />
for information on the accessories required. All equipment<br />
<strong>Pino</strong> 11/09-D-ENG 3
Sicherheitshinweise<br />
Safety information<br />
vornehmen oder machen Sie sich mit den Vorschriften vertraut,<br />
bevor Sie Ergänzungen oder Änderungen an der Lichtanlage<br />
selbst vornehmen.<br />
Die Verkehrszulassungsvorschriften sind in verschiedenen<br />
Staaten unterschiedlich. Deshalb muss es nach den jeweiligen<br />
Vorschriften eventuell mit einer Beleuchtungsanlage, Strahlern<br />
und einer Klingel ausgestattet werden. Wir bieten Zubehör<br />
nach der <strong>deutsch</strong>en Straßenverkehrs-Zulassungs-Ordnung<br />
(StVZO) an.<br />
Überlastung vermeiden<br />
Aufgrund der liegenden Position des <strong>Mit</strong>fahrers, werden zum<br />
Teil andere Muskelgruppen als bei einem herkömmlichen<br />
Fahrrad beansprucht. Sollten Sie noch wenig Erfahrungen mit<br />
einem Liegerad haben, dann beginnen Sie mit kleineren einfachen<br />
Touren, um einen Muskelkater zu vermeiden.<br />
Bremsen<br />
An Ihrem <strong>Pino</strong> sind besonders leistungsstarke Bremsen, Magura<br />
Louise, in Tandemversion montiert, die sich in einigen<br />
Details von der Standard-Version unterscheiden. Achten Sie<br />
beim Austausch oder Reparatur auf folgende Punkte:<br />
• Es dürfen ausschließlich unsere hauseigenen für das <strong>Pino</strong><br />
freigegebenen Bremsanlagen verwendet werden.<br />
• Es dürfen nur original Magura Bremsscheiben mit einem-<br />
Durchmesser von 180 mm hinten und 203 mm vorne verwendet<br />
werden.<br />
Die Scheibenbremsen des <strong>Pino</strong>s sind sehr leistungsfähig und<br />
gut dosierbar. Trotzdem kann es zur Blockierung der Räder<br />
kommen. Machen Sie sich vor der ersten Fahrt im Straßenverkehr<br />
mit der Bremskraft durch Bremsproben auf einem unbefahrenem<br />
Gelände vertraut. Die Bremsanlage muss vor dem<br />
Gebrauch „eingefahren“ werden. Dafür sind 25-30 Vollbremsungen<br />
notwendig.<br />
4<br />
should be installed by a qualified bike mechanic. If you plan on<br />
installing or making changes to the lighting system yourself,<br />
please study the applicable regulations before you begin.<br />
Traffic regulations are different in every country. It is important<br />
to choose a lighting system, reflectors, and a bell in<br />
accordance with the applicable regulations of the country in<br />
which the trike will be used. We offer accessories that comply<br />
with the German road traffic regulations (StVZO).<br />
Avoiding muscle strain<br />
The front rider, who pedals in a recumbent position, uses<br />
other muscle groups than are used when riding an upright cycle.<br />
If this rider has not had much experience with riding in a<br />
recumbent position, then we recommend starting with simple<br />
tours in order to avoid excessive muscle strain.<br />
Braking<br />
Your <strong>Pino</strong> is equipped with especially powerful brakes, Magura<br />
Louise, in the tandem version, which differs from the<br />
standard version in several ways. When making repairs or replacing<br />
parts, be sure to use only the braking systems specially<br />
designed and approved by HASE for the <strong>Pino</strong> and original Magura<br />
brake discs with a diameter of 180 mm in the back and<br />
203 mm in the front.<br />
The disc brakes of the <strong>Pino</strong> are very powerful and have good<br />
modulation. However, it is still possible for the wheels to become<br />
locked. Before your first ride in public traffic, be sure<br />
to familiarize yourself with the braking force by trying a few<br />
braking trials in an open area away from motorized vehicles.<br />
The braking system must be “broken in” before the first use.<br />
This requires 25-30 full braking operations.<br />
<strong>Pino</strong> 11/09-D-ENG
Geeignete Kleidung und Helm<br />
Die Benutzer des <strong>Pino</strong>s sollten eng anliegende Kleidung tragen,<br />
damit sie sich nicht in den Laufrädern oder Antrieb verfangen<br />
kann. Achten Sie auf herunterhängende Bänder von<br />
Jacken oder Schal. Tragen Sie Kleidung in Signalfarben, um die<br />
Aufmerksamkeit der anderen Verkehrsteilnehmer zu erhöhen.<br />
Ein Fahrradhelm kann vor Kopfverletzungen bei eventuellen<br />
Stürzen schützen.<br />
Verletzungsgefahr durch Antrieb<br />
Die <strong>Mit</strong>fahrer des <strong>Pino</strong>s dürfen während der Fahrt nicht in<br />
den Antrieb greifen. Dieses kann zu gefährlichen Verletzungen<br />
führen. Schalten Sie den Dynamo nur im Stand ein. Wegen<br />
der Nähe zu den Speichen besteht während der Fahrt eine<br />
akute Verletzungsgefahr.<br />
Treten in Kurven<br />
Je nach Einstellung könnte die mitfahrende Person in engen<br />
Kurven mit den Hacken an das Vorderrad stoßen. In engen<br />
Kurven sollte sie deshalb nicht mittreten. Kleinere Personen<br />
können kürzere Tretkurbeln (Zubehör) verwenden, um diese<br />
Gefahr zu reduzieren.<br />
Pedale<br />
Durch die liegende Position der mitfahrenden Person können<br />
die Füße besonders leicht von den Pedalen rutschen. Tragen<br />
Sie Schuhe mit Profil. Achten Sie auf einen ausreichenden Pedaldruck.<br />
Wir empfehlen die Verwendung der mitgelieferten<br />
Click-Pedale in Verbindung mit entsprechenden Schuhen, damit<br />
die Füße fixiert werden können. Dieses ist besonders bei<br />
<strong>Mit</strong>nahme von Kindern notwendig, da Kinder manchmal beim<br />
Fahren einschlafen.<br />
Anschnallen<br />
Schnallen Sie Kinder mit dem Dreipunkt-Sicherheitsgurt (Zubehör)<br />
an. Damit vermeiden Sie Verletzungen bei starken<br />
Bremsungen oder Unfällen.<br />
Fahren in der Dunkelheit<br />
Fahren Sie bei Dunkelheit und in der Dämmerung immer mit<br />
Licht.<br />
Sicherheitshinweise<br />
Safety information<br />
Suitable clothing and helmet<br />
<strong>Pino</strong> riders should never wear loose clothing that could get<br />
caught in the wheels or gears. Beware of scarves and clothing<br />
strings/cords that hang down. Wear brightly colored clothing<br />
(ideally signal colors) in order to increase visibility for other<br />
road users. A bicycle helmet can prevent head injuries in the<br />
case of accidents.<br />
Risk of injury from gear system<br />
<strong>Pino</strong> riders should never touch the gear system when the cycle<br />
is in motion. This could cause dangerous injuries. The dynamo<br />
should only be actuated when the bike is standing still.<br />
The proximity of the dynamo to the spokes poses an acute<br />
risk of injury if the rider attempts to actuate the mechanism<br />
when the bicycle is in motion.<br />
Pedaling around curves<br />
Depending on the length adjustment of the tandem, the heels<br />
of the front rider could bump against the front wheel in tight<br />
curves. Therefore, as a rule, the front rider should not pedal<br />
when riding around tight curves. For smaller riders, this risk<br />
could be reduced by using shorter crank arms (accessories).<br />
Pedals<br />
In a recumbent position (front rider), it is especially easy for<br />
the feet to slip from the pedals. Wear shoes with slip-resistant<br />
soles. Be sure to maintain sufficient pressure on the pedals.<br />
We recommend using the enclosed clipless pedals with<br />
the corresponding shoes in order to ensure that the rider’s<br />
feet are secured. This is especially important when the front<br />
rider is a child because children sometimes fall asleep while<br />
riding.<br />
Safety belt<br />
Secure children in the front seat using the three-point Safety<br />
Belt. This prevents injury in the case of abrupt braking or accidents.<br />
Riding at night<br />
Always use lights when riding at night or in conditions of low<br />
visibility, such as dusk and dawn.<br />
<strong>Pino</strong> 11/09-D-ENG 5<br />
8/09
Sicherheitshinweise<br />
Safety information<br />
Technischer Zustand<br />
Führen Sie vor jeder Fahrt eine Sichtprüfung auf eventuelle<br />
Schäden durch. Lassen Sie das <strong>Pino</strong> regelmäßig von ihrer Fachwerkstatt<br />
warten. Wartungsintervalle entnehmen Sie Kapitel<br />
„Wartungsintervalle“ Seite 19.<br />
Das <strong>Pino</strong> darf nur mit von uns empfohlenen Ersatzteilen und<br />
Zubehör ausgestattet werden. Wenden Sie sich an ihre Fachwerkstatt.<br />
Rahmenteilung<br />
Der Rahmen des <strong>Pino</strong>s lässt sich mit wenigen Handgriffen teilen.<br />
Somit ist es möglich, die Länge für Transportzwecke zu<br />
reduzieren. Nach dem Zusammenbau der beiden Rahmenteile<br />
müssen die beiden Schrauben wieder fest angezogen werden.<br />
Die roten Anzeigestifte müssen vollständig im Rahmen eingetaucht<br />
sein. Es besteht sonst akute Unfallgefahr.<br />
Belastung des <strong>Pino</strong><br />
Beachten Sie, dass das Gesamtgewicht (<strong>Pino</strong>, Fahrer und<br />
Gepäck) 225 kg nicht überschreiten darf. Transportieren Sie<br />
Gepäck nur auf dem dafür vorgesehenen Gepäckträger und<br />
Lowrider (Zubehör). Achten Sie auf eine gleichmäßige Lastenverteilung.<br />
Seriennummer und Fahrradkodierung<br />
Die Rahmennummer ist auf dem Hauptrahmen unter dem<br />
vorderen Sitz eingeprägt (Bild auf der Innenseite des Umschlags).<br />
Hier, und nur hier darf eine Fahrradkodierung angebracht<br />
werden. Diese hilft nach Diebstahl oder Verlust den<br />
Besitzer zu ermitteln.<br />
6<br />
Technical condition<br />
Before each trip, be sure to check the condition of the bicycle<br />
for possible faults or damage. Take your <strong>Pino</strong> to your bike<br />
shop for regular maintenance. The recommended maintenance<br />
intervals can be found in the section “Maintenance<br />
intervals” on page 19. Use only the replacement parts and accessories<br />
recommended by HASE. Consult your bike shop for<br />
more information.<br />
Dismantling the frame<br />
The frame of the <strong>Pino</strong> can be easily dismantled, making it possible<br />
to reduce the length for transport. After the reassembling<br />
of the two sections of the frame, you need tighten the<br />
two screws on the right side of the frame. The red indicator<br />
must be inside of the frame. Riding with lose screws can cause<br />
accidents.<br />
Loading the <strong>Pino</strong><br />
Be sure not to exceed the maximum permissible combined<br />
weight for bicycle, riders, and luggage: 225 kg (500 lbs). All<br />
luggage should be transported on the luggage rack and/or<br />
Lowrider Rack (accessory). Ensure that the weight is distributed<br />
evenly.<br />
Serial Number and Bike Coding<br />
The serial number you can find on the Frame under the front<br />
seat (picture on the inner side of the cover). Here and only<br />
here is the place to engrave the Bike Coding. This helps after<br />
thievery or lost to find the owner.<br />
<strong>Pino</strong> 11/09-D-ENG
Anpassen an Körpergröße<br />
Die richtige Einstellung des <strong>Pino</strong>s ist wichtig für das Wohlbefinden<br />
und die Leistungsfähigkeit beim Fahren. Das <strong>Pino</strong> lässt<br />
sich individuell auf die Körpergröße der fahrenden Personen<br />
von ca. 1,50 bis 2,00 m Größe einstellen. Für mitfahrende Kinder<br />
ist eine zusätzliche Tretkurbel als Zubehör erhältlich.<br />
Prüfen der Sitzposition des Fahrers<br />
Setzen Sie sich auf den Sattel des <strong>Pino</strong>s mit den Füßen auf den<br />
Pedalen und mit den Ballen über der <strong>Mit</strong>te der Pedalachsen.<br />
Befindet sich eine Pedale ganz unten, dann sollte dieses Bein<br />
fast ganz ausgestreckt sein. Lässt sich das Bein nicht ausstrecken<br />
oder der Fuß erreicht nur sehr schwer die Pedale, dann<br />
müssen Sie die Höhe des Sattels neu einstellen.<br />
Die Lenkereinstellung kann variiert werden . Der Oberkörper<br />
sollte leicht nach vorne geneigt sein (bequeme Position) oder<br />
weit nach vorne geneigt sein (sportliche Position) und die Arme<br />
ausgestreckt sein.<br />
Sattel einstellen<br />
Der Sattel lässt sich in der Höhe, Neigung und Abstand zum<br />
Lenker verstellen.<br />
1. Lösen Sie den Schnellspanner (1), ziehen Sie die Sattelstütze<br />
nach oben oder schieben Sie sie in das Sitzrohr<br />
hinein.<br />
Achtung!<br />
Die Sattelstütze darf nur bis zur Markierung herausgezogen<br />
werden. Diese Markierung darf nicht sichtbar sein.<br />
Wenn sie sichtbar wird, ist die Sattelstütze zu weit herausgezogen.<br />
Es drohen Unfallgefahr und Rahmenschaden.<br />
2. Ziehen Sie den Schnellspanner (1) wieder fest.<br />
3. Lösen Sie die Schraube (2) unter dem Sattel mit einem<br />
Innensechskantschlüssel 6 mm. Der Sattel lässt sich im<br />
Winkel verstellen und nach vorne oder nach hinten verschieben.<br />
Hinweis:<br />
Bei <strong>Pino</strong> Fast ist der Sattel mit zwei Schrauben an der<br />
Sattelstütze befestigt.<br />
4. Ziehen Sie die Schraube (2) wieder fest. Um die bequemste<br />
Position zu finden sind eventuell mehrere Versuche<br />
notwendig.<br />
Foto Sitzposition <strong>Mit</strong>fahrer<br />
Adjusting your <strong>Pino</strong><br />
The proper adjustment of the <strong>Pino</strong> is important for riding<br />
comfort and performance. The <strong>Pino</strong> can be adjusted to fit riders<br />
between approx. 1.50 and 2.00 m (5’ and 6’7”) in height.<br />
A special pedal crank is available (accessory) for children in<br />
the front riding position.<br />
Checking the seat position of the rear rider<br />
Sit on the rear seat of the <strong>Pino</strong> with your feet on the pedals<br />
and the balls of your feet on the pedal axles. When one pedal<br />
is in the lowest position, the corresponding leg should be<br />
almost straight. If the leg cannot be straightened or the foot<br />
cannot comfortably reach the pedal, then the height of the<br />
seat must be readjusted.<br />
The position of the handlebars can also be adjusted. The upper<br />
body should lean either slightly forward (comfortable position)<br />
or far forward (sporty position), and the arms should<br />
be straight.<br />
Adjusting the seat position of the rear rider<br />
It is possible to adjust the height and angle of the seat and the<br />
distance between the seat and handlebars.<br />
1. Open the quick-release (1); adjust the seat height by pulling<br />
the seat post further out or pushing it further in.<br />
Caution!<br />
The seat post should never be extended past the minimum<br />
insertion mark. This mark should not be visible. If<br />
the mark is visible, the seat post has been extended past<br />
its minimum insertion length. Riding with an over-extended<br />
seat post can cause accidents or damage to the<br />
frame.<br />
2. Retighten the quick-release (1).<br />
3. Loosen the screw (2) beneath the seat using a 6mm Allen<br />
key. Adjust the angle and lateral position of the seat.<br />
Note:<br />
The seat of the <strong>Pino</strong> Fast is secured to the seat post with<br />
two screws.<br />
4. Retighten the screw (2). You may have to readjust the<br />
seat several times in order to find the most comfortable<br />
position.<br />
<strong>Pino</strong> 11/09-D-ENG 7<br />
1<br />
2
Anpassen an Körpergröße<br />
Adjusting your <strong>Pino</strong><br />
Lenker einstellen<br />
Um eine ergonomische Sitzposition zu finden, lassen sich die<br />
Lenkergriffe in der Höhe (A) und im Winkel (B) und der gesamte<br />
Lenker in der Neigung (C) verstellen. Somit ist eine<br />
Einstellung zwischen komfortabel und extrem sportlich möglich.<br />
1. Lösen Sie die Schraube (1) mit einem Innensechskantschlüssel<br />
5 mm.<br />
2. Passen Sie die Höhe der Lenkergriffe und den Winkel<br />
Ihren Bedürfnissen an.<br />
8<br />
Achtung!<br />
Der Lenker darf nur soweit herausgezogen werden, dass<br />
die Unterkante der Lenkerrohre mit der Unterkannte<br />
der Einspannung des Lenkers abschließen. Ein zu weit<br />
herausgezogener Lenker kann zu Unfällen mit Verletzungen<br />
führen.<br />
Hinweis:<br />
Durch Drehen der Lenkergriffe wird auch die Lenkerbreite<br />
verändert. Diese sollte immer möglichst schmal sein.<br />
3. Ziehen Sie die Schraube (1) wieder fest.<br />
4. Lösen Sie die vier Schrauben (2) mit einem Innensechskantschlüssel<br />
6 mm.<br />
5. Neigen Sie den Lenker nach vorne (sportlich) oder nach<br />
hinten (komfortabel).<br />
6. Ziehen Sie die vier Schrauben (2) mit 23 Nm wieder fest.<br />
7. Prüfen Sie, ob die Lenkbewegung nicht eingeschränkt<br />
wird.<br />
Achtung!<br />
Einschränkungen der Bewegungsfreiheit des Lenkers<br />
können zu Unfällen mit Verletzungen führen.<br />
A<br />
B<br />
C<br />
2<br />
1<br />
Adjusting the handlebars<br />
The height (A), angle (B), and position (C) of the handlebars<br />
can be adjusted in order to create an ergonomic riding position.<br />
The desired position can vary greatly, from comfortable<br />
to sporty.<br />
1. Loosen the screw (1) using a 5mm Allen key.<br />
2. Adjust the height and angle of the handlebar to meet your<br />
needs.<br />
Caution!<br />
When raising the handlebars, ensure that the lower edge<br />
of the handlebar is at least flush with (or lower than) the<br />
lower edge of the clamp. A handlebar post that is not<br />
fully secured in the clamp could come loose while riding,<br />
posing a great risk of accident and injury.<br />
Note:<br />
A change in the angle of the handlebars will also alter<br />
the distance between the handlebars. This distance<br />
should always be always as small as possible.<br />
3. Retighten the screw (1).<br />
4. Loosen the four screws (2) using a 6mm Allen key.<br />
5. Tilt the handlebars forward (sporty riding position) or<br />
backward (more comfortable position).<br />
6. Retighten the four screws (2) with a torque of 23 Nm (17<br />
ft-lbs).<br />
7. Check that the handlebars can be moved freely in both<br />
directions without restriction.<br />
Caution!<br />
Any restriction in the free movement of the handlebars<br />
could affect the handling of the tandem and greatly<br />
increase risk of accident and injury.<br />
<strong>Pino</strong> 11/09-D-ENG
Prüfen der Sitzposition des <strong>Mit</strong>fahrers<br />
Setzen Sie sich auf den Sitz des <strong>Pino</strong>s mit den Füßen auf den<br />
Pedalen und mit den Ballen über der <strong>Mit</strong>te der Pedalachsen.<br />
Wenn sich die Kurbeln in einer Linie mit dem Vorbau befinden,<br />
sollte ein Bein fast ganz ausgestreckt sein. Lässt sich das<br />
Bein nicht ausstrecken oder der Fuß erreicht nur sehr schwer<br />
die Pedale, dann müssen Sie die Rahmenlänge neu einstellen.<br />
Der Verstellbereich beträgt 27 cm.<br />
Rahmenlänge einstellen<br />
1. Lösen Sie die Innensechskantschraube zwischen Vorbau<br />
und Hauptrahmen (1) mit einem Innensechskantschlüssel<br />
6 mm.<br />
2. Lösen Sie den Kettenspanner (2), indem Sie die Klemmung<br />
am linken Sitzrohr mit einem Innensechskantschlüssel<br />
6 mm gegen den Uhrzeigersinn drehen.<br />
3. Schieben Sie den Vorbau in den Hauptrahmen oder ziehen<br />
Sie den Vorbau aus dem Rahmen heraus.<br />
Achtung!<br />
Der Vorbau darf nur bis zur Markierung, einer Bohrung<br />
auf der Oberseite des Vorbaus, herausgezogen werden.<br />
Diese Bohrung darf nicht sichtbar sein. Wenn sie sichtbar<br />
wird, ist der Vorbau zu weit herausgezogen.<br />
Es drohen Unfallgefahr und Rahmenschaden.<br />
4. Ziehen Sie die Innensechskantschraube (1) leicht an.<br />
5. Prüfen Sie die Sitzposition. Sind noch Änderungen notwendig,<br />
dann wiederholen Sie die Schritte 1 bis 4.<br />
6. Richten Sie den Vorbaus so aus, dass die Tretlagerachse<br />
waagerecht verläuft. Ziehen Sie die Innensechskantschraube<br />
(1) zwischen Vorbau und Hauptrahmen mit einem<br />
6 mm Innensechskantschlüssel mit 12 Nm fest.<br />
Achtung!<br />
Diese Schraube muss unbedingt mit 12 Nm fest angezogen<br />
werden. Bei Fahrten mit loser Schraube droht<br />
Unfallgefahr und Beschädigung des Rahmens.<br />
7. Spannen Sie die Kette, indem Sie den Kettenspanner<br />
(3) nach vorne ziehen und die Klemmung (2) am linken<br />
Sitzrohr mit einem Innensechskantschlüssel 6 mm wieder<br />
festziehen.<br />
3<br />
Anpassen an Körpergröße<br />
Adjusting your <strong>Pino</strong><br />
<strong>Pino</strong> 11/09-D-ENG 9<br />
1<br />
2<br />
Checking the seat position of the front rider<br />
Sit in the front seat of the <strong>Pino</strong> with your feet on the pedals<br />
and the balls of your feet on the pedal axles. When the crank<br />
arms are lined up with the front boom, one leg should be<br />
almost straight. If the leg cannot be straightened or the foot<br />
does not comfortably reach the pedal, then the frame length<br />
must be readjusted. The adjustment range is 27 cm (10 ½”).<br />
Adjusting the frame length<br />
1. Loosen the Allen bolt between the front boom and the<br />
main frame (1) using a 6mm Allen key.<br />
2. Loosen the chain tensioner (2) by turning the recessed<br />
clamp fitting inside the hole on the left seat tube counterclockwise<br />
using a 6mm Allen key.<br />
3. Push the front boom further into the frame tube, or pull<br />
the front boom further out of the frame.<br />
Caution!<br />
The front boom cannot be extended past the minimum<br />
insertion mark, which is a small hole located on the top<br />
of the boom. This hole should not be visible. If the hole<br />
is visible, the front boom has been extended past its<br />
minimum insertion length. Riding with an over-extended<br />
boom could cause accidents or damage to the frame.<br />
4. Tighten the Allen bolt (1) lightly.<br />
5. Check the seat position. If further adjustment is required,<br />
repeat steps 1 to 4.<br />
6. Position the front boom so that the axle of the bottom<br />
bracket is parallel to the surface of the ground. Tighten<br />
the Allen bolt (1) between the front boom and the main<br />
frame using a 6mm Allen key and a torque of 12 Nm<br />
(8.9 ft-lbs).<br />
Caution!<br />
It is absolutely necessary to tighten this bolt with a torque<br />
of 12 Nm (8.9 ft-lbs). Riding with a loose bolt poses a<br />
high risk of accident and damage to the frame.<br />
7. Tighten the chain by loosening the recessed clamp fitting<br />
inside the hole on the left seat tube using a 6mm Allen<br />
key, pulling the chain tensioner (3) forward, and retightening<br />
the clamp fitting (2).
Anpassen an Körpergröße<br />
Adjusting your <strong>Pino</strong><br />
Sitzneigung einstellen<br />
1. Lösen Sie den Schnellspanner der Sitzstrebe (1).<br />
2. Neigen Sie den Sitz in die gewünschte Position.<br />
3. Ziehen Sie die den Schnellspanner (1) wieder fest.<br />
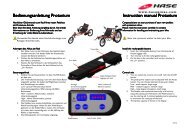
Bremsgriffe an Handgröße anpassen<br />
1. Entfernen Sie die Kunststoffkappe (2) aus dem Bremsgriff.<br />
2. Drehen Sie die sich in der Bohrung befindliche Schraube<br />
mit einem Innensechskantschlüssel 2,5 mm im Uhrzeigersinn,<br />
um den Bremsgriff näher an den Lenkergriff zu<br />
bringen. Drehen Sie die Schraube gegen den Uhrzeigersinn,<br />
um den Bremsgriff vom Lenkergriff zu entfernen.<br />
3. Wiederholen Sie den Vorgang für den zweiten Bremsgriff<br />
und bringen Sie die Kunststoffkappen wieder an.<br />
Sicherheitsgurt (Zubehör) anpassen<br />
Wir empfehlen bei Fahrten mit Kindern, den als Zubehör (Im<br />
Zubehör Kindertretlager enthalten) erhältlichen Sicherheitsgurt<br />
zu benutzen. Der Gurt ist mit den Fixierschnallen in der<br />
Höhe und Weite einstellbar. Stellen Sie den Sicherheitsgurt so<br />
ein, dass er eng anliegt, jedoch nicht einschneidet.<br />
10<br />
1<br />
2<br />
Adjusting the seat angle<br />
1. Open the quick-release on the seat stay (1).<br />
2. Adjust the seat angle to the desired position.<br />
3. Retighten the quick-release (1).<br />
Adjusting the brake levers to hand size<br />
1. Remove the plastic cap (2) from the brake lever.<br />
2. The screw located in the hole beneath the cap adjusts the<br />
position of the lever. Turn the screw using a 2.5mm Allen<br />
key: clockwise in order to position the lever closer to the<br />
handlebar grip and counterclockwise in order to position<br />
the lever further from the handlebar grip.<br />
3. Repeat the procedure for the second brake lever, and reinsert<br />
the plastic caps.<br />
Adjusting the Safety Belt (accessory)<br />
When the front rider is a child, we recommend using the<br />
Safety Belt available as an accessory (included with the<br />
Children’s Crankset). The Safety Belt can be adjusted to the<br />
height and width of the rider using the buckles. Adjust the<br />
Safety Belt so that the straps hold the rider snugly but are not<br />
uncomfortably tight.<br />
<strong>Pino</strong> 11/09-D-ENG
Rund ums Fahren<br />
Der richtige Luftdruck<br />
Fahren Sie nur mit dem richtigen Luftdruck. Der Luftdruckbereich<br />
ist auf der Reifenflanke angegeben.<br />
Schaltung<br />
Die Schaltung ermöglicht die Anpassung der eigenen Leistungsfähigkeit<br />
an die Geländeform und die gewünschte Fahrgeschwindigkeit.<br />
Der Krafteinsatz pro Kurbelumdrehung kann<br />
durch die Wahl eines geeigneten Ganges verringert werden.<br />
So lassen sich steile Berge in einem kleineren Gang wesentlich<br />
leichter befahren als in einem hohen Gang. Dafür werden<br />
Sie langsamer und müssen mehr treten. Hohe Gänge eignen<br />
sich für schnelle Fahrten im flachen Gelände oder bei Bergabfahrten.<br />
Der Gang sollte so gewählt werden, dass die Trittfrequenz<br />
mehr als 70 Umdrehungen der Kurbel pro Minute beträgt.<br />
So können Sie am kraftsparendsten fahren und schonen<br />
ihre Kniegelenke.<br />
Das <strong>Pino</strong> ist serienmäßig mit einer 27-Gang Kettenschaltung<br />
mit Drehgriff ausgestattet. Alternativ kann eine 14-Gang<br />
Rohloff zum Einsatz kommen. Das <strong>Pino</strong> Fast wird mit Lenkerendschaltern<br />
geschaltet. Bei der Kettenschaltung können Sie<br />
den Gang nur wechseln, wenn Sie treten. Bei einer Nabenschaltung<br />
ist das auch im Stand möglich.<br />
Achtung!<br />
Beachten Sie auch die beigefügte Betriebsanleitung des<br />
Schaltungsherstellers.<br />
Achtung!<br />
Machen Sie sich vor der ersten Fahrt im Straßenverkehr<br />
mit der Schaltung auf einem unbefahrenen Gelände<br />
vertraut. Im Straßenverkehr könnte die Einübung des<br />
Schaltens die Aufmerksamkeit vom Straßenverkehr<br />
ablenken.<br />
Maximaler Luftdruck<br />
Maximum Pressure<br />
Riding your <strong>Pino</strong><br />
Correct tire pressure<br />
The <strong>Pino</strong> should only be ridden with the correct tire pressure.<br />
The tire pressure range is specified on the tire sidewalls.<br />
Shifting<br />
Shifting gears allows you to adjust your pedaling strength to<br />
the terrain and desired speed. The force required per pedal<br />
revolution can be decreased by selecting the appropriate gear.<br />
In this way, it is much easier to ride up a steep hill in a lower<br />
gear than in a high gear. In a lower gear, however, you are<br />
slower and have to pedal faster. High gears are best suited<br />
for riding at higher speeds on flat terrain or riding downhill.<br />
Select a gear that allows you to pedal at more than 70 pedal<br />
revolutions per minute. This cadence is optimal for producing<br />
sustained power and preventing excessive strain on the<br />
knee joints. In its standard version, the <strong>Pino</strong> is equipped with<br />
a 27-speed derailleur system with twist shifters. The <strong>Pino</strong> can<br />
also be ordered with a 14-speed Rohloff. The <strong>Pino</strong> Fast is<br />
equipped with bar end shifters. With derailleur systems, the<br />
gears can only be shifted when pedaling. Hub gears allow you<br />
to shift even when the pedals are not in motion.<br />
Caution!<br />
Please read the information provided in the enclosed<br />
manual from the gear system manufacturer.<br />
Caution!<br />
Before riding the <strong>Pino</strong> on public roads, be sure to familiarize<br />
yourself with the shifting of gears in an open area<br />
away from traffic. Learning to shift gears on a new bike<br />
takes practice, which could distract you from navigating<br />
road traffic.<br />
<strong>Pino</strong> 11/09-D-ENG 11
Rund ums Fahren<br />
Riding your <strong>Pino</strong><br />
Schalten mit Drehgriff<br />
Drehen Sie den Drehgriff (1) am rechten Lenkerende gegen<br />
den Uhrzeigersinn, dann schalten Sie auf höhere Gänge für<br />
schnellere Fahrten um. Drehen Sie den Drehgriff im Uhrzeigersinn,<br />
dann schalten Sie auf niedrigere Gänge für langsameres<br />
Fahren um.<br />
Drehen Sie den Drehgriff (2) am linken Lenkerende gegen den<br />
Uhrzeigersinn, dann schalten Sie auf ein größeres Kettenblatt<br />
für schnellere Fahrten um. Drehen Sie den Drehgriff im Uhrzeigersinn,<br />
dann schalten Sie auf ein kleineres Kettenblatt für<br />
langsameres Fahren um.<br />
Bei Rohloff-Schaltung entfällt der linke Schaltgriff.<br />
12<br />
Hinweis:<br />
Vermeiden Sie „über Kreuz schalten“. So können Sie effizienter<br />
Fahren und die Lebensdauer der Kette verlängern<br />
Schalten mit Lenkerendschaltern (<strong>Pino</strong> Fast)<br />
Bewegen Sie den Hebel am Ende des rechten Lenkerendes<br />
nach unten, dann schalten Sie auf höhere Gänge für schnelles<br />
Fahren um. Bewegen Sie ihn nach oben, dann schalten Sie auf<br />
niedrigere Gänge für langsameres Fahren um.<br />
Bewegen Sie den Hebel am Ende des linken Lenkerendes<br />
nach unten, dann schalten Sie auf ein größeres Kettenblatt für<br />
schnelles Fahren um. Bewegen Sie ihn nach oben, dann schalten<br />
Sie auf ein kleineres Kettenblatt für langsameres Fahren<br />
um.<br />
Hinweis:<br />
Vermeiden Sie „über Kreuz schalten“. So können Sie effizienter<br />
Fahren und die Lebensdauer der Kette verlängern.<br />
2<br />
1<br />
1<br />
2<br />
2<br />
1 2 3 4 5 6<br />
3 1<br />
7 8 9<br />
Shifting gears with the twist shifters<br />
Turn the twist shifter (1) on the right handlebar clockwise to<br />
shift to a higher gear for faster riding or counterclockwise to<br />
shift to a lower gear for slower riding. Turn the twist shifter<br />
(2) on the left handlebar counterclockwise to shift to a higher<br />
gear for faster riding and clockwise to shift to a lower gear<br />
for slower riding.<br />
<strong>Bikes</strong> equipped with a Rohloff hub do not have a shifter on<br />
the left side.<br />
Note:<br />
In order to increase riding efficiency and prolong the life<br />
of the chain, avoid the gears that make the chain cross<br />
over at an extreme angle.<br />
Shifting gears with bar end shifters (<strong>Pino</strong> Fast)<br />
Move the lever at the tip of the right handlebar grip downward<br />
in order to shift to a higher gear for faster riding or upward<br />
to shift to a lower gear for slower riding.<br />
Move the lever at the tip of the left handlebar grip downward<br />
to shift to a higher gear for faster riding and upward to shift<br />
to a lower gear for slower riding.<br />
Note:<br />
In order to increase riding efficiency and prolong the life<br />
of the chain, avoid the gears that make the chain cross<br />
over at an extreme angle.<br />
<strong>Pino</strong> 11/09-D-ENG
Bremsen<br />
An Ihrem <strong>Pino</strong> sind die besonders leistungsstarken hydraulischen<br />
Bremsen Magura Louise montiert. Es handelt sich<br />
dabei um eine Tandemversion, die sich durch 180 mm und<br />
203 mm Bremsscheiben und Bremsleitungen von der Standard-Version<br />
unterscheidet. <strong>Mit</strong> dem rechten Bremsgriff wird<br />
das Hinterrad und mit dem linken Bremsgriff das Vorderrad<br />
gebremst.<br />
Die Bremsgriffe sind „umgekehrt“ angebracht und erfordern<br />
etwas Eingewöhnung.<br />
Achtung!<br />
Die Scheibenbremsen des <strong>Pino</strong>s sind sehr leistungsfähig<br />
und gut dosierbar. Trotzdem kann es zur Blockierung der<br />
Räder kommen. Durch die höhere Zuladung eines Tandems,<br />
kann der Bremsweg länger ausfallen als bei einem<br />
„Solo“-Fahrrad. Machen Sie sich vor der ersten Fahrt im<br />
Straßenverkehr mit der Bremskraft durch Bremsproben<br />
auf einem unbefahrenem Gelände vertraut.<br />
Gepäck anbringen<br />
<strong>Mit</strong> dem als Zubehör erhältlichen Gepäckträger und einem<br />
Lowrider lässt sich das <strong>Pino</strong> zu einem für lange Reisen geeigneten<br />
Tourer ausbauen. Der Lowrider wird, günstig für den<br />
Schwerpunkt, am Rahmen zwischen den beiden Laufrädern<br />
angebracht. In Verbindung mit dem Zweibeinständer und<br />
einer zusätzlichen Lowriderstrebe können Sie sogar bis zu<br />
vier Fahrradtaschen mit einem maximalen Gewicht von 25 kg<br />
daran befestigen.<br />
Für eine bessere Standfestigkeit empfehlen wir den <strong>Hase</strong>-<br />
Zweibeinständer, der hinter dem Vorderrad angebracht ist.<br />
So lässt sich das <strong>Pino</strong> einfacher beladen.<br />
Hinweis:<br />
Achten Sie bei größeren Gepäckmengen auf eine ausgewogene<br />
Lastverteilung. Bei einseitig angebrachten Lasten<br />
können sich die Fahreigenschaften verschlechtern.<br />
Achtung!<br />
Durch die höhere Zuladung kann der Bremsweg länger<br />
ausfallen als bei einem unbeladenem <strong>Pino</strong>. Machen Sie<br />
sich vor der ersten Fahrt mit Gepäck mit den Brems- und<br />
Fahreigenschaften auf einem unbefahrenem Gelände<br />
vertraut.<br />
2<br />
Rund ums Fahren<br />
Riding your <strong>Pino</strong><br />
Braking<br />
Your <strong>Pino</strong> is equipped with especially powerful hydraulic Magura<br />
Louise brakes. This braking system has been adapted for<br />
tandem use, with one 180mm and one 203mm brake disc and<br />
special brake hoses. The right brake lever controls the rear<br />
wheel, and the left brake lever, the front wheel. The brake<br />
levers are mounted “upside-down”, which requires some time<br />
to get used to.<br />
Caution!<br />
The disc brakes of the <strong>Pino</strong> are very powerful and<br />
have good modulation. However, it is still possible for<br />
the wheels to become locked. The braking distance for<br />
tandems can be longer than that of “solo” bicycles owing<br />
to the additional payload. Before your first ride in public<br />
traffic, be sure to familiarize yourself with the braking<br />
force by trying a few braking trials in an open area away<br />
from motorized vehicles.<br />
Transporting luggage<br />
The <strong>Pino</strong> can be equipped for longer tours with the Luggage<br />
Rack and Lowrider Rack, which are both available as accessories.<br />
The Lowrider Rack is mounted to the frame between<br />
the two wheels, which lowers the center of gravity, improving<br />
handling. When used in combination with the Double Kickstand<br />
and an additional Lowrider Bar, the Lowrider Rack can<br />
transport up to four panniers with a maximum load of 25 kg<br />
(55 lbs).<br />
For increased stability, we recommend the HASE Double<br />
Kickstand, which is mounted behind the front wheel. This<br />
makes it easier to load the <strong>Pino</strong>.<br />
Note:<br />
When transporting larger quantities of luggage, be sure<br />
to distribute the weight evenly. An unevenly distributed<br />
load could impair riding stability.<br />
Caution!<br />
The braking distance for a heavily loaded bicycle can be<br />
longer than that of an unloaded bicycle. Before your first<br />
long ride with luggage, be sure to familiarize yourself with<br />
the braking force and riding stability of the loaded <strong>Pino</strong> in<br />
an open area away from motorized vehicles.<br />
<strong>Pino</strong> 11/09-D-ENG 13
Rund ums Fahren<br />
Riding your <strong>Pino</strong><br />
<strong>Pino</strong> parken<br />
<strong>Mit</strong> dem als Zubehör erhältlichen <strong>Hase</strong>-Zweibeinständer können<br />
Sie das <strong>Pino</strong> sicher abstellen. Der Ständer ist so ausgelegt,<br />
dass er Belastungen mit Gepäck und Fahrern aushält. Wir<br />
empfehlen den Zweibeinständer besonders dann, wenn Sie<br />
Kinder mitnehmen. So können Sie das Kind anschnallen, ohne<br />
die Gefahr einzugehen, dass das <strong>Pino</strong> kippt.<br />
14<br />
Achtung!<br />
Bocken Sie das <strong>Pino</strong> immer über beide Ständerfüße auf,<br />
so dass sie gleichmässig belastet werden. Beim Aufbocken<br />
über einen Ständerfuß besteht Bruchgefahr.<br />
Kinder mitnehmen<br />
Für die <strong>Mit</strong>nahme von Kindern ist das <strong>Pino</strong> wegen der liegenden<br />
Position bestens geeignet. Für Kinder, die mit ihren<br />
Beinen bei der kürzesten Einstellung des Rahmens die Pedale<br />
nicht erreichen, bieten wir ein zusätzliches, verschiebbares<br />
Kindertretlager (Seite 27, „Zubehör montieren“) und Kindergriffe<br />
an. So können Kinder ab ca. 1 m Größe aktiv mittreten.<br />
In Verbindung mit einer Kupplung und dem Kinderanhänger<br />
Trets können Sie ein weiteres aktiv mittretendes Kind mitnehmen.<br />
<strong>Pino</strong> auf Auto-Fahrradträger transportieren<br />
Sie können das <strong>Pino</strong> auf einem herkömmlichen Fahrraddach-<br />
oder Heckgepäckträger transportieren.<br />
Reduzieren Sie die Gesamtlänge (siehe nächster Abschnitt).<br />
Nehmen Sie die Sitzbespannung ab. Entfernen Sie vor dem<br />
Transport alle Teile, die sich während der Fahrt lösen<br />
könnten. Stellen Sie das <strong>Pino</strong> auf den Fahrradträger. Fixieren<br />
Sie beide Räder und den Rahmen. Vergewissern Sie sich, dass<br />
das <strong>Pino</strong> sich nicht lockern kann.<br />
Rahmenlänge für Transport reduzieren<br />
Sollte es notwendig sein, das <strong>Pino</strong> im Auto, Zug oder einem<br />
anderen Fahrzeug zu transportieren, dann können Sie die Gesamtlänge<br />
verkürzen, indem Sie den Vorbau ganz einschieben.<br />
1. Markieren Sie (z.B. mit einem wasserfesten Filzstift) die<br />
Position des Vorbaus im Hauptrahmen auf der Unterseite<br />
des Rohres. Es erleichtert die ursprüngliche Einstellung<br />
wiederherzustellen.<br />
2. Stellen Sie den Rahmen auf die kürzeste Länge ein. Beschreibung<br />
finden Sie im Kapitel „Rahmenlänge einstellen“<br />
auf Seite 9.<br />
Parking the <strong>Pino</strong><br />
The <strong>Pino</strong> can be parked securely using the HASE Double<br />
Kickstand available as an accessory. The kickstand is designed<br />
to support the weight of the luggage and riders when the tandem<br />
is parked. We especially recommend the Double Kickstand<br />
when the front rider is a child. This feature allows you<br />
to help the child get onto the seat and fasten the safety belt<br />
with no danger of tipping.<br />
Caution!<br />
For <strong>Pino</strong>s with a Double Kickstand: Always ensure that<br />
the <strong>Pino</strong> is resting evenly on both legs of the kickstand<br />
when parked. If the <strong>Pino</strong> is supported by a single leg of<br />
the kickstand, the leg may break.<br />
Transporting children<br />
The recumbent position of the front seat is ideal for children.<br />
If the child’s feet do not reach the pedals when the front<br />
boom is fully inserted (shortest frame setting), we offer an<br />
additional, repositionable Children’s Crankset (see also page<br />
27, “Installing accessories”) and Children’s Grips. With this<br />
crankset, children as small as 1 meter (3’ 3”) in height can<br />
pedal in the front seat. An additional child can be transported<br />
(and pedal along) by hitching a Trets trailer to the <strong>Pino</strong>.<br />
Transporting the <strong>Pino</strong> on a car rack<br />
The <strong>Pino</strong> can be transported with a standard roof or rearmounted<br />
bicycle carrier. Reduce the frame length (see next<br />
section). Remove the seat cover. Remove all parts that could<br />
become loose during transport. Place the <strong>Pino</strong> on the car<br />
rack. Secure the two wheels and the frame. Ensure that the<br />
<strong>Pino</strong> cannot become loose during transport.<br />
Reducing frame length for transport<br />
The <strong>Pino</strong> can be adjusted to its most compact state for transportation<br />
by car, train, or other vehicle by fully inserting the<br />
front boom.<br />
1. Mark (for example, with a permanent marker) the position<br />
of the front boom in the main frame on the bottom<br />
of the tube. This makes it easier to reassemble the bicycle<br />
with its original dimensions.<br />
2. Adjust the frame to its shortest length. For more information,<br />
see “Adjusting the frame length” on page 9.<br />
<strong>Pino</strong> 11/09-D-ENG<br />
8/09
Hinweis:<br />
Sollte das <strong>Pino</strong> noch zu lang sein, dann können Sie den<br />
Rahmen teilen.<br />
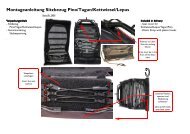
Rahmen teilen<br />
Der Rahmen des <strong>Pino</strong>s lässt sich mit wenigen Handgriffen teilen.<br />
Somit ist es möglich, die Länge noch weiter zu reduzieren.<br />
Transport auf engstem Raum z.B. in einem PKW-Kofferraum<br />
wird möglich. Dabei kann das komplette Zubehör wie<br />
Zweibeinständer, Lowrider etc. am Rad montiert bleiben.<br />
1. Schieben Sie den Vorbau ein. Siehe Kapitel „Rahmenlänge<br />
einstellen“ auf Seite 9.<br />
2. Schrauben Sie den linken Bremsgriff (2) der Vorderradbremse<br />
mit einem Innensechskantschlüssel 5 mm ab und<br />
lösen Sie die Befestigung der Bremsleitung (3) mit einem<br />
Innensechskantschlüssel 3 mm vom Lenker.<br />
3. Schrauben Sie die Lenkübertragungsstange (6) von der<br />
Lenkanbindung an der Gabel (5) mit einem Innensechskantschlüssel<br />
6 mm und einem Gabelschlüssel 13 mm ab.<br />
Drehen Sie die Lenkübertragungsstange nach hinten.<br />
4. Nehmen Sie die linke Kette vom hinteren Kettenblatt ab.<br />
Achten Sie darauf, dass die Kette nicht verschmutzt.<br />
5. Lösen Sie die Schrauben der <strong>Rahmentrennung</strong> (7) auf der<br />
rechten Seite mit einem Innensechskantschlüssel 5 mm<br />
durch Drehung gegen den Uhrzeigersinn.<br />
6. Trennen Sie die beiden Rahmenteile. Ist ein Zweibeinständer<br />
montiert, dann bleibt der vorderer Teil des Rahmen<br />
stehen. Trennen Sie die Steckverbindung des Beleuchtungskabels<br />
(Option).<br />
7. Legen Sie beide Rahmenteile in den Kofferraum. Polstern<br />
Sie empfindliche Teile wie Schaltung, Scheibenbremsen,<br />
Beleuchtung, lackierte Teile etc.<br />
Der Zusammenbau erfolgt in umgekehrter Reihenfolge.<br />
Achtung!<br />
Nach dem Zusammenbau der beiden Rahmenteile<br />
müssen die Schrauben (7) mit einem 5mm Innensechskantschlüssel<br />
im Uhrzeigersinn fest angezogen werden.<br />
Die roten Anzeigestifte (8) auf der rechten Seite des<br />
Rahmens dürfen nicht aus dem Rahmen herausragen. Bei<br />
Fahrten mit losen Schrauben besteht akute Unfallgefahr.<br />
2<br />
3<br />
4<br />
7<br />
Rund ums Fahren<br />
Riding your <strong>Pino</strong><br />
Note:<br />
If the <strong>Pino</strong> is still too long for transport, the frame can<br />
also be dismantled.<br />
Dismantling the frame<br />
The frame of the <strong>Pino</strong> can be easily dismantled, making it possible<br />
to further reduce the length. This feature lets you transport<br />
the <strong>Pino</strong> in the smallest of spaces, such as the trunk of a<br />
car. All accessories, such as the Double Kickstand and Lowrider<br />
Rack, can remain attached.<br />
1. Insert the front boom fully into the frame. See the section<br />
“Adjusting the frame length” on page 9.<br />
2. Unscrew the left brake lever (2) of the front-wheel brake<br />
using a 5mm Allen key and remove the fastening clamp of<br />
the brake hose (3) from the handlebar using a 3mm Allen<br />
key.<br />
3. Unscrew the steering rod (6) from the fork-steering rod<br />
connection (5) using a 6mm Allen key and a 13mm openend<br />
wrench. Pull the end of the steering rod around to<br />
the back.<br />
4. Remove the left chain from the rear chainring. Be sure<br />
that the chain does not become soiled.<br />
5. Loosen the screws counterclockwise on the right side on<br />
the frame joint (7) using a 5mm Allen key.<br />
6. Pull apart the two sections of the frame. If your <strong>Pino</strong> has a<br />
Double Kickstand, the front half of the frame will remain<br />
upright. Separate the plug connection of the lighting cable<br />
(if applicable).<br />
7. Place the two sections of frame in the trunk/case. Wrap<br />
all sensitive parts, such as the gear system, brake discs,<br />
lighting, lacquered parts, etc., with packing material to<br />
avoid damage in transport.<br />
Caution!<br />
After the reassembling of the two sections of the frame,<br />
you need tighten the two screws (7) on the right side of<br />
the frame. The red indicator (8) must be inside of the<br />
frame. Riding with lose screws can cause accidents.<br />
<strong>Pino</strong> 11/09-D-ENG 15<br />
6<br />
8<br />
O.K<br />
5
Rund ums Fahren<br />
Riding your <strong>Pino</strong><br />
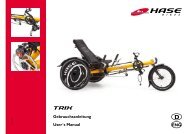
<strong>Pino</strong> in einem Karton verpacken<br />
Der Karton sollte die Innenmaße von mindestens<br />
200 x 90 x 20 cm haben.<br />
1. Bauen Sie die Pedalen ab.<br />
2. Bauen Sie den Sitz ab, indem Sie den Schnellspanner,<br />
sowie die Sitzbespannung lösen und die Sitzrohre (1)<br />
auseinander ziehen.<br />
3. Schrauben Sie die vier Befestigungsschellen der Bremsleitungen<br />
(2) am Lenker mit einem Innensechskantschlüssel<br />
6 mm ab. Schrauben Sie den Lenker ab, indem Sie die vier<br />
Schrauben (3) mit einem Innensechskantschlüssel 6 mm<br />
herausschrauben.<br />
4. Lösen Sie die Schraube des Vorbaus mit einem Innensechskantschlüssel<br />
6 mm (siehe auch Seite 9, Rahmenlänge<br />
einstellen). Nehmen Sie die linke Kette vom hinteren<br />
Kettenblatt ab. Achten Sie darauf, dass die Kette nicht<br />
verschmutzt. Schützen Sie sie mit Verpackungsmaterial.<br />
Ziehen den Vorbau heraus.<br />
5. Stellen Sie das <strong>Pino</strong> in den Karton und fixieren Sie es<br />
gegen Verrutschen mit Verpackungsmaterial. Schützen Sie<br />
alle empfindlichen Teile gegen Beschädigung.<br />
6. Schieben Sie den Sattel bis zur Oberkante des Kartons<br />
ein.<br />
16<br />
3<br />
2<br />
1<br />
Packaging the <strong>Pino</strong><br />
Use a box with internal dimensions of at least<br />
200 x 90 x 20 cm (78¾” x 35½” x 8”).<br />
1. Remove the pedals.<br />
2. Remove the front seat by opening the quick release, removing<br />
the seat cover and pulling apart the seat tubes (1).<br />
3. Remove the four fastening clamps that attach the brake<br />
hoses (2) to the handlebars using a 6mm Allen key. Detach<br />
the handlebars by removing the four screws (3) using<br />
a 6mm Allen key.<br />
4. Loosen the four screws of the front boom using<br />
a 6mm Allen key (see also page 9, “Adjusting the frame<br />
length”). Take the left chain off the rear chainring. Be sure<br />
that the chain does not become soiled and protect it with<br />
packing material. Remove the front boom.<br />
5. Place the <strong>Pino</strong> in the box and secure it with packing material<br />
to prevent movement. Be sure to protect all sensitive<br />
parts from damage.<br />
6. Lower the rear seat so that the frame fits into the box.<br />
<strong>Pino</strong> 11/09-D-ENG
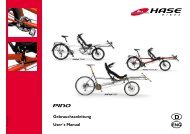
<strong>Pino</strong> im Fahrradkoffer transportieren<br />
Der Rahmen des <strong>Pino</strong> ist teilbar, somit lässt er sich ohne größeren<br />
Aufwand auf ein kleines Verpackungsmaß reduzieren.<br />
Im zerlegten Zustand passt das <strong>Pino</strong> in Grundversion, das<br />
heißt ohne Gepäckträger, ohne Lowrider, ohne Zweibeinständer,<br />
ohne Federgabel und ohne Teilverkleidung in einen<br />
Fahrradkoffer der Größe B: 80/117 cm, H: 30 cm, L: 85 cm,<br />
z.B. der Firma B&W Bike cases. Zubehör wie Schutzbleche<br />
und Beleuchtung etc. lässt sich im zerlegten Zustand im Koffer<br />
unterbringen.<br />
1. Bauen Sie die Pedale ab.<br />
2. Setzen Sie den Sattel herunter.<br />
3. Bauen Sie den Sitz ab, indem Sie den Schnellspanner,<br />
sowie die Sitzbespannung lösen und die Sitzrohre (1)<br />
auseinander ziehen.<br />
4. Schieben Sie den Vorbau ein. Siehe Kapitel „Rahmenlänge<br />
einstellen“ auf Seite 9.<br />
5. Schrauben Sie den linken Bremsgriff (2) der Vorderradbremse<br />
mit einem Innensechskantschlüssel 5 mm ab und<br />
lösen Sie die Befestigung der Bremsleitung (3) mit einem<br />
Innensechskantschlüssel 3 mm vom Lenker.<br />
6. Schrauben Sie den Lenker ab, indem Sie die vier Schrauben<br />
(4) mit einem Innensechskantschlüssel 6 mm herausschrauben.<br />
7. Schrauben Sie die Lenkübertragungsstange (6) von der<br />
Lenkanbindung an der Gabel (5) mit einem Innensechskantschlüssel<br />
6 mm und einem Gabelschlüssel 13 mm.<br />
Drehen Sie Lenkübertragungsstange nach hinten.<br />
8. Nehmen Sie die linke Kette vom hinteren Kettenblatt<br />
ab. Achten Sie darauf, dass die Kette nicht verschmutzt.<br />
Schützen Sie sie mit Verpackungsmaterial.<br />
9. Lösen Sie die Schrauben der <strong>Rahmentrennung</strong> (7) auf der<br />
rechten Seite mit einem Innensechskantschlüssel 5 mm<br />
durch Drehung gegen den Uhrzeigersinn.<br />
Trennen Sie de Steckverbindung des Beleuchtungskabels<br />
(Option). Trennen Sie die beiden Rahmenteile von<br />
einander.<br />
2<br />
3<br />
4<br />
7<br />
Rund ums Fahren<br />
Riding your <strong>Pino</strong><br />
<strong>Pino</strong> 11/09-D-ENG 17<br />
6<br />
1<br />
5<br />
Transporting the <strong>Pino</strong> in a bike case<br />
The <strong>Pino</strong>’s frame can be dismantled, allowing it to be easily<br />
reduced in size to for transport. When dismantled, the<br />
basic <strong>Pino</strong> (meaning a <strong>Pino</strong> with no Luggage Rack, Lowrider<br />
Rack, Double Kickstand, Suspension Fork, or Streamer) fits<br />
into a standard, size B bike case: 80/117 cm (31”/46”), H: 30<br />
cm (12”), L: 85 cm (33”), e.g., from the company B&W Bike<br />
Cases. Basic accessories such as fenders, lighting, etc. can be<br />
packed into the case with the dismantled frame.<br />
1. Remove the pedals.<br />
2. Lower the rear seat.<br />
3. Remove the front seat by opening the quick release, removing<br />
the seat cover and pulling apart the seat tubes (1). <br />
4. Insert the front boom as far as possible into the frame.<br />
See section “Adjusting the frame length” on page 9.<br />
5. Unscrew the left brake lever (2) of the front-wheel brake<br />
using a 5mm Allen key and remove the fastener of the<br />
brake hose (3) from the handlebar using a 3mm Allen key.<br />
6. Remove the handlebars by unscrewing the four screws (4)<br />
using a 6mm Allen key.<br />
7. Unscrew the steering rod (6) from the fork-steering rod<br />
connection (5) using a 6mm Allen key and a 13mm openend<br />
wrench. Pull the end of the steering rod around to<br />
the back.<br />
8. Remove the left chain from the rear chainring. Be sure<br />
that the chain does not become soiled. Wrap it carefully<br />
with packing material to protect it from damage in transport.<br />
9. Loosen the screws counterclockwise on the right side on<br />
the frame joint (7) using a 5mm Allen key. Pull apart the<br />
two sections of the frame. Separate the plug connection<br />
of the lighting cable (if applicable).
Rund ums Fahren<br />
Riding your <strong>Pino</strong><br />
10. Bauen Sie die Laufräder aus.<br />
18<br />
Hinweis:<br />
Die Laufräder passen in den Koffer hinein. Um die<br />
empfindlichen Bremsscheiben zu schützen empfehlen wir,<br />
diese zu demontieren.<br />
11. Entfernen Sie den Schnellspanner aus dem Vorderrad.<br />
Legen Sie das Vorderrrad (1) in eine Laufradtasche und<br />
dann in den Koffer, wie im Bild gezeigt.<br />
12. Legen Sie den hinteren Teil des Rahmens (3) zwischen<br />
die Gabel des vorderen Rahmenteils (2) und die beiden<br />
Teile zusammen in den Koffer. Schützen Sie Lackteile mit<br />
Verpackungsmaterial.<br />
13. Wickeln Sie den Lenker (4) mit Verpackungsmaterial ein<br />
und legen Sie ihn in den Koffer.<br />
14. Legen Sie den Sitz (6) in den Koffer.<br />
15. Entfernen Sie den Schnellspanner aus dem Hinterrad. Legen<br />
Sie das Hinterrad (5) in eine Laufradtasche und dann<br />
in den Koffer.<br />
16. Legen Sie alle Kleinteile verpackt in den Koffer.<br />
17. Fixieren Sie alle Teile mit Koffergurten und polstern Sie<br />
die Zwischenräume mit Verpackungsmaterial.<br />
Der Zusammenbau erfolgt in umgekehrter Reihenfolge.<br />
Achtung!<br />
Nach dem Zusammenbau der beiden Rahmenteile<br />
müssen die Schrauben mit einem 5mm Innensechskantschlüssel<br />
im Uhrzeigersinn fest angezogen werden. Die<br />
roten Anzeigestifte auf der rechten Seite des Rahmens<br />
dürfen nicht aus dem Rahmen herausragen. Bei Fahrten<br />
mit losen Schrauben besteht akute Unfallgefahr.<br />
Siehe Seite 15, Rahmen teilen.<br />
85 cm 33 in<br />
5<br />
117 cm 46 in<br />
80 cm 31 in<br />
1<br />
30 cm<br />
12 in<br />
6<br />
3<br />
2<br />
O.K<br />
4<br />
10. Remove the wheels.<br />
Note:<br />
The wheels will fit in the case. We recommend removing<br />
the brake discs in order to protect these sensitive parts<br />
from damage.<br />
11. Remove the quick release assembly from the front wheel<br />
(1). Place the front wheel in a wheel bag and then in the<br />
case, as shown in the photo.<br />
12. Place the rear section of the frame (3) inside the fork (2);<br />
then place both parts into the case. Wrap all lacquered<br />
parts with packing material to prevent scratching.<br />
13. Wrap the handlebars (4) with packing material and place<br />
them in the case.<br />
14. Place the front seat (6) in the case.<br />
15. Remove the quick release assembly from the rear wheel.<br />
Place the rear wheel (5) in a wheel bag and then in the<br />
case.<br />
16. Wrap the small parts in packing material and pack them in<br />
the case.<br />
17. Secure all parts using the belts, and fill the empty spaces<br />
with packing material.<br />
Caution!<br />
After the reassembling of the two sections of the frame,<br />
you need tighten the two screws (7) on the right side of<br />
the frame. The red indicator (8) must be inside of the<br />
frame. Riding with lose screws can cause accidents. See<br />
page 15, Dismantling the frame.<br />
<strong>Pino</strong> 11/09-D-ENG
Wartung und Reparatur<br />
Wartungsintervalle<br />
Hinweis:<br />
Lassen Sie alle Inspektions- und Wartungsarbeiten von<br />
ihrem <strong>Hase</strong>-Fachhändler durchführen.<br />
Die erste Inspektion erfolgt nach den ersten 300 km. Alle<br />
weiteren im Abstand von 3000 km oder in einem jährlichen<br />
Abstand.<br />
Bauteil Tätigkeit<br />
Vor<br />
jeder<br />
Fahrt<br />
Beleuchtung Funktion prüfen X<br />
Bereifung Luftdruck prüfen<br />
Profiltiefe und Seitenflanken prüfen<br />
Bremsen Belagstärke prüfen<br />
Position zur Bremsscheibe prüfen<br />
Bremsprobe durchführen<br />
Bremsschläuche Auf Beschädigung prüfen X<br />
Dynamobefestigung Auf Festigkeit prüfen X<br />
Schrauben der <strong>Rahmentrennung</strong> Auf Festigkeit prüfen X<br />
Kette Auf Verschleiß prüfen<br />
schmieren<br />
Monatlich<br />
Kurbelbefestigung Schrauben prüfen X<br />
Laufräder Rundlauf prüfen<br />
Speichenspannung prüfen<br />
Lenker prüfen X<br />
Lenkübertragungsstange Spiel prüfen X<br />
Steuerlager Spiel prüfen X<br />
Naben Spiel prüfen X<br />
Pedale Spiel prüfen X<br />
Schaltwerk reinigen, schmieren X<br />
Schaltzüge Auf Beschädigung prüfen X<br />
Schnellspanner Festigkeit prüfen X<br />
Schrauben und Muttern Festigkeit prüfen X<br />
X<br />
X<br />
X<br />
X<br />
X<br />
X<br />
X<br />
X<br />
X<br />
Jährlich<br />
Component Action<br />
Maintenance and repair<br />
Maintenance intervals<br />
Note:<br />
Please have all inspection and maintenance work performed<br />
by your authorized <strong>Hase</strong> retailer.<br />
The first inspection should be performed after the initial 300<br />
km (200 miles). All additional inspections should be performed<br />
in 3000km intervals or on a yearly basis.<br />
<strong>Pino</strong> 11/09-D-ENG 19<br />
Before<br />
every<br />
ride<br />
Lighting Check function X<br />
Tires Check tire pressure<br />
Check tread wear and sidewalls<br />
Brakes Check pad thickness<br />
Check alignment to the brake disc<br />
Test braking effectiveness<br />
Brake cables or brake hoses Check for damage X<br />
Dynamo mounting Check for tightness X<br />
Screws for frame dismantling Check for tightness X<br />
Chain Check for wear<br />
Oil<br />
X<br />
X<br />
X<br />
Once a<br />
month<br />
Crank bracket Check bolts X<br />
Wheels Check for lateral/radial true<br />
Check spoke tension<br />
Handlebar Inspect X<br />
Steering rod Check for play X<br />
Headset Check for play X<br />
Hubs Check for play X<br />
Pedals Check for axle play X<br />
Rear derailleur Clean, lubricate X<br />
Derailleur hanger Check for damage X<br />
Quick releases Check for tightness X<br />
Screws/bolts and nuts Check for tightness X<br />
X<br />
X<br />
X<br />
X<br />
X<br />
X<br />
Once a<br />
year
Wartung und Reparatur<br />
Maintenance and repair<br />
Rundlauf der Laufräder kontrollieren<br />
Die Laufräder wurden werkseitig sorgfältig zentriert. Aufgrund<br />
der Belastung setzen sich die Speichen in den Felgensitzen<br />
nach einer ersten Einfahrphase so, dass die Speichenspannung<br />
unterschiedlich sein kann und das Laufrad unrund läuft.<br />
Lassen Sie die Laufräder bei der ersten Inspektion von Ihrer<br />
Fachwerkstatt nach ca. 300 km nachzentrieren. Danach ist<br />
das Nachspannen in der Regel nur noch selten notwendig. Ob<br />
eine Felge rund läuft können Sie feststellen, in dem Sie an der<br />
Gabel oder an der Kettenstrebe einen Draht befestigen, der<br />
die Felge kaum berührt. Heben Sie das <strong>Pino</strong> an und lassen Sie<br />
das Laufrad drehen. Entfernt sich die Felgenflanke an einigen<br />
Stellen mehr von dem Draht oder berührt sie ihn, dann muss<br />
das Laufrad in einer Fachwerkstatt nachzentriert werden.<br />
Bereifung kontrollieren<br />
Überprüfen Sie die Reifen auf Beschädigungen und auf intaktes<br />
Profil. Tauschen Sie poröse oder abgefahrene Reifen aus.<br />
Überprüfen Sie vor jeder Fahrt den Luftdruck und fahren Sie<br />
stets mit dem auf der Reifenflanke angegebenen Luftdruck.<br />
20<br />
Achtung!<br />
Fahren Sie nie mit einem höheren als dem angegebenen<br />
Luftdruck. Der Reifen könnte platzen. Unfall- und Verletzungsgefahr!<br />
Hinweis:<br />
Wenn Sie eine andere als die originale Reifengröße<br />
verwenden, kann es notwendig sein die Position des<br />
Dynamos (Option) neu einzustellen.<br />
Scheibenbremsen kontrollieren<br />
Beachten Sie die beigefügte Betriebsanleitung des Bremsenherstellers.<br />
Lassen Sie die Belagstärke regelmäßig von ihrer<br />
Fachwerkstatt kontrollieren. Bei ungewöhnlichen Bremsgeräuschen<br />
oder einer unzureichenden Bremswirkung, wenden<br />
Sie sich unverzüglich an ihre Fachwerkstatt.<br />
Checking the wheels for lateral/radial true<br />
The wheels have been carefully trued prior to shipment. During<br />
the break-in period, stress on the wheels may cause the<br />
spokes to settle into the rims so that the spoke tension is no<br />
longer uniform and the wheels untrue. Have your wheels retrued<br />
by your authorized retailer at the first inspection after<br />
approx. 300 km (200 miles). Subsequent tensioning is seldom<br />
necessary. You can check whether a rim is true by attaching<br />
a wire to the fork or chain stay and positioning it so that it<br />
almost touches the rim. Lift the <strong>Pino</strong> and rotate the wheel. If<br />
portions of the rim move away from or come in contact with<br />
the wire, the wheel must be taken to a qualified bicycle mechanic<br />
for re-truing.<br />
Checking the tires<br />
Check the tires for damage and tread wear. Tires with cuts,<br />
cracks, or worn tread should be replaced. Check tire pressure<br />
before each ride, and always ride with the pressure specified<br />
on the tire sidewalls.<br />
Caution!<br />
Never ride with excessive tire pressure (higher than<br />
specified on the sidewall). The tire could burst. Risk of<br />
accident and injury!<br />
Note:<br />
When using a tire that is a different size than the original<br />
tire, it may be necessary to reposition the dynamo (if<br />
applicable).<br />
Checking the disc brakes<br />
Please note the information provided in the enclosed manual<br />
from the brake manufacturer. Have a qualified bicycle mechanic<br />
check the pad thickness regularly. If you notice any unusual<br />
braking sounds or inadequate braking strength, consult<br />
your bicycle mechanic immediately.<br />
<strong>Pino</strong> 11/09-D-ENG
Kettenschaltung kontrollieren und nachstellen<br />
Beachten Sie die beigefügte Betriebsanleitung des Schaltungsherstellers.<br />
Die Kettenschaltung wurde werkseitig sorgfälltig<br />
eingestellt. Im Laufe der Zeit können sich jedoch die Schaltzüge<br />
dehnen und die Schaltung arbeitet nicht mehr exakt.<br />
1. Klettert die Kette nur unwillig beim Schalten auf das<br />
nächst größere Ritzel, dann spannen Sie den Bowdenzug,<br />
in dem Sie die Einstellschraube am Schaltwerk (1) oder<br />
am Schaltgriff zunächst etwa eine Umdrehung gegen den<br />
Uhrzeigersinn drehen. Klettert die Kette unwillig auf das<br />
nächst kleinere Ritzel, dann drehen Sie die Einstellschraube<br />
im Uhrzeigersinn.<br />
2. Schalten Sie herauf und herunter, wobei Sie das Hinterrad<br />
anheben und die Kurbel drehen. Klettert die Kette<br />
leicht herauf und wieder herunter, dann ist die Schaltung<br />
richtig eingestellt. Es können eventuell mehrere Versuche<br />
notwendig sein.<br />
Damit die Kette von den beiden äußeren Ritzeln nicht herunterfällt,<br />
wird sie durch Endanschläge begrenzt. Diese verändern<br />
sich normalerweise nicht bei normalem Gebrauch. Sollte<br />
es jedoch notwendig sein, weil z.B. das Schaltwerk oder das<br />
Schaltauge verbogen sind, gehen Sie wie folgt vor:<br />
1. Schalten Sie, während Sie die Tretkurbeln drehen, den<br />
Gang auf das kleinste Ritzel und schauen Sie von hinten<br />
auf den Zahnkranz, ob die Leitrollen des Schaltwerks sich<br />
genau unter dem kleinsten Ritzel befinden.<br />
2. Ist dieses nicht der Fall, dann verdrehen Sie die mit<br />
„H“ gekennzeichnete Kreuzschlitzschraube so, dass die<br />
Leitrollen des Schaltwerks sich genau unter dem Ritzel<br />
befinden.<br />
3. Schalten Sie, während Sie die Tretkurbeln drehen, vorsichtig<br />
auf das größte Ritzel.<br />
4. Schauen Sie von hinten auf den Zahnkranz, ob die Leitrollen<br />
des Schaltwerks sich genau unter dem größten Ritzel<br />
befinden.<br />
5. Ist dieses nicht der Fall, dann verdrehen Sie die mit<br />
„L“ gekennzeichnete Kreuzschlitzschraube so, dass die<br />
Leitrollen des Schaltwerks sich genau unter dem Ritzel<br />
befinden.<br />
<strong>Pino</strong> 11/09-D-ENG 21<br />
1<br />
Wartung und Reparatur<br />
Maintenance and repair<br />
Checking and adjusting the derailleur<br />
Please note the information provided in the enclosed manual<br />
from the gear system manufacturer. The derailleur has been<br />
carefully adjusted at the factory. Over time, however, the<br />
gear cables tend to stretch and the derailleur may no longer<br />
function with the same precision.<br />
1. If the chain seems reluctant to move onto the next larger<br />
sprocket when shifting, then tighten the Bowden cable by<br />
turning the barrel adjuster on the derailleur (1) or twist<br />
shifter one full turn counterclockwise (to start with). If<br />
the chain seems reluctant to move onto the next smaller<br />
sprocket, then turn the barrel adjuster clockwise.<br />
2. Shift up and down while turning the crank with the rear<br />
wheel lifted. If the chain switches easily between sprockets<br />
in both directions, the derailleur is properly adjusted.<br />
It may be necessary to check and readjust several times<br />
before the proper setting is found.<br />
The limit stops prevent the chain from falling off of the two<br />
outer sprockets. These stops generally do not require readjustment<br />
with normal bicycle use. If a readjustment nevertheless<br />
becomes necessary, for example, because the derailleur<br />
or derailleur hanger is bent, proceed as follows:<br />
1. While spinning the pedals, shift the chain to the smallest<br />
sprocket. Now check whether the guide pulley of the derailleur<br />
is in line with the smallest sprocket when looking<br />
from the back.<br />
2. If this is not the case, turn the Phillips screw marked with<br />
an “H” until the guide pulley of the derailleur is in exact<br />
alignment with the sprocket.<br />
3. While spinning the pedals, carefully shift the chain to the<br />
largest sprocket.<br />
4. Check whether the guide pulley of the derailleur is now in<br />
line with the largest sprocket when looking from the back.<br />
5. If this is not the case, turn the Phillips screw marked with<br />
an “L” until the guide pulley of the derailleur is in exact<br />
alignment with the sprocket.
Wartung und Reparatur<br />
Maintenance and repair<br />
22<br />
Hinweis:<br />
Überlassen Sie eine komplette Neu-Einstellung der Schaltung<br />
ihrer Fachwerkstatt. Fehleinstellungen können zu<br />
schwerwiegenden mechanischen Schäden führen. Beachten<br />
Sie die Betriebsanleitung des Schaltungsherstellers.<br />
Achtung!<br />
Nach der Einstellung der Schaltung, sollten Sie unbedingt<br />
auf einem unbefahrenen Gelände eine Probefahrt unternehmen.<br />
Treten Fehler im Straßenverkehr auf, dann kann<br />
das zum Verlust der Fahrkontrolle führen.<br />
Ketten prüfen<br />
Beim <strong>Pino</strong> werden zwei Ketten verwendet. Die vordere<br />
ist länger als bei einem herkömmlichen Fahrrad und sie<br />
wird nicht geschaltet. Der Verschleiß ist geringer und somit<br />
braucht sie nicht so oft ausgewechselt werden. Die Hintere<br />
Kette ist kürzer und sie wird geschaltet. Deshalb verschleißt<br />
sie früher als die vordere. Den Zustand können Sie mit einer<br />
Kettenverschleißlehre aus dem Fachhandel überprüfen. Wir<br />
empfehlen Ihnen dieses von einer Fachwerkstatt überprüfen<br />
zu lassen und die Ketten, eventuell auch die Kettenblätter und<br />
die Ritzelkassette wechseln zu lassen.<br />
Die vordere Kette für die längste Einstellung des <strong>Pino</strong> beträgt<br />
mit Verbindungsglied 3683 mm. Das entspricht 145 Kettengliedern.<br />
Die hintere Kette hat eine Standardlänge.<br />
Ketten reinigen und schmieren<br />
Damit die Kette ihre maximale Lebensdauer erreicht, muss<br />
sie regelmäßig gereinigt und geschmiert werden.<br />
1. Reinigen Sie die Kette mit einem trockenen und sauberen<br />
Lappen.<br />
Achtung!<br />
Verwenden Sie keine Lösungsmittel und keine Druckreiniger.<br />
Diese könnten die Schmierstoffe aus den Lagern der<br />
Kettenglieder auswaschen und die Lebensdauer der Kette<br />
verkürzen.<br />
2. Tragen Sie gleichmäßig Kettenöl, -fett oder -wachs auf die<br />
Kettenglieder auf, während Sie die Kurbel drehen.<br />
Note:<br />
A complete readjustment of the derailleur should only be<br />
performed by a qualified mechanic. Incorrect adjustments<br />
can cause serious mechanical damage. Please note the<br />
information provided in the manual from the gear system<br />
manufacturer.<br />
Caution!<br />
After the derailleur has been adjusted, it is absolutely<br />
essential that you test the gears in an open area away<br />
from traffic before taking the bicycle onto public roads.<br />
Problems may arise that could cause you to lose control<br />
of the bicycle.<br />
Checking the chains<br />
The <strong>Pino</strong> uses two chains. The front chain is longer than that<br />
of a standard bicycle and has no gears. This chain does not experience<br />
as much wear as a normal chain and therefore does<br />
not need to be replaced as often. The rear chain is shorter<br />
and has gears. Therefore this chain wears more quickly than<br />
the front chain. You can check the condition of the chain using<br />
a chain wear gauge from a bike shop. We recommend<br />
that you have a qualified bicycle mechanic regularly check the<br />
condition of the chain and, if necessary, replace the chainrings<br />
and the cassette.<br />
For the longest frame adjustment of the <strong>Pino</strong>, the front chain<br />
must be 3683 mm in length (with the master link). This is<br />
equivalent to 145 chain links. The rear chain has a standard<br />
length.<br />
Cleaning and oiling the chains<br />
In order to ensure that the chains do not wear out before the<br />
end of their maximum working life, they must be cleaned and<br />
oiled on a regular basis.<br />
1. Clean the chains using a clean, dry cloth.<br />
Caution!<br />
Never use solvents or pressure cleaners. These could<br />
wash the lubricants out of the chain bearings and<br />
shorten the life of the chain.<br />
2. Apply chain oil, grease, or wax evenly to the chain links<br />
while slowly rotating the crank.<br />
<strong>Pino</strong> 11/09-D-ENG
Hinweis:<br />
Bei Regenfahrten wird ein Teil des Schmierstoffes<br />
abgewaschen und gelangt somit in die Umwelt. Wir empfehlen<br />
biologisch abbaubare Schmierstoffe.<br />
Achtung!<br />
Der Kettenschmierstoff darf nicht auf die Bremsscheiben<br />
oder Reifen gelangen. Die Bremswirkung könnte beeinträchtigt<br />
werden oder die Räder könnten wegrutschen.<br />
3. Treten Sie einige Umdrehungen, damit sich der Schmierstoff<br />
verteilen kann.<br />
4. Lassen Sie den Schmierstoff einige Minuten einwirken und<br />
wischen Sie anschließend den überschüssigen Schmierstoff<br />
mit einem sauberen und trockenen Lappen ab.<br />
Vordere Kette spannen<br />
1. Lösen Sie mit einem Innensechskantschlüssel 6 mm die<br />
Konusklemmung (1) am linken Sitzrohr durch Drehung<br />
gegen den Uhrzeiger.<br />
2. Ziehen Sie den Kettenspanner (2) nach vorne bis die<br />
Kette gespannt ist.<br />
Hinweis:<br />
Falls der Kettenspanner klemmen sollte, dann bewegen<br />
Sie ihn etwas hin und her, um ihn zu lösen. Sollte das<br />
nicht zum Erfolg führen, dann schlagen Sie mit einem<br />
Kunststoffhammer seitlich gegen die Konusklemmung.<br />
3. Ziehen Sie die Konusklemmung (1) wieder fest.<br />
Kettenschutzrohre prüfen<br />
Die Kettenschutzrohre (3) haben die Aufgabe Kleidung vor<br />
Kettenschmierstoff zu schützen. Im Laufe des Gebrauchs verschleißen<br />
sie durch Reibung mit der laufenden Kette. Kontrollieren<br />
Sie die Kettenschutzrohre an den Enden auf Verschleißspuren.<br />
Sind die Enden vollständig verschlissen, lassen Sie die<br />
Kettenschutzrohre von ihrer Fachwerkstatt austauschen.<br />
Hinweis:<br />
Für den Austausch der Kettenschutzrohre muss die Kette<br />
am Verbindungsglied getrennt werden.<br />
2<br />
3<br />
Wartung und Reparatur<br />
Maintenance and repair<br />
Note:<br />
Rain can wash off traces of lubricant, releasing it into<br />
the environment. We recommend using biodegradable<br />
lubricants.<br />
Caution!<br />
Never allow chain lubricant to come in contact with the<br />
brake discs or tires. This could significantly reduce braking<br />
performance or, in the case of lubricant on tires, wheel<br />
traction.<br />
3. Continue rotating the crank to distribute the lubricant.<br />
4. Wait several minutes to allow the lubricant to penetrate.<br />
Then wipe off all excess lubricant using a clean, dry cloth.<br />
Tightening the front chain<br />
1. Loosen the conical clamp fitting (2) inside the hole on the<br />
left seat tube using a 6mm Allen key.<br />
2. Pull the chain tensioner forward until the chain is tight.<br />
Note:<br />
If the chain tensioner will not move, wiggle it back and<br />
forth in order to loosen it. If the chain tensioner is still too<br />
stiff to move, then try striking lateral the conical clamp<br />
fitting with a plastic mallet.<br />
3. Retighten the conical clamp fitting (2).<br />
Checking the chain tube<br />
The purpose of the chain tube (1) is to protect clothing from<br />
chain lubricant. Over time, friction from the moving chain will<br />
cause the tube to wear. Check the ends of the chain tube for<br />
signs of wear. If the ends are completely worn, have your bicycle<br />
mechanic replace the tube.<br />
Note:<br />
In order to replace the chain tube, the chain must be<br />
opened at the connecting link.<br />
<strong>Pino</strong> 11/09-D-ENG 23<br />
8/09<br />
1
Wartung und Reparatur<br />
Maintenance and repair<br />
Dynamo einstellen (Option)<br />
Der Dynamo ist an der rechten Sitzstrebe befestigt. Damit<br />
der Dynamo korrekt arbeitet, muss die Laufrolle des Dynamos<br />
auf der Dynamolauffläche auf der Reifenflanke laufen und<br />
die Läuferachse senkrecht zur Dynamolauffläche ausgerichtet<br />
sein. Beachten Sie auch die Betriebsanleitung des Dynamoherstellers.<br />
1. Lösen Sie die Schraube der Dynamobefestigung (1) mit<br />
einem Innensechskantschlüssel 5 mm und einem Gabelschlüssel<br />
10 mm, so dass sich der Dynamo in dem<br />
Langloch verschieben lässt.<br />
2. Halten Sie als Hilfsmittel eine Schnur zwischen der Radnabe<br />
und der Laufrolle des Dynamos und richten Sie den<br />
Dynamo so aus, dass die Achse des Läufers genau mit der<br />
Hilfslinie der Schnur übereinstimmt.<br />
3. Die Laufrolle des Dynamos muss dabei auf der Dynamolauffläche<br />
auf der Reifenflanke laufen.<br />
4. Ziehen Sie die Befestigungsschraube des Dynamos wieder<br />
fest.<br />
24<br />
Achtung!<br />
Wenn der Dynamo nicht korrekt ausgerichtet ist, erhöht<br />
sich der Fahrwiderstand und das Laufgeräusch. Eine<br />
Beschädigung der Reifenflanke oder der Laufrolle ist<br />
möglich.<br />
1<br />
Adjusting the dynamo (if applicable)<br />
The dynamo is mounted on the right seat stay. In order for<br />
the dynamo to function effectively, the dynamo roller must<br />
contact the wheel within the dynamo roller surface on the<br />
sidewall, and the axis of roller rotation must be perpendicular<br />
to the roller surface. Please note the information provided in<br />
the user’s manual from the dynamo manufacturer.<br />
1. Loosen the screw of the dynamo bracket (1) using a<br />
5mm Allen key and a 10mm open-end wrench so that the<br />
dynamo can be moved within the slot.<br />
2. To assess the proper alignment of the dynamo, hold a<br />
piece of string or cord between the center of the wheel<br />
axis and the center of the dynamo roller, checking that<br />
the longitudinal axis of the dynamo (roller rotation axis) is<br />
located precisely along this line.<br />
3. The dynamo roller must also be positioned so that it runs<br />
along the roller surface of the tire sidewall.<br />
4. Retighten the screw of the dynamo bracket.<br />
Caution!<br />
Positioning the dynamo incorrectly will increase the running<br />
resistance and noise level and may cause damage to<br />
the tire sidewall or dynamo roller.<br />
<strong>Pino</strong> 11/09-D-ENG
Zubehör montieren<br />
Lowrider montieren<br />
1. Stecken Sie den Halter (1) in die Bohrung und schrauben<br />
Sie ihn mit der mitgelieferten Schraube (2) mit einem<br />
Innensechskantschlüssel 3 mm fest. Gehen Sie auf der<br />
anderen Seite genauso vor.<br />
2. Stecken Sie die beiden mitgelieferten Schrauben (3) von<br />
innen in die unterste Bohrung im Sitzblech. Eventuell kann<br />
es notwendig sein die Rahmenklemmung zu lösen. Gehen<br />
Sie auf der anderen Seite genauso vor.<br />
3. Setzen Sie den Lowrider so wie im Bild gezeigt an den<br />
Hauptrahmen. Schrauben Sie mit den beiden Muttern (4)<br />
den Lowrider handfest an.<br />
4. Schrauben Sie den Lowrider mit den mitgelieferten Innensechskantschrauben<br />
(5) an die unteren Bohrungen an den<br />
Halter (1) handfest an.<br />
5. Richten Sie den Lowrider so aus, dass die oberen Streben<br />
waagerecht verlaufen und ziehen Sie alle Schrauben fest<br />
an. Soll anschließend ein Zweibeinständer montiert werden,<br />
dann ziehen Sie die Muttern (4) nur handfest an.<br />
Hinweis:<br />
Dieser Lowrider ist für ein Paar Taschen geeignet. In<br />
Verbindung mit einem Zweibeinständer lässt sich eine zusätzliche<br />
Strebe für ein zweites Paar Taschen anbringen.<br />
Die maximale Belastung beträgt 25 kg.<br />
4 3<br />
5 1<br />
<strong>Pino</strong> 11/09-D-ENG 25<br />
8/09<br />
2<br />
Installing accessories<br />
Mounting the Lowrider Rack<br />
1. Insert the rack supports (1) into the holes on either side<br />
of the frame and secure them with the enclosed screws<br />
(2) using a 3mm Allen key.<br />
2. Insert the two enclosed screws (3) through the lowest<br />
hole in the seat-mounting plate from the inside (with<br />
the head of the screw on the inside of the plate and the<br />
threads on the outside). It may be necessary to loosen the<br />
frame joint.<br />
3. Mount the Lowrider Rack as shown in the picture. Attach<br />
the end mounts of the rack with the two nuts (4), tightening<br />
lightly at first.<br />
4. Then fasten the middle mounts of the rack with the enclosed<br />
Allen screws (5), screwing them lightly at first into<br />
the lower holes of the rack supports (1).<br />
5. Adjust the position of the Lowrider Rack so that the top<br />
bars are level, then tighten all screws securely, unless you<br />
are also mounting a Double Kickstand. In this case, leave<br />
the nuts (4) lightly tightened.<br />
Note:<br />
This lowrider can carry one pair of panniers. When used<br />
in combination with the Double Kickstand, an additional<br />
bar can be mounted on which a second pair of panniers<br />
can be attached. The maximum load is 25 kg (55 lbs).
Zubehör montieren<br />
Installing accessories<br />
Zweibeinständer und Lowriderstrebe montieren<br />
ohne montierten Lowrider<br />
1. Stecken Sie den Halter (1) in die Bohrung und schrauben<br />
Sie ihn mit der mitgelieferten Schraube (2) mit einem<br />
Innensechskantschlüssel 3 mm fest.<br />
2. Stecken Sie die beiden mitgelieferten Schrauben (3) von<br />
innen in die Bohrung (siehe Hinweis) im Sitzblech.<br />
3. Setzen Sie den Zweibeinständer so wie im Bild gezeigt an<br />
den Hauptrahmen. Schrauben Sie mit den beiden Muttern<br />
(4) den Zweibeinständer handfest an.<br />
4. Schrauben Sie den Zweibeinständer mit den mitgelieferten<br />
Innensechskantschrauben (5) an den Halter (1) handfest<br />
an.<br />
mit montiertem Lowrider<br />
5. Entfernen Sie die Schrauben (5) und die Muttern (4).<br />
6. Setzen Sie den Zweibeinständer so wie im Bild gezeigt auf<br />
die Schrauben (3) und schrauben Sie die beiden Muttern<br />
(4) handfest an.<br />
Hinweis:<br />
Die Wahl der Bohrung hängt von der Art bzw. Länge der<br />
Gabel ab. Oberste Bohrung: starre Gabel, mittlere Bohrung:<br />
Federgabel, untere Bohrung: High-End-Federgabel.<br />
Bei einem ausgeklappten Zweibeinständer sollte sich das<br />
Vorderrad nur wenige Millimeter über dem Boden befinden.<br />
So lässt sich das belastete <strong>Pino</strong> mit dem geringsten<br />
Kraftaufwand auf- und abstellen.<br />
7. Setzen Sie den Zweibeinständer (und die zusätzliche<br />
Lowriderstrebe (6) für ein zweites Paar Taschen, falls<br />
diese montiert werden soll) so wie im Bild gezeigt an den<br />
Halter (1) und schrauben Sie ihn mit den mitgelieferten<br />
Innensechskantschrauben (5) handfest an.<br />
8. Stecken Sie die zusätzliche Lowriderstrebe (6) (falls diese<br />
montiert werden soll) in die Schelle (7) und schrauben Sie<br />
diese an den Zweibeinständer mit einem Innensechskantschlüssel<br />
5 mm fest. Positionieren Sie sie horizontal.<br />
9. Ziehen Sie alle Schrauben mit einem Innensechskantschlüssel<br />
5 mm fest an.<br />
26<br />
4 3<br />
5 1<br />
7<br />
6<br />
2<br />
Mounting the Double Kickstand and Lowrider Bars<br />
Without lowrider rack<br />
1. Insert the supports (1) in to the holes on either side of<br />
the frame and secure them with the enclosed screws (2)<br />
using a 3mm Allen key.<br />
2. Insert the two enclosed screws (3) through the hole (for<br />
choice of hole, see Note below) in the seat-mounting<br />
plate from the inside (with the head of the screw on the<br />
inside of the plate and the threads on the outside).<br />
3. Mount the Double Kickstand to the frame as shown in the<br />
picture. Attach the top mounts of the kickstand with the<br />
two nuts (4), tightening lightly at first.<br />
4. Then fasten the rear mounts of the kickstand with the<br />
enclosed Allen screws (5) screwing them lightly at first<br />
into the supports (1).<br />
With lowrider rack<br />
5. Remove the screws (5) of the middle rack mounts and the<br />
nuts (4) of the end mounts.<br />
6. Mount the Double Kickstand onto the screws (3) as<br />
shown in the picture and attach it with the two nuts (4),<br />
tightening lightly at first.<br />
Note:<br />
The kickstand can be mounted to any of the three holes<br />
in the seat-mounting plate, depending on the type and<br />
length of the fork. Use the top hole for rigid forks, the<br />
middle hole for suspension forks, and the lower hole for<br />
high-end suspension forks. When the tandem is resting<br />
on the kickstand, the front wheel should be suspended<br />
no more than a few millimeters above the ground. This<br />
positioning allows the kickstand of a loaded <strong>Pino</strong> to be<br />
engaged and disengaged with minimal effort.<br />
7. Place the rear mounts of the kickstand (and the additional<br />
Lowrider Bars (6) for an additional set of panniers, if<br />
applicable) onto the supports (1) as shown in the picture<br />
and fasten them with the enclosed Allen screws (5), tightening<br />
lightly at first.<br />
8. Insert the ends of the additional Lowrider Bars (6) (if<br />
applicable) into the clamps (7) and fasten them to the<br />
kickstand using a 5mm Allen key. Position the bar so that<br />
it is level (horizontal).<br />
9. Tighten all screws and nuts securely.<br />
<strong>Pino</strong> 11/09-D-ENG
Kindertretlager montieren<br />
Für Kinder, die mit ihren Beinen bei der kürzesten Einstellung<br />
des Rahmens das Tretlager nicht erreichen, bieten wir ein<br />
zusätzliches, verschiebbares Kindertretlager (Zubehör) an. So<br />
können Kinder ab ca. 1 m Größe aktiv mittreten. Das Kindertretlager<br />
wird in den Kettenlauf hinter dem vorderen Tretlager<br />
auf den Hauptrahmen zwischengesetzt. Falls ein Kettenschutzrohr<br />
montiert ist, muss dieses gekürzt werden.<br />
1. Reduzieren Sie die Rahmenlänge, siehe Seite 9 „Rahmenlänge<br />
einstellen“.<br />
2. Biegen Sie die Schelle des Kindertretlagers auseinander<br />
und setzen Sie es auf das Hauptrohr.<br />
3. Haken Sie die beiden Spannhaken ein.<br />
4. Schieben Sie die Tretkurbel auf die gewünschte Position<br />
und fixieren Sie sie, indem Sie die Spanner nach unten<br />
drehen.<br />
Hinweis:<br />
Eventuell kann es notwendig sein, die Klemmung der<br />
Kindertretkurbel durch Drehen der Muttern fein<br />
einzustellen.<br />
5. Nehmen Sie die linke Kette vom hinteren Kettenblatt,<br />
um das obere Kettenschutzrohr (1) aus der Halterung<br />
entfernen zu können.<br />
6. Entfernen Sie das obere Kettenschutzrohr (1) aus der<br />
Halterung, indem Sie es nach vorne drehen und aus dem<br />
Langloch (2) herausziehen.<br />
7. Legen Sie die Kette über das Kettenblatt des Kindertretlagers.<br />
8. Kürzen Sie das Kettenschutzrohr auf die benötigte Länge,<br />
damit es nicht mit der Umlenkrolle des Kettenspanners<br />
kollidiert. Schneiden Sie vorsichtig mit einem Messer das<br />
Kettenschutzrohr um die Kette ab. Schlitzen Sie das übriggebliebene<br />
Rohr auf und entfernen Sie es.<br />
9. Legen Sie die Kette auf das hintere Kettenblatt.<br />
10. Ziehen Sie den Vorbau, siehe Seite 9 „Rahmenlänge einstellen“<br />
soweit heraus, dass die Kette gespannt ist.<br />
11. Sie können die Kette auch spannen, indem Sie mit einem<br />
Innensechskantschlüssel 6 mm die Klemmung am linken<br />
Sitzrohr lösen, den Kettenspanner nach vorne ziehen und<br />
die Klemmung wieder festziehen (siehe Seite 23).<br />
Zubehör montieren<br />
Installing accessories<br />
Mounting the Children’s Crankset<br />
We offer an additional, adjustable crankset (accessory) for<br />
children whose legs are too short to reach the pedals when<br />
the front boom is fully inserted. This crankset allows children<br />
of at least 1m (3’ 3”) in height to actively pedal in the<br />
front seat. The Children’s Crankset is mounted to the frame<br />
between the rider and the front crankset. The chainring fits<br />
under the top section of chain. If there is a chain tube around<br />
the chain, the tube must be shortened.<br />
1. Shorten the frame length, see page 9 “Adjusting the frame<br />
length”.<br />
2. Spread the clamp arms of the two quick-release assemblies<br />
apart and place them over the front tube of the main<br />
frame (not front boom).<br />
3. Engage the hooks of the quick releases without tightening.<br />
4. Move the crankset into the desired position and secure it<br />
by tightening the quick releases (pushing down the clamp<br />
tensioner).<br />
Note:<br />
It may be necessary to adjust (loosen or tighten) the<br />
quick release assemblies by turning the nuts.<br />
5. Take the left chain off the rear chainring so that the chain<br />
tube (1) can be removed from the chain-tube mount.<br />
6. Remove the top chain tube (1) from the mount by twisting<br />
it upward and pulling it out of the slot (2).<br />
7. Place the chain over the chainring of the Children’s<br />
Crankset.<br />
8. Shorten the chain tube to the required length to ensure<br />
that it does not collide with the pulley of the chain<br />
tensioner. Use a cutting blade to carefully cut the chain<br />
tube around the chain. Then remove the excess tubing by<br />
cutting it lengthwise and pulling it off of the chain.<br />
9. Wrap the chain back around the rear chainring.<br />
10. Pull out the front boom, see page 9 “Adjusting the frame<br />
length”, until the chain is tight.<br />
11. You can also tighten the chain by loosening the recessed<br />
clamp fitting (2) in the hole on the left seat tube using a<br />
6mm Allen key, pulling the chain tensioner forward, and<br />
retightening the clamp fitting (2) (see page 23).<br />
<strong>Pino</strong> 11/09-D-ENG 27
Zubehör montieren<br />
Installing accessories<br />
Kindersicherheitsgurte montieren<br />
1. Nehmen Sie die Dreipunkt-Sicherheitsgurte, sie sind<br />
Bestandteil im Zubehör Kindertretkurbel, aus der Verpackung.<br />
2. Stecken Sie die beiden Steckverbindungen in das Schloss.<br />
Legen Sie den gesamten Gurt so über den Sitz, wie er<br />
montiert werden soll, das heißt: Zwei Gurte nach oben,<br />
einen nach unten. Die beiden Gurte mit den Steckverbindungen<br />
werden an einer Querverbindung hinter dem<br />
Sitz befestigt (Bild A). Der Gurt mit dem Schloss wird am<br />
Hauptrahmen befestigt (Bild B).<br />
3. (Bild A) Legen Sie einen der beiden Gurte mit Steckverbindung<br />
über den Sitz und führen sie ihn durch die<br />
Schlaufe (1).<br />
4. Legen Sie den Gurt um die Querverbindung (2) und führen<br />
Sie ihn durch die Fixierschnallen (3).<br />
5. Gehen Sie mit dem zweiten Gurt genauso vor.<br />
6. (Bild B) Legen Sie den Gurt mit dem Schloss um den<br />
Hauptrahmen zwischen Sitz und Steuerlager (4) und<br />
befestigen Sie ihn mit den beiden Fixierschnallen auf die<br />
gleiche Weise wie die beiden anderen Gurten.<br />
7. Stellen Sie die Länge der Gurte mit den Fixierschnallen<br />
ein. Der Sicherheitsgurt sollte eng anliegen, jedoch nicht<br />
einschneiden.<br />
Kindergriffe montieren<br />
1. Nehmen Sie die Kindergriffe (5), sie sind Bestandteil im<br />
Zubehör Kindertretkurbel, aus der Verpackung.<br />
2. Lösen Sie die Schraube (6) mit einem Innensechskantschlüssel<br />
5 mm. Schieben Sie den Kindergriff auf den<br />
Standardgriff und ziehen Sie die Schraube (6) handfest an.<br />
3. Montieren Sie den zweiten Kindergriff auf die gleiche<br />
Weise auf den anderen Standardgriff.<br />
4. Lösen Sie Schrauben (7) mit einem Innensechskantschlüssel<br />
5 mm. Passen Sie die Stellung der Kindergriffe an.<br />
5. Ziehen Sie die Schrauben (6) und (7) fest.<br />
28<br />
A<br />
B<br />
7<br />
6<br />
2<br />
5<br />
1<br />
3<br />
4<br />
5<br />
Mounting the Children’s Safety Belt<br />
1. Remove the three-point Safety Belt that comes with the<br />
Children’s Crankset from its packaging.<br />
2. Insert the two tongue plates of the harnesses into the<br />
buckle. Lay the entire safety belt over the seat in the position<br />
it will be mounted: with two harnesses (with tongue<br />
plates) over the top of the seat and one (with the buckle)<br />
over the bottom. The two harnesses with the tongue<br />
plates are attached to the horizontal bar behind the seat<br />
(Fig. A). The harness with the buckle is attached to the<br />
frame (Fig. B).<br />
3. (Fig. A) Guide the end of one harness (with tongue plate)<br />
over the top of the seat and through the ring (1).<br />
4. Then wrap the harness end around the horizontal bar (2)<br />
and through the plastic sliding buckles (3).<br />
5. Repeat steps 3 and 4 with the second strap.<br />
6. (Fig. B) Wrap the end of the strap with the buckle around<br />
the frame between the headset and the seat (4), and attach<br />
it by feeding the end back through the plastic sliding<br />
buckles in the same way as the other two straps.<br />
7. Adjust the length of the straps using the sliding buckles.<br />
The Safety Belt should hold the child firmly but comfortably<br />
in the seat.<br />
Mounting the Children’s Grips<br />
1. Remove the children´s Grips that comes with the<br />
Children’s Crankset from its packaging.<br />
2. Lose the screw (6) using a 5mm Allen key. Slide the<br />
Children´s Grip to the Standard Grip and tight the screw<br />
lightly at first<br />
3. Mount the the second Children´s Grip at the same way.<br />
4. Lose the screws (7) using a 5mm Allen key and adjust the<br />
Position of the Children´s Grips<br />
5. Tighten the screws (6) and (7) securely.<br />
<strong>Pino</strong> 11/09-D-ENG
Ergogriffe montieren<br />
1. Nehmen Sie die Ergogriffe aus der Verpackung heraus.<br />
2. Schrauben Sie die Schraube (1) mit einem Innensechskantschlüssel<br />
5 mm aus den beiden Hälften des Ergogriffhalters<br />
heraus.<br />
3. Setzen Sie die beiden Hälften des Ergogriffhalters auf das<br />
Lenkerrohr und schrauben Sie die beiden Hälften des<br />
Ergogriffhalters mit Schraube (1) handfest an.<br />
4. Stecken Sie den Ergogriff (2) in den Ergogriffhalter und<br />
ziehen Sie die Schraube (1) leicht an.<br />
5. Montieren Sie den zweiten Ergogriff auf die gleiche Weise.<br />
6. Richten Sie beide Ergogriffe aus und ziehen Sie die Schrauben<br />
(1) fest.<br />
Schalensitz montieren<br />
Soll der Standardsitz durch einen leichteren und sportlicheren<br />
Schalensitz aus Carbon ersetzt werden, so muss der Standardsitz<br />
demontiert werden. Das Sitzblech (10) (Bild B), das<br />
der Sitzneigung dient, und die Schrauben (4) in den Rahmenblechen<br />
(5) bleiben montiert. Damit der Schalensitz spannungsfrei<br />
montiert werden kann, muss er mit Montagebohrungen<br />
versehen werden.<br />
1. Stecken Sie die große Unterlegscheibe (6) auf die Schraube<br />
(4) des linken Rahmenbleches (5). Stecken Sie den<br />
linken Carbonsitzhalter (3) auf die Schraube (4) des linken<br />
Rahmenbleches (5) auf . Stecken Sie anschließend die<br />
kleine Unterlegscheibe (7) auf die Schraube (4). Schrauben<br />
Sie die M8 Mutter (8) auf die Schraube (4) handfest auf.<br />
2. Montieren Sie den rechten Karbonsitzhalter (3a) auf die<br />
gleiche Weise. Die große Unterlegscheibe entfällt.<br />
A<br />
3a<br />
5<br />
3<br />
4<br />
5<br />
Zubehör montieren<br />
Installing accessories<br />
<strong>Pino</strong> 11/09-D-ENG 29<br />
6<br />
1<br />
7<br />
8<br />
9<br />
2<br />
Mounting the Ergo Grips<br />
1. Take the grips out of the packaging.<br />
2. Remove the screw (1) from the two halves of the mounting<br />
clamp using a 5mm Allen key.<br />
3. Place the two halves of the clamp around the handlebar<br />
and screw them together, lightly at first, with the screw<br />
(1).<br />
4. Insert the lower end of the grip (2) into the mounting<br />
clamp and tighten the screw (1) slightly.<br />
5. Repeat steps 2 through 4 for the second grip.<br />
6. Position the two grips and tighten the screws (1) securely<br />
Mounting the Carbon Fiber Seat<br />
To replace the standard front seat with a lighter and sportier<br />
Carbon Fiber Seat, begin by removing the standard seat. The<br />
seat mounting plate (10) (Fig. B), with which the seat position<br />
is adjusted, and the screws (4) in the frame plates (5) remain<br />
attached. Mounting holes must be drilled in the Carbon Fiber<br />
Seat so that it can be mounted without material stress (see<br />
drilling instructions below).<br />
1. Fit the large washer (6) onto the bolt (4) on the left frame<br />
plate (5). Slide the left seat support (3) of the Carbon<br />
Fiber Seat onto the bolt (4) of the left frame plate (5).<br />
Then fit the small washer (7) onto the bolt (4). Screw the<br />
M8 nut (8) onto the bolt (4), tightening lightly at first.<br />
2. Follow the same procedure for the right seat support<br />
(3a). On this side, however, no large washer is used.
3. Richten Sie das Sitzblech (10) wie im Bild B gezeigt aus<br />
und fixieren Sie es mit dem Schnellspanner.<br />
4. Montieren Sie den Haltewinkel (11) mit den Schrauben<br />
und Muttern des Standardsitzes (12) an das Sitzblech (10),<br />
so, dass es in einer Linie mit dem Sitzblech steht.<br />
5. Legen Sie den Schalensitz (13) auf die Halter (3) und den<br />
Haltewinkel (11).<br />
6. Richten Sie die Halter (3) so aus, dass der Schalensitz<br />
(13) auf einer möglichst großen Fläche auf den Haltern (3)<br />
liegt.<br />
7. Zeichnen Sie von unten die Bohrungen auf dem Schalensitz<br />
an und bohren Sie anschließend die Löcher mit einem<br />
Bohrer 6,5 mm.<br />
8. Legen Sie die Scheiben (14) auf die Bohrungen im Sitz und<br />
stecken Sie die Senkkopfschrauben (15) in die Bohrungen<br />
durch den Sitz.<br />
9. Legen Sie die Gummidistanzstücke (16) auf die Bohrungen<br />
in den Haltern (3) und dem Haltewinkel (11).<br />
10. Legen Sie den Sitz (13) auf die Halter (3) und den Haltewinkel<br />
(11), so dass alle Senkkopfschrauben (15) in<br />
den Bohrungen der Halter (3) und des Haltewinkels (11)<br />
stecken.<br />
11. Stecken Sie die Unterlegscheiben (17) von unten auf die<br />
Senkkopfschrauben (15) und schrauben Sie den Sitz mit<br />
den M6 Muttern (18) fest.<br />
12. Ziehen Sie die Schrauben (12) (Bild B) so fest, dass das<br />
Sitzblech (10) beweglich bleibt. Ziehen Sie alle anderen<br />
Schrauben fest. Stecken Sie die Kappen (9) auf die Muttern<br />
(8) (Bild A).<br />
13. Stellen Sie die Haltegriffe (19) ein: Lösen Sie die Schraube<br />
(20) mit einem 6 mm Innensechskantschlüssel. Drehen<br />
Sie den Griff in die gewünschte Stellung, ziehen Sie die<br />
Schraube (20) wieder fest.<br />
30<br />
B<br />
15<br />
3<br />
3<br />
15<br />
15<br />
19<br />
10<br />
14<br />
11<br />
12<br />
16<br />
17<br />
18<br />
20<br />
13<br />
11<br />
13<br />
3. Position the seat mounting plate (10) as illustrated in Fig.<br />
B, and secure it using the quick release mechanism.<br />
4. Use the bolts and nuts from the standard seat (12) to attach<br />
the mounting bracket (11) to the seat mounting plate<br />
(10), ensuring that it is positioned in alignment with the<br />
seat mounting plate.<br />
5. Place the Carbon Fiber Seat (13) onto the seat supports<br />
(3) and mounting bracket (11).<br />
6. Position the seat supports (3) in such a way that the<br />
Carbon Fiber Seat (13) is making contact with the largest<br />
possible surface of the seat supports (3).<br />
7. From below, mark the position of the mounting holes to<br />
be drilled in the Carbon Fiber Seat, and then drill the hoes<br />
using a 6.5mm drill bit.<br />
8. Place the washers (14) over the mounting holes and insert<br />
the flat-head bolts (15) through the washers and seat.<br />
9. Place the rubber spacers (16) onto the holes in the seat<br />
supports (3) and the mounting bracket (11).<br />
10. Place the seat (13) onto the seat supports (3) and mounting<br />
bracket (11), ensuring that all of the flat-head bolts<br />
(15) extend through the holes in the seat supports (3) and<br />
mounting bracket (11).<br />
11. Place the washers (17) over the threaded ends of the flathead<br />
bolts (15) from below and fasten the seat using the<br />
M6 nuts (18).<br />
12. Tighten the side bolts (12) (Fig. B) in the mounting bracket<br />
lightly enough to allow movement in the seat mounting<br />
plate (10). Tighten all other bolts securely. Press the caps<br />
(9) onto the nuts (8) (Fig. A).<br />
13. Adjust the position of the seat grips (19): Loosen the<br />
bolt (20) using a 6mm Allen key. Rotate the grip into the<br />
desired position, and retighten the bolt (20).<br />
<strong>Pino</strong> 11/09-D-ENG
Gewährleistung und Garantiebedingungen<br />
Es gilt die gesetzliche Gewährleistung. Ausgenommen sind<br />
Verschleißteile wie z.B. Kette, Reifen, Bremsen etc.. Der Gewährleistungzeitraum<br />
von (gesetzlich) 24 Monaten beginnt mit<br />
dem Kaufdatum. Während dieser 2 Jahre ist der Fachhändler<br />
der das <strong>Hase</strong>rad verkauft hat verpflichtet dafür zu sorgen,<br />
dass das Fahrrad keine Fehler hat die den Wert oder die<br />
Tauglichkeit aufheben oder erheblich mindern. Daher darf der<br />
Fachhändler das <strong>Hase</strong>rad nur in einem sicheren und fahrbereiten<br />
Zustand übergeben. Zusätzlich gewährt die Firma <strong>Hase</strong><br />
Spezialräder eine Garantie von 3 Jahren - ab Kaufdatum - auf<br />
Bruch des Rahmens gemäß den nachstehenden Bedingungen.<br />
Bei Einsendung der Registrierkarte verlängert sich diese<br />
Garantie auf 5 Jahre.<br />
•<br />
•<br />
•<br />
•<br />
•<br />
•<br />
•<br />
•<br />
•<br />
•<br />
•<br />
•<br />
38<br />
Die Firma <strong>Hase</strong> haftet nur für Mängel, die durch ihr Verschulden<br />
am Rahmen und der Montage entstanden sind. Für Montageteile<br />
haftet der jeweilige Hersteller.<br />
Diese zusätzliche Garantie gilt nur für den Ersterwerber, sofern<br />
er die Bedienungsanleitung befolgt.<br />
Innerhalb der Garantiezeit von 3 Jahren ab Kaufdatum wird ein<br />
gebrochenes Rahmenteil kostenlos instand gesetzt, oder sollte<br />
das nicht möglich sein, durch ein neuwertiges Teil ersetzt. Ausgetauschte<br />
Teile gehen in das Eigentum der Fa. <strong>Hase</strong> über.<br />
Weitergehende Ansprüche bestehen aufgrund dieser Garantie<br />
nicht. Insbesondere werden etwaige Demontage- oder Montagekosten<br />
(z.B. beim Fachhändler) und Versandkosten von Fa. <strong>Hase</strong><br />
nicht erstattet. Sendungen an uns sind stets ausreichend zu frankieren,<br />
da sie sonst nicht angenommen werden können.<br />
Die Zuladung (Fahrer und Gepäck) darf beim <strong>Pino</strong> 225 kg nicht<br />
übersteigen.<br />
Bei Wettbewerbseinsatz, Fahrten im off Road Bereich oder<br />
Fahrten die nicht dem Nutzungsprofil eines Fahrrades entsprechen,<br />
erlischt die Garantie und die gesetzliche Gewährleistung.<br />
Von der Garantie ausgeschlossen sind Schäden durch Unfälle.<br />
Keine Garantie erhält, wer für das <strong>Pino</strong> ungeeignetes Zubehör<br />
montiert, oder Zubehör unsachgemäß montiert. Deshalb lassen<br />
Sie den Austausch und die Montage von Teilen nur durch den<br />
Fachhändler erledigen.<br />
Keine Garantie erhält, wer am Rahmen schleift, bohrt, biegt, oder<br />
sonstige Modifikationen vornimmt.<br />
Durch eine Garantieleistung wird die Garantiezeit weder verlängert<br />
noch eine neue Garantiefrist in Lauf gesetzt.<br />
Die Abwicklung der Garantieleistung erfolgt ausschließlich durch<br />
das Fachgeschäft, bei dem das Rad gekauft wurde oder durch einen<br />
unserer Vertriebspartner<br />
Von Kindern darf das <strong>Pino</strong> nur unter Aufsicht der Eltern gefahren<br />
werden.<br />
Terms of limited warranty<br />
The terms and conditions are based on the statutory warranty.<br />
This excludes parts that wear such as the chain, tyres,<br />
brakes etc. The warranty period (statutory) of 24 months<br />
commences from the date of purchase. In addition, <strong>Hase</strong> offers<br />
a 3 year warranty (from date of purchase) against breakage<br />
of the frame in accordance with the following conditions.<br />
By sending in the enclosed registration card, you can extend<br />
the warranty period to 5 years. Your dealer is obliged to<br />
ensure, among other things, that your bicycle is not affected<br />
by defects which materially diminish its value of suitability for<br />
the described purpose. The exact details will vary according<br />
to your country. In Germany, this liability ends two years after<br />
purchase. Your dealer has to fully set up and adjust your<br />
bicycle, so that safe function is guaranteed. The dealer has to<br />
make a final safety check and carry out a test ride.<br />
•<br />
•<br />
•<br />
•<br />
•<br />
•<br />
•<br />
•<br />
•<br />
•<br />
•<br />
•<br />
<strong>Hase</strong> will only be held liable for defects caused from the production<br />
procedure and faults caused during assembly. For other assembly<br />
parts, the relevant manufacturer is liable.<br />
This additional warranty is only applies to the orginal owner and<br />
does not cover damage resulting from improper assembly or<br />
maintence (not in accordance with users manual)<br />
Within the warranty period of 3 years, <strong>Hase</strong> will repair, or if necessary<br />
replace any broken frame part free of charge. Any defective<br />
parts replaced by <strong>Hase</strong> become the property of ase.<br />
Any further claims beyond the scope of this warranty are excluded.<br />
<strong>Hase</strong> will not cover the costs of labor (e.g.,by the retailer)<br />
or shipping. We will not accept postal deliveries with insufficient<br />
postage.<br />
The maximum permissible load (rider and luggage) of 225kg (496<br />
lbs) specified for the <strong>Pino</strong> must not be exceeded.<br />
If the Lepus is used in competition, ridden on rough terrain,or<br />
subjected to abnormally excessive stress, the statutory and additional<br />
warranty become void.<br />
Damage resulting by accidents is not covered by the warranty.<br />
The warranty becomes void if the <strong>Pino</strong> has been fitted with incompatible<br />
accessories or if accessories are istalled incorrectly.<br />
Therefore always have components replaced and installed by an<br />
authorized retailer.<br />
The warranty becomes void if improper modifications ore alterations<br />
(e.g.,grinding, drilling,bending, etc.) are made to the frame.<br />
It is not possible to extend the warranty or commence a new<br />
warranty period.<br />
A warranty can only be put into effect by the authorized <strong>Hase</strong><br />
retailer from whom the trike was purchased or by one of our<br />
distribution partners.<br />
The <strong>Pino</strong> may only be ridden by children under perental supervision.<br />
<strong>Pino</strong> 11/09-D-ENG
<strong>Hase</strong> Spezialräder · Hiberniastraße 2 · 45731 Waltrop · Germany · Phone ++49 (0) 23 09 78 25 82 · Fax ++49 (0) 23 09 78 25 86 · info@hasebikes.com · www.hasebikes.com<br />
erstellt von:<br />
www.technik-transparent.de