AVS 13-14.indd - Wentronic
AVS 13-14.indd - Wentronic
AVS 13-14.indd - Wentronic

Sie wollen auch ein ePaper? Erhöhen Sie die Reichweite Ihrer Titel.
YUMPU macht aus Druck-PDFs automatisch weboptimierte ePaper, die Google liebt.
<strong>AVS</strong> <strong>13</strong><br />
<strong>AVS</strong> 14<br />
Bedienungsanleitung | Owner’s Manual<br />
Bitte vor Gebrauch sorgfältig lesen | Please read before use
2<br />
deutsch<br />
Praktisch: Die <strong>AVS</strong> verbindet bis zu 6 Geräte mit<br />
Ihrem Fernseher!<br />
Die meisten Fernsehgeräte verfügen nicht über die erforderlichen<br />
Anschlußmöglichkeiten für mehrere Geräte. Darum sind lästige Kabelmanöver<br />
oftmals unvermeidlich, um die verschiedenen Komponenten,<br />
wie z.B. Videorecoder, DVD-Player und Spiele-Konsolen, jedesmal aufs<br />
Neue für den Einsatz am Fernseher vorzubereiten und zu verbinden.<br />
Mit der <strong>AVS</strong> Umschaltbox lösen Sie dieses Problem und machen endlich<br />
Schluß mit dem Kabelsalat. Denn über die <strong>AVS</strong> koordinieren Sie<br />
dauerhaft und bequem bis zu 6 Endgeräte für den Empfang auf Ihrem<br />
Fernsehgerät. Es ist kein Umstecken mehr nötig. Die gewünschte Eingangsquelle<br />
wählen Sie fortan nur noch über die Bedienelemente an<br />
der Vorderseite der <strong>AVS</strong> Umschaltbox oder mit der beiliegenden Fernbedienung.<br />
Geräte anschließen: und fertig!<br />
Um die <strong>AVS</strong> Umschaltbox funktionsbereit zwischen Ihrem Fernseher<br />
und Ihren Geräten zu installieren ist keinerlei Programmieraufwand<br />
erforderlich. Lediglich bei der Verkabelung und Inbetriebnahme sind<br />
einige Punkte zu beachten:<br />
Die gekennzeichneten Anschlüsse auf der Rückseite der <strong>AVS</strong><br />
sind lediglich Empfehlungen und stimmen mit den Wahlknöpfen<br />
auf der Vorderseite und auf der Fernbedienung überein. Jedes<br />
Gerät kann praktisch an jeden Eingang angeschlossen werden.<br />
Beispiel<br />
Haben Sie beispielsweise 2 Videorecorder im Einsatz, so können<br />
Sie den zweiten Recorder auch beim CAM-Eingang verkabeln<br />
oder bei AUX 1, AUX 2 oder SAT etc.. Dies bedeutet, daß der<br />
zweite Videorecorder dementsprechend über die zugewiesene<br />
Wahltaste der <strong>AVS</strong> oder der Fernbedienung angewählt wird.<br />
➋ Bitte prüfen Sie vor Anschluß der einzelnen Geräte an die <strong>AVS</strong>,<br />
ob ein S-VHS-Ausgang bzw. eine S-VHS-Verbindungsmöglichkeit<br />
vorhanden ist. Sollte dies der Fall sein, empfehlen wir Ihnen den<br />
Gebrauch des S-VHS-Anschlusses für ein Maximum an Übertra<br />
gungsqualität.
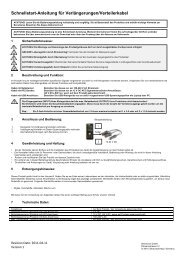
ohne S-VHS<br />
➌ Zum Anschluß der <strong>AVS</strong> <strong>13</strong> an das Fernsehgerät müssen alle<br />
Verbindungen ausgeführt sein, die auch bei den angeschlossenen<br />
Geräten benutzt wurden.<br />
<strong>AVS</strong> <strong>13</strong><br />
ohne S-VHS<br />
mit S-VHS<br />
mit S-VHS<br />
Beispiel<br />
Haben Sie Ihren Videorecorder mit Audio und S-VHS mit der <strong>AVS</strong><br />
verbunden und Ihren SAT-Receiver mit Audio und Video, so müs-<br />
sen Sie den Audio/Video-Ausgang und auch den S-VHS-Aus-<br />
gang der <strong>AVS</strong> mit Ihrem Fernseher verbinden.<br />
3
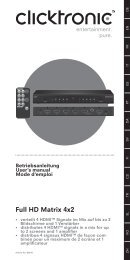
4<br />
➍ Zum Anschluß der <strong>AVS</strong> 14 an das Fernsehgerät verwenden Sie<br />
das beigefügte Scart-Adapterkabel und zusätzlich – falls möglich –<br />
das S-VHS Kabel.<br />
<strong>AVS</strong> 14<br />
ohne S-VHS<br />
mit S-VHS<br />
Inbetriebnahme und Kontrolle<br />
Vor der Inbetriebnahme stellen Sie bitte sicher, dass alle Geräte an<br />
das Stromnetz angeschlossen sind.<br />
Jedes Gerät, das mit der <strong>AVS</strong> verbunden wurde, muss ein<br />
Signal abgeben, wenn z.B. der Videorecorder angeschlossen ist,<br />
stellen Sie sicher, dass eine Kassette eingelegt ist und das Gerät<br />
auf „Play“ steht.<br />
Prüfen Sie, ob Ihr Fernseher eingeschaltet ist und korrekt mit der<br />
<strong>AVS</strong> verbunden ist (S-VHS und AV-Kabel müssen an der<br />
<strong>AVS</strong> am Ausgang „OUT TO TV“ angeschlossen sein).<br />
➋ Dann schalten Sie die <strong>AVS</strong> mit dem POWER-Schalter (Gehäu-<br />
sefront) ein. Eine Geräteanzeigeleuchte sollte aufleuchten.
Drücken Sie den Schalter mit der Beschriftung VCR, so wird die<br />
LED-Lampe auf dieser Taste leuchten und das Video-Programm<br />
muss nun auf Ihrem Fernseher erscheinen.<br />
Probieren Sie nun jeden Schalter für jedes Ihrer angeschlossenen<br />
Geräte an Ihrer <strong>AVS</strong> aus. Sehen Sie kein Bild, so schauen Sie<br />
unter dem Punkt „Fehlerbehebung“ in dieser Anleitung nach. Sie<br />
können nun auch die Umschaltung der Geräte mit der mitgeliefer-<br />
ten Fernbedienung vornehmen.<br />
Die <strong>AVS</strong> Fernbedienung<br />
Für die Inbetriebnahme der beiliegenden Fernbedienung benötigen Sie<br />
zwei 1,5 Volt Batterien (AA). Wenn die <strong>AVS</strong>-Umschaltbox angeschlossen<br />
ist, ist auch nach dem Einlegen der Batterien die Fernbedienung sofort<br />
aktiv und komplett vorprogrammiert. Sie können nun mit der Fernbedienung<br />
die <strong>AVS</strong>-Umschaltbox an- und ausschalten sowie per Knopfdruck<br />
die jeweiligen Eingangskanäle bzw. angeschlossenen Geräte (SAT, DVD,<br />
CAM etc.) mit dem Fernseher verbinden.<br />
Wozu dient die „Learn“-Taste?<br />
Die Learn-Taste kommt nur dann zum Einsatz, wenn anstelle der beigefügten<br />
<strong>AVS</strong> Fernbedienung eine andere handelsübliche Fernbedienung<br />
verwendet werden soll. In diesem Fall gilt folgende Vorgehensweise:<br />
1. Schalten Sie die <strong>AVS</strong>-Umschaltbox ein. Ein Anzeigelicht auf der<br />
Vorderseite der <strong>AVS</strong> wird leuchten.<br />
2. Drücken und halten Sie die Learn-Taste bis das Anzeigelicht aus-<br />
geht und die Kontroll-LED der Learn-Taste angeht. Das bringt die<br />
<strong>AVS</strong> Umschaltbox in den Learn-Modus. Die Learn-LED sollte jetzt<br />
blinken.<br />
3. Drücken Sie nun die erste Quellentaste auf Ihrer Fernbedienung, für<br />
den die <strong>AVS</strong> den Code lernen soll (DVD, SAT, VCR etc.) und halten<br />
Sie die Fernbedienung dabei direkt vor die Umschaltbox. Die betref-<br />
fende Quellenauswahltaste der <strong>AVS</strong> bleibt für 15 sec. im Lern-<br />
Modus und nimmt in dieser Zeit die Impulse der Fernbedienung in<br />
sich auf.<br />
4. Wiederholen Sie diesen Vorgang für die einzelnen Geräte.<br />
5
6<br />
5. Sollte kein Fernbedienungssignal von der <strong>AVS</strong> erkannt werden,<br />
blinkt die LED der Learn-Taste bereits nach 5 sec. und geht dann<br />
aus. Die <strong>AVS</strong> befindet sich wieder im Normalbetrieb.<br />
6. Wenn Sie alle Ihre Geräte programmiert haben, drücken Sie zum<br />
Abschluß erneut die Learn-Taste. Die LED der Learn-Taste verlischt<br />
und das Anzeigelicht des zuletzt programmierten Gerätes<br />
wird leuchten.<br />
Bitte beachten:<br />
Die Learn-Funktion wird nicht bei allen handelsüblichen Fernbedienungen<br />
unterstützt.<br />
Fehlerbehebung<br />
LED brennt nicht ➜ Kontrollieren Sie, ob der Netzstecker steckt<br />
und der POWER-Schalter gedrückt ist.<br />
Kein Bild ➜ Prüfen Sie, ob alle Videoanschlüsse richtig<br />
angeschlossen sind.<br />
➜ Sind alle Geräte eingeschaltet?<br />
➜ Überprüfen Sie, ob Sie den Eingang gewählt<br />
haben, an den das entsprechende Gerät<br />
angeschlossen ist.<br />
Kein Ton ➜ Siehe vorgenannte Angaben (Kein Bild).<br />
➜ Verbinden Sie das Kabel mit Ihrem Fernseh-<br />
gerät direkt, um sicher zustellen, dass sowohl<br />
das Kabel, als auch das Gerät in Ordnung<br />
sind.<br />
Fernbedienung ➜ Haben Sie die Fernbedienung in die Richtung<br />
geht nicht der <strong>AVS</strong> gehalten und war der Abstand<br />
nicht zu groß (max. 7,5 Meter).<br />
➜ Schauen Sie nach, ob das Fernbedienungsfen-<br />
ster nicht verdeckt ist.<br />
➜ Sind die Batterien richtig eingelegt?<br />
➜ Haben die Batterien noch Ihre volle Leistung?
english<br />
Practical: The <strong>AVS</strong> connects up to 6 devices with<br />
your television set!<br />
Most television sets do not provide the required connection possibilities<br />
for several devices. This often requires bothersome plugging and unplugging<br />
of cables in order to prepare and connect the different components<br />
as for e.g. video recorders, DVD-players and game consoles<br />
for application to the television.<br />
You solve this problem by the <strong>AVS</strong> and put an end to cable mix up. As<br />
with the <strong>AVS</strong> coordinate constantly and permanently up to 6 stations<br />
for the reception at your television set. No more plugging and unplugging<br />
is necessary. In future you only select the desired input source<br />
over the operating elements on the front side of the <strong>AVS</strong> or only with<br />
the enclosed remote control.<br />
Connect devices – ready!<br />
You don’t have to programme anything to get the <strong>AVS</strong> switchbox ready<br />
for use between your television set and the devices. Only when placing<br />
the cables and commencing operation you have to observe some<br />
points:<br />
The marked connection spots on the backside of the <strong>AVS</strong><br />
represent only recommendations and correspond to the selector<br />
switches on the front panel and on the remote control.<br />
Each device can actually be connected to each input.<br />
Example<br />
If you use e.g. 2 video recorders, you can also cable the second<br />
recorder at the CAM-input or at AUX 1, AUX 2 or SAT etc..<br />
This means the second recorder is correspondingly selected by<br />
the assigned selector switch of the <strong>AVS</strong> or the remote control.<br />
➋ Please check before connecting the individual devices to the<br />
<strong>AVS</strong>, whether a S-VHS-output respectively a connection<br />
possibility is available. Should this be the case, we recommend<br />
the use of the S-VHS-connection for a maximum of transmission<br />
quality.<br />
7
8<br />
without S-VHS<br />
<strong>AVS</strong> <strong>13</strong><br />
without S-VHS<br />
with S-VHS<br />
with S-VHS<br />
➌ While connecting the <strong>AVS</strong> <strong>13</strong> to the television set all the connec-<br />
tions have to be carried out which were required for the connected<br />
devices.<br />
Example<br />
When you have connected your video recorder by audio and S-VHS<br />
with the <strong>AVS</strong>, and your SAT-receiver with audio and video, you also<br />
have to connect the audio/video output and the S-VHS output of the<br />
<strong>AVS</strong> with your television.
➍ Please employ the enclosed Scart adapter cable and if possible<br />
– the S-VHS cable – for the connection of the <strong>AVS</strong> 14.<br />
<strong>AVS</strong> 14<br />
without S-VHS<br />
with S-VHS<br />
Initial operation and control<br />
Secure before installation that all auxiliary units are connected<br />
to the power supply.<br />
Each device which was connected to the <strong>AVS</strong> must release<br />
a signal, as e.g. if the video recorder is connected, secure<br />
a cassette is put inside and the function “play” is set at the<br />
device!<br />
Please check whether your television is turned on and connected<br />
properly to the <strong>AVS</strong> (S-VHS and AV-cable have to be connected<br />
to the <strong>AVS</strong> at the output “OUT TO TV”).<br />
➋ Then you turn on the <strong>AVS</strong> with the POWER switch (front panel).<br />
An indicator lamp at the device should light.<br />
9
10<br />
Press the button with the inscription VCR where the LED-lamp<br />
on this button is lighted and the video program has to appear<br />
on your television.<br />
Now try each switch for each of your devices connected to your<br />
<strong>AVS</strong>. If you don’t get a picture, refer to the point “Troubleshoo-<br />
ting Information” of this instruction. Now you can also carry out<br />
the switching of the devices with the supplied remote control.<br />
The <strong>AVS</strong> Remote Control<br />
Using the enclosed remote control for the first time, please put in two<br />
1.5 Volt batteries (AA). When the <strong>AVS</strong> switch box is connected and the<br />
batteries are put in, the remote control is immediately active and completely<br />
programmed. Now you can turn on and off the <strong>AVS</strong> switch box<br />
by the remote control as well as connect the respective input channels<br />
respectively connected devices (SAT, DVD, CAM etc) to the television<br />
set by pressing the button.<br />
What is the “learn” button good for?<br />
The learn button is only used when instead of the enclosed <strong>AVS</strong> remote<br />
control another traditional remote control is supposed to be employed.<br />
In this case you proceed as follows:<br />
1. Push the button of the <strong>AVS</strong> switch box. A device indicator light will<br />
turn on at the front panel of the <strong>AVS</strong>.<br />
2. Press and hold the learn button until the light turns off and the<br />
control LED of the learn button turns on. This places the <strong>AVS</strong><br />
switch box into the learn mode. The learn LED should blink now.<br />
3. Push the button for the first device you want the source selector to<br />
learn the codes (DVD, SAT. VCR etc.) for and point the remote<br />
control directly to the switch box. The respective source selector<br />
button of the <strong>AVS</strong> remains pressed for approx. 15 sec in the lean<br />
mode and takes in impulses from the remote control during this<br />
time.<br />
4. Repeat this operation for the individual devices.
5. If the <strong>AVS</strong> does not recognize a signal from the remote control the<br />
LED of the learn button will already blink after 5 sec. und then turns<br />
off. The <strong>AVS</strong> will be again in normal operation.<br />
6. When you have programmed all devices, press again the learn<br />
button. The LED of the learn button will turn off and the device<br />
indicator light of the device programmed at last will blink.<br />
Note:<br />
The learn function is not supported by all commercialised remote controls.<br />
Troubleshooting Information<br />
Light is not on ➜ Make sure power plug is firmly connected.<br />
➜ Be sure that the power button is pressed.<br />
No picture ➜ Check to see that all video cables are inserted<br />
into the proper connectors.<br />
➜ Check power switches on the TV and the video<br />
source.<br />
➜ Check if you have selected the channel corre-<br />
sponding to the device.<br />
No sound ➜ Refer to „No picture“ section.<br />
➜ Connecting the cable to TV directly to confirm<br />
the source and the cable is OK or not.<br />
Remote control ➜ Make sure the infrared receiver window is<br />
does not work not blocked.<br />
➜ Check the path between the selector and the<br />
remote control and clear of any obstructions.<br />
➜ Make sure that the remote control is directed<br />
to the window of source selector and the<br />
distance is less than 25 feet (max 7,5 m).<br />
➜ Make sure the batteries in the remote control<br />
are fresh.<br />
11
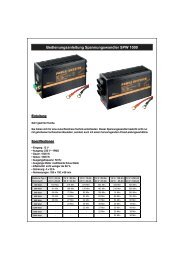
Gerätefront • Front Panel <strong>AVS</strong> <strong>13</strong>/14<br />
Learn Taste<br />
Learn Button<br />
Rückseite • Rear Panel <strong>AVS</strong> <strong>13</strong><br />
Stromversorgung<br />
Power Input<br />
SAT-Eingang<br />
SAT Input<br />
Beiliegendes Zubehör<br />
1 x Fernbedienung mit max. 7,5 m Reichweite<br />
1 x S-VHS-Kabel 1,5 m<br />
<strong>AVS</strong> <strong>13</strong>: 1 x Audio/Video-Kabel 1,5 m (Cinch)<br />
<strong>AVS</strong> 14: 1 x Audio/Video-Kabel 1,5 m mit 3 x<br />
Cinch-Stecker auf Scart-Stecker 21 pin<br />
DVD-Eingang CAM-Eingang VCR-Eingang AUX 2-Eingang AUX 1-Eingang<br />
DVD Input CAM Input VCR Input AUX 2 Input AUX 1 Input<br />
Rückseite • Rear Panel <strong>AVS</strong> 14<br />
Stromversorgung<br />
Power Input<br />
Infrarot Auge<br />
Infrared Reciever<br />
SAT-Eingang<br />
SAT Input<br />
DVD-Eingang CAM-Eingang VCR-Eingang<br />
DVD Input CAM Input VCR Input<br />
Technische Daten<br />
Frequenzrate 20 Hz - 10 MHz<br />
Input + Output Widerstand 75 Ω (Video);<br />
50 Ω (Audio)<br />
Eingangsspannung 1 Vp-p (Video)<br />
0,4 V (Audio)<br />
Maße (mm) 290 x 185 x 53<br />
Gewicht 1,2 kg<br />
Reichweite Fernbedienung 7,5 m<br />
Batterien für Fernbedienung 2 x 1,5 V (AA) ECR<br />
Geräte Tasten<br />
Device Buttons<br />
AUX 1/2-Eingange<br />
AUX 1/2 Inputs<br />
Power Taste<br />
Power Button<br />
TV-Ausgang<br />
OUT to TV<br />
TV-Ausgang<br />
OUT to TV<br />
Including Accessories<br />
1 x remote control range up to 7.5 m,<br />
1 x S-VHS cable 1.5 m<br />
<strong>AVS</strong> <strong>13</strong>: 1 x audio video cabel 1.5 m (RCA)<br />
<strong>AVS</strong> 14: 1 x audio video cabel 1.5 m with 3 x RCA<br />
plug into scart plug 21 pin<br />
Specifications<br />
Frequenty Range 20 Hz - 10 MHz<br />
Input + Output Impedance 75 Ω (Video);<br />
50 Ω (Audio)<br />
Input Level 1 Vp-p (Video)<br />
0.4 V (Audio)<br />
Dimensions (mm) 290 x 185 x 53<br />
Weight 1.2 kg<br />
Remote Control Range 7.5 m<br />
Remote Control Batteries 2 x 1.5 V (AA) ECR