S45I70, 60I70 XL - Фирменный интернет-магазин бытовой ...
S45I70, 60I70 XL - Фирменный интернет-магазин бытовой ...
S45I70, 60I70 XL - Фирменный интернет-магазин бытовой ...

Sie wollen auch ein ePaper? Erhöhen Sie die Reichweite Ihrer Titel.
YUMPU macht aus Druck-PDFs automatisch weboptimierte ePaper, die Google liebt.
18<br />
6<br />
4<br />
5<br />
3<br />
2 1<br />
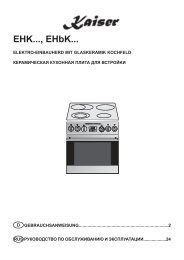
1155 mm<br />
EN<br />
Once the appliance is positioned, level the<br />
dishwasher by adjusting the feet 1 and 2 (screw in<br />
or out). The inclination angle must not exceed<br />
more than 2°.<br />
Ensure that the space between the contact<br />
surfaces at the top of the appliance is not more<br />
than 5 mm. Align the appliance door with the edge<br />
of the kitchen furniture unit.<br />
• Connect the inlet and drain hoses as well<br />
as the power cord.<br />
• Stick the safety adhesive covering 3 to the<br />
inner side of the working surface in the unit<br />
where the dishwasher is to be installed. To<br />
do that, first remove the stripe of paper to<br />
set the adhesive side free. The safety<br />
covering is intended to protect the furniture<br />
surface from the steam which comes out of<br />
the dishwasher in small quantities every<br />
time you open the door of the appliance.<br />
• Putting the dishwasher on slide-rails 4.<br />
• Push the dishwasher into the unit.<br />
• Fix the dishwasher in the unit with two<br />
countersunk head screws 5.<br />
While installing the dishwasher, leave some free<br />
space for the appliance door 6 to open.