Aufbauanleitung - Trixie
Aufbauanleitung - Trixie
Aufbauanleitung - Trixie

Sie wollen auch ein ePaper? Erhöhen Sie die Reichweite Ihrer Titel.
YUMPU macht aus Druck-PDFs automatisch weboptimierte ePaper, die Google liebt.
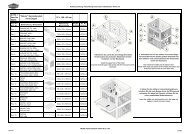
Art Nr./<br />
Item No.<br />
62332<br />
Pos. Nr. /<br />
Pos. No.<br />
Pos. a<br />
Pos. b<br />
Pos. c<br />
Pos. d<br />
Pos. e<br />
Pos. f<br />
Pos. g<br />
Pos. j<br />
Pos. i<br />
Pos. h<br />
Pos. k<br />
Pos. l<br />
Pos. y<br />
Pos. p<br />
Pos. o<br />
Pos. n<br />
180510<br />
"Natura" Kaninchenstall mit<br />
Auslauf<br />
Beschreibung / Description<br />
Vorderteil für Stall<br />
Front part for hutch<br />
Rückwand für Stall<br />
Back wall for hutch<br />
Seitenteil für Stall, rechts<br />
Right side panel for hutch<br />
Seitenteil für Stall, links<br />
Left side panel for hutch<br />
Giebel für Stall, vorne<br />
Gable for hutch, front<br />
Giebel für Stall, hinten<br />
Gable for hutch, back<br />
Leiste für Stall, links<br />
Side batten for hutch, left<br />
Ausziehbare Bodenwanne<br />
Drawer with plastic inlay<br />
Trennwand<br />
Partition<br />
Mittelboden<br />
Mid-floor<br />
Dach für Stall, links<br />
Left roof part for hutch<br />
Dach für Stall, rechts<br />
Right roof part for hutch<br />
Dachfirst für Stall<br />
Roof ridge for hutch<br />
Giebel für Freilauf, links/rechts<br />
Gable for enclosure, left/right<br />
Seitenteil für Freilauf, links<br />
Left side panel for enclosure<br />
Seitenteil für Freilauf, rechts<br />
Right side panel for enclosure<br />
199 x 146 x 93 cm<br />
Abmessung /<br />
Measurement<br />
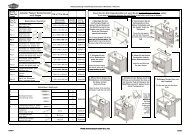
<strong>Aufbauanleitung</strong> / Assembling Instruction & Stückliste / Parts list<br />
Anzahl /<br />
Quantity<br />
Art. Nr. /<br />
Item No.<br />
760 x 1160 x 25 mm 1 62332-10<br />
760 x 1160 x 25 mm 1 62332-20<br />
25 x 1160 x 710 mm 1 62332-31<br />
25 x 1160 x 710 mm 1 62332-30<br />
760 x 270 x 45 mm 1 62332-53<br />
760 x 270 x 45 mm 1 62332-61<br />
15 x 55 x 710 mm 1 62332-52<br />
715 x 50 x 730 mm 1 62332-40<br />
8 x 490 x 700 mm 1 62332-34<br />
350 x 12 x 700 mm 2 62332-60<br />
510 x 30 x 910 mm 1 62332-50<br />
510 x 38 x 910 mm 1 62332-51<br />
90 x 60 x 940 mm 1 62332-54<br />
760 x 170 x 45 mm 2 62332-57<br />
25 x 710 x 770 mm 1 62332-32<br />
25 x 710 x 770 mm 1 62332-33<br />
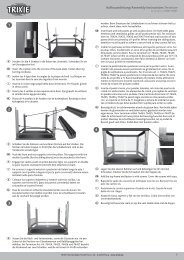
1. Montieren Sie zuerst den Stall: Verbinden Sie<br />
Vorder- und Rückseite (a, b) mit den Seitenteilen (c, d).<br />
First install the hutch: Connect front part and the back wall (a,<br />
b) with the side panels (c, d).<br />
TRIXIE Heimtierbedarf GmbH & Co. KG<br />
3. Schieben Sie die<br />
ausziehbare Bodenwanne<br />
(j) und die Trennwand (i)<br />
ein. Danach legen Sie den<br />
Mittelboden (h) ein.<br />
Insert the drawer (j) and the<br />
partition (i) and than the midfloor<br />
(h).<br />
2. Befestigen Sie nun Vorder- und Rückseite des<br />
Giebels (e, f). Verschrauben Sie die seitliche<br />
Leiste (g).<br />
Now fix the front and back panels of the gable (e, f). Screw<br />
also the side batten (g) in tight.<br />
4. Befestigen Sie die erste Dachhälfte (k). Montieren<br />
Sie die zweite Dachhälfte (l) mit Hilfe des Fangbandes<br />
(m). Verschrauben Sie den Dachfirst (y).<br />
Fix the first part of the roof (k). Install the second part (l)<br />
with the help of the check strap (m). Fix also the ridge (y).<br />
5. Montieren Sie nun das Freilaufgehege:<br />
Zuerst verschrauben Sie die Seitenteile des Giebels<br />
(p) an den Freilauf-Seitenteilen (o, n).<br />
Now install the enclosure: First screw the side panels of the<br />
gable (p) with the side panels of the enclosure (o, n).<br />
87980
Pos. Nr. /<br />
Pos. No.<br />
Pos. q<br />
Pos. r<br />
Pos. s<br />
Pos. t<br />
Pos. u<br />
Pos. v<br />
Pos. w<br />
Pos. x<br />
Beschreibung / Description<br />
Schutzprofil<br />
Protection profile<br />
Vorderteil für Freilauf<br />
Front part for enclosure<br />
Rückwand für Freilauf<br />
Back wall for enclosure<br />
Leisten für Freilauf, vorne/hinten<br />
Roof ledge for enclosure, front/back<br />
Rampe<br />
Ramp<br />
Dach für Freilauf, hinten<br />
Roof for enclosure, back<br />
Dach für Freilauf, vorne<br />
Roof for enclosure, front<br />
Dachfirst für Freilauf<br />
Roof ridge for enclosure<br />
Abmessung /<br />
Measurement<br />
<strong>Aufbauanleitung</strong> / Assembling Instruction & Stückliste / Parts list<br />
Anzahl /<br />
Quantity<br />
Art. Nr. /<br />
Item No.<br />
55 x 10 x 650 mm 1 62332-35<br />
1100 x 765 x 25 mm 1 62332-11<br />
1100 x 765 x 25 mm 1 62332-21<br />
1150 x 60 x 15 mm 2 62332-58<br />
1050 x 20 x 170 mm 1 62332-41<br />
1140 x 20 x 460 mm 1 62332-56<br />
1140 x 20 x 460 mm 1 62332-55<br />
100 x 60 x 1170 mm 1 62332-59<br />
A 31<br />
B 17<br />
C Senkkopfschrauben<br />
15<br />
D<br />
Countersunk screws<br />
5<br />
E 4<br />
F 9<br />
m<br />
Fangband<br />
Check strap<br />
weitere bereits vormontierte Teile (als Ersatzteile separat erhältlich)<br />
other parts already assembled (spare parts separately available)<br />
Scharnier, für vordere Stalltür und obere Tür des Auslaufs<br />
Hinge, for front door of the hutch and the upper door of enclosure<br />
Scharnier für untere Tür des Auslaufs<br />
Hinge for lower door of the enclosure<br />
Scharnier für Dach des Stalls / Hinge for roof of the hutch<br />
28 cm 1 6235-61<br />
5 cm 6 6235-72<br />
6,35 cm 2 6235-73<br />
7,6 cm 2 6235-74<br />
3-Wege Verschlussriegel / 3-way locking bolt 5,5 cm 1 6235-52<br />
6. Befestigen Sie dann das offene Seitenteil (n) am<br />
Kleintierstall. Legen Sie das Schutzprofil (q) über die<br />
beiden unteren Leisten, bevor Sie sie verschrauben.<br />
Fix the open side panel (n) to the hutch. Put the protection<br />
profile (q) over the two lower battens before you screw them<br />
together.<br />
1-Wege Verschlussriegel / 1-way locking bolt 5 cm 2 6235-53 8. Schrauben Sie nun die beiden Dachhälften (v,w)<br />
fest.<br />
180510<br />
Kleinteileset / Small parts<br />
62332-65<br />
Screw the two parts of the enclosure roof (v,w) in tight.<br />
TRIXIE Heimtierbedarf GmbH & Co. KG<br />
7. Verbinden Sie nun die anderen Seitenteile (s,r und<br />
o) des Freilaufgeheges mit dem Kleintierstall. Die<br />
Giebelseiten verbinden Sie mit den beiden Leisten (t).<br />
Stellen Sie die Rampe (u) vor die seitliche Öffnung<br />
und befestigen Sie diese.<br />
Now connect the other side panels of the enclosure (s,r and<br />
o) to the hutch. Connect the sides of the gable with the two<br />
battens (t). Put the ramp (u) in front of the side opening and<br />
fix it.<br />
9. Befestigen Sie danach die obere Leiste (x).<br />
Fix the ridge (x).<br />
87980