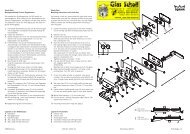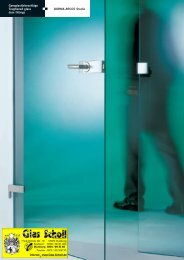
Dorma Visur Ganzglasanlage ohne sichtbare Beschläge
Dorma Visur Ganzglasanlage ohne sichtbare Beschläge
Dorma Visur Ganzglasanlage ohne sichtbare Beschläge

Sie wollen auch ein ePaper? Erhöhen Sie die Reichweite Ihrer Titel.
YUMPU macht aus Druck-PDFs automatisch weboptimierte ePaper, die Google liebt.
Montageanleitung<br />
DORMA VISUR<br />
Drehtürsystem<br />
Installation instruction<br />
DORMA VISUR<br />
pivoting door system<br />
DORMA−Glas<br />
Seite / Page 1 /11<br />
800.52.244.6.32<br />
Stand / Issue<br />
06/07
Wichtige Informationen:<br />
Important information:<br />
5 5*<br />
5<br />
Wichtige Hinweise:<br />
Important points:<br />
!<br />
!<br />
!<br />
!<br />
70<br />
* 5mm Glas/Wand sowie Glas/Glas<br />
* 5mm glass/wall as well as glass/glass<br />
Montagewerkzeug:<br />
Installation tool:<br />
DORMA−Glas<br />
98<br />
70<br />
Überdrehen der Tür verhindern!<br />
Stopper verwenden!<br />
Prevent excessive opening of the door,<br />
Please use a stopper.<br />
2,5 mm 5 mm 6 mm<br />
!<br />
1 =<br />
1.; 1.1;...=<br />
Geeignete, auf den Untergrund abgestimmte Ankersysteme verwenden!<br />
Please use suitable anchorsystems according to foundation!<br />
Das Bodenlager ist nicht gegen eindringendes Wasser geschützt!<br />
8<br />
8<br />
The bearing is not protected against water intrusion!<br />
Es ist nur der RTS 85 EN3 90° Feststellung zugelassen.<br />
Only the RTS 85 EN3 90° hold open angle is certified.<br />
70<br />
*max. 130°<br />
Seite / Page 2 /11<br />
Vor der Montage Glasflächen<br />
mit handelsüblichen Glasreiniger<br />
im Bereich der Klemmflächen reinigen.<br />
All glass clamping areas are to<br />
be cleaned with standard glass<br />
cleaning products prior to installation.<br />
keine Verdünnung verwenden<br />
do not use thinners<br />
Bauteil/Baugruppe<br />
component<br />
Montagefolge<br />
installation sequence<br />
Profilbreite<br />
min. 120<br />
* bei max. Wanddicke von 120mm<br />
* with max. wall thickness of 120mm<br />
Stopper: z.B. Art.−Nr.: 29.950<br />
stopper: e.g. Art.−No.: 29.950<br />
Glassauger / glass suction lifter<br />
profile width<br />
min. 120<br />
Hammerbohrkrone ø126 /<br />
hammer core bit ø126<br />
Stand / Issue<br />
06/07
Glasbearbeitung:<br />
Glass preparation:<br />
Glasverwendung: 10/12 mm Einscheibensicherheitsglas<br />
Glass application: 10/12 mm toughened safety glass<br />
DETAIL X<br />
Lieferumfang:<br />
Scope of delivery:<br />
1x<br />
DORMA−Glas<br />
max. 85 kg<br />
max. Breite: 1100mm<br />
max. width: 1100mm<br />
8<br />
min. Breite: 800 mm<br />
min. width: 800 mm<br />
4<br />
2x<br />
12<br />
1x<br />
2<br />
1x<br />
min. Höhe: 1996 mm<br />
min. hight: 1996 mm<br />
1x<br />
10<br />
3<br />
max. Höhe: 2500mm<br />
max. height: 2500mm<br />
2x<br />
4x<br />
5<br />
1x<br />
Seite / Page 3 /11<br />
33<br />
DETAIL X<br />
Ausführung der Glaszungen oben und unten gleich!<br />
Top and bottom glass tongues of identical design!<br />
11<br />
65<br />
65<br />
8x<br />
6<br />
R15<br />
30<br />
1x<br />
1<br />
1x<br />
4x<br />
7<br />
9<br />
Stand / Issue<br />
min. 120<br />
06/07
Bei 12mm Glasdicke: Vorbereitung der <strong>Beschläge</strong> 2 , 3<br />
With 12mm glass thickness: Preparation of hinges 2 , 3<br />
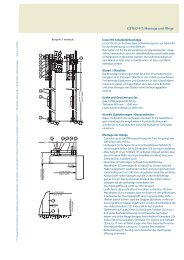
1. Montage des Montagewinkels 12 :<br />
1. Assembly of mounting angle 12 :<br />
!<br />
!<br />
DORMA−Glas<br />
6mm<br />
heraus schrauben<br />
unscrew<br />
Beim Komplett−Set inkl. Schließerkasten<br />
ist der Montagewinkel 12 bereits montiert.<br />
In the complete set, incl. transom box,<br />
the mounting angle 12 is already assembled.<br />
12.2<br />
12.1<br />
Seite / Page 4 /11<br />
Zwischenlage entfernen.<br />
Remove gaskets.<br />
Stand / Issue<br />
06/07
2. Montage des Schließerkastens:<br />
2. Installation of the transom box:<br />
!<br />
!<br />
2.1<br />
2.1<br />
Schrauben und Dübel zur Befestigung, sind nicht im Lieferumfang enthalten!<br />
Geeignete, auf den Untergrund abgestimmte Ankersysteme verwenden z.B.<br />
Schrauben DIN 912 M8x... oder DIN 7996 6x...<br />
Voraussetzung für die Montage des Schließerkastens ist eine ausgerichtete<br />
und tragfähige Unterkonstruktion bzw. Wand mit einer max. Toleranz von<br />
2mm pro Meter.<br />
Screws and plugs for connection are not part of delivery!<br />
Please use suitable anchorsystems according to foundation e.g.<br />
screws DIN 912 M8x... or DIN 7996 6x...<br />
Pre−condition for the assembly of transom box is an aligned and<br />
load−carrying substructure and/or wall with a max. tolerance<br />
of 2mm per meter.<br />
2.2 Drehpunkt aus Schließerkasten übernehmen und runterloten.<br />
2.2 Transfer pivot point from transom box perpendicular to the floor.<br />
2.3 Abstandshalter 10 demontieren.<br />
2.3 Dismount spacer bars 10 .<br />
DORMA−Glas<br />
1<br />
10<br />
2.3<br />
2.2 Lotpunkt / perpendicular point<br />
Seite / Page 5 /11<br />
Abstandshalter 10 bei flächenbündiger<br />
Deckenanbindung.<br />
Reinforcing spacer bars 10 to be used<br />
when transom box is flush with ceilling.<br />
Beispiel / Example<br />
Rohdecke / rough ceilling<br />
Gipsdecke / plasterboard ceilling<br />
2.2<br />
Stand / Issue<br />
06/07
3. Montage Lagertopf im Boden:<br />
3. Installation of casing into floor:<br />
!<br />
3.1 Bohrung ø126 für Lagertopf im Boden einbringen.<br />
Hammerbohrkrone, Fa. HILTI (TE−Y−BK125/430)<br />
Art.−Nr.: 00307066 (HILTI)<br />
3.1 Setting of bottom hole (ø126) for casing.<br />
hammer core bit, company HILTI (TE−Y−BK 125/430)<br />
Art.−No.: 00307066 (HILTI)<br />
Der Untergrund muss tragfähig sein.<br />
Geeignete, auf den Untergrund abgestimmte Ankersysteme verwenden!<br />
The foundation must be load−carrying.<br />
Please use suitable achorsystems according to foundation!<br />
4. Montage des oberen Beschlags:<br />
4. Installation of the top fitting:<br />
!<br />
70<br />
DORMA−Glas<br />
4.1<br />
3.2<br />
5 mm<br />
nur lösen / only release<br />
Vormontiert für 10mm Glasdicke!<br />
Bitte Hinweis auf Seite 4 beachten!<br />
Preassembled for 10mm glass thickness!<br />
Please pay attention to note on page 4.<br />
ø126, 64mm tief<br />
ø126, 64mm deep<br />
Seite / Page 6 /11<br />
4.2<br />
3.3<br />
3.2<br />
3.1<br />
Stand / Issue<br />
4.2<br />
4.1<br />
Befestigungslöcher<br />
Attachment holes<br />
06/07
4. Montage des oberen Beschlags:<br />
4. Installation of the top fitting:<br />
4.3<br />
5 mm<br />
15 Nm<br />
3.2<br />
5. Montage des unteren Beschlags:<br />
5. Installation of the bottom fitting:<br />
2.2<br />
5.1<br />
5 mm<br />
nur lösen / only release<br />
DORMA−Glas<br />
3.3<br />
4.4<br />
6 mm<br />
Schrauben lösen<br />
unscrew<br />
65<br />
5.2<br />
Seite / Page 7 /11<br />
2.1<br />
3.4<br />
4.5<br />
5.3<br />
5 mm<br />
15 Nm<br />
2.2<br />
Stand / Issue<br />
06/07
6. Montage der Drehtür:<br />
6. Installation of pivoting door:<br />
DORMA−Glas<br />
6.2<br />
6.1<br />
7. Montage des Rahmentürschließers:<br />
7. Installation of the transom door closer:<br />
7.1 Tür an RTS−Kasten lehnen.<br />
7.1 Lean the door against the transom box.<br />
7.1<br />
6.3<br />
6.3<br />
Scheibe auf 8mm Klötze aufstellen.<br />
Position glass onto 8mm blocks.<br />
Seite / Page 8 /11<br />
7.2 Rahmentürschließer einführen.<br />
7.2 Insert the transom door closer as shown.<br />
!<br />
Lappen zum Schutz über die Glaskante legen! Bauseits.<br />
Protect glass using cloths! On site.<br />
7.2<br />
8<br />
Stand / Issue<br />
06/07
7. Montage des Rahmentürschließers:<br />
7. Installation of the transom door closer:<br />
7.3 Schrauben fixieren<br />
7.3 Fix screws<br />
8. Montage der Drehtür:<br />
8. Installation of the pivoting door:<br />
DORMA−Glas<br />
DETAIL X DETAIL Y<br />
Sicht: unter den Sturz!<br />
View: under the lintel!<br />
DETAIL X DETAIL Y<br />
8.1 Tür einschwenken.<br />
8.1 Align the door.<br />
Seite / Page 9 /11<br />
± 1,2°<br />
8.2 8.3<br />
3.4<br />
3.3<br />
7.3 Schrauben fixieren<br />
7.3 Fix screws<br />
Stand / Issue<br />
6 mm<br />
15 Nm<br />
06/07
9. Drehtüranlage justieren:<br />
9. Adjustment of pivoting door system:<br />
5<br />
10. Endmontage der <strong>Beschläge</strong>:<br />
10. Final assembly of the fittings:<br />
DORMA−Glas<br />
DETAIL X<br />
DETAIL Y<br />
5<br />
8<br />
3D Verstellung / 3D adjustment<br />
Sicht von oben auf Lagertopf<br />
View from above onto casing<br />
5<br />
6<br />
10.2<br />
10.1<br />
Seite / Page 10 /11<br />
5<br />
6<br />
DETAIL Y<br />
4 mm<br />
Y<br />
± 2,5<br />
± 3<br />
X<br />
Verstellung der Höhe und Neigung!<br />
Adjustment of the height and inclination.<br />
Y<br />
± 2,5<br />
Z<br />
Z<br />
X<br />
Verstellung der Lage.<br />
Adjustment of position.<br />
DETAIL X<br />
10.1<br />
10.2<br />
4 mm<br />
Stand / Issue<br />
06/07
11. Einstellung des Rahmentürschließers:<br />
11. Adjustment of the transom door closer:<br />
1. Voll kontrolliertes Schließen mit einstellbarer Geschwindigkeit.<br />
Entire control of closing with adjustable speed.<br />
2. Einstellbare Schließdämpfung.<br />
Adjustable closing damping.<br />
12. Endmontage:<br />
12. Final assembly:<br />
DORMA−Glas<br />
12.1<br />
Seite / Page 11 /11<br />
1 2<br />
12.3<br />
12.4<br />
oberer Beschlag<br />
top fitting<br />
unterer Beschlag<br />
bottom fitting<br />
12.2 Folienstreifen abziehen.<br />
12.2 Pull off backing tape.<br />
Stand / Issue<br />
06/07