Bedienung Java-Client (1.00) - Guntermann und Drunck GmbH
Bedienung Java-Client (1.00) - Guntermann und Drunck GmbH Bedienung Java-Client (1.00) - Guntermann und Drunck GmbH
Video profiles Setting options The user is enabled to edit the profile’s video settings. The following pages describe the settings that are provided on the different tabs of the window. The lower window section is identical on all tabs: The left corner displays the number of image updates per second in the client window (image frequency) as well as the data transfer rate (in kilobyte per second) between KVM matrix system and Java client. The following operating elements can also be found in this section: display directly: changes in the settings are immediately applied to the image screen in the client window Test: applies changes in the settings for the display screen in the client window Refresh: synchronizes the transmitted image of the target Cancel: cancels changes in the settings and close window Close: temporarily saves settings until the target is accessed again Save: save settings Undo: undo all changes since last saving Defining the image width, position and size The Image tab enables you to define the image width, the position and the size. ADVICE: If you want this tab’s settings to be automatically determined, click on Image position recognition. The following requirements are necessary to execute this function reliably: The screen resolution of the target is lower than the resolution of the client window. The setting of the frames of the currently accessing target computer lie within a gegnerated size (depending on the image resolution). 18 · G&D UCON-IP-NEO
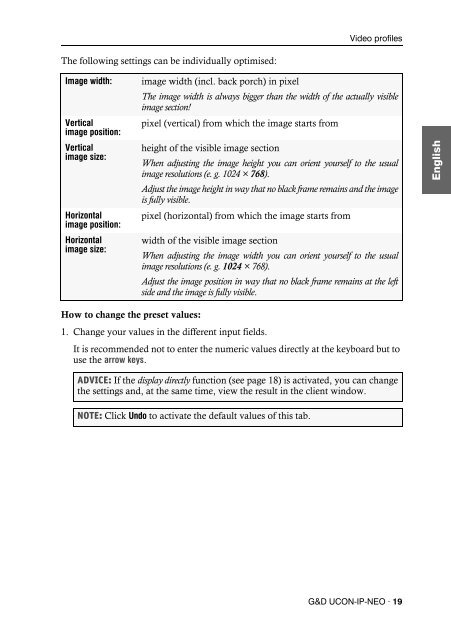
The following settings can be individually optimised: Video profiles Image width: image width (incl. back porch) in pixel The image width is always bigger than the width of the actually visible image section! Vertical pixel (vertical) from which the image starts from image position: Vertical height of the visible image section image size: When adjusting the image height you can orient yourself to the usual image resolutions (e. g. 1024 × 768). Adjust the image height in way that no black frame remains and the image is fully visible. Horizontal pixel (horizontal) from which the image starts from image position: Horizontal width of the visible image section image size: When adjusting the image width you can orient yourself to the usual image resolutions (e. g. 1024 × 768). Adjust the image position in way that no black frame remains at the left side and the image is fully visible. How to change the preset values: 1. Change your values in the different input fields. It is recommended not to enter the numeric values directly at the keyboard but to use the arrow keys. ADVICE: If the display directly function (see page 18) is activated, you can change the settings and, at the same time, view the result in the client window. NOTE: Click Undo to activate the default values of this tab. G&D UCON-IP-NEO · 19
- Seite 3 und 4: Inhaltsverzeichnis Inhaltsverzeichn
- Seite 5 und 6: Der Java Client Der Java Client Der
- Seite 7 und 8: Erste Schritte Eine Verbindung zum
- Seite 9 und 10: Informationen der Statuszeile Erste
- Seite 11 und 12: Umschalten zwischen den Zielrechner
- Seite 13 und 14: Verbindungsaufbau Verbindungsaufbau
- Seite 15 und 16: Das Steuerboard Das Steuerboard Das
- Seite 17 und 18: Das Steuerboard Aufschaltung auf de
- Seite 19 und 20: Anzeige des On-Screen-Displays übe
- Seite 21 und 22: Videoeinstellungen Videoeinstellung
- Seite 23 und 24: Folgende Einstellungen können von
- Seite 25 und 26: Einstellung der Phasenlage Videoein
- Seite 27 und 28: Videofunktionen Videofunktionen Aut
- Seite 29 und 30: Mausbremse Mausbremse Viele Betrieb
- Seite 31 und 32: Verschlüsselung Erweiterte Funktio
- Seite 33 und 34: NOTIZEN
- Seite 35 und 36: Contents Contents The Java client .
- Seite 37 und 38: The Java client The Java client The
- Seite 39 und 40: Getting started Establishing a conn
- Seite 41 und 42: Information in the status bar The s
- Seite 43 und 44: Switching between targets Getting s
- Seite 45 und 46: Establishing a connection Establish
- Seite 47 und 48: Control panel Control panel The con
- Seite 49 und 50: Accessing the last target (Last Tar
- Seite 51 und 52: Displaying the on-screen display vi
- Seite 53: Video profiles Video profiles When
- Seite 57 und 58: Adjusting the phase position Video
- Seite 59 und 60: Video functions Video functions Aut
- Seite 61 und 62: Mouse delay Many operating systems
- Seite 63 und 64: Encryption Advanced functions IMPOR
- Seite 65 und 66: NOTES
- Seite 67 und 68: NOTES
The following settings can be individually optimised:<br />
Video profiles<br />
Image width: image width (incl. back porch) in pixel<br />
The image width is always bigger than the width of the actually visible<br />
image section!<br />
Vertical pixel (vertical) from which the image starts from<br />
image position:<br />
Vertical height of the visible image section<br />
image size:<br />
When adjusting the image height you can orient yourself to the usual<br />
image resolutions (e. g. 1024 × 768).<br />
Adjust the image height in way that no black frame remains and the image<br />
is fully visible.<br />
Horizontal pixel (horizontal) from which the image starts from<br />
image position:<br />
Horizontal width of the visible image section<br />
image size:<br />
When adjusting the image width you can orient yourself to the usual<br />
image resolutions (e. g. 1024 × 768).<br />
Adjust the image position in way that no black frame remains at the left<br />
side and the image is fully visible.<br />
How to change the preset values:<br />
1. Change your values in the different input fields.<br />
It is recommended not to enter the numeric values directly at the keyboard but to<br />
use the arrow keys.<br />
ADVICE: If the display directly function (see page 18) is activated, you can change<br />
the settings and, at the same time, view the result in the client window.<br />
NOTE: Click Undo to activate the default values of this tab.<br />
G&D UCON-IP-NEO · 19


