Kährs Verlegeanleitung - koncepta GmbH & Co.KG
Kährs Verlegeanleitung - koncepta GmbH & Co.KG
Kährs Verlegeanleitung - koncepta GmbH & Co.KG

Sie wollen auch ein ePaper? Erhöhen Sie die Reichweite Ihrer Titel.
YUMPU macht aus Druck-PDFs automatisch weboptimierte ePaper, die Google liebt.
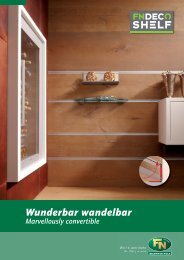
<strong>Verlegeanleitung</strong> für <strong>Kährs</strong> holzfussböden 15<br />
<strong>Verlegeanleitung</strong> für <strong>Kährs</strong> activity floor 30 mm; bei<br />
schwimmender Verlegung auf ebenem und festem<br />
untergrund<br />
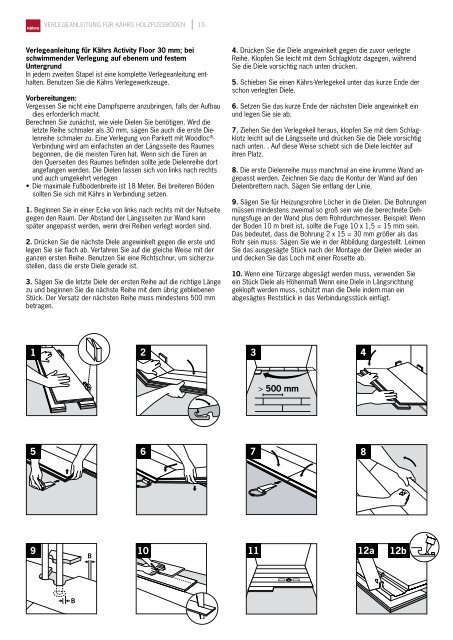
in jedem zweiten stapel ist eine komplette <strong>Verlegeanleitung</strong> enthalten.<br />
benutzen sie die <strong>Kährs</strong> Verlegewerkzeuge.<br />
Vorbereitungen:<br />
Vergessen sie nicht eine dampfsperre anzubringen, falls der aufbau<br />
dies erforderlich macht.<br />
berechnen sie zunächst, wie viele dielen sie benötigen. Wird die<br />
letzte reihe schmaler als 30 mm, sägen sie auch die erste dielenreihe<br />
schmaler zu. eine Verlegung von Parkett mit Woodloc ® 8.7.5 Installation instructions for <strong>Kährs</strong> Active Floor 30 mm;<br />
floating installation on level and fixed surfaces. 4. drücken sie die diele angewinkelt gegen die zuvor verlegte<br />
reihe. Klopfen sie leicht mit dem schlagklotz dagegen, während<br />
sie die diele vorsichtig nach unten drücken.<br />
<strong>Co</strong>mplete installation instructions are provided in every other bundle. Use <strong>Kährs</strong>’ installation tools. Preparations:<br />
– Do not forget the vapour barrier if the installation requires this.<br />
5. schieben sie einen <strong>Kährs</strong>-Verlegekeil unter das kurze ende der<br />
– First calculate how many floorboards are required. If the last row is narrower<br />
schon<br />
than 30<br />
verlegten<br />
mm, saw<br />
diele.<br />
the first row of boards as<br />
well. When installing a floor with woodloc 6. setzen sie das kurze ende der nächsten diele angewinkelt ein<br />
und legen sie sie ab.<br />
7. ziehen sie den Verlegekeil heraus, klopfen sie mit dem schlag-<br />
- klotz leicht auf die längsseite und drücken sie die diele vorsichtig<br />
Verbindung wird am einfachsten an der längsseite des raumes nach unten. . auf diese Weise schiebt sich die diele leichter auf<br />
begonnen, die die meisten türen hat. Wenn sich die türen an ihren Platz.<br />
1. Begin in<br />
den<br />
one<br />
Querseiten<br />
corner and<br />
des<br />
install<br />
raumes befinden sollte jede dielenreihe dort<br />
from left angefangen to right with werden. the long die dielen lassen sich von links nach rechts 8. die erste dielenreihe muss manchmal an eine krumme Wand an-<br />
bottom lip und out auch towards umgekehrt the room. verlegen<br />
gepasst werden. zeichnen sie dazu die Kontur der Wand auf den<br />
The long • Die side maximale distance Fußbodenbreite to the wall ist 18 Meter. Bei breiteren Böden dielenbrettern nach. sägen sie entlang der linie.<br />
can be adjusted sollten sie later sich when mit <strong>Kährs</strong> three in Verbindung setzen.<br />
rows have been installed.<br />
9. sägen sie für heizungsrohre löcher in die dielen. die bohrungen<br />
1. beginnen sie in einer ecke von links nach rechts mit der nutseite müssen mindestens zweimal so groß sein wie die berechnete deh-<br />
gegen den raum. der abstand der längsseiten zur Wand kann nungsfuge an der Wand plus dem rohrdurchmesser. beispiel: Wenn<br />
2. Press<br />
später<br />
the next<br />
angepasst<br />
floor board<br />
werden,<br />
at an<br />
wenn drei reihen verlegt worden sind. der boden 10 m breit ist, sollte die fuge 10 x 1,5 = 15 mm sein.<br />
angle to the first and lay it down.<br />
das bedeutet, dass die bohrung 2 x 15 = 30 mm größer als das<br />
<strong>Co</strong>ntinue 2. drücken in the same sie die way nächste with the diele angewinkelt gegen die erste und rohr sein muss. sägen sie wie in der abbildung dargestellt. leimen<br />
rest of the legen first sie row. sie flach Check ab. with Verfahren sie auf die gleiche Weise mit der sie das ausgesägte stück nach der Montage der dielen wieder an<br />
a line to ganzen ensure ersten that the reihe. starting benutzen sie eine richtschnur, um sicherzu- und decken sie das loch mit einer rosette ab.<br />
boards stellen, lie straight. dass die erste diele gerade ist.<br />
10. Wenn eine türzarge abgesägt werden muss, verwenden sie<br />
3. sägen sie die letzte diele der ersten reihe auf die richtige länge ein stück diele als höhenmaß Wenn eine diele in längsrichtung<br />
3. Cut the<br />
zu und<br />
final<br />
beginnen<br />
board in<br />
sie<br />
the<br />
die<br />
first<br />
nächste<br />
row<br />
reihe mit dem übrig gebliebenen geklopft werden muss, schützt man die diele indem man ein<br />
to the correct stück. der length Versatz and der begin nächsten the reihe muss mindestens 500 mm abgesägtes reststück in das Verbindungsstück einfügt.<br />
next row betragen. with the piece that was left<br />
over. Stagger the boards’ end joints<br />
by at least 500 mm.<br />
1 4<br />
7<br />
2 5<br />
8<br />
® – First calculate how many floorboards are required. If the last row is narrower than 30 mm, saw the first row of boar<br />
well. When installing a floor with woodloc<br />
1. Begin in one corner and install<br />
from left to right with the long<br />
bottom lip out towards the room.<br />
The long side distance to the wall<br />
can be joints, adjusted the work later is when facilitated three if the installation starts at the long side that has most<br />
doors. If there are doors along the short rows side have of been the room installed. begin each row of boards at these. The boards can be installed<br />
both from left and right.<br />
– The maximum floor width is 18 metres. 2. Press <strong>Co</strong>ntact the <strong>Kährs</strong> next floor if the board floor is at wider. an<br />
angle to the first and lay it down.<br />
<strong>Co</strong>ntinue in the same way with the<br />
rest of 4. the Press first the row. floor Check board with at an angle 8. The first board row must some-<br />
a line to to the ensure board that in the front. starting Knock lightly times be adjusted to a crooked wall.<br />
boards with lie straight. the hand block while carefully Draw the wall’s contour on the<br />
pressing the board down.<br />
floorboards. Saw.<br />
3. Cut the final board in the first row<br />
to the 5. correct Push in length a <strong>Kährs</strong> and installation begin the key 9. Drill holes in the board for<br />
next row under with the the board piece you that have was already left heater pipes. The holes must be at<br />
over. installed Stagger the at the boards’ short end end. joints least double the size of the estimated<br />
by at least 500 mm.<br />
movement joint at the wall plus the<br />
6. Press in the next board’s short pipe diameter. Example: If the floor<br />
end at an angle and lay down the is 10 m wide, the hole shall be<br />
long side.<br />
10 x 1.5 = 15 mm. This means<br />
1 2 x 415<br />
= 30 mm larger that the pipe. 7<br />
7. Remove the installation key and Saw as shown in the picture. When<br />
knock lightly with the hand block the board has been installed, glue<br />
on the long side while at the same the sawn-out piece and cover the<br />
time carefully pressing the board holes with pipe collars.<br />
down and it will move into place<br />
more easily.<br />
2 5<br />
8<br />
3<br />
6<br />
9<br />
® bottom lip out towards the room. with the hand block while carefu<br />
The long side distance to the wall pressing the board down.<br />
can be<br />
joints,<br />
adjusted<br />
the work<br />
later<br />
is<br />
when<br />
facilitated<br />
three<br />
if the installation starts at the long side that h<br />
doors. If there are doors along the short rows side have of been the room installed. begin each row of boards 5. Push at these. in a <strong>Kährs</strong> The boards installation can be ke ins<br />
both from left and right. 8.7.5 Installation instructions under for <strong>Kährs</strong> the board Active you have already Floo<br />
– The maximum floor width is 18 metres. 2. Press <strong>Co</strong>ntact the <strong>Kährs</strong> next floor if the board floor is at wider. an installed at the short end.<br />
floating installation on level and fixed surfaces.<br />
angle to the first and lay it down.<br />
<strong>Co</strong>ntinue in the same way with the 6. Press in the next board’s short<br />
<strong>Co</strong>mplete 4. Press the floor board at an angle 8. rest installation of the first instructions row. Check are with provided in every end at other an The angle bundle. first and board Use lay <strong>Kährs</strong>’ row down must insta the<br />
– Do a not line forget to to the ensure the board vapour that in barrier the front. starting Knock if the installation lightly long requires side. times this. be adjusted to a crook<br />
with the hand block while carefully Draw the wall’s contour on t<br />
– First boards calculate lie straight. how many floorboards are required. If the last row is narrower than 3<br />
pressing the board down.<br />
floorboards. Saw.<br />
7.<br />
well. When installing a floor with woodloc<br />
Remove the installation key and<br />
3. Cut the final board in the first row knock lightly with the hand block<br />
5. Push in a <strong>Kährs</strong> installation key 9. to the correct length and begin the on the long Drill side holes while in the at the board same fo<br />
next row under with the the board piece you that have was already left time carefully heater pipes. pressing The holes the board mus<br />
over. installed Stagger the at the boards’ short end end. joints down least and double it will move the size into of place the e<br />
by at least 500 mm.<br />
more movement easily. joint at the wall p<br />
6. Press in the next board’s short pipe diameter. Example: If t<br />
1. Begin in end one at corner an angle and and install lay down the is 10 m wide, the hole shall<br />
from left to long right side. with the long<br />
10 x 1.5 = 15 mm. This mea<br />
bottom lip out 1towards the room.<br />
2 x 415<br />
= 30 mm larger that t<br />
The long side 7. Remove distance the to installation the wall key and Saw as shown in the picture<br />
can be adjusted knock later lightly when with three the hand block the board has been installed<br />
rows have been on the installed. long side while at the same the sawn-out piece and cove<br />
time carefully pressing the board holes with pipe collars.<br />
2. Press the down next floor and it board will move at an into place<br />
angle to the more first easily. and lay it down.<br />
<strong>Co</strong>ntinue in the same way with the<br />
rest of the first row. Check with<br />
a line to ensure that the starting<br />
boards lie straight. 2<br />
5<br />
3. Cut the final board in the first row<br />
to the correct length and begin the<br />
next row with the piece that was left<br />
over. Stagger the boards’ end joints<br />
by at least 500 mm.<br />
1 3<br />
4 6<br />
130<br />
2<br />
5<br />
® not forget the vapour barrier if the installation requires this.<br />
st calculate how many floorboards are required. If the last row is narrower than 30 mm, saw the first row of boards as<br />
ll. When installing a floor with woodloc<br />
ions for <strong>Kährs</strong> Active Floor 30 mm;<br />
el and fixed surfaces.<br />
ded gin in in every one corner other bundle. and install Use <strong>Kährs</strong>’ installation tools. Preparations:<br />
tallation left to right requires with this. the long<br />
om lip out towards the room.<br />
required. If the last row is narrower than 30 mm, saw the first row of boards as<br />
joints, the work is facilitated if the installa<br />
long side distance to the wall<br />
®<br />
be<br />
joints,<br />
adjusted<br />
the work<br />
later<br />
is<br />
when<br />
facilitated<br />
three<br />
if the installation starts at the long side that doors. has most If there are doors along the short side of the room begin each row of boards<br />
s side have of been the room installed. begin each row of boards at these. The boards can be installed both from left and right.<br />
– The maximum floor width is 18 metres. <strong>Co</strong>ntact <strong>Kährs</strong> if the floor is wider.<br />
ess ontact the <strong>Kährs</strong> next floor if the board floor is at wider. an<br />
e to the first and lay it down.<br />
4. Press the floor board at an angle<br />
tinue in the same way with the<br />
4. Press the floor board at an angle 8. to the board in front. Knock lightly<br />
of the first row. Check with<br />
The first board row must some-<br />
to the board in front. Knock lightly<br />
with the hand block while carefully<br />
e to ensure that the starting<br />
times be adjusted to a crooked wall.<br />
with the hand block while carefully<br />
pressing the board down.<br />
ds lie straight.<br />
Draw the wall’s contour on the<br />
pressing the board down.<br />
floorboards. Saw.<br />
5. Push in a <strong>Kährs</strong> installation key<br />
ut the final board in the first row<br />
5. Push in a <strong>Kährs</strong> installation key 9. under the board you have already<br />
e correct length and begin the<br />
Drill holes in the board for<br />
under the board you have already heater pipes. The holes must be at<br />
installed at the short end.<br />
row with the piece that was left<br />
. installed Stagger the at the boards’ short end end. joints least double the size of the estimated<br />
movement joint at the wall plus the<br />
6. Press in the next board’s short<br />
t least 500 mm.<br />
6. Press in the next board’s short pipe diameter. Example: If the floor<br />
end at an angle and lay down the<br />
end at an angle and lay down the is 10 m wide, the hole shall be<br />
long side.<br />
long side.<br />
10 x 1.5 = 15 mm. This means<br />
1 2 x 415<br />
= 30 mm larger that the pipe. 7<br />
7. Remove the installation key and<br />
7. Remove the installation key and Saw as shown in the picture. When<br />
knock lightly with the hand block<br />
knock lightly with the hand block the board has been installed, glue<br />
on the long side while at the same<br />
on the long side while at the same the sawn-out piece and cover the<br />
time carefully pressing the board<br />
time carefully pressing the board holes with pipe collars.<br />
down and it will move into place<br />
down and it will move into place<br />
more easily.<br />
more easily.<br />
2 4<br />
5 7<br />
8<br />
3 5<br />
6 8<br />
9<br />
® joints, the work is facilitated if the installation starts at the long side that has most<br />
ors. If there are doors along the short side of the room begin each row of boards at these. The boards can be installed<br />
th from left and right.<br />
e maximum floor width is 18 metres. <strong>Co</strong>ntact <strong>Kährs</strong> if the floor is wider.<br />
4. Press the floor board at an angle 8. The first board row must some-<br />
to the board in front. Knock lightly times be adjusted to a crooked wall.<br />
with the hand block while carefully Draw the wall’s contour on the<br />
pressing the board down.<br />
floorboards. Saw.<br />
5. Push in a <strong>Kährs</strong> installation key 9. Drill holes in the board for<br />
nstallation instructions under for <strong>Kährs</strong> the board Active you have already Floor 30 heater mm; pipes. The holes must be at<br />
installed at the short end.<br />
least double the size of the estimated<br />
g installation on level and fixed surfaces.<br />
movement joint at the wall plus the<br />
6. Press in the next board’s short pipe diameter. Example: If the floor<br />
installation instructions are provided in every end at other an angle bundle. and Use lay <strong>Kährs</strong>’ down installation the tools. is 10 Preparations: m wide, the hole shall be<br />
orget the vapour barrier if the installation long requires side. this.<br />
10 x 1.5 = 15 mm. This means<br />
culate how many floorboards are required. If the last row is narrower than 30 mm, saw 2 x the 15 = first 30 row mm of larger boards that as the pipe.<br />
7.<br />
en installing a floor with woodloc<br />
Remove the installation key and Saw as shown in the picture. When<br />
knock lightly with the hand block the board has been installed, glue<br />
on the long side while at the same the sawn-out piece and cover the<br />
time carefully pressing the board holes with pipe collars.<br />
down and it will move into place<br />
more easily.<br />
n one corner and install<br />
o right with the long<br />
out towards the room.<br />
side distance to the wall<br />
justed later when three<br />
been installed.<br />
e next floor board at an<br />
he first and lay it down.<br />
in the same way with the<br />
first row. Check with<br />
nsure that the starting<br />
straight.<br />
final board in the first row<br />
rect length and begin the<br />
with the piece that was left<br />
ger the boards’ end joints<br />
t 500 mm.<br />
4<br />
7<br />
® 8.7.5 Installation instructions for <strong>Kährs</strong> Active Floor 30 mm;<br />
floating installation on level and fixed surfaces.<br />
<strong>Co</strong>mplete installation instructions are provided in every other bundle. Use <strong>Kährs</strong>’ installation tools. Preparations:<br />
– Do not forget the vapour barrier if the installation requires this.<br />
– First calculate how many floorboards are required. If the last row is narrower than 30 mm, saw the first row of boards as<br />
well. When installing a floor with woodloc<br />
1. Begin in one corner and install<br />
from left to right with the long<br />
bottom lip out towards the room.<br />
The long side distance to the wall<br />
can be<br />
joints,<br />
adjusted<br />
the work<br />
later<br />
is<br />
when<br />
facilitated<br />
three<br />
if the installation starts at the long side that has most<br />
f there are doors along the short rows side have of been the room installed. begin each row of boards at these. The boards can be installed<br />
m left and right.<br />
imum floor width is 18 metres. 2. Press <strong>Co</strong>ntact the <strong>Kährs</strong> next floor if the board floor is at wider. an<br />
angle to the first and lay it down.<br />
<strong>Co</strong>ntinue in the same way with the<br />
4. Press the floor board at an angle 8. rest of the first row. Check with<br />
The first board row must some-<br />
a line to to the ensure board that in the front. starting Knock lightly times be adjusted to a crooked wall.<br />
boards with lie straight. the hand block while carefully Draw the wall’s contour on the<br />
pressing the board down.<br />
floorboards. Saw.<br />
3. Cut the final board in the first row<br />
5. Push in a <strong>Kährs</strong> installation key 9. to the correct length and begin the<br />
Drill holes in the board for<br />
next row under with the the board piece you that have was already left heater pipes. The holes must be at<br />
over. installed Stagger the at the boards’ short end end. joints least double the size of the estimated<br />
by at least 500 mm.<br />
movement joint at the wall plus the<br />
6. Press in the next board’s short pipe diameter. Example: If the floor<br />
end at an angle and lay down the is 10 m wide, the hole shall be<br />
long side.<br />
10 x 1.5 = 15 mm. This means<br />
1 2 x 415<br />
= 30 mm larger that the pipe. 7<br />
7. Remove the installation key and Saw as shown in the picture. When<br />
knock lightly with the hand block the board has been installed, glue<br />
on the long side while at the same<br />
time carefully pressing the board<br />
the sawn-out piece and cover the<br />
holes with pipe collars.<br />
down and it will move into place<br />
more easily.<br />
2 5<br />
8<br />
® r 30 mm;<br />
10. If you need to cut a door liner 12. The boards can<br />
use a floorboard as an underlay to all directions if req<br />
tion tools. Preparations:<br />
get the exact height. If you need to follows if you cann<br />
saw lengthwise protect the board’s angle the board un<br />
mm, saw the first row of boards as<br />
joints, the work is facilitated joint with if the a sawn-off installation piece starts from at the long side or low-fitting that has most radia<br />
ion starts at the long side that doors. has most If there are doors along the short side of the room begin a each short row end of that boards can at be these. inserted The in boards can 12a. be Cut installed away abou<br />
at these. The boards can be installed both from left and right.<br />
the joint.<br />
ing moulding. 12b.<br />
10. If 10. you If need you need to cut to a cut door a door liner liner 12. The 12. boards The boards board can be can into installed be place instal us fr<br />
– The maximum floor width is 18 metres. <strong>Co</strong>ntact <strong>Kährs</strong> if the floor is wider.<br />
use a use floorboard a floorboard 11. as Skirting an as underlay an boards underlay to must to not all be directions all directions if required. if required. Proceed Pro<br />
get the get exact the exact height. pressed height. If you down If need you so that need to the to floor follows is follows if you if cannot If you you cannot plan gain to access gain do ac m<br />
4. Press saw the lengthwise saw floor lengthwise board locked. protect at an protect All the angle connection board’s the board’s 8. rails The angle first must angle the board board the row the board under must room under some- a remembe door a doo line<br />
8. The first board row must some-<br />
to the joint board joint with in front. with a sawn-off be a Knock sawn-off fixed piece in lightly the piece from concrete from times so or as be low-fitting not adjusted or low-fitting to radiator, floor a crooked radiator, with for a wall. exampl materi for ex<br />
times be adjusted to a crooked wall.<br />
with the a short hand a short end block that end to while can that prevent be can carefully inserted the be inserted wood in floor’s Draw in 12a. the natural Cut wall’s 12a. away Cut contour away about moisture on about 2/3 the through. of 2/3 the of loc th<br />
Draw the wall’s contour on the<br />
pressing the the joint. the board joint. down. movements. floorboards. ing moulding. ing Saw. moulding. <strong>Co</strong>mpletion 12b. Glue. 12b. Glue. Knock tasks<br />
Knt<br />
floorboards. Saw.<br />
board board into place into place using using a heel a iron hee<br />
5. Push 11. in Skirting 11. a <strong>Kährs</strong> Skirting boards installation boards must must not key be not be 9. Drill holes in the board for<br />
9. Drill holes in the board for<br />
under pressed the pressed board down you down so have that so already the that floor the floor is heater is If pipes. you If plan you The plan to holes do to more must do more building be at buildin<br />
10. If you need to cut a door liner 10. 12.<br />
heater pipes. The holes must be at<br />
installed<br />
If locked. you<br />
at<br />
need<br />
the All The to<br />
short connection cut boards<br />
end.<br />
a door can liner be installed 12. locked. All connection rails must rails must least<br />
from The<br />
double the boards room the •<br />
the<br />
Installation room remember can<br />
size<br />
be remember of<br />
installed<br />
the<br />
of to estimated protect fittings: to from prote the D<br />
use a floorboard as an underlay use to a all directions if required. Proceed<br />
least double the size of the estimated<br />
be floorboard fixed be fixed in the as in an concrete the underlay concrete so to as so not as not all<br />
movement<br />
directions as floor floor with joint<br />
for if with required. a installing<br />
at material the a material wall<br />
Proceed goalposts that plus allows that the<br />
as all an<br />
get the exact height. If you need get to<br />
movement joint at the wall plus the<br />
6. Press<br />
the to exact prevent in to follows<br />
the prevent height.<br />
next the if<br />
board’s wood you If the you cannot wood floor’s need<br />
short floor’s gain to natural access natural follows<br />
pipe<br />
to<br />
diameter. moisture if you moisture equipment cannot through. Example: through. gain shall<br />
If<br />
access<br />
the<br />
be<br />
floor<br />
ancho to<br />
saw lengthwise protect the board’s saw<br />
pipe diameter. Example: If the floor<br />
end at<br />
lengthwise movements. an angle movements. angle<br />
and<br />
protect the<br />
lay<br />
board the<br />
down<br />
under board’s<br />
the<br />
a door liner angle<br />
is 10 <strong>Co</strong>mpletion m<br />
the<br />
wide,<br />
board <strong>Co</strong>mpletion the<br />
the<br />
under concrete<br />
hole tasks: shall<br />
a tasks: door floor<br />
be<br />
liner and the<br />
joint with a sawn-off piece from joint<br />
is 10 m wide, the hole shall be<br />
long side.<br />
with a or sawn-off low-fitting piece radiator, from for example. or<br />
10<br />
low-fitting<br />
x 1.5 = 15<br />
edges radiator,<br />
mm.<br />
shall<br />
This<br />
for<br />
means<br />
be example. at the same<br />
a short end that can be inserted a short in end 12a. that Cut can away be inserted about 2/3 in of the 12a.<br />
10 x 1.5 = 15 mm. This means<br />
2<br />
lock-<br />
x 15<br />
Cut<br />
=<br />
away<br />
30 mm<br />
slightly about<br />
larger<br />
2/3 lower<br />
that<br />
of than the<br />
the<br />
lock-<br />
pipe.<br />
the sub<br />
the joint.<br />
the<br />
2 x 15 = 30 mm larger that the pipe.<br />
7. Remove<br />
joint. ing<br />
the<br />
moulding.<br />
installation<br />
12b.<br />
key<br />
Glue.<br />
and<br />
Knock ing<br />
Saw<br />
the moulding.<br />
as shown<br />
Sockets<br />
in<br />
12b.<br />
the<br />
Glue.<br />
picture.<br />
for attaching Knock<br />
When<br />
the equi<br />
Saw as shown in the picture. When<br />
knock lightly<br />
board<br />
with<br />
into<br />
the<br />
place<br />
hand<br />
using<br />
block<br />
a heel iron. board<br />
the board<br />
into<br />
has<br />
place and<br />
been<br />
using installation<br />
installed,<br />
a heel of iron.<br />
glue<br />
the var<br />
11. Skirting boards must not be 11.<br />
the board has been installed, glue<br />
on the<br />
Skirting<br />
long<br />
boards<br />
side while<br />
must<br />
at<br />
not<br />
the same<br />
be<br />
the sawn-out<br />
fittings<br />
piece and<br />
in the<br />
cover<br />
floor<br />
the<br />
are bes<br />
pressed down so that the floor pressed<br />
the sawn-out piece and cover the<br />
time<br />
is<br />
carefully<br />
down If you<br />
pressing<br />
so plan that the to<br />
the<br />
do floor<br />
board<br />
more is building If<br />
holes<br />
in you<br />
with<br />
plan<br />
pipe<br />
to with do<br />
collars.<br />
more a hole building cutter. in<br />
locked. All connection rails must locked.<br />
holes with pipe collars.<br />
down and<br />
All the<br />
it<br />
connection<br />
will<br />
room<br />
move<br />
remember rails<br />
into place<br />
must to protect the room remember to protect the<br />
be fixed in the concrete so as not be<br />
more<br />
fixed<br />
easily.<br />
in floor the concrete with a material so as not that allows floor with a • material Pitch lines: that Before allows markin<br />
to prevent the wood floor’s natural to prevent moisture the wood through. floor’s natural moisture through. lines, the surface to be lac<br />
7<br />
movements.<br />
movements. <strong>Co</strong>mpletion tasks: <strong>Co</strong>mpletion must tasks: be thoroughly clean<br />
ding to the lacquer manuf<br />
instructions. Line markin<br />
should be carried out by a<br />
specially-trained professio<br />
10<br />
• Over-lacquering 12a floors w<br />
pitch lines: Over-lacquer<br />
be carried out 24 hours af<br />
8<br />
10 10<br />
line painting is complete.<br />
ber that the floor may nee<br />
ning once more to get rid<br />
and dirt. The temperature<br />
12a 12a<br />
room or of the lacquer mu<br />
1.<br />
be lower than 13°C when<br />
11<br />
ering. Spread the 12b lacquer<br />
2.<br />
roller, applicator or lacque<br />
130<br />
3<br />
6<br />
9<br />
130<br />
3<br />
130<br />
5<br />
6<br />
6<br />
9<br />
3<br />
6 8<br />
9<br />
6<br />
9<br />
1. 1.<br />
10 10 11 11 12a<br />
12a12b12b<br />
130<br />
9<br />
1.<br />
1.<br />
2.<br />
2.<br />
3.<br />
1.<br />
3.<br />
2.<br />
1.<br />
2.<br />
3.<br />
3.