air conditioner (multi-split type) outdoor unit installation manual
air conditioner (multi-split type) outdoor unit installation manual
air conditioner (multi-split type) outdoor unit installation manual

Sie wollen auch ein ePaper? Erhöhen Sie die Reichweite Ihrer Titel.
YUMPU macht aus Druck-PDFs automatisch weboptimierte ePaper, die Google liebt.
01_OutdoorInstallation_EN.fm Page 6 Monday, February 5, 2007 4:11 PM<br />
4 INSTALLATION OF OUTDOOR UNIT<br />
EN<br />
Installation Location<br />
A place which provides enough space around the <strong>outdoor</strong><br />
<strong>unit</strong> as shown in the diagram.<br />
A place which can bear the weight of the <strong>outdoor</strong> <strong>unit</strong> and<br />
does not allow an increase in noise level and vibration.<br />
A place where the operation noise and discharged <strong>air</strong> do not<br />
disturb neighbors.<br />
A place which is not exposed to a strong wind.<br />
A place free of combustible gases.<br />
A place which does not block a passageway.<br />
When the <strong>outdoor</strong> <strong>unit</strong> is to be installed in an elevated<br />
position, be sure to secure its feet.<br />
Piping connections to the <strong>outdoor</strong> <strong>unit</strong> should be arranged in<br />
the sequence A, then B, C, starting from the bottom. (For<br />
each piping connection, the gas pipe is on the bottom and the<br />
liquid pipe on top.)<br />
When <strong>multi</strong>ple indoor <strong>unit</strong>s are to be connected to the<br />
<strong>outdoor</strong> <strong>unit</strong>, make sure the ends of the pipes and wires from<br />
each indoor <strong>unit</strong> are connected to the <strong>outdoor</strong> <strong>unit</strong> correctly.<br />
(Problems caused by indoor <strong>unit</strong>s being connected to the<br />
<strong>outdoor</strong> <strong>unit</strong> incorrectly are very common in <strong>multi</strong>ple-<strong>unit</strong><br />
<strong>installation</strong>s.)<br />
The length and height differences of the connecting pipes<br />
between the indoor and <strong>outdoor</strong> <strong>unit</strong>s must be within the<br />
ranges indicated below.<br />
Allowable piping length and height difference<br />
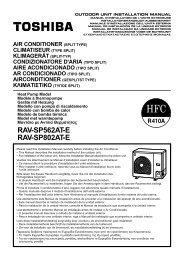
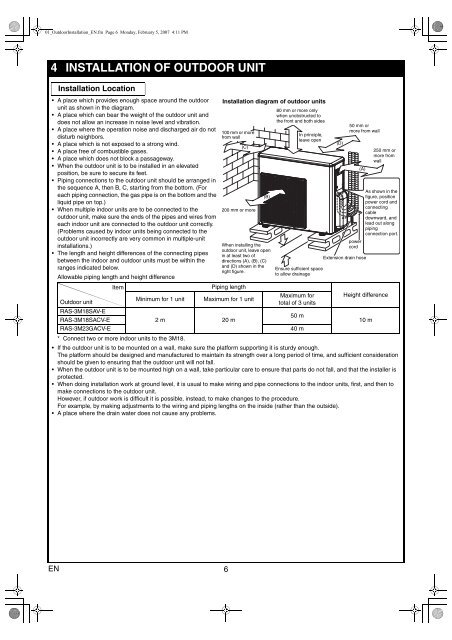
Installation diagram of <strong>outdoor</strong> <strong>unit</strong>s<br />
100 mm or more<br />
from wall<br />
Item<br />
Piping length<br />
Outdoor <strong>unit</strong><br />
Minimum for 1 <strong>unit</strong> Maximum for 1 <strong>unit</strong><br />
Maximum for<br />
total of 3 <strong>unit</strong>s<br />
RAS-3M18SAV-E<br />
RAS-3M18SACV-E<br />
2 m 20 m<br />
50 m<br />
RAS-3M23GACV-E 40 m<br />
* Connect two or more indoor <strong>unit</strong>s to the 3M18.<br />
If the <strong>outdoor</strong> <strong>unit</strong> is to be mounted on a wall, make sure the platform supporting it is sturdy enough.<br />
The platform should be designed and manufactured to maintain its strength over a long period of time, and sufficient consideration<br />
should be given to ensuring that the <strong>outdoor</strong> <strong>unit</strong> will not fall.<br />
When the <strong>outdoor</strong> <strong>unit</strong> is to be mounted high on a wall, take particular care to ensure that parts do not fall, and that the installer is<br />
protected.<br />
When doing <strong>installation</strong> work at ground level, it is usual to make wiring and pipe connections to the indoor <strong>unit</strong>s, first, and then to<br />
make connections to the <strong>outdoor</strong> <strong>unit</strong>.<br />
However, if <strong>outdoor</strong> work is difficult it is possible, instead, to make changes to the procedure.<br />
For example, by making adjustments to the wiring and piping lengths on the inside (rather than the outside).<br />
A place where the drain water does not cause any problems.<br />
6<br />
(C)<br />
200 mm or more<br />
(B)<br />
When installing the<br />
<strong>outdoor</strong> <strong>unit</strong>, leave open<br />
in at least two of<br />
directions (A), (B), (C)<br />
and (D) shown in the<br />
right figure.<br />
80 mm or more only<br />
when unobstructed to<br />
the front and both sides<br />
In principle,<br />
leave open<br />
Ensure sufficient space<br />
to allow drainage<br />
(D)<br />
50 mm or<br />
more from wall<br />
power<br />
cord<br />
(A)<br />
Extension drain hose<br />
Height difference<br />
10 m<br />
250 mm or<br />
more from<br />
wall<br />
As shown in the<br />
figure, position<br />
power cord and<br />
connecting<br />
cable<br />
downward, and<br />
lead out along<br />
piping<br />
connection port.