Create successful ePaper yourself
Turn your PDF publications into a flip-book with our unique Google optimized e-Paper software.
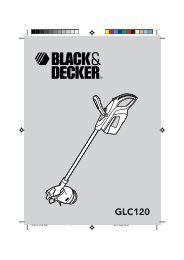
ENGLISH◆◆◆◆◆◆Check the cable frequently for damage. If the cable isdamaged, it must be replaced by an authorised repairagent in order to prevent a hazard. Inspect extensioncables periodically. Replace a damaged extension cableimmediately.Keep all nuts, bolts and screws on the appliance tight toensure a safe working condition.Check the grass bag for wear or damage and replace it ifnecessary. Never use the appliance without the grass bag.When not in use, the appliance should be stored in a dryplace. Children should not have access to stored appliances.Ensure that only replacement cutting means of the righttype are used.Use only <strong>Black</strong> & <strong>Decker</strong> recommended spare parts andaccessories.Warning symbolsThe following warning symbols are found on the appliance:Read the manual prior to operation.Do not expose the appliance to rain or high humidity.Using an extension cableAlways use an approved extension cable suitable for thepower input of this tool (see technical data). The extensioncable must be suitable for outdoor use and marked accordingly.Up to 30 m of 1.5 mm HO5VV-F extension cable can be usedwithout loss of product performance. Before use, inspect theextension cable for signs of damage, wear and ageing.Replace the extension cable if damaged or defective.When using a cable reel, always unwind the cable completely.Features1. On/off switch2. Lock-off button3. Switch box4. Upper handle5. Lower handle6. Grass bag7. Motor cover8. WheelsAssemblyWarning! Before assembly, make sure that the appliance isswitched off and unplugged.!Remove the plug from the socket if the mains cableis damaged.Keep bystanders away.Assembling the handle (fig. A)The lower handle parts have several mounting holes, allowingyou to set the handle to a comfortable height during assembly.◆ Fit the two lower handle parts (9) to the upper handle (4)using the screws (10), washers (11) and nuts (12) as shown.Remove the plug from the socket before carrying outany adjustment, servicing or maintenance.Beware of sharp edges.Keep the cable away from the cutting blades.Electrical safetyThe appliance must always be switched off at the mainsbefore disconnecting any plug and socket connector orextension cable.Double insulationThis appliance is double insulated in accordancewith EN 60335; therefore no earth wire is required.Always check that the power supply corresponds tothe voltage on the rating plate.Electric safety can be further improved by using a high-sensitivity30 mA residual current device (RCD).Fitting the handle (fig. B)◆ Insert the ends of the lower handle (5) into thecorresponding holes (13) in the mower.◆ Press the handle down as far as it will go.◆ Secure the handle using the screws (14).Fixing the cable (fig. C)The mains cable has to be fixed using the cable restraints.◆ Clip the one restraint (15) onto the cable leading from theswitchbox to the motor. Secure the restraint to the lowerhandle (5)◆ Clip the other restraint (15) onto the cable leading fromthe switchbox to the mains plug. Secure the restraint tothe upper handle (4)Warning! Make sure the cable is secured using the cablerestraints prior to connecting the plug to the mains outlet.Assembling and fitting the grass bag (fig. D1 & D2)◆ Align the two halves of the grass bag (6) (fig. D1).◆ Press the two halves together.◆ Lift the flap (16) and place the grass bag over the lugs (17)(fig. D2).6