CMP-USBVG6 - Sun Electronics
CMP-USBVG6 - Sun Electronics
CMP-USBVG6 - Sun Electronics

You also want an ePaper? Increase the reach of your titles
YUMPU automatically turns print PDFs into web optimized ePapers that Google loves.
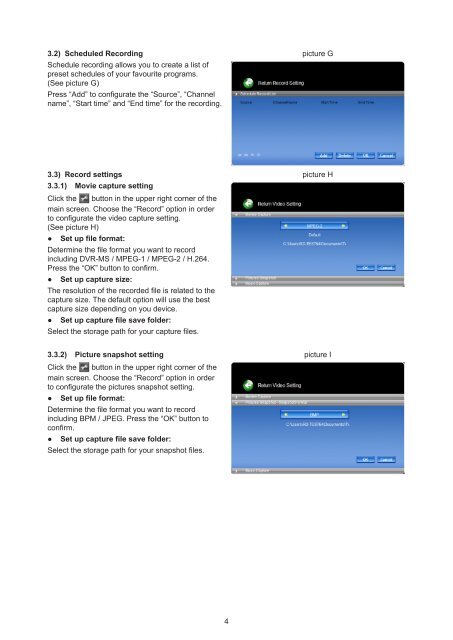
3.2) Scheduled Recording<br />
Schedule recording allows you to create a list of<br />
preset schedules of your favourite programs.<br />
(See picture G)<br />
Press “Add” to configurate the “Source”, “Channel<br />
name”, “Start time” and “End time” for the recording.<br />
picture G<br />
3.3) Record settings<br />
3.3.1) Movie capture setting<br />
Click the button in the upper right corner of the<br />
main screen. Choose the “Record” option in order<br />
to configurate the video capture setting.<br />
(See picture H)<br />
● Set up file format:<br />
Determine the file format you want to record<br />
including DVR-MS / MPEG-1 / MPEG-2 / H.264.<br />
Press the “OK” button to confirm.<br />
● Set up capture size:<br />
The resolution of the recorded file is related to the<br />
capture size. The default option will use the best<br />
capture size depending on you device.<br />
● Set up capture file save folder:<br />
Select the storage path for your capture files.<br />
picture H<br />
3.3.2) Picture snapshot setting<br />
Click the button in the upper right corner of the<br />
main screen. Choose the “Record” option in order<br />
to configurate the pictures snapshot setting.<br />
● Set up file format:<br />
Determine the file format you want to record<br />
including BPM / JPEG. Press the “OK” button to<br />
confirm.<br />
● Set up capture file save folder:<br />
Select the storage path for your snapshot files.<br />
picture I<br />
4