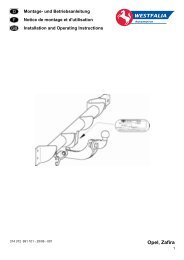
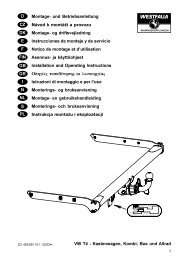
Montage- und Betriebsanleitung Kupplungskugel mit ... - Westfalia
Montage- und Betriebsanleitung Kupplungskugel mit ... - Westfalia
Montage- und Betriebsanleitung Kupplungskugel mit ... - Westfalia

Create successful ePaper yourself
Turn your PDF publications into a flip-book with our unique Google optimized e-Paper software.
GB<br />
Important:<br />
Each time before towing a trailer,<br />
check that the ball rod is properly<br />
locked (see A. 3 below)!<br />
Do not release unless the trailer is<br />
hitched up!<br />
When driver without a trailer, the<br />
ball rod must be taken off and the<br />
plug ALWAYS inserted in the<br />
mounting tube!<br />
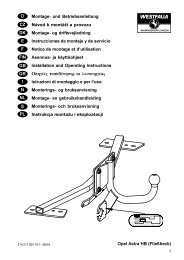
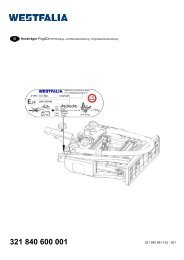
A. INSTALLATION<br />
1. Remove the plug from the mounting<br />
tube.<br />
When the ball rod is taken out of<br />
the boot it is normally in the<br />
"pretensioned state". You can<br />
recognise this from the fact that the<br />
release lever (see sketch) is resting<br />
against the ball rod. There is a gap<br />
of about 6 mm between handwheel<br />
and ball rod (see sketch) and the<br />
"red" marking of the handwheel is in<br />
the "green" area of the ball rod.<br />
Please note that the ball rod can<br />
be inserted only in this state!<br />
Should, for whatever reason, the<br />
locking mechanism of the ball rod<br />
have been released before installation<br />
- you can recognise this from<br />
the fact that there is a gap of about<br />
5 mm between release lever and<br />
ball rod (see sketch), the "green"<br />
marking of the handwheel is aligned<br />
with the "green" area of the ball rod<br />
and the handwheel (see sketch) is<br />
resting against the ball rod - the<br />
release mechanism has to be<br />
pretensioned as follows:<br />
Operating instructions for detachable ball rod<br />
Insert the key, open the lock and<br />
then pull out the handwheel to the<br />
side and turn it in the direction of<br />
the arrow as far as the stop. The<br />
release lever will then engage and,<br />
after the handwheel is released, the<br />
locking mechanism remains in the<br />
pretensioned position.<br />
2. To install the ball rod, insert it into<br />
the mounting tube from below and<br />
push it up.<br />
• The locking operation is performed<br />
automatically in this<br />
case.<br />
• Do not hold your hands in the<br />
area of the handwheel.<br />
• Close the lock and withdraw the<br />
key.<br />
• Press the cap onto the lock.<br />
3. For safety reasons:<br />
Always check whether the ball rod<br />
is properly locked and secured.<br />
You can recognise this from the<br />
following characteristics:<br />
• "Green" marking of the handwheel<br />
is aligned with the "green" area of<br />
the ball rod.<br />
• Handwheel is resting against ball<br />
rod (no gap).<br />
• Lock closed and key withdrawn<br />
(handwheel cannot be pulled out).<br />
• Ball rod must be fully inserted in<br />
the mounting tube and be tight<br />
(check by shaking).<br />
If the check of all 4 characteristics<br />
is not satisfactory, the installation<br />
procedure should be repeated.<br />
Even if only one of the characteristics<br />
is not met, the towing device<br />
must not be used.<br />
In this case, contact the manufacturer.<br />
35<br />
B. REMOVAL<br />
1. Pull the cap off the lock and press<br />
cap onto the handle of the key.<br />
Open lock with the key (key cannot<br />
be withdrawn when lock is open!)<br />
2. • Hold ball rod tight, pull out<br />
handwheel at the side and turn it<br />
against the force of the spring in<br />
the direction of the arrow as far as<br />
the stop.<br />
• Remove ball rod downward out of<br />
the mounting tube.<br />
• The handwheel can then be<br />
released; it then automatically<br />
engages in the tensioned position.<br />
• Please also pay attention to the<br />
symbols on the handwheel and<br />
on the enclosed sketch "Detachable<br />
ball rod".<br />
3. Stow the ball rod in the boot in a<br />
safe place and protected against<br />
dirt.<br />
As already mentioned, the key<br />
cannot be withdrawn in the<br />
tensioned position.<br />
Insert plug into the mounting<br />
tube!<br />
C. IMPORTANT POINTS TO NOTE!<br />
The ball rod can be easily installed<br />
and removed with the normal force<br />
of your hands.<br />
Please never use any sort of aids<br />
or tools etc. as this might result in<br />
damage to the mechanism.