D21710 D21711 D21716 D21717 - Service - DeWALT
D21710 D21711 D21716 D21717 - Service - DeWALT
D21710 D21711 D21716 D21717 - Service - DeWALT

Create successful ePaper yourself
Turn your PDF publications into a flip-book with our unique Google optimized e-Paper software.
ENGLISH<br />
Conductor size (mm 2 ) Cable rating (Amperes)<br />
0.75 6<br />
1.00 10<br />
1.50 15<br />
2.50 20<br />
4.00 25<br />
20<br />
Cable length (m)<br />
7.5 15 25 30 45 60<br />
Voltage Amperes Cable rating (Amperes)<br />
115 0 - 2.0 6 6 6 6 6 10<br />
2.1 - 3.4 6 6 6 6 15 15<br />
3.5 - 5.0 6 6 10 15 20 20<br />
5.1 - 7.0 10 10 15 20 20 25<br />
7.1 - 12.0 15 15 20 25 25 -<br />
12.1 - 20.0 20 20 25 - - -<br />
230 0 - 2.0 6 6 6 6 6 6<br />
2.1 - 3.4 6 6 6 6 6 6<br />
3.5 - 5.0 6 6 6 6 10 15<br />
5.1 - 7.0 10 10 10 10 15 15<br />
7.1 - 12.0 15 15 15 15 20 20<br />
12.1 - 20.0 20 20 20 20 25 -<br />
Assembly and adjustment<br />
Prior to assembly and adjustment always<br />
unplug the tool.<br />
Selecting the operating mode (fig. B)<br />
The tool can be used in two operating modes:<br />
Rotary drilling:<br />
for steel, wood and plastics.<br />
Percussion drilling:<br />
simultaneous rotating and impacting for<br />
concrete and masonry drilling<br />
operations.<br />
• Select the required operating mode by rotating<br />
the mode selector (4) to the required position.<br />
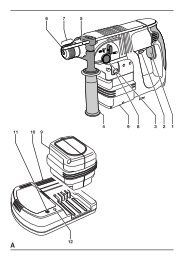
Inserting and removing a bit (fig. A)<br />
Keyless chuck<br />
• Open the chuck by turning the sleeve (9)<br />
counterclockwise and insert the bit shank.<br />
• Tighten firmly by turning the sleeve clockwise.<br />
Keyed chuck<br />
• Open the chuck by turning the sleeve (9)<br />
counterclockwise and insert the bit shank.<br />
• Put the chuck key (10) into each hole in the side<br />
of the chuck and turn clockwise until tight.<br />
• To remove the bit, proceed in reverse order.<br />
Fitting the side handle (fig. A)<br />
The side handle (6) can be fitted to suit both<br />
RH- and LH-users.<br />
Always use the drill with the side handle<br />
properly assembled.<br />
• Loosen the side handle.<br />
• For RH-users, slide the side handle clamp over<br />
the collar behind the chuck, handle at the left.<br />
• For LH-users, slide the side handle clamp over<br />
the colar behind the chuck, handle at the right.<br />
• Rotate the side handle to the desired position<br />
and tighten the handle.<br />
Setting the drilling depth (fig. C)<br />
• Insert the required drill bit into the chuck.<br />
• Slacken the side handle (6).<br />
• Fit the depth adjustment rod (7) through the hole<br />
in the side handle clamp.<br />
• Adjust the drilling depth as shown.<br />
• Tighten the side handle.<br />
Forward/reverse slider (fig. A)<br />
• To select forward or reverse rotation, use the<br />
forward/reverse-switch (3) (see arrow on tool).<br />
Always wait until the motor has come to<br />
a complete standstill before changing the<br />
direction of rotation.<br />
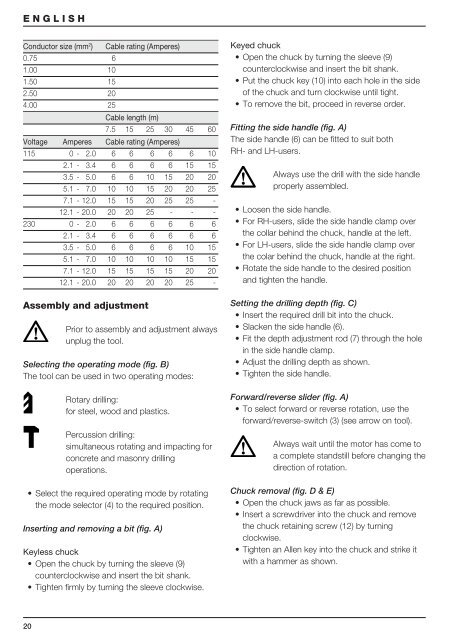
Chuck removal (fig. D & E)<br />
• Open the chuck jaws as far as possible.<br />
• Insert a screwdriver into the chuck and remove<br />
the chuck retaining screw (12) by turning<br />
clockwise.<br />
• Tighten an Allen key into the chuck and strike it<br />
with a hammer as shown.