NAD VISO 1 AP Wireless AirPlay Music System - Polaris Audio

You also want an ePaper? Increase the reach of your titles
YUMPU automatically turns print PDFs into web optimized ePapers that Google loves.
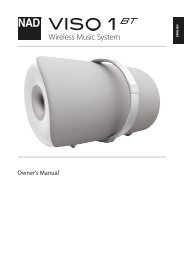
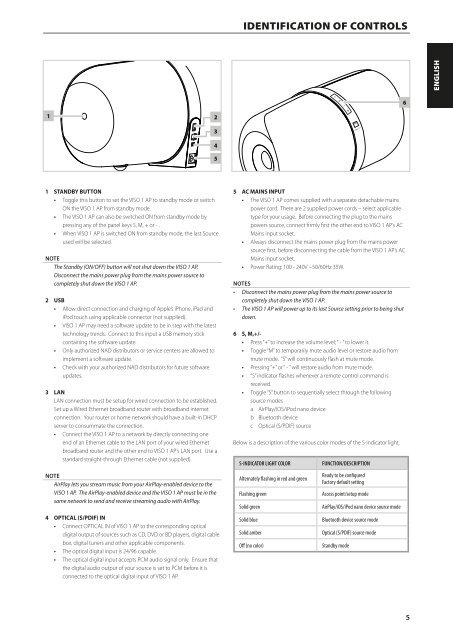
IDENTIFICATION OF CONTROLS<br />
ENGLISH<br />
6<br />
1 2<br />
3<br />
4<br />
5<br />
FRANÇAIS<br />
1 STANDBY BUTTON<br />
• Toggle this button to set the <strong>VISO</strong> 1 <strong>AP</strong> to standby mode or switch<br />
ON the <strong>VISO</strong> 1 <strong>AP</strong> from standby mode.<br />
• The <strong>VISO</strong> 1 <strong>AP</strong> can also be switched ON from standby mode by<br />
pressing any of the panel keys S, M, + or - .<br />
• When <strong>VISO</strong> 1 <strong>AP</strong> is switched ON from standby mode, the last Source<br />
used will be selected.<br />
NOTE<br />
The Standby (ON/OFF) button will not shut down the <strong>VISO</strong> 1 <strong>AP</strong>.<br />
Disconnect the mains power plug from the mains power source to<br />
completely shut down the <strong>VISO</strong> 1 <strong>AP</strong>.<br />
2 USB<br />
• Allow direct connection and charging of Apple’s iPhone, iPad and<br />
iPod touch using applicable connector (not supplied).<br />
• <strong>VISO</strong> 1 <strong>AP</strong> may need a software update to be in step with the latest<br />
technology trends. Connect to this input a USB memory stick<br />
containing the software update.<br />
• Only authorized <strong>NAD</strong> distributors or service centers are allowed to<br />
implement a software update.<br />
• Check with your authorized <strong>NAD</strong> distributors for future software<br />
updates.<br />
3 LAN<br />
LAN connection must be setup for wired connection to be established.<br />
Set up a Wired Ethernet broadband router with broadband internet<br />
connection. Your router or home network should have a built-in DHCP<br />
server to consummate the connection.<br />
• Connect the <strong>VISO</strong> 1 <strong>AP</strong> to a network by directly connecting one<br />
end of an Ethernet cable to the LAN port of your wired Ethernet<br />
broadband router and the other end to <strong>VISO</strong> 1 <strong>AP</strong>’s LAN port. Use a<br />
standard straight-through Ethernet cable (not supplied).<br />
NOTE<br />
<strong>AirPlay</strong> lets you stream music from your <strong>AirPlay</strong>-enabled device to the<br />
<strong>VISO</strong> 1 <strong>AP</strong>. The <strong>AirPlay</strong>-enabled device and the <strong>VISO</strong> 1 <strong>AP</strong> must be in the<br />
same network to send and receive streaming audio with <strong>AirPlay</strong>.<br />
4 OPTICAL (S/PDIF) IN<br />
• Connect OPTICAL IN of <strong>VISO</strong> 1 <strong>AP</strong> to the corresponding optical<br />
digital output of sources such as CD, DVD or BD players, digital cable<br />
box, digital tuners and other applicable components.<br />
• The optical digital input is 24/96 capable.<br />
• The optical digital input accepts PCM audio signal only. Ensure that<br />
the digital audio output of your source is set to PCM before it is<br />
connected to the optical digital input of <strong>VISO</strong> 1 <strong>AP</strong>.<br />
5 AC MAINS INPUT<br />
• The <strong>VISO</strong> 1 <strong>AP</strong> comes supplied with a separate detachable mains<br />
power cord. There are 2 supplied power cords – select applicable<br />
type for your usage. Before connecting the plug to the mains<br />
powers source, connect firmly first the other end to <strong>VISO</strong> 1 <strong>AP</strong>’s AC<br />
Mains input socket.<br />
• Always disconnect the mains power plug from the mains power<br />
source first, before disconnecting the cable from the <strong>VISO</strong> 1 <strong>AP</strong>’s AC<br />
Mains input socket.<br />
• Power Rating: 100 - 240V ~50/60Hz 35W.<br />
NOTES<br />
• Disconnect the mains power plug from the mains power source to<br />
completely shut down the <strong>VISO</strong> 1 <strong>AP</strong>.<br />
• The <strong>VISO</strong> 1 <strong>AP</strong> will power up to its last Source setting prior to being shut<br />
down.<br />
6 S, M,+/-<br />
• Press “+” to increase the volume level; “ - ” to lower it.<br />
• Toggle “M” to temporarily mute audio level or restore audio from<br />
mute mode. “S” will continuously flash at mute mode.<br />
• Pressing “+” or “ - ” will restore audio from mute mode.<br />
• “S” indicator flashes whenever a remote control command is<br />
received.<br />
• Toggle “S” button to sequentially select through the following<br />
source modes<br />
a <strong>AirPlay</strong>/iOS/iPod nano device<br />
b Bluetooth device<br />
c Optical (S/PDIF) source<br />
Below is a description of the various color modes of the S-indicator light.<br />
S-INDICATOR LIGHT COLOR<br />
Alternately flashing in red and green<br />
Flashing green<br />
Solid green<br />
Solid blue<br />
Solid amber<br />
Off (no color)<br />
FUNCTION/DESCRIPTION<br />
Ready to be configured<br />
Factory default setting<br />
Access point/setup mode<br />
<strong>AirPlay</strong>/iOS/iPod nano device source mode<br />
Bluetooth device source mode<br />
Optical (S/PDIF) source mode<br />
Standby mode<br />
РУССКИЙ<br />
SVENSKA NEDERLANDS DEUTSCH<br />
ITALIANO<br />
ESPAÑOL<br />
5