NAD VISO 1 AP Wireless AirPlay Music System - Polaris Audio

You also want an ePaper? Increase the reach of your titles
YUMPU automatically turns print PDFs into web optimized ePapers that Google loves.
®<br />
<strong>Wireless</strong> <strong>AirPlay</strong>® <strong>Music</strong> <strong>System</strong><br />
РУССКИЙ<br />
SVENSKA<br />
DEUTSCH<br />
ENGLISH<br />
ITALIANO<br />
ESPAÑOL<br />
FRANÇAIS<br />
Owner’s Manual<br />
NEDERLANDS
IMPORTANT SAFETY INSTRUCTIONS<br />
ENGLISH FRANÇAIS ESPAÑOL ITALIANO DEUTSCH NEDERLANDS SVENSKA РУССКИЙ<br />
SAVE THESE INSTRUCTIONS FOR LATER USE<br />
FOLLOW ALL WARNINGS AND INSTRUCTIONS MARKED ON THE AUDIO<br />
EQUIPMENT.<br />
1. Read instructions - All the safety and operating instructions should be read<br />
before the product is operated.<br />
2. Retain instructions - The safety and operating instructions should be retained<br />
for future reference.<br />
3. Heed Warnings - All warnings on the product and in the operating instructions<br />
should be adhered to.<br />
4. Follow Instructions - All operating and use instructions should be followed.<br />
5. Cleaning - Unplug this product from the wall outlet before cleaning. Do not use<br />
liquid cleaners or aerosol cleaners. Clean only with dry cloth.<br />
6. Attachments - Do not use attachments not recommended by the product<br />
manufacturer as they may cause hazards.<br />
7. Water and Moisture - Do not use this product near water-for example, near a<br />
bath tub, wash bowl, kitchen sink, or laundry tub; in a wet basement; or near a<br />
swimming pool; and the like.<br />
8. Accessories - Do not place this product on an unstable cart, stand, tripod,<br />
bracket, or table. The product may fall, causing serious injury to a child or adult,<br />
and serious damage to the product. Use only with a cart, stand, tripod, bracket, or<br />
table recommended by the manufacturer, or sold with the product. Any mounting<br />
of the product should follow the manufacturer’s instructions, and should use a<br />
mounting accessory recommended by the manufacturer.<br />
9. A product and cart combination should be moved with care. Quick<br />
stops, excessive force, and uneven surfaces may cause the product and<br />
cart combination to overturn.<br />
10. Ventilation - Slots and openings in the cabinet are provided for ventilation and<br />
to ensure reliable operation of the product and to protect it from overheating, and<br />
these openings must not be blocked or covered. The openings should never be<br />
blocked by placing the product on a bed, sofa, rug, or other similar surface. This<br />
product should not be placed in a built-in installation such as a bookcase or rack<br />
unless proper ventilation is provided or the manufacturer’s instructions have been<br />
adhered to.<br />
11. Power Sources - This product should be operated only from the type of power<br />
source indicated on the marking label. If you are not sure of the type of power<br />
supply to your home, consult your product dealer or local power company.<br />
The primary method of isolating the amplifier from the mains supply is to<br />
disconnect the mains plug. Ensure that the mains plug remains accessible at<br />
all times. Unplug the AC power cord from the AC outlet if the unit will not be<br />
used for several months or more. The socket-outlet shall be installed near the<br />
equipment and shall be easily accessible.<br />
12. Grounding or Polarization - This product may be equipped with a polarized<br />
alternating-current line plug (a plug having one blade wider than the other). This<br />
plug will fit into the power outlet only one way. This is a safety feature. If you are<br />
unable to insert the plug fully into the outlet, try reversing the plug. If the plug<br />
should still fail to fit, contact your electrician to replace your obsolete outlet. Do<br />
not defeat the safety purpose of the polarized plug.<br />
13. Power Cord Protection - Power-supply cords should be routed so that they<br />
are not likely to be walked on or pinched by items placed upon or against them,<br />
paying particular attention to cords at plugs, convenience receptacles, and the<br />
point where they exit from the product.<br />
14. Outdoor Antenna Grounding - If an outside antenna or cable system is<br />
connected to the product, be sure the antenna or cable system is grounded so<br />
as to provide some protection against voltage surges and built-up static charges.<br />
Article 810 of the National Electrical Code, ANSI/NFPA 70, provides information<br />
with regard to proper grounding of the mast and supporting structure, grounding<br />
of the lead-in wire to an antenna discharge unit, size of grounding conductors,<br />
location of antenna discharge unit, connection to grounding electrodes, and<br />
requirements for the grounding electrode.<br />
15. Lightning - For added protection for this product during a lightning storm, or<br />
when it is left unattended and unused for long periods of time, unplug it from the<br />
wall outlet and disconnect the antenna or cable system. This will prevent damage<br />
to the product due to lightning and power line surges.<br />
16. Power Lines - An outside antenna system should not be located in the vicinity<br />
of overhead power lines or other electric light or power circuits, or where it can<br />
fall into such power lines or circuits. When installing an outside antenna system,<br />
extreme care should be taken to keep from touching such power lines or circuits<br />
as contact with them might be fatal.<br />
17. Overloading - Do not overload wall outlets, extension cords, or integral<br />
convenience receptacles as this can result in a risk of fire or electric shock.<br />
18. Object and Liquid Entry - Never push objects of any kind into this product through<br />
openings as they may touch dangerous voltage points or short out parts that could<br />
result in a fire or electric shock. Never spill liquid of any kind on the product.<br />
WARNING: THE <strong>AP</strong>PARATUS SHOULD NOT BE EXPOSED TO DRIPPING OR SPLASHING,<br />
AND OBJECTS FILLED WITH LIQUIDS, SUCH AS VASES, SHOULD NOT BE PLACED ON<br />
THE <strong>AP</strong>PARATUS. AS WITH ANY ELECTRONIC PRODUCTS, USE CARE NOT TO SPILL<br />
LIQUIDS INTO ANY PART OF THE SYSTEM. LIQUIDS CAN CAUSE A FAILURE AND/OR A<br />
FIRE HAZARD.<br />
19. Damage Requiring Service - Unplug this product from the wall outlet and refer<br />
servicing to qualified service personnel under the following conditions:<br />
a When the power supply cord or plug is damaged.<br />
b If liquid has been spilled, or objects have fallen into the product.<br />
c If the product has been exposed to rain or water.<br />
d If the product does not operate normally by following the operating<br />
instructions. Adjust only those controls that are covered by the operating<br />
instructions as an improper adjustment of other controls may result in<br />
damage and will often require extensive work by a qualified technician to<br />
restore the product to its normal operation.<br />
e If the product has been dropped or damaged in any way.<br />
f When the product exhibits a distinct change in performance-this indicates a<br />
need for service.<br />
20. Replacement Parts - When replacement parts are required, be sure the service<br />
technician has used replacement parts specified by the manufacturer or have the<br />
same characteristics as the original part. Unauthorized substitutions may result in<br />
fire, electric shock, or other hazards.<br />
21. Safety Check - Upon completion of any service or repairs to this product, ask the<br />
service technician to perform safety checks to determine that the product is in<br />
proper operating condition.<br />
22. Heat - The product should be situated away from heat sources such as radiators,<br />
heat registers, stoves or other products (including amplifiers) that produce heat.<br />
Battery shall not be exposed to excessive heat such as sunshine, fire or the like.<br />
WARNING<br />
TO REDUCE THE RISK OF FIRE OR ELECTRIC SHOCK, DO NOT EXPOSE THIS PRODUCT TO<br />
RAIN OR MOISTURE.<br />
CAUTION<br />
TO PREVENT ELECTRIC SHOCK, MATCH WIDE BLADE OF PLUG TO WIDE SLOT, FULLY<br />
INSERT.<br />
RESPONSIBLE PARTY<br />
LENBROOK AMERICA<br />
6 Merchant Street<br />
Sharon, MA 02067<br />
USA<br />
Telephone: 800 263 4641<br />
781 784 8586<br />
Facsimile: 781 784 8386<br />
WARNING<br />
Changes or modifications to this unit not expressly approved by the party responsible<br />
for compliance could void the user’s authority to operate the equipment.<br />
NOTE<br />
Shielded cables must be used with this unit to ensure compliance with the Class B<br />
FCC limits.<br />
Under the influence of electrostatic phenomenon, the product may malfunction and<br />
require user to reset.<br />
Under environment with radio frequency interference, the product may malfunction<br />
and require user to reset.<br />
Under the environment with electrical fast transient, the product may malfunction and<br />
require user to reset.<br />
2
23. Battery Disposal - When disposing of used batteries, please comply<br />
with governmental regulations or environmental public instruction’s<br />
rules that apply in your country or area. Batteries (battery pack or<br />
batteries installed) must not be exposed to excessive heat such as<br />
sunshine, fire or the like.<br />
Caution Marking and rating plate is located at bottom enclosure of the apparatus.<br />
24. Safety Check - Upon completion of any service or repairs to this<br />
product, ask the service technician to perform safety checks to<br />
CAUTION<br />
determine that the product is in proper operating condition.<br />
Danger of<br />
25.<br />
explosion<br />
Wall or<br />
if<br />
Ceiling<br />
battery is<br />
Mounting<br />
incorrectly<br />
- The<br />
replaced.<br />
product<br />
Replace<br />
should<br />
only<br />
be<br />
with<br />
mounted<br />
the same<br />
to a<br />
or<br />
wall<br />
equivalent type.<br />
or ceiling only as recommended by the manufacturer.<br />
An appliance WARNING with a protective earth terminal should be connected to a mains outlet<br />
with a protective earth The connection. lightning flash with arrowhead symbol, within an equilateral<br />
triangle, is intended to alert the user to the presence of<br />
NOTE<br />
uninsulated “dangerous voltage” within the product’s enclosure<br />
This equipment has that been may tested be and of sufficient found to magnitude comply with to the constitute limits for a a risk Class of B<br />
digital device, pursuant electric to Part shock 15 of to the persons FCC Rules. These limits are designed to<br />
provide reasonable protection against harmful interference in a residential installation.<br />
This equipment generates, The exclamation uses and can point radiate within radio an frequency equilateral energy triangle and, is intended if not<br />
installed and used in to accordance alert the user with to the the instructions, presence of may important cause harmful operating interference<br />
to radio communications. and maintenance However, there (servicing) is no guarantee instructions that in interference the literature will not<br />
occur in a particular accompanying installation. If this the equipment appliance. does cause harmful interference to<br />
radio or television reception, which can be determined by turning the equipment off<br />
and on, the user is encouraged to try to correct the interference by one or more of the<br />
following measures:<br />
• Reorient or relocate the receiving antenna.<br />
• Increase the separation between the equipment and receiver.<br />
• Connect the equipment into an outlet on a circuit different from that to<br />
which the receiver is connected.<br />
• Consult the dealer or an experienced radio/ TV technician for help.<br />
CAN ICES-3 (B)/NMB-3(B)<br />
This device WARNING: complies with TO REDUCE Industry Canada THE RISK license-exempt OF FIRE OR RSS-210. ELECTRIC Operation SHOCK, is<br />
subject to DO the NOT following EXPOSE two conditions: THIS <strong>AP</strong>PARATUS (1) this device TO RAIN may not OR cause MOISTURE Interference, AND<br />
and (2) this OBJECTS device must FILLED accept WITH any interference, LIQUIDS, SUCH including AS VASES, interference SHOULD that may NOT BE<br />
cause undesired PLACED operation ON THIS of <strong>AP</strong>PARATUS.<br />
the device.<br />
• no naked CAUTION flame sources REGARDING such as PLACEMENT<br />
lighted candles should be placed on the<br />
apparatus; To maintain proper ventilation, be sure to leave a space around the unit<br />
• the use (from of apparatus the largest in outer tropical dimensions climate including projections) than is equal to,<br />
or greater than shown below.<br />
This device complies<br />
Left and<br />
with<br />
Right<br />
Part<br />
Panels:<br />
15 of<br />
10<br />
the<br />
cm<br />
FCC rules. Operation is subject to the<br />
Rear Panel: 10 cm<br />
following two conditions:<br />
Top Panel: 50 cm<br />
(1) This device may not cause harmful interference, and<br />
(2) This device must accept any interference received, including interference that may<br />
IMPORTANT INFORMATION TO UK CUSTOMERS<br />
cause undesired DO NOT operation. cut off the mains plug from this equipment. If the plug fitted is<br />
not suitable for the power points in your home or the cable is too short<br />
to reach THE LIGHTNING a power point, FLASH then WITH obtain ARROWHEAD an appropriate SYMBOL, safety WITHIN approved AN<br />
extension EQUILATERAL lead or consult TRIANGLE, your IS dealer. INTENDED If nonetheless, TO ALERT THE the USER mains TO plug THE is<br />
cut off, PRESENCE REMOVE OF THE UNINSULATED FUSE and dispose “DANGEROUS of the PLUG VOLTAGE” immediately, WITHIN THE to avoid<br />
possible PRODUCT’S shock hazard ENCLOSURE by inadvertent THAT MAYBE connection OF SUFFICIENT to the mains MAGNITUDE supply. TO If<br />
this product CONSTITUTE is not A provided RISK OF ELECTRIC with a mains SHOCK plug, TO or PERSONS. one has to be fitted, then<br />
follow the instructions given below:<br />
THE EXCLAMATION POINT WITHIN AN EQUILATERAL TRIANGLE IS<br />
INTENDED TO ALERT THE USER TO THE PRESENCE OF IMPORTANT<br />
OPERATING AND MAINTENANCE (SERVICING) INSTRUCTIONS IN THE<br />
LITERATURE ACCOMPANYING THE <strong>AP</strong>PLIANCE.<br />
IMPORTANT SAFETY INSTRUCTIONS<br />
IMPORTANT<br />
DO NOT make any connection to the larger terminal which is marked<br />
with the letter ‘E’ or by the safety earth symbol or colored GREEN or GREEN<br />
AND YELLOW. The wires in the mains lead on this product are colored in<br />
accordance with the following code:<br />
CAUTION REGARDING PLACEMENT<br />
BLUE - NEUTRAL<br />
To maintain<br />
BROWN<br />
proper<br />
- LIVE<br />
ventilation, be sure to leave a space around the unit (from the largest<br />
outer dimensions including projections) that is equal to or greater than shown below.<br />
As these<br />
Left and<br />
colors<br />
Right<br />
may<br />
Panels:<br />
not correspond<br />
10 cm<br />
with the colored markings identifying<br />
the terminals<br />
Rear Panel:<br />
in<br />
10<br />
your<br />
cm<br />
plug, proceed as follows:<br />
• The BLUE wire must be connected to the terminal marked with the<br />
WARNING letter ‘N’ or colored BLACK.<br />
If • this The product BROWN is used wire at must 240VAC, be connected a suitable to attachment the terminal plug marked should with be used. the<br />
letter ‘L’ or colored RED<br />
FCC • When RF RADIATION replacing the EXPOSURE fuse, only STATEMENT<br />
a correctly rated and approved type<br />
Caution: should To be maintain used, and compliance be sure with to re-fit the the FCC’s fuse RF cover. exposure guidelines, place the <strong>VISO</strong><br />
1 <strong>AP</strong> at least 20cm from nearby persons.<br />
IF IN DOUBT CONSULT A COMPETENT ELECTRICIAN.<br />
EUROPEAN UNION NOTICE FOR WIRELESS PRODUCT<br />
This product is manufactured Hereby, to Lenbrook comply Industries with the radio Limited, declares that<br />
interference requirements this of <strong>Wireless</strong> EEC DIRECTIVE <strong>Music</strong> <strong>System</strong> 2004/108/EC. is in compliance with<br />
0979<br />
the R&TTE Directive (1999/5/EC), Low Voltage<br />
Directive NOTES ON (2006/95/EC) ENVIRONMENTAL and other essential PROTECTION requirements. The declaration of conformity<br />
may be consulted At the at end www. of its lenbrook.com/DoC.<br />
useful life, this product must not be disposed<br />
of with regular household waste but must be returned to a<br />
NOTES ON collection ENVIRONMENTAL point for the PROTECTION<br />
recycling of electrical and electronic<br />
equipment. At the end The of symbol its useful on life, the this product, user’s must manual not be disposed and of with<br />
packaging point regular this out. household waste but must be returned to a collection point for<br />
the recycling of electrical and electronic equipment. The symbol on the<br />
The materials can product, be reused owner’s in accordance manual and with packaging, their markings. point this Through out.<br />
re-use, recycling of raw materials, or other forms of recycling of old<br />
products, you The are making materials an can important be reused contribution in accordance to the with protection their markings. of<br />
Through our environment. re-use, recycling of raw materials or other forms of recycling of old products,<br />
you are making an important contribution to the protection of our environment. Your<br />
local Your administrative local administrative office office can advise can advise you of you the of responsible the responsible waste disposal waste point.<br />
disposal point.<br />
INFORMATION ABOUT COLLECTION AND DISPOSAL OF WASTE BATTERIES<br />
(DIRECTIVE RECORD YOUR 2006/66/EC MODEL NUMBER OF THE EUROPEAN (NOW, WHILE PARLIAMENT YOU CAN AND SEE IT) THE COUNCIL<br />
OF The EUROPEAN model and serial UNION) number (FOR of EUROPEAN your new C 355BEE CUSTOMERS are located ONLY) on the<br />
back of the cabinet. For your Batteries future convenience, bearing any of we these suggest symbols that you indicate that<br />
record these numbers here: they should be treated as “separate collection” and not<br />
as municipal waste. It is encouraged that necessary<br />
Model number : . measures . . . . . . . . . . are . . . implemented . . . . . . . . . . . . . . to . . . maximize . . . . . . . the separate<br />
Serial number : ......................................<br />
collection of waste batteries and to minimize the disposal<br />
of batteries as mixed municipal waste.<br />
End-users are exhorted not to dispose of waste batteries<br />
as unsorted municipal waste. In order to achieve a<br />
high level of recycling waste of batteries, discard waste<br />
batteries separately and properly through an accessible<br />
collection point in your vicinity. For more information about collection and recycling<br />
of waste batteries, please contact your local municipality, your waste disposal service<br />
or the point of sale where you purchased the items.<br />
By ensuring compliance and conformance to proper disposal of waste batteries,<br />
potential hazardous effects on human health is prevented and the negative impact of<br />
batteries and waste batteries on the environment is minimized, thus contributing to<br />
the protection, preservation and quality improvement of the environment.<br />
WARNING: DO NOT INGEST BATTERY,<br />
<strong>NAD</strong> is a trademark of <strong>NAD</strong> Electronics International, a division of Lenbrook Industries Limited<br />
CHEMICAL BURN HAZARD<br />
Copyright 2008, <strong>NAD</strong> Electronics International, a division of Lenbrook Industries Limited<br />
The remote control supplied with this product contains a coin/button<br />
cell battery. If the coin/button cell battery is swallowed, it can cause<br />
severe internal burns in just 2 hours and can lead to death.<br />
ENGLISH<br />
FRANÇAIS<br />
ESPAÑOL<br />
ITALIANO<br />
DEUTSCH<br />
NEDERLANDS<br />
SVENSKA<br />
РУССКИЙ<br />
SVENSKA NEDERLANDS DEUTSCH<br />
ITALIANO<br />
ESPAÑOL<br />
FRANÇAIS<br />
ENGLISH<br />
Keep new and used batteries away from the children. If the battery compartment<br />
<br />
does not close securely, stop using the product and keep it away from children.<br />
If you think batteries might have been swallowed or placed inside a part of the body,<br />
seek immediate medical attention.<br />
РУССКИЙ<br />
3
INTRODUCTION<br />
ENGLISH FRANÇAIS ESPAÑOL ITALIANO DEUTSCH NEDERLANDS SVENSKA РУССКИЙ<br />
Thank you for choosing <strong>NAD</strong>.<br />
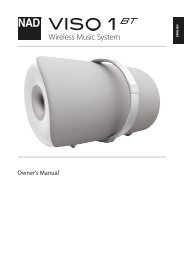
The <strong>NAD</strong> <strong>VISO</strong> 1 <strong>AP</strong> is the latest evolution of the <strong>VISO</strong> 1 <strong>Wireless</strong> Digital<br />
<strong>Music</strong> <strong>System</strong>. <strong>NAD</strong> <strong>VISO</strong> 1 <strong>AP</strong> takes the award-winning audio performance<br />
of the original <strong>NAD</strong> <strong>VISO</strong> 1 and adds the versatility of Wi-Fi and Apple<br />
<strong>AirPlay</strong>. A USB port at the rear is also added to allow direct connection and<br />
charging of Apple’s iPhone, iPad or iPod touch.<br />
Using <strong>NAD</strong>’s Direct Digital technology to eliminate all analog stages along<br />
with their inherent noise and distortion, the <strong>NAD</strong> <strong>VISO</strong> 1 <strong>AP</strong> is a complete<br />
digital device. <strong>NAD</strong> uses a sophisticated closed loop DAC technology to<br />
directly power the speakers. Acoustic design is provided by <strong>NAD</strong>’s sister<br />
company, PSB Speakers, and the amplification and acoustic design is<br />
fully integrated to create very impressive synergies. The result is a shelf<br />
system with enough acoustic power to fill a large room, guaranteed lowest<br />
distortion and widest frequency response.<br />
As with all our products, <strong>NAD</strong>’s “<strong>Music</strong> First” design philosophy guided the<br />
<strong>VISO</strong> 1 <strong>AP</strong> design that it can confidently promise you both state-of-the-art<br />
technology and audiophile-quality music listening for years to come.<br />
We encourage you to take a few minutes now to read right through this<br />
manual. Investing a little time here at the outset might save you a good<br />
deal of time later, and is by far the best way to ensure that you make the<br />
most of your investment in the <strong>VISO</strong> 1 <strong>AP</strong>.<br />
For warranty information contact your local distributor.<br />
<strong>NAD</strong> SHALL NOT BE HELD LIABLE FOR ANY TECHNICAL OR USER<br />
INTERFACE DISCREPANCIES IN THIS MANUAL.THE <strong>VISO</strong> 1 <strong>AP</strong><br />
OWNER’S MANUAL MAY BE SUBJECT TO CHANGE WITHOUT PRIOR<br />
NOTICE. CHECK OUT THE <strong>NAD</strong> WEBSITE FOR THE LATEST VERSION<br />
OF THE <strong>VISO</strong> 1 <strong>AP</strong> OWNER’S MANUAL.<br />
WHAT’S IN THE BOX<br />
Packed with your <strong>VISO</strong> 1 <strong>AP</strong> you will find<br />
<strong>VISO</strong> 1 <strong>AP</strong> accessories box containing the following<br />
• Two detachable mains power cord<br />
• The <strong>VISO</strong> 1 <strong>AP</strong> remote control with 3V CR2025 battery<br />
• Cleaning cloth<br />
• <strong>VISO</strong> 1 <strong>AP</strong> Quick Setup Guide<br />
<strong>NAD</strong> is a trademark of <strong>NAD</strong> Electronics International, a division of Lenbrook Industries Limited<br />
Copyright 2014, <strong>NAD</strong> Electronics International, a division of Lenbrook Industries Limited<br />
SAVE THE PACKAGING<br />
Please save the box and all of the packaging in which your <strong>VISO</strong> 1 <strong>AP</strong><br />
arrived. Should you move or otherwise need to transport your <strong>VISO</strong> 1 <strong>AP</strong>,<br />
this is by far the safest container in which to do so. We’ve seen too many<br />
otherwise perfect components damaged in transit for lack of a proper<br />
shipping carton, so please: Save that box!<br />
CHOOSING A LOCATION<br />
Provide enough space (at least10 cm) around the <strong>VISO</strong> 1 <strong>AP</strong> port to allow air<br />
flow freely. Ensure that there is a clear line of sight, within 25 feet/8 meters,<br />
between the <strong>VISO</strong> 1 <strong>AP</strong>’s front view and your primary listening/viewing<br />
position - this will allow reliable infrared remote control communications.<br />
4
IDENTIFICATION OF CONTROLS<br />
ENGLISH<br />
6<br />
1 2<br />
3<br />
4<br />
5<br />
FRANÇAIS<br />
1 STANDBY BUTTON<br />
• Toggle this button to set the <strong>VISO</strong> 1 <strong>AP</strong> to standby mode or switch<br />
ON the <strong>VISO</strong> 1 <strong>AP</strong> from standby mode.<br />
• The <strong>VISO</strong> 1 <strong>AP</strong> can also be switched ON from standby mode by<br />
pressing any of the panel keys S, M, + or - .<br />
• When <strong>VISO</strong> 1 <strong>AP</strong> is switched ON from standby mode, the last Source<br />
used will be selected.<br />
NOTE<br />
The Standby (ON/OFF) button will not shut down the <strong>VISO</strong> 1 <strong>AP</strong>.<br />
Disconnect the mains power plug from the mains power source to<br />
completely shut down the <strong>VISO</strong> 1 <strong>AP</strong>.<br />
2 USB<br />
• Allow direct connection and charging of Apple’s iPhone, iPad and<br />
iPod touch using applicable connector (not supplied).<br />
• <strong>VISO</strong> 1 <strong>AP</strong> may need a software update to be in step with the latest<br />
technology trends. Connect to this input a USB memory stick<br />
containing the software update.<br />
• Only authorized <strong>NAD</strong> distributors or service centers are allowed to<br />
implement a software update.<br />
• Check with your authorized <strong>NAD</strong> distributors for future software<br />
updates.<br />
3 LAN<br />
LAN connection must be setup for wired connection to be established.<br />
Set up a Wired Ethernet broadband router with broadband internet<br />
connection. Your router or home network should have a built-in DHCP<br />
server to consummate the connection.<br />
• Connect the <strong>VISO</strong> 1 <strong>AP</strong> to a network by directly connecting one<br />
end of an Ethernet cable to the LAN port of your wired Ethernet<br />
broadband router and the other end to <strong>VISO</strong> 1 <strong>AP</strong>’s LAN port. Use a<br />
standard straight-through Ethernet cable (not supplied).<br />
NOTE<br />
<strong>AirPlay</strong> lets you stream music from your <strong>AirPlay</strong>-enabled device to the<br />
<strong>VISO</strong> 1 <strong>AP</strong>. The <strong>AirPlay</strong>-enabled device and the <strong>VISO</strong> 1 <strong>AP</strong> must be in the<br />
same network to send and receive streaming audio with <strong>AirPlay</strong>.<br />
4 OPTICAL (S/PDIF) IN<br />
• Connect OPTICAL IN of <strong>VISO</strong> 1 <strong>AP</strong> to the corresponding optical<br />
digital output of sources such as CD, DVD or BD players, digital cable<br />
box, digital tuners and other applicable components.<br />
• The optical digital input is 24/96 capable.<br />
• The optical digital input accepts PCM audio signal only. Ensure that<br />
the digital audio output of your source is set to PCM before it is<br />
connected to the optical digital input of <strong>VISO</strong> 1 <strong>AP</strong>.<br />
5 AC MAINS INPUT<br />
• The <strong>VISO</strong> 1 <strong>AP</strong> comes supplied with a separate detachable mains<br />
power cord. There are 2 supplied power cords – select applicable<br />
type for your usage. Before connecting the plug to the mains<br />
powers source, connect firmly first the other end to <strong>VISO</strong> 1 <strong>AP</strong>’s AC<br />
Mains input socket.<br />
• Always disconnect the mains power plug from the mains power<br />
source first, before disconnecting the cable from the <strong>VISO</strong> 1 <strong>AP</strong>’s AC<br />
Mains input socket.<br />
• Power Rating: 100 - 240V ~50/60Hz 35W.<br />
NOTES<br />
• Disconnect the mains power plug from the mains power source to<br />
completely shut down the <strong>VISO</strong> 1 <strong>AP</strong>.<br />
• The <strong>VISO</strong> 1 <strong>AP</strong> will power up to its last Source setting prior to being shut<br />
down.<br />
6 S, M,+/-<br />
• Press “+” to increase the volume level; “ - ” to lower it.<br />
• Toggle “M” to temporarily mute audio level or restore audio from<br />
mute mode. “S” will continuously flash at mute mode.<br />
• Pressing “+” or “ - ” will restore audio from mute mode.<br />
• “S” indicator flashes whenever a remote control command is<br />
received.<br />
• Toggle “S” button to sequentially select through the following<br />
source modes<br />
a <strong>AirPlay</strong>/iOS/iPod nano device<br />
b Bluetooth device<br />
c Optical (S/PDIF) source<br />
Below is a description of the various color modes of the S-indicator light.<br />
S-INDICATOR LIGHT COLOR<br />
Alternately flashing in red and green<br />
Flashing green<br />
Solid green<br />
Solid blue<br />
Solid amber<br />
Off (no color)<br />
FUNCTION/DESCRIPTION<br />
Ready to be configured<br />
Factory default setting<br />
Access point/setup mode<br />
<strong>AirPlay</strong>/iOS/iPod nano device source mode<br />
Bluetooth device source mode<br />
Optical (S/PDIF) source mode<br />
Standby mode<br />
РУССКИЙ<br />
SVENSKA NEDERLANDS DEUTSCH<br />
ITALIANO<br />
ESPAÑOL<br />
5
<strong>VISO</strong> 1 REMOTE CONTROL<br />
ENGLISH FRANÇAIS ESPAÑOL ITALIANO DEUTSCH NEDERLANDS SVENSKA РУССКИЙ<br />
S<br />
Sequentially select through Sources.<br />
+/- Increase or decrease loudness level.<br />
X<br />
Temporarily mutes audio output or restores audio from mute mode.<br />
The following remote control commands are applicable only in <strong>AirPlay</strong> mode or when using an iOS<br />
device<br />
0 Skip forward to the next song.<br />
Skip forward through parts of the current broadcast or song (if applicable).<br />
9 Skip back to the previous song.<br />
Skip back through parts of the current broadcast or song (if applicable).<br />
uj<br />
Start playback.<br />
Pause playback temporarily.<br />
6
<strong>VISO</strong> 1 <strong>AP</strong> OPERATION<br />
FIRST TIME USE<br />
Out of the box and connecting the <strong>VISO</strong> 1 <strong>AP</strong> to the mains power source for<br />
the first time, the “S” indicator will alternately switch to green and red light<br />
after initializing. This indicates that the <strong>VISO</strong> 1 <strong>AP</strong> is ready to be configured.<br />
Refer to the following sections to fully enjoy and appreciate your <strong>VISO</strong> 1 <strong>AP</strong>.<br />
3 Launch Safari and enter http://192.168.1.12 . The <strong>VISO</strong> 1 <strong>AP</strong> User<br />
Interface menu window will appear. Select Profile Configuration.<br />
ENGLISH<br />
SETTING UP NETWORK CONNECTION<br />
<strong>AirPlay</strong> lets you stream music from your <strong>AirPlay</strong>-enabled device to the <strong>VISO</strong><br />
1 <strong>AP</strong>. The <strong>AirPlay</strong>-enabled device and the <strong>VISO</strong> 1 <strong>AP</strong> must be in the same<br />
network to send and receive streaming audio with <strong>AirPlay</strong>.<br />
The <strong>VISO</strong> 1 <strong>AP</strong> can be connected to a network using any of the following<br />
methods<br />
A Wired connection<br />
B <strong>Wireless</strong> connection<br />
C Share Wi-Fi setting<br />
Start playback of your device after successful network connection using any<br />
of the above methods.<br />
WIRED CONNECTION<br />
Network connection using Ethernet broadband connection. Set up a Wired<br />
Ethernet broadband router with broadband internet connection. Your<br />
router or home network should have a built-in DHCP server to consummate<br />
the connection.<br />
• Using a standard straight-through Ethernet cable, connect one end of<br />
the Ethernet cable (not supplied) to the LAN port of your wired Ethernet<br />
broadband router and the other end to <strong>VISO</strong> 1 <strong>AP</strong>’s LAN port.<br />
• The ”S” indicator will turn to solid green upon successful network<br />
connection.<br />
It is advisable that wired connection is utilized when possible. Wired<br />
connection is less likely to have “drop-out” or range problem and not<br />
vulnerable to interference or eavesdropping.<br />
WIRELESS CONNECTION<br />
<strong>Wireless</strong> (WiFi) broadband router with broadband internet connection is<br />
required for wireless connection to be established. <strong>Wireless</strong> connection for<br />
<strong>VISO</strong> 1 <strong>AP</strong> can be setup by the following procedure.<br />
1 Press and hold “S” until it turns flashing green – this indicates it is in<br />
Access point/setup mode already.<br />
2 Using your iOS device (iPad is used here for reference), select among<br />
the list of available network connections the unique network ID (<strong>NAD</strong>_<br />
<strong>VISO</strong>1_DF601A in this example) of your <strong>VISO</strong> 1 <strong>AP</strong>.<br />
4 Select your local network from the drop down SSID list (<strong>NAD</strong>LAB<br />
(WPA2 TKIP+CCMP) in this example).<br />
NOTES<br />
• The Status Information displays current details about your <strong>VISO</strong> 1 <strong>AP</strong><br />
like connection status, signal strength, firmware version and others.<br />
If your <strong>VISO</strong> 1 <strong>AP</strong> is configured already, locate and access the TCP/IP<br />
address of your <strong>VISO</strong> 1 <strong>AP</strong> to check Status Information.<br />
• Firmware Update is not for consumer use- this is restricted to authorized<br />
<strong>NAD</strong> service personnel and distributors.<br />
5 Type the WPA Passphrase (if it is password protected) of your local<br />
network in the field provided and then select Apply to join in.<br />
NEDERLANDS DEUTSCH<br />
ITALIANO<br />
ESPAÑOL<br />
FRANÇAIS<br />
РУССКИЙ<br />
SVENSKA<br />
7
<strong>VISO</strong> 1 <strong>AP</strong> OPERATION<br />
ENGLISH FRANÇAIS ESPAÑOL ITALIANO DEUTSCH NEDERLANDS SVENSKA РУССКИЙ<br />
6 A Warning notice will pop-up. Select OK to save the new settings. ”S”<br />
will continuously flash until it turns solid green. Network connection is<br />
successfully established with ”S” turning to solid green. Your iOS device<br />
(iPad) is now interfaced with the <strong>VISO</strong> 1 <strong>AP</strong>.<br />
7 Return to the Wi-Fi settings of your iOS (iPad) device and ensure that it<br />
is set to the same network setting as above (<strong>NAD</strong>LAB).<br />
SHARE WIFI SETTINGS<br />
WiFi connection can also be achieved by directly connecting your iOS<br />
device to the USB input of the <strong>VISO</strong> 1 <strong>AP</strong>. Follow below procedure for<br />
automatic network detection and connection.<br />
1 Using applicable Apple USB cable (not supplied), connect iOS device to<br />
USB input of <strong>VISO</strong> 1 <strong>AP</strong> to share WiFi settings.<br />
2 Press and hold “M” and “S”.<br />
3 From iOS device, select “Allow”. Enter correct network username and<br />
password when prompted. Select <strong>AirPlay</strong> .<br />
NOTE<br />
Upon successful WiFi sharing, you can disconnect iOS device from <strong>VISO</strong> 1 <strong>AP</strong>.<br />
<strong>AirPlay</strong> as a Source takes priority over connected iPod or iOS devices.<br />
8
<strong>VISO</strong> 1 <strong>AP</strong> OPERATION<br />
SOURCE SELECTION<br />
There are three Sources that <strong>VISO</strong> 1 <strong>AP</strong> can select. These are<br />
1 <strong>AirPlay</strong>/iOS/iPod nano device*<br />
2 Bluetooth device<br />
3 Optical (S/PDIF) source<br />
<strong>VISO</strong> 1 <strong>AP</strong> will output the audio from any of the above sources upon<br />
successful detection or connection.<br />
AIRPLAY<br />
<strong>AirPlay</strong> lets you stream music from your <strong>AirPlay</strong>-enabled device to the <strong>VISO</strong><br />
1 <strong>AP</strong>. The <strong>AirPlay</strong>-enabled device and the <strong>VISO</strong> 1 <strong>AP</strong> must be in the same<br />
network to send and receive streaming audio with <strong>AirPlay</strong>. This connection<br />
could be wired, using an Ethernet cable, or wireless.<br />
• After your <strong>AirPlay</strong>-enabled device and <strong>VISO</strong> 1 <strong>AP</strong> are connected to the<br />
same network, the Airplay source will detect the <strong>VISO</strong> 1 <strong>AP</strong>. Select the<br />
<strong>AirPlay</strong> icon ( ) that appears in the application display and select<br />
the unique ID of your <strong>VISO</strong> 1 <strong>AP</strong> (<strong>NAD</strong> <strong>VISO</strong>1_DF601A in the example<br />
below).<br />
BLUETOOTH DEVICE<br />
Bluetooth creates wireless connection between compatible devices by<br />
being paired together.<br />
1 Ensure that your Bluetooth device is active or turned ON.<br />
2 Pair or connect your Bluetooth device with the unique device ID of<br />
your <strong>VISO</strong> 1 <strong>AP</strong> which is listed as the product name (<strong>VISO</strong>1 <strong>AP</strong>) together<br />
with the last six characters of your unit’s MAC (Machine Access Control)<br />
address (example: <strong>VISO</strong>1 <strong>AP</strong> DF8036).<br />
^<br />
ENGLISH<br />
FRANÇAIS<br />
ESPAÑOL<br />
• <strong>Audio</strong> from iTunes running from your MAC or PC can also be streamed<br />
using <strong>AirPlay</strong> as long as they are connected to the same network.<br />
3 Toggle “S” until it turns to blue light – Bluetooth device mode. Start<br />
playback of your Bluetooth device upon connection.<br />
iOS/iPod NANO DEVICE*<br />
You can directly playback your iOS/iPod nano device with <strong>VISO</strong> 1 <strong>AP</strong> if you<br />
prefer not to use <strong>AirPlay</strong>.<br />
1 Using applicable Apple USB connector, connect your iOS/iPod nano<br />
device to the USB input of <strong>VISO</strong> 1 <strong>AP</strong>.<br />
2 Toggle “S” until it turns to green light – <strong>AirPlay</strong>/iOS/iPod nano device<br />
mode. If <strong>AirPlay</strong> is disconnected or unavailable, the <strong>VISO</strong> 1 <strong>AP</strong> will<br />
automatically playback the source. If <strong>AirPlay</strong> is available, select “Dock<br />
connector” (if applicable) to playback the connected source.<br />
SVENSKA<br />
DEUTSCH<br />
ITALIANO<br />
NEDERLANDS<br />
In some cases, you may need to toggle or cycle through “S” to activate<br />
<strong>AirPlay</strong> mode or iOS/iPod nano device mode.<br />
* Refer to the section below about iOS/iPod SUPPORTED BY <strong>VISO</strong> 1 <strong>AP</strong><br />
for a list of compatible devices.<br />
РУССКИЙ<br />
9
<strong>VISO</strong> 1 <strong>AP</strong> OPERATION<br />
ENGLISH FRANÇAIS ESPAÑOL ITALIANO DEUTSCH NEDERLANDS SVENSKA РУССКИЙ<br />
OPTICAL (S/PDIF) SOURCE<br />
Connect OPTICAL IN of <strong>VISO</strong> 1 <strong>AP</strong> to the corresponding optical digital<br />
output of sources such as CD, DVD or BD players, digital cable box, digital<br />
tuners and other applicable components. Toggle “S” until it turns to solid<br />
amber (Optical (S/PDIF) mode).<br />
IMPORTANT NOTES<br />
• The optical digital input is 24/96 capable.<br />
• The optical digital input accepts PCM audio signal only. Ensure that the<br />
digital audio output of your source is set to PCM before it is connected to<br />
the optical digital input of <strong>VISO</strong> 1 <strong>AP</strong>.<br />
RESTORING <strong>VISO</strong> 1 <strong>AP</strong> TO ITS<br />
FACTORY DEFAULT SETTINGS<br />
You may restore your <strong>VISO</strong> 1 <strong>AP</strong> to its factory default settings. Resetting<br />
your <strong>VISO</strong> 1 <strong>AP</strong> may address the remote possibility of your <strong>VISO</strong> 1 <strong>AP</strong><br />
exhibiting some glitches or inadvertent functionality issues. Follow the<br />
procedure below to reset your <strong>VISO</strong> 1 <strong>AP</strong>.<br />
1 Disconnect and then reconnect your <strong>VISO</strong> 1 <strong>AP</strong> to the mains power<br />
source. As soon as “S” (in green) begins to flash, press and hold “-“ until<br />
the “S” indicator turns off. Release “-“.<br />
2 <strong>VISO</strong> 1 <strong>AP</strong> will continue to initialize.<br />
3 The “S” indicator will then alternately switch to green and red light after<br />
initializing. This indicates that the <strong>VISO</strong> 1 <strong>AP</strong> is ready to be configured<br />
again.<br />
iOS/iPod DEVICES SUPPORTED BY <strong>VISO</strong> 1 <strong>AP</strong><br />
The following is a table listing the iOS and iPod devices supported by <strong>VISO</strong><br />
1 <strong>AP</strong>. This list will be updated when newer versions or devices become<br />
available and compatible with <strong>VISO</strong> 1 <strong>AP</strong>. Updated list will be posted in the<br />
<strong>NAD</strong> website page for <strong>VISO</strong> 1 <strong>AP</strong>.<br />
iOS/iPod SUPPORTED BY <strong>VISO</strong> 1 <strong>AP</strong><br />
Device Software Device Software<br />
iPod nano 3rd Gen v1.1.3 iPhone 3G iOS 4.2.1<br />
iPod nano 4th Gen v1.0.3 iPhone 3GS iOS 6.0.1<br />
iPod nano 5th Gen v1.0.2 iPhone 4 iOS 6.0.1<br />
iPod nano 6th Gen v1.2 iPhone 4S iOS 6.0.1<br />
iPod nano 7th Gen v1.0.1 iPhone 5 iOS 6.0.1<br />
iPod touch 1st Gen iOS 3.1.3 iPad iOS 5.1.1<br />
iPod touch 2nd Gen iOS 4.2.1 iPad 2 iOS 6.0.1<br />
iPod touch 3rd Gen iOS 5.1.1 iPad 3rd Gen iOS 6.0.1<br />
iPod touch 4th Gen iOS 6.0.1<br />
iPod touch 5th Gen iOS 6.0.1<br />
10
РУССКИЙ<br />
SVENSKA<br />
NEDERLANDS<br />
DEUTSCH<br />
ITALIANO<br />
ESPAÑOL<br />
FRANÇAIS<br />
ENGLISH<br />
11
www.<strong>NAD</strong>electronics.com<br />
©2014 <strong>NAD</strong> ELECTRONICS INTERNATIONAL<br />
A DIVISION OF LENBROOK INDUSTRIES LIMITED<br />
All rights reserved. <strong>NAD</strong> and the <strong>NAD</strong> logo are trademarks of <strong>NAD</strong> Electronics International, a division of Lenbrook Industries Limited.<br />
No part of this publication may be reproduced, stored or transmitted in any form without the written permission of <strong>NAD</strong> Electronics International.<br />
While every effort has been made to ensure the contents are accurate at the time of publication, features and specifications may be subject to change without prior notice.<br />
<strong>VISO</strong>1<strong>AP</strong>_eng_OM_v08 - Sep 2014