HART Field Communicator HPC401Plus - smarresearch
HART Field Communicator HPC401Plus - smarresearch
HART Field Communicator HPC401Plus - smarresearch
Create successful ePaper yourself
Turn your PDF publications into a flip-book with our unique Google optimized e-Paper software.
SmarResearch<br />
TechnologySource<br />
<strong>HART</strong> ®<br />
<strong>Field</strong>bus<br />
Profibus<br />
Intrinsic Safety<br />
Configuration Tools<br />
Semiconductors<br />
Training<br />
Custom Design<br />
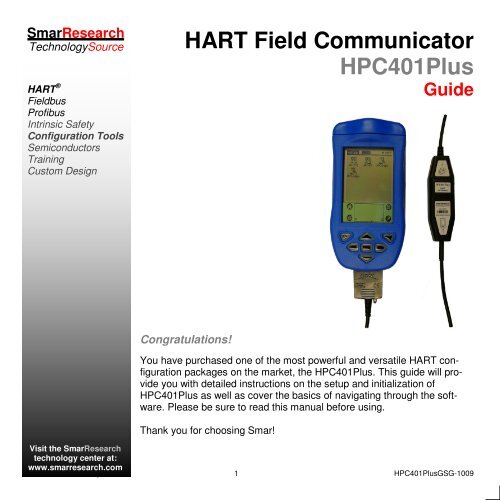
<strong>HART</strong> <strong>Field</strong> <strong>Communicator</strong><br />
<strong>HPC401Plus</strong><br />
Guide<br />
Congratulations!<br />
You have purchased one of the most powerful and versatile <strong>HART</strong> configuration<br />
packages on the market, the <strong>HPC401Plus</strong>. This guide will provide<br />
you with detailed instructions on the setup and initialization of<br />
<strong>HPC401Plus</strong> as well as cover the basics of navigating through the software.<br />
Please be sure to read this manual before using.<br />
Thank you for choosing Smar!<br />
Visit the SmarResearch<br />
technology center at:<br />
www.<strong>smarresearch</strong>.com<br />
© Smar Research Corporation 1 <strong>HPC401Plus</strong>GSG-1009
Contents<br />
1. General Overview<br />
1.1 General Principles ………………………………………………………………………… 3<br />
1.2 Hardware Overview ………………………………………………………………………. 3<br />
1.3 Software Overview ……………………………………………………………………….. 4<br />
2. Setup & Installation<br />
2.1 Box Contents ………………………………………………………………………………. 5<br />
2.2 Hardware Setup & Usage ……………………………………………………………...… 6<br />
2.3 Software Setup & Installation…………………………………………………………….. 7<br />
2.4 Restoring the HPC Suite from Backup…………………………………………………..8<br />
3. Using the HPC Suite Software<br />
3.1 Opening the HPC Suite Software ……………………………………………………..… 9<br />
3.2 HPC401 ……………………………………………………………………………………. 9<br />
3.2.1 Registering the HPC401 …….…………………………………………………… 10<br />
3.2.2 Polling for Devices …….…………………………………………………………. 10<br />
3.2.3 Navigating Device Parameters …….……………………………………………. 12<br />
3.2.4 Device Drivers …….………………………………………………………………. 13<br />
3.3 HPCLogger ………………………………………………………………………………… 15<br />
3.3.1 Starting HPCLogger ……………………………………………………………… 15<br />
3.3.2 Selecting Logged Variables …………………………………………………….. 15<br />
3.3.3 Starting a Log ……………………………………………………………………... 16<br />
3.3.4 Transferring Logs to a PC………………………………………………………... 17<br />
3.4 HPCGraph …………………………………………………………………………………. 18<br />
3.4.1 Starting HPCGraph………………………………………………………………... 18<br />
3.4.2 Selecting Variables to Graph…………………………………………………….. 18<br />
3.4.3 Using Graphs………………………………………………………………………. 20<br />
3.4.4 Offline Graphing……………………………………………………….................. 22<br />
3.5 HPC301 ……………………………………………………………………………………. 22<br />
4. Troubleshooting ……………………………………………………………………………… 23<br />
© Smar Research Corporation 2 <strong>HPC401Plus</strong>GSG-1009
1. General Overview<br />
1.1 General Principles<br />
The HPC401 Plus <strong>HART</strong> <strong>Field</strong> <strong>Communicator</strong> provides a complete solution for configuring and<br />
monitoring <strong>HART</strong> devices in the palm of your hand. The HPC401 Plus is comprised of three main<br />
components plus accessories. These parts consist of the Palm handheld, the HPC401 Plus <strong>HART</strong><br />
interface hardware, and the HPC Suite of Palm applications. This trio of hardware and software<br />
comprises a complete <strong>HART</strong> field communicator that can be powerful, multi-faceted and portable all<br />
in one.<br />
Using the familiar Palm operating system as a basis for the HPC401 Plus has many distinct advantages.<br />
Palm handhelds are widely used across the world, enabling the HPC401 Plus to be used with<br />
an already installed base of hundreds of thousands of Palm owners who are familiar with the Palm<br />
operating system. Using the large screen and graphical interface of the Palm lends itself to easy<br />
configuration of even the most complex transmitters. In addition, the Palm can be detached from the<br />
HPC401 Plus interface and used for all the traditional Palm features for personal organization. The<br />
new industrial exterior allows for durability in the most rugged of areas.<br />
The HPC401 Plus is ready to go right out of the box. The Palm has been pre-installed with the HPC<br />
Suite of <strong>HART</strong> configuration software and is ready to communicate with <strong>HART</strong> devices. The user<br />
needs only to attach the HPC401 Plus <strong>HART</strong> interface to the Palm, connect the pinch connectors to<br />
the <strong>HART</strong> network and launch the HPC401 application.<br />
For more detailed information on the installation setup and operation of HPC401, refer to the proceeding<br />
sections of this document.<br />
1.2 Hardware Overview<br />
The HPC401 Plus <strong>HART</strong> interface is designed to interface to the Palm multi connector located on<br />
the bottom of the Palm handheld, allowing communication between the Palm and the <strong>HART</strong> network.<br />
The included pinch connectors easily connect to any <strong>HART</strong> network for instant communication.<br />
The HPC401 Plus <strong>HART</strong> interface requires no batteries, running solely off the handhelds internal<br />
power supply. Its compact size and low power consumption makes the HPC401 interface an<br />
ideal solution for portability, its rugged exterior makes it the ideal tool for any plant or factory.<br />
© Smar Research Corporation 3 <strong>HPC401Plus</strong>GSG-1009
1.3 Software Overview<br />
The HPC Suite of software includes 4 distinct applications: HPC401, HPCGraph, HPCLogger and<br />
HPC301. Each of these applications is preloaded onto the handheld and designed for a particular<br />
function. A summary of each application can be seen on the following pages. For detailed information<br />
about the features and operation of each application, refer to their respective sections in this<br />
manual.<br />
HPC401<br />
The main application of the HPC Suite, HPC401, allows communication, monitoring and configuration<br />
of <strong>HART</strong> devices. The HPC401 software is based upon manufacturer device description files<br />
(DDL) and thus allows access to all menus and parameters as designed by the manufacturer.<br />
HPCGraph<br />
This graphing application allows device variables to be trended over time in an easy to view graphical<br />
format. Device parameters can be simultaneously graphed in various colors for easy identification.<br />
HPCLogger<br />
This software application allows for the logging of device variable values over time. A wide range of<br />
variables can be logged automatically at a user selectable sample time, or manually one by one.<br />
These logs can be saved and transferred to a PC for further analysis.<br />
HPC301<br />
The HPC301 software is the predecessor of the HPC401 software. It allows for the configuration<br />
and monitoring of <strong>HART</strong> devices but is not DDL derived. This application has been included as an<br />
alternative to using the DDL based menu and parameter structures of HPC401 for those whom<br />
have grown accustomed to the HPC301 layout for devices such as the Smar line of transmitters.<br />
© Smar Research Corporation 4 <strong>HPC401Plus</strong>GSG-1009
2. Setup & Installation<br />
2.1 Box Contents<br />
Before setting up your HPC401 Plus, please verify that all box contents are included. The HPC401<br />
Plus box contents can be seen below in Figure 1.<br />
1. Palm PDA - The included Palm is pre loaded with the HPC Suite of software. The battery of<br />
the Palm may require charging. Please read the Palm documentation before using.<br />
2. HPC401 Plus Interface - The HPC401 Plus hardware interface attaches to the bottom of the<br />
Palm and connects to the <strong>HART</strong> network. See the following section on how to correctly use<br />
this interface.<br />
3. Product Documentation & Software - Contains the Smar documentation and software. Note:<br />
The HPC401 Suite of software is already pre-loaded onto the Palm PDA.<br />
4. Power Supply - Connects to the Palm or the HPC401 Plus <strong>HART</strong> interface to recharge the<br />
Palm.<br />
5. Palm USB Hotsync Cable - Connects the Palm to your PC to Hotsync via USB.<br />
Figure 1 - HPC401 Box Contents<br />
© Smar Research Corporation 5 <strong>HPC401Plus</strong>GSG-1009
2.2 Hardware Setup & Usage<br />
Before using the HPC401 Plus to communicate you may wish to fully charge the Palm. This can be<br />
done by connecting the Palm power supply to the Palm. In order to charge your Palm, simply plug it<br />
into the provided power supply.<br />
Connecting/Disconnecting the HPC401 Plus Interface<br />
Insert the HPC401 Plus Interface into the multi-connector of the Palm handheld as shown in Figure<br />
2 below, pushing the HPC401 Plus Interface connector into the multi-connector slot until locked in.<br />
Connect the pinch connectors to the <strong>HART</strong> line as shown in Figure 3 below. Communication<br />
requires a minimum load of 250 Ohms on the <strong>HART</strong> line. The Palm is now ready to communicate.<br />
Tap the HPC401 icon on the Palm screen to load the software and begin communicating.<br />
To disconnect the HPC401 Plus Interface, pull the interface away from the Palm handheld firmly,<br />
avoiding any twisting or sideways force.<br />
Figure 2 - HPC401 Plus Interface<br />
Figure 3 - Connection to the <strong>HART</strong> network<br />
© Smar Research Corporation 6 <strong>HPC401Plus</strong>GSG-1009
Charging the Palm handheld via the HPC401 Plus Interface<br />
The Palm handheld can be charged with the HPC401 Plus Interface still connected. This is possible<br />
due to the inclusion of a passthrough power supply connector on the bottom of the HPC401 Plus<br />
Interface. To charge the Palm with the HPC401 Plus Interface connected, simply insert the<br />
connector of the included power supply into the HPC401 Plus power supply connector as shown in<br />
Figure 4 below. The Palm handheld will indicate it is being charged. The HPC401 Plus hardware<br />
and software can be used as normal while the Palm is charging.<br />
Note: The HPC401 Plus Interface is powered from the Palm battery and requires no additional<br />
power supply to function.<br />
2.3 Software Setup & Installation<br />
Figure 4 - Connecting Power Supply to HPC401 Plus Interface<br />
The entire HPC Suite is pre-loaded onto the included Palm handheld and is ready to be used. It is<br />
recommended to install the Palm software onto your PC in order to enable Hotsyncing and to<br />
backup the files contained on your Palm. This will ensure that the HPC Suite along with your Palm<br />
settings will be recoverable if your Palm should lose its memory. In this case a simple Hotsync will<br />
restore these files and settings automatically.<br />
Note: Installation of the Meazura and Palm software can be completed by inserting the Smar<br />
Research Product CD into the CD-ROM drive of your PC and selecting the “MEZ1000 Setup” .<br />
© Smar Research Corporation 7 <strong>HPC401Plus</strong>GSG-1009
Reinstalling the HPC Suite software with Hotsync backup from PC<br />
If you have installed the Palm software onto your PC and completed at least one Hotsync, your PC<br />
will contain a backup of the HPC Suite software and any other Palm data since your last Hotsync. In<br />
this case all you must do is connect the Palm to your PC and Hotsync.<br />
Reinstalling the HPC Suite software without Hotsync backup from PC<br />
If you have not installed the Palm software onto your PC and completed at least one hotsync, you<br />
will need to install both the Palm software and the HPC Suite onto your PC. Installation of the<br />
Meazura and Palm software can be completed by inserting the Smar Research Prodcut CD into the<br />
CD-ROM drive of your PC and selecting the “MEZ1000 Setup” .<br />
A copy of the HPC Suite software is contained on the included Smar Research Product CD. When a<br />
complete re-installation is necessary, this CD can be used to re-install all the HPC Suite<br />
applications onto the Palm handheld. Simply insert the CD into the CD-ROM drive of your PC and<br />
follow the on screen instructions to install the desired applications. Please note: the Palm software<br />
must already be installed on your PC in order to sucessfully re-install any HPC Suite software.<br />
2.4 Restoring the HPC401 Suite from Card Backup<br />
The HPC401 Suite can be restored from card backup in the case it is accidentally removed from<br />
your Palm.<br />
To restore the HPC401 Suite from backup:<br />
1. Select Card Backup from your Palm handheld.<br />
2. Select the HPCSuite option from the backup list.<br />
3. Select Restore | Partial Restore.<br />
4. The desired files for the HPC Suite applications will be checked by default, Select Restore<br />
Checked.<br />
5. You will be prompted to restart the Palm.<br />
© Smar Research Corporation 8 <strong>HPC401Plus</strong>GSG-1009
3. Using the HPC Suite Software<br />
3.1 Opening the HPC Suite<br />
The HPC Suite of applications, HPC401, HPCGraph, HPCLogger and HPC301 can be found<br />
under the <strong>HART</strong> category. Select “<strong>HART</strong>” from the dropdown list located at the upper right<br />
corner of the Palm screen. This will display the various HPC Suite applications as shown in<br />
Figure 5. Opening any of the HPC Suite applications is as simple as selecting it on the screen.<br />
The following sections will discuss the general usage<br />
of each of these programs.<br />
3.2 HPC401<br />
Figure 5 - HPC Suite<br />
HPC401 is the primary application of the HPC Suite. HPC401 allows the user to poll for devices<br />
on the <strong>HART</strong> network, communicate with them and configure their various parameters. Because<br />
HPC401 is based upon Device Description files (DDL), all the menus, variables and methods<br />
are supported as defined by the manufacturer DDL.<br />
The HPC401 is already loaded with support for devices from a range of manufacturers. In<br />
addition, new device drivers can be downloaded from the Smar Research website and added<br />
into HPC401. For more information on adding or requesting new device drivers, see the device<br />
drivers section.<br />
© Smar Research Corporation 9 <strong>HPC401Plus</strong>GSG-1009
After selecting HPC401 from the <strong>HART</strong> category of the applications screen, an “About HPC401”<br />
screen will appear. This screen identifies the Version number of the software you are running along<br />
with important copyright information. To continue the main application, select “OK”, or select<br />
“Cancel” to return to the application selection screen.<br />
3.2.1 Registering the HPC401<br />
The HPC401 software must be registered. An HPC401 Registration screen will appear each and<br />
everytime the HPC401 is launched until the software is properly registered. Unregistered software<br />
will prompt you to fill out the registration form and input your registration code. Please fill out the<br />
included HPC401 registration form and agree to the terms and conditions of the agreement. This<br />
form should be faxed to Smar Research Corp. You will receive your registration code shortly via<br />
email or fax.<br />
Enter the registration code you have received at the registration code prompt. A sucessful code will<br />
notify the user, at which point the registration screen will no longer appear at the startup of HPC401.<br />
A unsucessful code will inform the user of such, and allow the user to re-input the code.<br />
Note: The HPC401 software will still function while you are waiting for your registration code. This is<br />
accomplished by selecting “Skip” on the HPC401 Registration screen.<br />
3.2.2 Polling for Devices<br />
HPC401 can locate <strong>HART</strong> devices via the polling screen. The polling screen is automatically<br />
opened at the start of HPC401. As seen in Figure 6, the polling screen allows the user a choice of<br />
polling by device address, address range (0-15) or by tag. The details of each method are explained<br />
on the following pages. After HPC401 polls the network, all found devices will be listed in the live<br />
list. To open a particular device, simply select it from the list.<br />
© Smar Research Corporation 10 <strong>HPC401Plus</strong>GSG-1009
Polling for a Single Device<br />
To poll for a single online device by address:<br />
1. Select the checkbox next to the “Device Address” option.<br />
2. Choose the address of the device by selecting it from the<br />
drop-down menu located next to “Device Address”.<br />
3. Select the “Poll” button.<br />
Polling for Multiple Devices<br />
To poll for multiple online devices within an address range:<br />
1. Select the checkbox next to the “From/To” option.<br />
2. Choose the start and end search addresses from the corresponding<br />
drop-down menus located next to the “From”<br />
and “To” options respectively.<br />
3. Select the “Poll” button.<br />
Polling by Tag<br />
To poll for an online device by tag:<br />
Figure 6 - Polling Screen<br />
1. Select the checkbox next to the “Tag” option.<br />
2. Enter the tag of the device you are looking for in the field<br />
located next to “Tag”.<br />
3. Select the “Poll” button.<br />
Figure 7 - Live List Screen<br />
© Smar Research Corporation 11 <strong>HPC401Plus</strong>GSG-1009
3.2.3 Navigating Device Parameters<br />
Devices listed in the Live List can be opened by selecting them from the list. Once a device is selected,<br />
the main menu of the device will be opened. The contents of the main menu and subsequent<br />
screens will vary dependant on the device manufacturer and model. However, the general layout<br />
and navigation of these screens is common to all devices. Below is an example of a typical device.<br />
The main menu of most devices will consist of a number of buttons which lead to various submenus,<br />
parameters and methods. Menus and Methods are represented by buttons. Selecting a<br />
menu button will open the corresponding sub-menu. Selecting a method button will execute the<br />
corresponding action.<br />
User editable fields are available for changing various parameters of the device. Editable variables<br />
will include either a text field denoted by a dotted underline or a drop-down list denoted by an arrow.<br />
Examples of this can be seen in the figure below. These variables can be edited by the user and<br />
sent to the device by selecting the “Send” button at the bottom of the screen.<br />
At the bottom of every sub-menu there is three buttons: “Send”, “Back”, and “Done”. The Send button<br />
will send any changes you have made to the editable fields of the current menu to the device.<br />
Once the send is complete, the values have been successfully sent to the device. The Back button<br />
will return you to the previous menu. The Done button will return you to the main menu of the device.<br />
Text Editable <strong>Field</strong><br />
Drop Down Menu<br />
Figure 8 - Typical Device Main Menu<br />
Figure 9 - Various Editable <strong>Field</strong>s<br />
© Smar Research Corporation 12 <strong>HPC401Plus</strong>GSG-1009
3.2.4 Device Drivers<br />
The HPC401 software is based on the Device Description Language (DDL). This language was<br />
created to offer a standardized method of detailing all the variables, commands and parameters of a<br />
specific device as well as to describe the basic menu structure and layout that the end user should<br />
see when communicating with a manufacturers device. Device description files are created by the<br />
device manufacturer and allow the device parameters and menus to be displayed and structured as<br />
the manufacturer intended. The HPC401 software builds on these DDL’s to offer compatibility with a<br />
range of <strong>HART</strong> devices directly from your Palm PDA.<br />
HPC401 is preloaded with all supported devices at the time of purchase. Accessing supported devices<br />
is as simple as selecting them from the Live List (for more information on polling for devices,<br />
see section 3.2.2). The various device parameters, menus and methods can then be accessed as<br />
designed by the manufacturer.<br />
Uninstalled or Unsupported Devices<br />
Occasionally a device may be found on the <strong>HART</strong> network that is either not installed on your Palm<br />
or is currently unsupported. When an uninstalled or unsupported device is found by HPC401, the<br />
software will display a message explaining such. An example of this message can be seen below in<br />
Figure 10. The message includes a device driver number. Devices may be requested to be added<br />
by sending this device driver number along with your full contact information to<br />
HPC401@<strong>smarresearch</strong>.com. Devices for which the device driver is not installed may still be<br />
accessed in generic mode via the HPC301 software. Please note, before requesting the addition of<br />
a device, check the HPC401 Device Driver Library located at www.<strong>smarresearch</strong>.com for the most<br />
up to date device drivers.<br />
Figure 10 -<br />
Uninstalled Device Screens<br />
© Smar Research Corporation 13 <strong>HPC401Plus</strong>GSG-1009
Adding a Device Driver to HPC401<br />
Device drivers may be added to the HPC401 in order to quickly and easily support new devices. To<br />
add a device driver to your HPC401, follow the steps below:<br />
To add a device driver to HPC401:<br />
1. Download the device driver file “mmddrr.prc” from the www.<strong>smarresearch</strong>.com HPC401 device<br />
driver library (or email) and save it to a location on your computer.<br />
2. Double click the *.prc file to have it added to your Palm Hotsync list.<br />
Note: The Palm desktop software must be installed on the computer.<br />
3. Connect your Palm to your computer to Hotsync.<br />
4. The new device driver is now downloaded to your Palm and available for use in HPC401.<br />
The HPC401 Device Driver files follow a naming convention of “mmddrr.prc” where:<br />
mm = <strong>HART</strong> Manufacturer Code<br />
dd = Device Coderr = Hardware Revision Code<br />
Adding Device Drivers from Card Backup<br />
Device drivers may be added to the HPC401 by selecting them from the card backup.<br />
To add device drivers to HPC401 from backup:<br />
1. Select Card Backup from your Palm handheld.<br />
2. Select the manufacturer you would like to backup from the available list. Note: Backups are<br />
listed in the format of the first five characters of the manufacturer name followed by the code in<br />
hexadecimal format.<br />
3. Select Restore | Partial Restore.<br />
4. Place a check next to the drivers desired and select Restore Checked.<br />
5. You will be prompted to restart the Palm.<br />
© Smar Research Corporation 14 <strong>HPC401Plus</strong>GSG-1009
3.3 HPCLogger<br />
The HPCLogger application adds the additional functionality of data logging to the HPC Suite.<br />
HPCLogger enables the user to log variables over time automatically or manually and store these<br />
variables for later trending or processing. The stored logs can be transferred easily to your PC for<br />
further processing.<br />
3.3.1 Starting HPCLogger<br />
To start HPCLogger, follow the steps below:<br />
1. Select the HPCLogger icon from the Palm application menu. This will open the application and<br />
bring you to the polling screen.<br />
2. The polling screen is common to all HPC Suite applications. Simply select the address, address<br />
range or tag of the device(s) you wish to poll for and select “Poll” (see section 3.2.2 for<br />
additional details regarding polling).<br />
3. After execution of the Poll, the list of devices found on the bus will be displayed.<br />
3.3.2 Selecting Logged Variables<br />
By default, the device variables that will be logged are the PV (primary device variable), PV%, Out<br />
(mA), and SV (secondary device variable). If the device supports command 33 of the <strong>HART</strong> specification,<br />
you alternatively have the option to log different variables.<br />
After you have started HPCLogger and polled for devices (see section 3.3.1) follow these steps to<br />
select non-default variables:<br />
1. Select a device from the Live List.<br />
2. Select the desired 4 variables to log from the 4 drop down menus on the Specific Monitor<br />
screen (Figure 11).<br />
3. Select “Done”.<br />
© Smar Research Corporation 15 <strong>HPC401Plus</strong>GSG-1009
NOTE:<br />
Only devices which support command 33 of the<br />
<strong>HART</strong> specification will support custom selection of<br />
logging variables. Devices which do not support this<br />
command will only log the default variables as described<br />
above and will not have access to the Specific<br />
Monitor screen.<br />
Figure 11 - Specific Monitor Screen<br />
3.3.3 Starting a Log<br />
To start logging:<br />
1. From the Live List screen, enter the desired sample time in minutes (Figure 12) .<br />
The default value is 1.<br />
2. Select the “Start Logging” button to go to the logging screen (Figure 13).<br />
3. From the logging screen you may select to automatically log or manually log the selected variables.<br />
Automatic logging will log the variables at the interval entered on the Live List screen,<br />
while manual logging requires the user to select each time the variables should be logged.<br />
To automatically log:<br />
4. Select the “Auto Log” button.<br />
5. Select the “Done” button when finished.<br />
© Smar Research Corporation 16 <strong>HPC401Plus</strong>GSG-1009
To manually log:<br />
4. Select the “Manual Log” button.<br />
5. Select the “Log Now” button repeatedly as desired (Figure 14).<br />
6. Select “Done” when finished.<br />
Figure 12 - Live List Screen Figure 13 - Logging Screen Figure 14 - Manual Logging<br />
3.3.4 Transferring Logs to a PC<br />
Once device variable data has been logged, this data can be transferred to your PC for further<br />
analysis. To transfer logs to a PC and view them, follow these steps:<br />
1. Install the Smar Conduit software onto your PC with the Palm Desktop software.<br />
The Conduit software is included on the Product CD and can also be downloaded from<br />
www.<strong>smarresearch</strong>.com.<br />
2. Execute a Hotsync between your Palm and your PC.<br />
3. The newly created data files will be located in the \\Datalogger directory<br />
of the PC. The naming convention for these log files are dMMDDXXXXXX.txt where:<br />
MM is the devices manufacturer code in hexadecimal format (for example, 3e for Smar)<br />
DD is the devices type code in hexadecimal format (for example, 01 for the LD301)<br />
XXXXXX is the devices serial number in hexadecimal format.<br />
© Smar Research Corporation 17 <strong>HPC401Plus</strong>GSG-1009
4. Open the text file in your preferred text editor.<br />
3.4 HPCGraph<br />
The HPCGraph application allows for the graphical trending of up to 4 variables simultaneously from<br />
any <strong>HART</strong> device. Graphs can be customized and saved for offline viewing. For instructions on how<br />
to use the various functions of HPCGraph, see the following sections.<br />
3.4.1 Starting HPCGraph<br />
To start HPCGraph, follow the steps below:<br />
1. Select the HPCGraph icon from the Palm application menu. This will open the application and<br />
bring you to the polling screen.<br />
2. The polling screen is common to all HPC Suite applications. Simply select the address, address<br />
range or tag of the device's) you wish to poll for and select “Poll” (see section 3.2.2 for<br />
additional details regarding polling).<br />
3. After execution of the Poll, the list of devices found on the bus will be displayed.<br />
3.4.2 Selecting Variables to Graph<br />
By default, the device variables that will be graphed are the Current, PV (primary variable), SV<br />
(secondary variable), and TV (tertiary variable). If the device supports command 33 of the <strong>HART</strong><br />
specification, the option to alternatively log different variables is available.<br />
After you have started HPCLogger and polled for devices (see section 3.3.1) follow these steps to<br />
select which variables will be graphed:<br />
1. Select a device from the Live List.<br />
2. Select the check boxes next to the variables you wish to graph. The color underneath each<br />
check box corresponds to the line color of the graph (Figure 15).<br />
© Smar Research Corporation 18 <strong>HPC401Plus</strong>GSG-1009
If the device supports command 33 of the <strong>HART</strong> specification, variables other than the default<br />
may be graphed by selecting the “Spec Monit” button. From the specific monitor screen, 4<br />
variables may be selected from the 4 drop down lists. Check the boxes for the variables you<br />
wish to graph (Figure 16).<br />
3. Select the “Graph” button when you are finished selecting the variables.<br />
NOTE:<br />
Only devices which support command 33 of the <strong>HART</strong> specification will support custom selection<br />
of graphing variables. Devices which do not support this command will only log the<br />
default variables as described above and will not have access to the Specific Monitor screen.<br />
NOTE:<br />
At any time during the<br />
variable selection, the<br />
“Device Status” button may<br />
be selected to view the<br />
current device status information.<br />
Figure 15 - Variable Selection<br />
Figure 16 - Specific Monitor<br />
© Smar Research Corporation 19 <strong>HPC401Plus</strong>GSG-1009
3.4.3 Using Graphs<br />
Once the graphing variables have been chosen and the “Graph” button has been selected, the<br />
graphing will proceed. An example of the graphing screen can be seen in Figure 17 along with descriptions<br />
of its various fields.<br />
Settings<br />
Button<br />
Start<br />
Button<br />
Stop<br />
Button<br />
Done<br />
Button<br />
Ymax<br />
Variable List<br />
Graphing<br />
Window<br />
Ymin<br />
Xmin<br />
X Axis Scroll Buttons<br />
Figure 17 - Graphing Screen<br />
Xmax<br />
Variable List - Located on the left side column, the variable list provides information for each of the 4<br />
graphed variables. The variable name, current value and line color is shown for each variable.<br />
Graph Window - This is the area where the 4 variables will be graphed. Each color corresponds to<br />
the appropriate variable in the Variable List.<br />
© Smar Research Corporation 20 <strong>HPC401Plus</strong>GSG-1009
Ymax,Ymin,Xmax,Xmin - The X & Y scale for the Graph Window is based upon the minimum and<br />
maximum values as shown by Ymax, Ymin, Xmax and Xmin respectively. To change the scale of<br />
the graph, select the “Settings” button.<br />
Settings Button - This button opens the setting screen where the scale of the graph can be changed<br />
(Figure 18). The values for the vertical scale (Ymax, Ymin) and the horizontal scale (Xmax, Xmin)<br />
can be edited here simply by entering a new value into the corresponding fields. Once you have<br />
entered the desired values, select “Done” to return to the graph screen. The graph will now reflect<br />
the scale that was entered.<br />
Start Button - This button will start the graphing of the selected variables.<br />
Stop Button - This button will stop the graphing of the selected variables.<br />
Done Button - To stop the graphing and exit the graphing screen, select this button. The graphed<br />
data will automatically be saved to the palm.<br />
X Axis Scroll Buttons - These two arrow shaped buttons will scroll the X axis in the corresponding<br />
direction. This is useful for graphs which have a large amount of trending data.<br />
Figure 18 - Settings Screen<br />
© Smar Research Corporation 21 <strong>HPC401Plus</strong>GSG-1009
3.4.4 Offline Graphing<br />
Graphing data which has been previously graphed is automatically stored to the Palm for later review.<br />
These “offline” graphs can be accessed from the polling screen. Follow these steps to open<br />
and view an offline graph:<br />
1. From the main polling screen of HPCGraph, select the “Offline Graphics” button.<br />
2. A list of all currently available offline graphs will be displayed (Figure 19). Select a file and it will<br />
be loaded (Figure 20). The offline graph files follow the following naming convention:<br />
dMMDDXXXXXXgf where:<br />
MM is the devices manufacturer code in hexadecimal format (for example, 3e for Smar)<br />
DD is the devices type code in hexadecimal format (for example, 01 for the LD301)<br />
XXXXXX is the devices serial number in hexadecimal format.<br />
3.5 HPC301<br />
Figure 19 - Offline Graphics File Selection<br />
Figure 20 - Offline Graphics<br />
The HPC301 software is a legacy piece of software which has been included in the HPC Suite for<br />
users whom have grown accustomed to the layout and structure of the HPC301 software. In addition,<br />
the HPC301 software can be used to access devices in generic mode which do not currently<br />
have a loaded Device Driver in HPC401. The usage of HPC301 is similar to HPC401. Simply poll<br />
for devices from the polling screen and navigate the device parameters. HPC301 can access any<br />
<strong>HART</strong> device in generic mode as well as fully support a collection of specific <strong>HART</strong> devices including<br />
the full line of Smar <strong>HART</strong> devices. For more information on the operation of the HPC301, refer<br />
to the HPC301 manual. To download a copy, visit www.<strong>smarresearch</strong>.com.<br />
© Smar Research Corporation 22 <strong>HPC401Plus</strong>GSG-1009
4. Troubleshooting<br />
Problem<br />
Possible Cause<br />
Possible Solution<br />
No Communication<br />
or<br />
Intermittent<br />
Communication<br />
Excessive noise or ripple.<br />
Low level signal.<br />
Insufficient loop resistance.<br />
Interface is not connected.<br />
<strong>Field</strong> device is not powered<br />
or polarity is reversed<br />
or insufficient loop<br />
current and voltage at the<br />
field device terminal.<br />
The Palm battery has<br />
been discharged past the<br />
normal range.<br />
More than one device<br />
using the same address.<br />
<strong>Field</strong> device configured in<br />
multi-drop mode. It is<br />
using an address other<br />
than zero.<br />
Place the HPC401 Interface leads across the<br />
resistor and check if communication is working.<br />
Verify field-wiring shield is grounded at one end<br />
only. Normally, the shield is grounded at the<br />
power supply side only.<br />
Add an additional 250-ohm resistor in series to the<br />
current loop.<br />
Refer to the Hardware Setup & Usage section of<br />
this manual.<br />
Verify power supply and field device.<br />
Recharge the Palm battery.<br />
Poll for device by TAG name rather than address.<br />
Disconnect one device, change the connected<br />
device address and reconnect the first device.<br />
Execute polling address operation scanning from<br />
address 1 to 15.<br />
© Smar Research Corporation 23 <strong>HPC401Plus</strong>GSG-1009
Troubleshooting<br />
Problem<br />
Palm no longer<br />
contains HPC401<br />
software<br />
Possible Cause<br />
Palm lost internal memory<br />
and reset. Battery<br />
fully drained.<br />
Possible Solution<br />
If you have Hotsynced with your PC, Hotsync to<br />
restore the HPC Suite software.<br />
If you have never Hotsynced your Palm, use the<br />
included Product CD to reinstall by selecting the<br />
“MEZ100 Setup”.<br />
Smar Research reserves the right to make changes to design and functionality of any product<br />
without notice. Smar Research does not assume any liability arising out of the application or use of<br />
any product. Smar Research, Technology Source, and the SRC logo are registered trademarks of<br />
Smar Research Corporation. The <strong>HART</strong>, <strong>Field</strong>bus, and Profibus Foundation logos are trademarks<br />
of their respective owners.<br />
Smar Research Corporation<br />
2110 5 th Ave.<br />
Ronkonkoma, NY USA 11779<br />
Tel: 631.737.3111 Fax: 631.737.3892<br />
sales@SmarResearch.com<br />
www.SmarResearch.com<br />
© Smar Research Corporation 24 <strong>HPC401Plus</strong>GSG-1009


